Зміст
- Передмова
- Подяки
- Про автора
- Копірайт та ліцензія
- Глава 1 Від нуля до розгортання
- Глава 2 Застосування Іграшка
- Глава 3Здебільше статичні сторінки
- Глава 4Ruby в стилі Rails
- Глава 5 Заповнення розміщень
- Глава 6 Моделювання користувачів
- Глава 7Реєстрація
- Глава 8 Вхід, вихід
- Chapter 9 Оновлення, відображення та видалення користувачів
- Глава 10 Активація рахунків та скидання паролю
- Глава 11 Мікропости користувача
- Глава 12 Слідування за користувачами
Передмова
Моя бувша компанія (CD Baby) була одною з перших, хто голосно перейшов на Ruby on Rails, та потім ми ще голосніше перейшли назад до PHP (пошукайте мене в Google щоб прочитати про цю драму). Ця книжка, написана Michael Hartl, була такою рекомендованою, що я стпробував її, та я використав Ruby on Rails Tutorialщоб знову повернутися назад до Rails.
Хоча я прокладав свій шлях через багато книжок про Rails, це є однією, що нарешті дозволила мені "спіймати" це. Все зроблене дуже багато ”шляхом Rails” — шляхом, що відчувався як дуже ненатуральний для мене раніше, але зараз, коли я подужав цю книжку, нарешті відчувається натуральнім. Це, також, одна книжка по Rails, що робить побудовану-на-тестах разробку весь час, підхід, дуже рекомендований експертами, але який ніколи не був так ясно продемонстрований до цього. Нарешті, включаючи Git, GitHub та Heroku в демонстраційні приклади, автор дійсно надає вам відчуття, що таке розробляти проект з реального світу. Приклади коду туторіала не знаходяться в ізоляції.
Лінійна начитка є дуже добрим форматом. Персонально я подужав Rails Tutorial за три довгі дні,1 роблячи всі приклади та виклики в кінці кожної глави. Пройдіть це від початку до кінця, без перестрибувань деінде, та ви отримаєте остаточний прибуток.
Насолоджуйтесь!
Derek Sivers (sivers.org) Founder, CD Baby
Подяки
Ruby on Rails Tutorial завдячує багато моїй попередній книжці про Rails, RailsSpace, і таким чином моєму співавтору Aurelius Prochazka. Я маю подякувати Aure як за працю, що він зробив над цією книжкою, та за його підтримку цієї також. Я також дякую Debra Williams Cauley, моєму редактору обох книжок, RailsSpace та Ruby on Rails Tutorial; доки вона братиме мене на бейсбольні ігри, доки я буду писатиму книжки для неї.
Я також вдячний великому списку рубістів, хто мав наснагу та надихав мене на протязі років: David Heinemeier Hansson, Yehuda Katz, Carl Lerche, Jeremy Kemper, Xavier Noria, Ryan Bates, Geoffrey Grosenbach, Peter Cooper, Matt Aimonetti, Mark Bates, Gregg Pollack, Wayne E. Seguin, Amy Hoy, Dave Chelimsky, Pat Maddox, Tom Preston-Werner, Chris Wanstrath, Chad Fowler, Josh Susser, Obie Fernandez, Ian McFarland, Steven Bristol, Pratik Naik, Sarah Mei, Sarah Allen, Wolfram Arnold, Alex Chaffee, Giles Bowkett, Evan Dorn, Long Nguyen, James Lindenbaum, Adam Wiggins, Tikhon Bernstam, Ron Evans, Wyatt Greene, Miles Forrest, гарні люди з Pivotal Labs, команда Heroku, хлопці з thoughtbot, та бригада GitHub. Нарешті, багато, багато читачів — дуже багато, щоб перерахувати — робили внесок величезну кількість повідомлень про помилки на протязі намисання цієї книжки, і я з пошаною дякую їм за допомогу зробити її настільки гарною, наскільки вона може бути.
Про автора
Michael Hartl є автором Ruby on Rails Tutorial, одного з провідних введень до веб розробки, та співзасновником Softcover, платформи самодруку. Його ранішній досвід включає написання та розробку RailsSpace, вкрай застарілої книжки по Rails, та розробку Insoshi, колись популярної, а тепер застарілої платформи для соціальних мерж на Ruby on Rails. В 2011мі році Michael отримав відзнаку Ruby Hero Award за його вклад в співтовариство Ruby. Він отримав диплом в Harvard College, має Ph.D. in Physics від Caltech, та є вихованцем ентерпренійської програми Y Combinator.
Копірайт та ліцензія
Ruby on Rails Tutorial: Learn Web Development with Rails. Copyright © 2014 by Michael Hartl. All source code in the Ruby on Rails Tutorial is available jointly under the MIT License and the Beerware License.
The MIT License

Copyright (c) 2014 Michael Hartl

Permission is hereby granted, free of charge, to any person obtaining a copy
of this software and associated documentation files (the "Software"), to deal
in the Software without restriction, including without limitation the rights
to use, copy, modify, merge, publish, distribute, sublicense, and/or sell
copies of the Software, and to permit persons to whom the Software is
furnished to do so, subject to the following conditions:

The above copyright notice and this permission notice shall be included in
all copies or substantial portions of the Software.

THE SOFTWARE IS PROVIDED "AS IS", WITHOUT WARRANTY OF ANY KIND, EXPRESS OR
IMPLIED, INCLUDING BUT NOT LIMITED TO THE WARRANTIES OF MERCHANTABILITY,
FITNESS FOR A PARTICULAR PURPOSE AND NONINFRINGEMENT.  IN NO EVENT SHALL THE
AUTHORS OR COPYRIGHT HOLDERS BE LIABLE FOR ANY CLAIM, DAMAGES OR OTHER
LIABILITY, WHETHER IN AN ACTION OF CONTRACT, TORT OR OTHERWISE, ARISING FROM,
OUT OF OR IN CONNECTION WITH THE SOFTWARE OR THE USE OR OTHER DEALINGS IN
THE SOFTWARE.
/*
 * ----------------------------------------------------------------------------
 * "THE BEERWARE LICENSE" (Revision 43):
 * Michael Hartl wrote this code. As long as you retain this notice you
 * can do whatever you want with this stuff. If we meet some day, and you think
 * this stuff is worth it, you can buy me a beer in return.
 * ----------------------------------------------------------------------------
 */
- Це не типово! Проходження цілої книжки зазвичай займає muchдовше ніж три дні. ↑
Глава 1 Від нуля до розгортання
Ласкаво просимо до Ruby on Rails Tutorial: Learn Web Development with Rails. Призначенням цієї книжки є навчити вас, як розробляти власні веб застосування, та нашим обраним інструментом є популярний веб фреймворк Ruby on Rails. Якщо ви нові в цьому предметі, Ruby on Rails Tutorial дасть вам наскрізне введення в розробку веб застосувань, включаючи базове підгрунтя в Ruby, Rails, HTML & CSS, базах даних, управлінні версіями, тестуванні та розгортанні — достатньо для запуску вас в кар’єрі веб розробника або технологічного антрепренера. З другого боку, якщо ви вже знаєте веб розробку, це книжка швидко навчить вас основам фреймворку Rails, включаючи MVC та REST, генератори, міграції, маршрутування та вбудований Ruby. В кожному разі, коли ви закінчите Ruby on Rails Tutorial, ви отримаєте досить, щоб мати вигоди від значно більшої кількості книжок, блогів та скринкастів, що є частиною процвітаючої екосистеми проміської освіти.
Ruby on Rails Tutorialобирає інтегрований підхід до веб розробки, будуючи три приклада застосувань зі зростаючою складністю, починаючи з мінімального застосування hello(Розділ 1.3), трохи більш спроможного застосування toy(Глава 2), та реального застосування sample (Глава 3 до Глава 12). Як випливає з їх загальних імен, застосування, розроблені в Ruby on Rails Tutorial не є специфічними для окремого типу веб сайту; хоча останнє просте застосування буде забирати більше, ніж надавати перевтілення окремого популярного соціального сайту мікроблогів (сайта, який випадково також був з початку написаний на Rails), наголос продовж викладання робиться на загальних принципах, так що ви будете мати надійну основу, безвідносно, який тип веб застосування ви будуєте.
Одне загальне питання, це як багато підгрунтя треба, щоб навчитися веб розробці за допомогою Ruby on Rails Tutorial. Як обговорюється більш детально в Розділі 1.1.1, веб розробка є складним предметом, осообливо для повних початківців. Хоча цей підручник був спочатку розроблений для читачів з деяким попереднім досвідом програмування або веб розробки, фактично вона знайшла значну аудиторію серед розробників-початківців. Щоб відзначити це, нагальна, третя редакція Rails Tutorial робить декілька важливих кроків, щоб знизити бар’єр початку роботи з Rails (Врізка 1.1).
Ця, третя редакція Ruby on Rails Tutorial націлена на зниження бар’єру до початку роботи з Rails в декілька шляхів:
- Використання стандартного оточення розробки в хмарі (Розділ 1.2), що обходить багато проблем, асоційованих з встановкою та конфігурацією нової системи
- Використання "стеку по замовчанню" Rails, включаючи вбудований фреймворк тестування MiniTest
- Уникнення багатьох зовнішніх залежностей (RSpec, Cucumber, Capybara, Factory Girl)
- Полегшений та більш гнучкий підхід до тестування
- Відкладання або уникнення більш складних опцій конфігурації (Spork, RubyTest)
- Менше наголосу на можливостях, специфічних до кожної окремої версії Rails, з більшим наголосом на головних принципах веб розробки
Моя надія полягає в тому, що ці зміни зроблять третю редакцію Ruby on Rails Tutorial доступною для навіть ширшої аудієнції, ніж попередні версії.
В цій першій главі ми розпочнемо з Ruby on Rails,
встановивши необхідне програмне забезпечення та налаштувавши
неше оочення робробки (Розділ
1.2).
Ми будемо створювати наше перше Rails застосування, що
називається hello_app.
Rails Tutorialнаголошує на добрих практиках
розробки програмного забезпечення, так що безпосередньо
після створення нашого нового та свіжого проекту Rails, ми
підпорядкуємо його контролю версій Git (Розділ 1.4). Та, вірите або ні, в
цій главі ми навіть викладено наше перше застосування у
великий веб через розгортання його в промисловому
середовищі (Розділ
1.5).
В Главі 2,
ми зробимо другий проект, чиє призначення буде демонструвати
базові роботи в застосуванні Rails.
Щоб швидко почати роботу, ми побудуємо це іграшкове
застосування (що називається toy_app) з
використанням підпорок (Врізка
1.2) щоб згенерувати код;
оскільки цей код буде однаково бридким та складним, Глава 2
буде фокусуватись на взаємодії з іграшковим застосуванням
через його URI (що їх часто називають URL)2
з використанням веб браузера.
Решта підручника фокусується на розробці одного великого реального
прикладу застосування (що називається sample_app),
записуючи
весь код з самого початку.
Ми розробимо просте застосування, використовуючи моделі
(mockups), базовану на тестуванні розробку
(TDD), та інтеграційні тести.
Ми почнемо в Главі
3 зі створення статичних
сторінок, та потім додамо трохи динамічного вмісту. Ми
зробимо швидкий відступ в Главі 4,
щоб вивчити трохи про мову Ruby під Rails.
Потім, в Главі
5 і до Глави 10,
ми будемо завершувати основи нашого застосування, роблячи
розміщення сайту, створюючи модель користувача, та повну
систему реєстрації та аутентифікації (включаючи
активацію рахунків та скидання паролів).
Нарешті, в Главі
11 та Главі 12 ми
додамо мікроблоггінг та соціальні можливості, щоб зробити
робочий сайт-приклад.
З самого початку Rails отримував переваги від відчутного
почуття захвату, починаючи від 15-хвилинного відео з велболгу Rails
створювача David Heinemeier Hansson.
Це відео та його послідовники є чудовим шляхом відчути
потужність Rails, і я рекомендую передивитись їх.
Але будьте попереджені: вони досягають своїх чудових
п’ятнадцятихвилиних досягнень за допомогою можливісті, що
називається підпорки (scaffolding), що дуже
покладається на згенерований код, магічно
створений через команду Rails generate scaffold.
Коли пишешь підручник з Ruby on Rails, є спокуса покластися на цей підхід ціх підпорок — це швидше, простіше, більш привабливо. Яле складність та випадкова кількість коду в підпорках може стати повністю спантеличливою для початкового розробника на Rails; ви можете біти в змозі використовувати їх, але ви вірогідно не будете їх розуміти. Слідуя підходу підпорок ви ризикуєте перетворитися в віртуозного генератора скриптів, з малим (та крихким) дійсним знанням Rails.
В Ruby on Rails Tutorial, ми приймаємо (майже) полярно протилежний підхід: хоча Глава 2 буде розробляти мале іграшкове застосування з використання підпорок, основа Rails Tutorialє застосування-приклад, що ми почнемо писати в Главі 3. На кожній стадії розробки застосування-приклада ми будемо писати малий, строго відмірянийшматок коду — досить простий, щоб зрозуміти, та досить новаторський, щоб кидати виклик. Камулятивний ефект буде глибше, більш гнучке знання Rails, надаючи вам гарне підгрунтя для написання майже любого типу веб застосування.
1.1 Вступ
Ruby on Rails (або коротше “Rails”) є фреймворком веб розробки, написаний на мові програмування Ruby. Від дебюту в 2004, Ruby on Rails швидко став одним з найбільш потужних та популярних інструментів для побудови динамічних веб застосувань. Rails використовується такими різними компаніями, як Airbnb, Basecamp, Disney, GitHub, Hulu, Kickstarter, Shopify, Twitter та Yellow Pages. Також багато студій веб дизайну, що спеціалізуються на Rails, такі як ENTP, thoughtbot, Pivotal Labs, Hashrocket та HappyFunCorp, і додайте незалежних консультантів, тренерів та контракторів.
Що робить Rails таким величним? Зпершу, Ruby on Rails є на 100% відкритим кодом, доступним під дозвільною MIT License, та як результат, також нічого не коштує завантажити та встановити його. Rails також завдячний більшості свого успіху свому елегантному та компактному дизайну; використовуючи здатність пристосовуватись своєї підлеглої мови Ruby, Rails ефективно створює домен-специфічну мову для написання веб застосувань. В результаті багато загальних завдань веб програмування — такі, як генерування HTML, створеня моделей даних, та маршрутування URL — є простими з Rails, а результуючий код застосування компактний та змістовний.
Rails також швидко адаптується до нових розробок в веб технолгії та дизайні фреймворків. Наприклад, Rails був одним з перших фреймворків, що повністю сприяв та реалізував архітектурний стиль REST для структурування веб застосувань (що ми вивчимо в ході проходження цього підручника). Та коли інші фреймворки розробляють успішні нові технолгії, творець Rails David Heinemeier Hansson та команда Rails core team не вагаючись вбудовують їх ідеї. Можливо, найбільш драматичним прикладом є злиття Rails та Merb, конкуруючого веб фреймворка на Ruby, так що Rails тепер виграє від модулярного дизайнуMerb, стабільного API, та покращеної продуктивності.
Нарешті Rails виграє від незвичайно енергійної та розгалуженої спільноти. Результати включають сотні надсилачів відкритого коду, гарно влаштовані конференції, карколомну кількість gems (самодостатніх рішень для специфічних проблем, таких, як розбивка на сторінки або завантаження зображень), багату різноманіть інформатиіних блогів, та ріг достатку дискусійних форумів та каналів IRC. Велика кількість програмістів на Rails також спрощує обробку невідворотних помилок застосувань: алгоритм “шукай в Google код помилки” майже завжди продукує релевантний пост блогу або потік дискусійного форуму.
1.1.1 Попередні вимоги
Немає формальних попередніх вимог для цієї книжки — Ruby on Rails Tutorialмістить інтегрований курс не тільки для Rails, але також для підлеглої мови Ruby, тестового фреймворку Rails по замовчанню (MiniTest), командного рядка Unix, HTML, CSS, невеликої кількості JavaScript, та навіть трохи SQL. Є багато матеріалу для засвоєння, тим не менш, та я загалом рекомендую мади деякий досвід в HTML та програмуванні, перет тим, як розпочати цей курс. Кажучи так, велика кількість початківців використовують Ruby on Rails Tutorial для вивчання веб розробки з самого початку, так що навіть якщо ви маєте обмежений досвід, я рекомендую зробити спробу. Якщо ви почуваєтесь спантеличеним, ви завжди можете повернутись назад, та почати з одного з ресурсів, перелічених нижче. Інша стратегія, рекомендована багатьма читачами, це просто пройте цей курс двічі; ви можете здивуватись, як багато ви вивчили за перший раз (та наскільки легше робити це вдруге).
Одне велике питання, коли вивчають Rails, це чи слід спочатку вивчати Ruby. Відповідь залежить від вашого персонального стилю навчання та наскільки багато досвіду програмування ви вже маєте. Якщо ви звикли вивчати все систематично, з початку і до кінця, або коли ви ніколи не програмували до цього, тоді вивчення Ruby спочатку може добре спрацювати для вас, і в цьому випадку я рекомендую Learn to Program від Chris Pine та Beginning Ruby від Peter Cooper. З другого боку, багато починаючих розробників на Rails захоплені можливістю створювати вебзастосування, і скоріше не чекатимуть, щоб завершити цілу книжку по Ruby, перед тим, як написати одну веб сторінку. В цьому разі я рекомендую слідувати короткому інтерактивному курсові на Try Ruby3Rails Tutorial. Якщо ви знайшли цей курс дуже складним, іи можете спробувати почати з Learn Ruby on Rails від Daniel Kehoe або One Month Rails, обі з яких більше націлені на повних початківців, чим Ruby on Rails Tutorial.
В кінуі курсу, не важливо де ви почали, ви будете готові для значно більшої кількості середніх та складних ресурсів Rails за рамками цієї книжки. Осб деякі, що я практично рекомендую:
- Code School: Добрі інтерактивні курси програмування онлайн
- Turing School of Software & Design: повний час, 27 тижнів програма тренінгу в Denver, Colorado, з $500 снижкою для читачів Rails Tutorial, використовуючи код RAILSTUTORIAL500
- Tealeaf Academy: Добрий оналйн розробницький буткамп Rails (включає ускладнений матеріал)
- Thinkful: Онлайн клас, що поєднує вас з професійним інженером по мірі просівання по базованому на проектах розкладу
- Pragmatic Studio: Онлайн курси Ruby and Rails від Mike та Nicole Clark. Разом з автором Programming Ruby Dave Thomas, Mike започаткував перші курси по Rails, що я відвідував в далекому 2006му році.
- RailsCasts від Ryan Bates: Чудові (здебільше безкоштовні) скринкасти з Rails
- RailsApps: Велика різноманіть деталізованих, розібраних по темах проектів Rails та курсів
- Rails Guides: По темах, та завжди оновлені довідники з Rails
1.1.2 Домовленості в цій книжці
Домовленості в цій книжці загалом пояснюють самі себе. В цьому розділі я зупинюсь на тих, що можуть викликати питання.
Багато прикладів в цій книжці використовують команди командного рядка. Для спрощення всі приклади командного рядка використовують підказку командного рядка в стилі Unix (знак долараa dollar sign), як тут:
$ echo "hello, world"
hello, world
Як зазначається в Розділі
1.2, я рекомендую, щоб
користувачі всіх операційних систем (особливо Windows)
використовували хмарне оточення розробки (Розділ 1.2.1),
що іде з вбудованим командним рядком Unix (Linux).
Це, крім іншого, корисно, оскільки Rails іде з багатьма
командами, що можуть виконуватись в командному рядку.
Наприклад, в Розділі
1.3.2 ми виконуємо
локальний веб сервер розробки за допомогою команди rails
server:
$ rails server
Як і з підказкою командного рядка, Rails Tutorial
використовує домовленість Unix для роздільників каталогів
(тобто звичайний слеш /).
Наприклад, приклад застосування production.rb
має файл конфігурації в такому вигляді:
config/environments/production.rb
Цей шлях файлу має розумітись як відносний до корньового каталогу застосування, що буде відрізнятися в різних системах; в хмарній IDE (Розділ 1.2.1він виглядатиме так) :
/home/ubuntu/workspace/sample_app/
Таким чином, повний шлях до production.rb
буде
/home/ubuntu/workspace/sample_app/config/environments/production.rb
Для скорочення я типово оминаю шлях застосування,
та пишу тільки config/environments/production.rb.
Rails Tutorial часто показує вихід різних програм (команд оболонки, статусі контроля версій, програм Ruby, таке інше). Оскільки є незліченні малі відмінності міжрізними комп’ютерними системами, вихід, що ви бачите, мож ене завжди точно співпадати з показаним в тексті, але це не є причиною для стурбованості. На додаток, деякі команди можуть продукувати помилки, в залежності від вашої системи; скоріше ніж спробувати завдання Sisyphean по документуванню всіх таких помилок в цьму курсі, я делегую це алгоритму “пошукай повідомлення про помилку в Google”, що, окрім іншого, є гарною практикою для розробки програмного забезпечення в реальному світі. Якщо ви отримали любі проблеми, слудуя цьому курсу, я рекомендую проконсультуватися з ресурсами, переліченими в Rails Tutorial help section.4
Оскільки Rails Tutorial покриває тестування застосувань Rails, часто є корисним, чи буде якісь з фрагментів коду викликати збій тестової сюїти (на що вказує червоний колір) або пройде (на зо вказує зелений колір). По домовленості код, що буде викликати збій тесту, вказується червоним, тоді як код, що проходитиме тест, вказується чк зелений.
Кожна глава в цьому курсі включає розділ Вправи, виконання яких необов’язкове, але рекомендоване. Щоб утримувати загальну дискусію незалежоною від вправ, рішення загалон не включаються в подальші лістинги коду. В рідких випадках, коли рішення використовується в подальшому, воно явно вирішується в головному тексті.
Нарешті, для зручності Ruby on Rails Tutorial адаптує дві домовленості, розроблені для того, щоб дільшість прикладів коду було легше зрозуміти. Перше, деякі лістинги коду включають один або більше підсвічених рядків, як показано нижче:
class User < ActiveRecord::Base
validates :name, presence: true
validates :email, presence: true
end
такі підсвічені рядки типово вказують найбільш важливий новий код в наданому прикладі, та часто (хоча і не однак) представляють різницю між представленим лістингом коду, та попереднім лістингом. Друге, для скорочення та простоти багато лістингів коду в книжці включають вертикальні крапки, як наведено нижче:
class User < ActiveRecord::Base
.
.
.
has_secure_password
end
Ці крапки представляють пропущений код та не мають копіюватися буквально.
1.2 До роботи
Навіть для досвідчених розробників Rails, встановлення Ruby, Rails, та всього асоційованого програмного забезпечення може бути вправою з розчарування. Загальна проблема полягає в великій кількості оточень: різні операційні системи, номери версій, налаштування текстових редакторів та інтегрованих оточень розробки (IDE), таке інше. Користувачі, хто вже мають налаштоване оточення розробки, встановлене на їх локальній машині, запрошуються до використання їх улюбленого налаштування, але (як зазначається у Врізці 1.1) нові користувачі заохочуються оминути таке встановлення та проблеми конфігурування, використовуючи хмарне інтегроване оточення розробки. Хмарне IDE робить в звичайному веб браузері і, таким чином, робить однаково між різними платформами, що особливо корисно для операційних систем (таких як Windows), на яких розробка Rails є складною з історичних причин. Якщо, не зважаючи на пов’язані виклики, ви все ще бажаєте звершити Ruby on Rails Tutorial з використанням локального оточення розробки, я рекомендую наступні інструкції на InstallRails.com.5
1.2.1 Оточення розробки
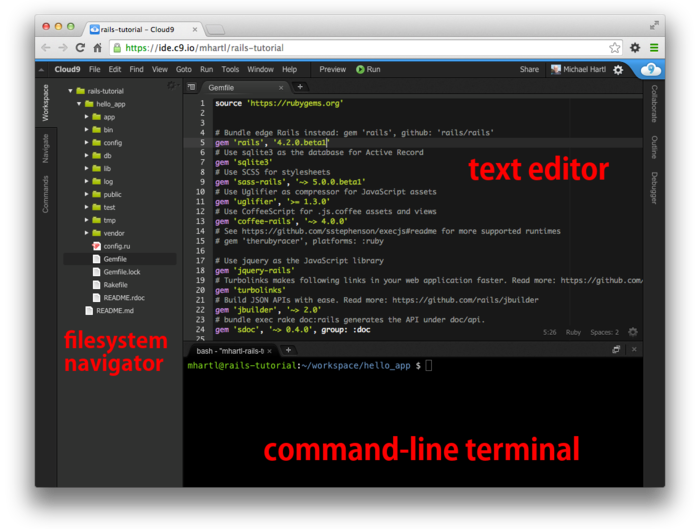
Зважаючи на різні ідіосинкразичні настроювання, можливо є стільки оточень розробки, як і програмістів на Rails. Щоб уникнути ціх складностей, Ruby on Rails Tutorial стандартизується на чудовому хмарному отченні розробки Cloud9. Зокрема, для цієї третьої редакції я радий бути партнером Cloud9, та запропонувати оточення розробки, спаціально скроєне для птреб цього курсу. Результуючий робочий простір Rails Tutorial Cloud9 надходить попередньо налаштованим з більшістю потрібного програмного забезпечення для професійної розробки на Rails, включаючи Ruby, RubyGems, Git. (Поза це, єдина велика частина программного забезпечення, що ми встановимо окремо, є сам Rails, і це зроблено навмисно (Розділ 1.2.2).) Хмарна IDE також включає три базові компоненти, потрібні для розробки веб застосувань: текстовий редактор, навігатор файлової системи, та термінал командного рядка (Малюнок 1.1). Поміж інших можливостей, текстовий редактор хмарної IDE підтримує глобальний пошук “Find in Files”, що я вважаю за основу для навігації любого великого проекту Ruby or Rails.6 Нарешті, навіть якщо ви прийняли рішення не використовувати виключно хмарний IDE в реальному житті (і я рекомендую вам вивчити інші тулкіти також), він провадить чудове введення в загальні можливості текстових редакторів та інших інструментів розробки.
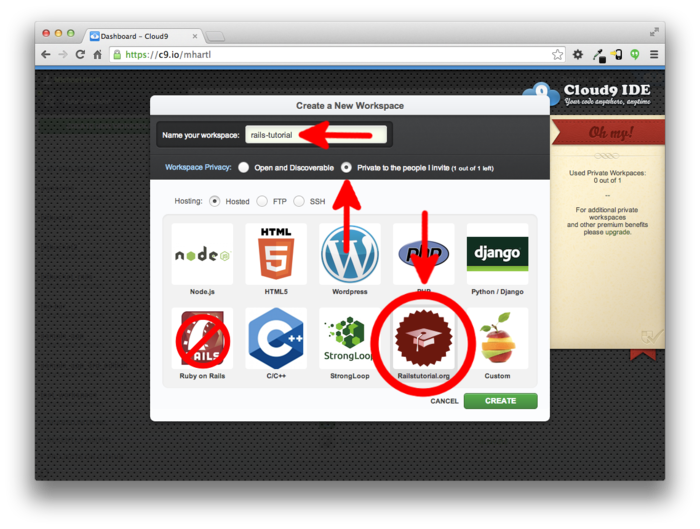
Ось кроки для початку з хмарним оточенням розробки:
- Безкоштовно зареєструйтеся на Cloud97
- Клацніть на “Go to your Dashboard”(насправді це лівий сайдбар, прим. перекладача)
- Оберіть “Create New Workspace”
- Як змальовано на Малюнку 1.2, створіть робочий простір з назвою “rails-tutorial” (не “rails_tutorial”), встановіть його як “Private to the people I invite” (Приватний для запрошених людей), та виберіть іконку для Rails Tutorial (неіконку для Ruby on Rails)
- Нажміть “Create”(Створити)
- Коли Cloud9 завершить налаштування робочого постору, оберіть та клацніть “Start editing”(Почати редагування).
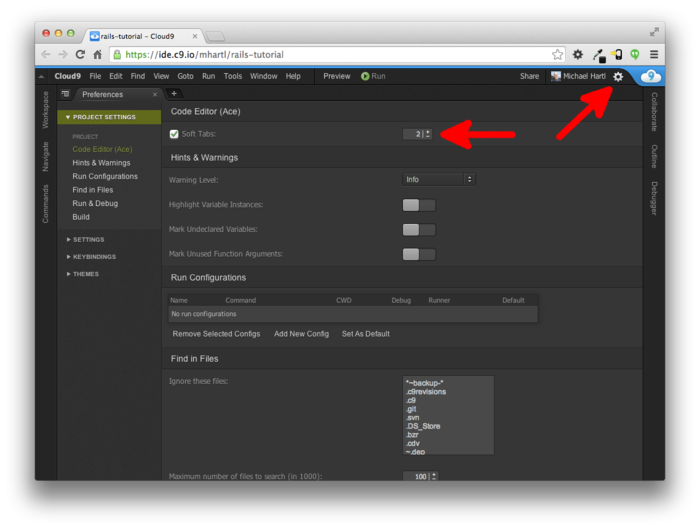
Оскільки використання двох проміжків для відступів є майже універсальною домовленостю в Ruby, я також рекомендую змінити редактор для використання двох проміжків, замість чотирьох по замовчанню. Як показано на Малюнку 1.3, ви можетее зробити це, клацнувши на іконці шестерні в верхньому правому кутку, та потім обрати “Code Editor (Ace)”, щоб змінити налаштування “Soft Tabs”. (Зауважте, що це набувє чинності беспосередньо; вам не треба натискати на кнопку “Save”).
1.2.2 Встановлення Rails
Оточення розробки з Розділу 1.2.1
включає все програмне забезпечення, що нам треба для
початку, окрім самого Rails.8Щоб встановити Rails,
ми використаємо команду gem, надану
менеджером пакунків RubyGems, що включає
друкування команди, показаної в Лістингу 1.1
в вашому терміналі командного рядка.
(Якщо ви розробляєте на вашій локальній системі, це
означає звичане вікно терміналу; якщо це хмарне IDE, це
означає використання інструменту командного рядка,
показаного на Малюнку
1.1.)
$ gem install rails -v 4.2.0
Тут флаг -v дає впевненість, що буде
встановлена вказана версяія Rails, що є важливим для
отримання результатів, співпадаючих з цім підручником.
1.3 Перше застосування
Слідуя довгій традиції програмування комп’ютерів, наша мета для нашого першого застосування є написання програми “hello, world”. Зокрема, ми створимо просте застосування, що відображує рядок “hello, world!” на веб сторінці, обоє, в нашому оточенні розробки (Розділ 1.3.4) та в справжньому веб (Розділ 1.5).
Практично всі застосівання Rails починають однаковим
шляхом, виконанням команди rails new.
Це корисна команда створює скелет Rails застосування в
обраному вами каталозі.
Щоб почати, користувачі, що невикористовують
Cloud9 IDE, рекомендовану в Розділі 1.2.1,
повинні створити каталог робочого простору для
ваших проектів Rails, якщо він ще не існує (Лістинг 1.2)
та перейти в цей каталог.
(Лістинг
1.2 використовує команди Unix
cd та mkdir; дивіться Врізку 1.3,
якщо ви ще не вільно володієте ціми командами).
робочого
простору (workspace)$ cd # Переходимо в домашній каталог
$ mkdir workspace # Створюємо робочій простір
$ cd workspace/ # Переходимо в каталог пробочого простору
Для читачів, що прийшли з Windows або (в меншій, але достатньо значній мірі) з Macintosh OS X, командний рядок Unix може бути незнайомим. На щастя, якщо ви використовуєте рекомендоване оточення хмари, ви автоматично маєте доступ до командного рядка Unix (Linux), що виконує стандартну оболонку інтерфейса командного рядка, відому як Bash.
Базова ідея командного рядка проста: надаючи короткі команди, користувач може виконувати велике різномаїття операцій, таких, як створення каталогів (mkdir), переміщення або копіювання файлів (mv та cp), або мандрування файловою системою, змінюючи каталоги (cd). Хоча командний рядок може видаватись примітивним для користувачів, що здебільшо знайомі з графічним інтерфейсом користувача (GUIs), зовнішність оманлива: командний рядок є одним з найбільш потужних інструментів в розпорядженні розробника. Запевняю, що ви рідко побачите робочий стіл досвідченого розробника без декількох відкритих вікон термінала, де запущені командні оболонки.
Основний предмет глибокий, але для потреб цього курсу нам треба тільки трохи найбільш загальних команд Unix для командного рядка, як підсумовано в Таблиці 1.1. Для більш глибинного занурення в командний рядок Unix, дивіться Conquering the Command Line від Mark Bates (доступно як fбезкоштовна онлайн версія та як електронна книга та скринкаст).
| Опис | Команда | Приклад |
| друкувати вміст каталогу | ls | $ ls -l |
| створити каталог | mkdir <dirname> | $ mkdir workspace |
| змінити каталог | cd <dirname> | $ cd workspace/ |
| перейти на рівень вище | $ cd .. |
|
| перейти додому | $ cd ~ або просто
$ cd |
|
| перейти відносно ~ | $ cd ~/workspace/ |
|
| перемістити файл (або перейменувати) | mv <source> <target> | $ mv README.rdoc
README.md |
| копіювати файл | cp <source> <target> | $ cp README.rdoc
README.md |
| видалити файл | rm <file> | $ rm README.rdoc |
| видалити пустий каталог | rmdir <directory> | $ rmdir workspace/ |
| видалити непустий каталог | rm -rf <directory> | $ rm -rf tmp/ |
| зтулити та друкувати вміст файлів | cat <file> | $ cat ~/.ssh/id_rsa.pub |
Наступний крок для обох, локальних файлових систем та
хмарного IDE є створення першого застосування з
використанням команди з Лістингу
1.3.
Зауважте, що Лістинг
1.3 явно включає номер версії
Rails (_4.2.0_) як частину команди.
Це дає впевненість, що використовується та ж версія Rails,
що ми встановили в Лістингу
1.1, для створення структури
файлів нашого першого застосування. (Якщо команда в Лістингу 1.3
повертає помилку, на кшталт “Could not find ’railties”’, це
означає, що ви не маєте потрібної встановленої Rails, та вам
потрібно ще раз перевірити, що ви слідували командам з Лістингу 1.1 точно по написаному).
rails new
(з вказанням номеру версії). $ cd ~/workspace
$ rails _4.2.0_ new hello_app
create
create README.rdoc
create Rakefile
create config.ru
create .gitignore
create Gemfile
create app
create app/assets/javascripts/application.js
create app/assets/stylesheets/application.css
create app/controllers/application_controller.rb
.
.
.
create test/test_helper.rb
create tmp/cache
create tmp/cache/assets
create vendor/assets/javascripts
create vendor/assets/javascripts/.keep
create vendor/assets/stylesheets
create vendor/assets/stylesheets/.keep
run bundle install
Fetching gem metadata from https://rubygems.org/..........
Fetching additional metadata from https://rubygems.org/..
Resolving dependencies...
Using rake 10.3.2
Using i18n 0.6.11
.
.
.
Your bundle is complete!
Use `bundle show [gemname]` to see where a bundled gem is installed.
run bundle exec spring binstub --all
* bin/rake: spring inserted
* bin/rails: spring inserted
Як ви бачите в кінці Лістингу
1.3, виконання rails
new автоматично виконує команду bundle
install, після того, як створення файлі завершено. ми обсудимо що це
означає більш детально, починаючи з Розділу 1.3.1.
Зауважте, як багато файлів та каталогів створює
команда rails.
Це стандартна структура файлів та каталогів (Малюнок 1.4)
є однією з багатьох переваг Rails; він безпосередньо
переносить вас з нуля до функціонального (хоча б і
мінімального) застосування.
Більше того, оскільки структура є загальною для всіх
застосувань Rails, ви можете безпосередньо отримати
орієнтир, дивлячись на чийсь код.
Підсумок файлів по замовчанню Rails наводиться в Таблиці 1.2;
ми вивчимо призначення більшості з ціх файлів та каталогів
впродовж цієї книги.
Зокрема, починаючи з Розділу 5.2.1
ми обсудимо каталог app/assets, частину конвеєру
активів, що робить простішим, чим коли б не було,
організувати та розгорнути активи, такі, як каскадні листи
стилів та файли JavaScript.
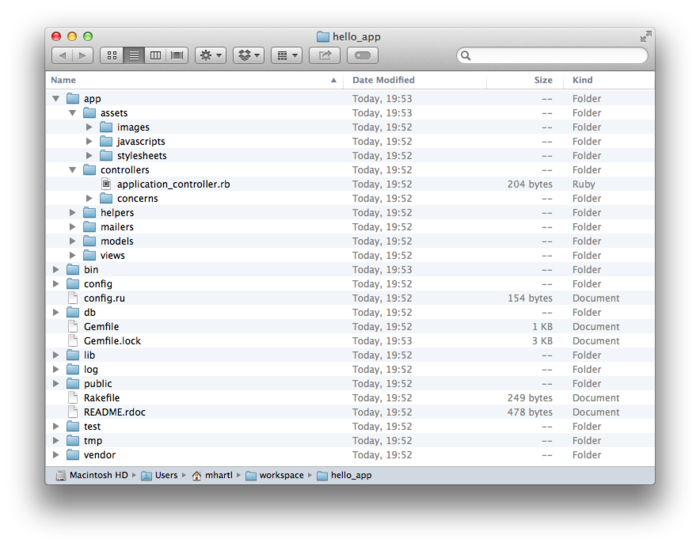
| Файл/Каталог | Призначення |
app/ |
Базовий код застосування, включаючи моделі, вигляди, контролери та допоміжники |
app/assets |
Активи застосування. такі, як каскадні листи стилів (CSS), файли JavaScript та зображення |
bin/ |
Двійникові виконавчі файли |
config/ |
Конфігурація застосування |
db/ |
Файли бази даних |
doc/ |
Документація застосування |
lib/ |
Бібліотечні модулі |
lib/assets |
Активи бібліотек, такі як каскадні листи стилів (CSS), файли JavaScript та зображення |
log/ |
Файли журналів застосування |
public/ |
Публічно доступні файли (через веб браузер), такі як сторінки помилок |
bin/rails |
Програма для генерації коду, відкриття консольних сессій або запуску локального серверу |
test/ |
Тести застосування |
tmp/ |
Тимчасові файли |
vendor/ |
Third-party code such as plugins and gems |
vendor/assets |
Сторонні активи, такі, як каскадні листи стилів (CSS), файли JavaScript та зображення |
README.rdoc |
Короткий опис застосування |
Rakefile |
Службові завдання, досяжні
через команду rake |
Gemfile |
Залежності Gem для застосування |
Gemfile.lock |
Список gems, що використовуються для впевненості, що всі копіїзастосування використовують ті ж версії |
config.ru |
Файл конфігурації для Rack middleware |
.gitignore |
Шаблони для файлів, що мають бути ігноровані Git |
по замовчанню
1.3.1 Bundler
Після створення нового застосування Rails, наступним
кроком є використання Bundlerдля встановлення та
включення gems, потрібних для застосування.
Як коротко зазначено в Розділі 1.3,
Bundler виконується автоматично (через bundle
install) командою rails, але в
цьому розділі ми зробимо деякі зміни до gems застосування
по замовчанню, та виконаємо Bundler знову.
Це включає відкриття файлу Gemfile в
текстовому редакторі.
(З хмарним IDE, це включає клацання на стрілці в
навігаторі для відкриття каталогу застосування, да
подвійне клацання на іконці Gemfile).
Хоча точні номери версій та деталі можуть трохи
відрізнятися, результат повинен виглядати дещо подібно
до Малюнку
1.5 та Лістингу 1.4. (Код в цьому файлі є
Ruby, але не турбуйтесь на цей момент щодо синтаксису; Глава 4 пояснює Ruby з більшою
глибиною). Якщо файл та каталоги не з’являються, як
показано на Малюнку
1.5, клацніть на
навігаційній шестерні та оберіть “Refresh File Tree”
(Оновити дерево каталогів).
(Як головне правило, ви маєте оновити файлове дерево
кожного разу, коли файли або каталоги не виглядають так,
як очікується).
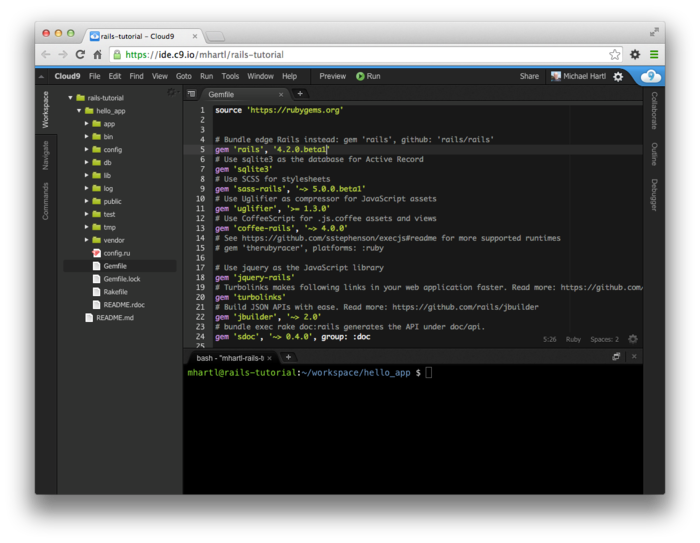
Gemfile по замовчанню
в текстовому редакторі. Gemfile по
замовчанню в каталозі hello_app.
source 'https://rubygems.org'
# Bundle edge Rails instead: gem 'rails', github: 'rails/rails'
gem 'rails', '4.2.0'
# Use sqlite3 as the database for Active Record
gem 'sqlite3'
# Use SCSS for stylesheets
gem 'sass-rails', '~> 5.0.1'
# Use Uglifier as compressor for JavaScript assets
gem 'uglifier', '>= 1.3.0'
# Use CoffeeScript for .js.coffee assets and views
gem 'coffee-rails', '~> 4.0.0'
# See https://github.com/sstephenson/execjs#readme for more supported runtimes
# gem 'therubyracer', platforms: :ruby
# Use jquery as the JavaScript library
gem 'jquery-rails'
# Turbolinks makes following links in your web application faster. Read more:
# https://github.com/rails/turbolinks
gem 'turbolinks'
# Build JSON APIs with ease. Read more: https://github.com/rails/jbuilder
gem 'jbuilder', '~> 2.0'
# bundle exec rake doc:rails generates the API under doc/api.
gem 'sdoc', '~> 0.4.0', group: :doc
# Use ActiveModel has_secure_password
# gem 'bcrypt', '~> 3.1.7'
# Use Unicorn as the app server
# gem 'unicorn'
# Use Capistrano for deployment
# gem 'capistrano-rails', group: :development
group :development, :test do
# Call 'debugger' anywhere in the code to stop execution and get a
# debugger console
gem 'byebug'
# Access an IRB console on exceptions page and /console in development
gem 'web-console', '~> 2.0.0.beta2'
# Spring speeds up development by keeping your application running in the
# background. Read more: https://github.com/rails/spring
gem 'spring'
end
Багато з ціх рядків закоментовані за допомогою
символу #; вони присутні тут щоб
показати вам деякі загально потрібні gems та надати
приклади синтаксису Bundler.
На цей момент нам не потрібні ніші gems, ніж встановлені
по замовчанню.
Якщо ви не вказали номер версії кодманді gem,
Bundler буде автоматично встановлювати найостаннішу версію
gem. Це,
наприклад, так виглядає в коді
gem 'sqlite3'
Є також два загальні шляхи, щоб задати диапазон версій gem, що дозволяє нам мати деякий контроль над версіями, що використовуються в Rails. Перший виглядає так:
gem 'uglifier', '>= 1.3.0'
Це встановлює останню версію uglifier
gem (що обробляє компрессію файлів для конвеєру активів),
доти, доки вона більша, ніж, або дорівнює версії 1.3.0
— навіть якщо це, скажімо, версія 7.2. Другий метод виглядає
так:
gem 'coffee-rails', '~> 4.0.0'
Він встановлює gem coffee-rails, до тих
пір, як вона новіша від версії 4.0.0, та не
новіша, ніж 4.1.
Іншими словами, нотація >=
завжди встановлює останній gem, тоді як нотація ~>
4.0.0 встановлює тільки оновлені gems, що
представляють мінорну точку релізу (наприклад, з 4.0.0
до 4.0.1), але не релізи мажорні точки
(наприклад, з 4.0 до 4.1). На жаль, досвід
показує, що навіть мінорні версії можуть зруйнувати речі,
так що для Ruby on Rails Tutorial ми будемо
стояти на засадах застереження, включаючи точні номери
версій для усіх gems.
Ви можете використовувати найбільш нові версії кожного
gem, включаючи консрукцію ~>в
Gemfile (що я загалом рекомендую для більш
доствідчених користувачів), але будьте попереджені, що це
може призвести до того, що ця інструкція буде діяти
непередбачено.
Перетворення Gemfile в Лістингу 1.4
на використання точних версій gem versions призводить до
коду, показаному в Лістингу 1.5. Зауважте, що ми також
застосовуємо цю можливість, щоб змусити sqlite3
gem бути включеним тільки в оточенні розробки або
тестування (Розділ
7.1.1), що запобігає
потенційному конфлікту з базою даних, що використовується
Heroku (Розділ 1.5).
Gemfile з явною
версією для кожного Ruby gem. source 'https://rubygems.org'
gem 'rails', '4.2.0'
gem 'sass-rails', '5.0.1'
gem 'uglifier', '2.5.3'
gem 'coffee-rails', '4.1.0'
gem 'jquery-rails', '4.0.3'
gem 'turbolinks', '2.3.0'
gem 'jbuilder', '2.2.3'
gem 'sdoc', '0.4.0', group: :doc
group :development, :test do
gem 'sqlite3', '1.3.9'
gem 'byebug', '3.4.0'
gem 'web-console', '2.0.0.beta3'
gem 'spring', '1.1.3'
end
Коли ви розмістите вміст Лістингу 1.5
в Gemfile застосування, встановіть gems з
використанням bundle install:9
$ cd hello/app/
$ bundle install
Fetching source index for https://rubygems.org/
.
.
.
Команда bundle install може зайняти деякий
час, але коли він скінчиться, наше застосування буде
готове до виконання.
1.3.2 rails server
Завдяки виконанню rails new в Розділі 1.3
та bundle install в Розділі 1.3.1,
ми вже маємо застосування, що можна виконати — але як? На щастя, Rails іде з
програмою командного рядка, або скриптом, що
виконує локлаьний веб сервер, щоб сприяти
нам в розробці нашого застосування.
Точна команда залежить від оточення, що ми використовуємо:
на локальній системі ми просто викликаємо rails
server (Лістинг
1.6), тодя як на Cloud9 вам
треба надати додаткову IP адресу прив’язки та номер
порту,щоб сповістити Rails серверу адресу, що
він може використовувати, щоб зробити застосування видимим
для загалу світу (Лістинг
1.7).10 (Cloud9 використовує
спеціальні змінні оточення, $IP та
$PORT, щоб присвоїти IP адресу та порт
динамічно. Якщо ви
бажаєте побачити значення ціх змінних, наберіть echo
$IP або echo $PORT в командному
рядку). Якщо ваша система скаржиться на відсутність
робочого оточення JavaScript, навідайтесь на сторінку execjs в GitHub для
переліку можливостей.
Загалом я рекомендую встановити Node.js.
$ cd ~/workspace/hello_app/
$ rails server
=> Booting WEBrick
=> Rails application starting on http://localhost:3000
=> Run `rails server -h` for more startup options
=> Ctrl-C to shutdown server
$ cd ~/workspace/hello_app/
$ rails server -b $IP -p $PORT
=> Booting WEBrick
=> Rails application starting on http://0.0.0.0:8080
=> Run `rails server -h` for more startup options
=> Ctrl-C to shutdown server
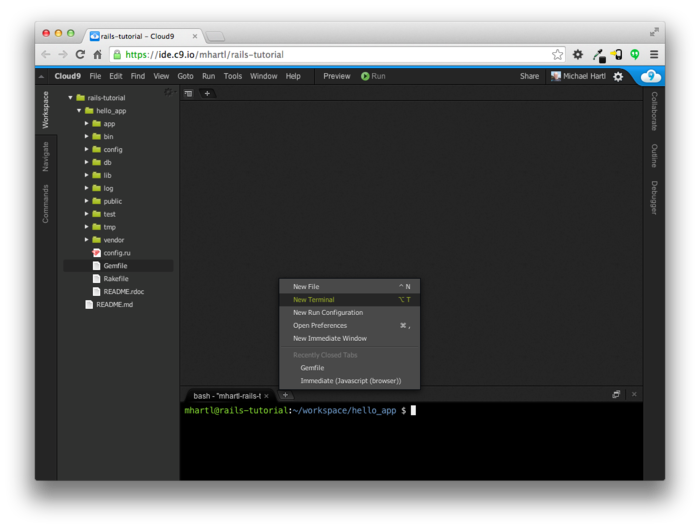
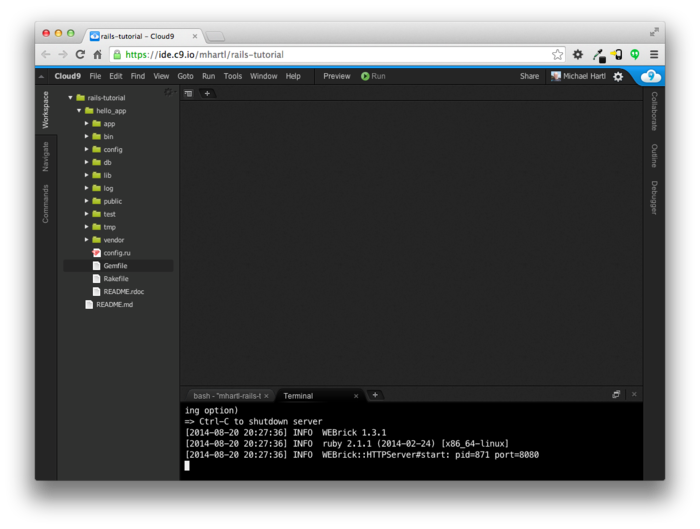
Яку б опцію ви не обрали, я рекомендую виконувати команду
rails server в другому термінали (вкладинці),
так що ви зможете надавати команди в першому терміналі, як
показано на Малюнку
1.6 та Малюнку 1.7. (Якщо ви вже
запустили сервер в першій вкладинці, нажміть Ctrl-C, щоб
завершити його).11 На локальному
сервері спрямуйте свій браузер за адресою http://localhost:3000/; на хмарній
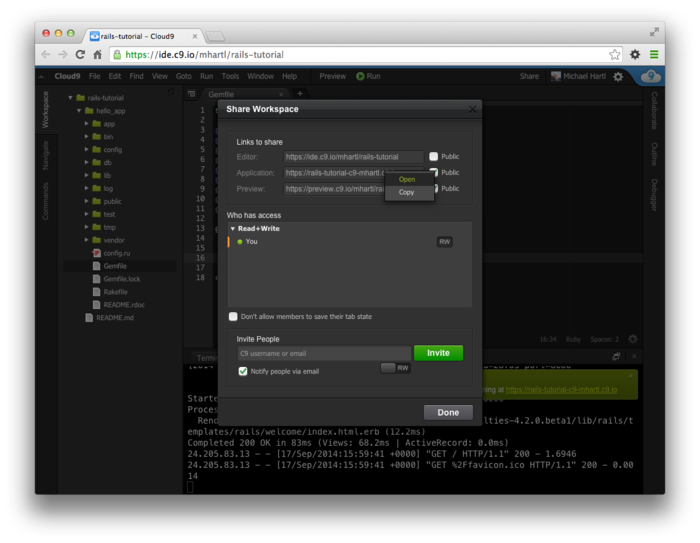
IDE, перейдіть до Share на клацніть на Application
address, щоб відкрити його (Малюнок 1.8). В жодному разі
результат має виглядати як на Малюнку 1.9.
rails server. Щоб побачити інформацію щодо першого застосування, клацніть на посиланні “About your application’s environment”. Хоча точні номери версій можуть відрізнятись, результат повинен виглядати я на Малюнку 1.10. Зрозуміло, що ми не потребуємо сторінку Rails по замовчанню в далекій перспективі, але вже зараз приємно побачити, що вона робить. Ми приберемо цю сторінку (і замінимо її на власну домашню сторінку) в Розділі 1.3.4.
1.3.3 Model-View-Controller (MVC)
Навіть на ранній стадії є корисним отримати
високорівневий огляд того, як робить застосування Rails (Малюнок 1.11). Ви можете вже знати,
що стандартна структура застосування Rails (Малюнок 1.4)
має каталог з назвою app/ с трьома
підкаталогами: models, views
та controllers. Це підказка, що Rails
слідує архітектурному шаблону model-view-controller (MVC), що
змушує відділяти “логіку домену” (також її назівають
“бізнес логікою”) від логіки вводу та презентації, що
асоціюється з графічним інтерфейсом користувача (GUI). В разі веб
застосувань, “логіка домену” типово представлена моделями
даних для речей, таких як користувачі, статті та продукти,
а в ролі GUI виступає звичайна веб сторінка в веб
браузері.
Під час взаємодії з застосуванням Rails, браузер надсилає запит, який отримується веб сервером, та передається до Rails контроллера, який відповідає за те, що робити далі. В деяких випадках контроллер безпосередньо малює вигляд, що є шаблоном, який перетворюється на HTML, та відсилається назад в браузер. Більше загально, для динамічних сайтів, контролер спілкується з моделлю, що є об’єктом Ruby, що представляє елемент цього сайту (такий як користувач), та відповідає за комунікацію з базою даних. Після виклику моделі, контроллер малює вигляд, та повертає повну веб сторінку в браузер як HTML.
Не хвилюйтесь, якщо поки ця дискусія виглядає трохи абстрактною. Ми будемо часто посилатись часто на цю сторінку. Розділ 1.3.4 показує перше застосування MVC, тоді як Розділ 2.2.2 включає більш детальовану дискуссію по MVC в контексті іграшкового застосування. Нарешті, застосування-приклад буде використовувати всі аспекти MVC; ми покриємо контроллери та вигляди, починаючи з Розділу 3.2, моделі починаючи з Розділу 6.1, та ми побачимо всі три, що роблять разом в Розділі 7.1.2.
1.3.4 Hello, world!
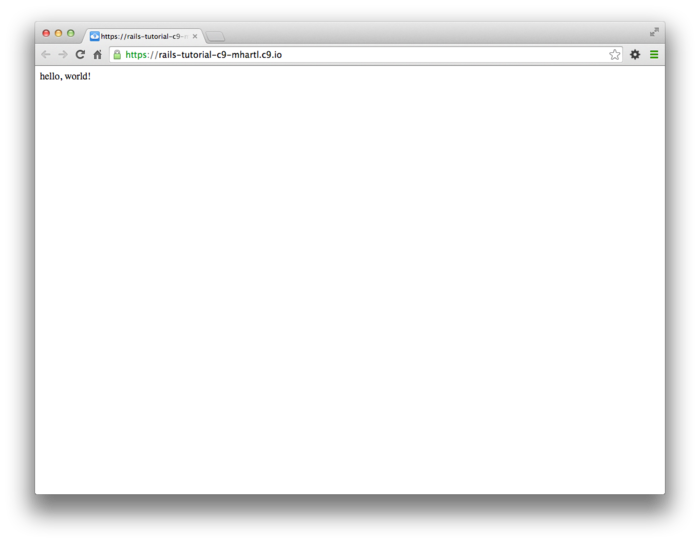
В якості першого застосування фреймворку MVC, ми зробимо мінімальні зміни до першого застосування, додаючи акцію контроллера для малювання рядка “hello, world!”. (Ми вивчимо більше про акції контроллера, починаючи з Розділу 2.2.2). Результатом буде заміщення сторінки по замовчанню з Малюнка 1.9 на сторінку “hello, world”, що є ціллю цього розділу.
Як підказує ім’я, акції контроллера визначені в
контролерах. Ми
назовемо нашу акцію hello та
розмістимо її в контроллері Application.
Насправді на часі контроллер Application є єдиним
контролером, що є у нас, що ми можемо перевірити,
виконуючи
$ ls app/controllers/*_controller.rb
щоб побачити наявні контроллери.
(Ми будемо створювати наші власні коонтроллери Главі 2.) Лістинг 1.8
показує результуюче визначення hello, що
використовує функцію render
для повертання тексту “hello, world!”.
(Не турбуйтесь щодо синтаксису Ruby прямо зараз; він буде
пояснений більш детально в Главі 4.)
hello
до контроллера Application.
app/controllers/application_controller.rb
class ApplicationController < ActionController::Base
# Prevent CSRF attacks by raising an exception.
# For APIs, you may want to use :null_session instead.
protect_from_forgery with: :exception
def hello
render text: "hello, world!"
end
end
Маючи визначеною якцію, що повертає бажаний рядок, нам треба сповістити Rails використовувати цю акцію, замість сторінки по замовчанню Малюнок 1.10. Щоб робити це, ми редактуємо маршрутникRails, що сидить попереду контроллера на Малюнку 1.11 та визначає, куди відіслати запити, що надходять з браузера. (Я пропустив маршрутник на Малюнку 1.11 для спрощення, але ми обсудимо його більш детально починаючи з Розділу 2.2.2). Зокрема, ми бажаємо змінити сторінку по замовчанню, кореневий маршрут, який визначає сторінку, що обслуговує кореневий URL. Оскільки це URL для адрес типу http://www.example.com/ (де нічого не слідує після фінальної косої), для скорочення на кореневий URL часто посилаються як на / (“слеш”).
Як видно в Лістингу
1.9, файл маршрутів Rails (config/routes.rb)
включає закоментований рядок, що показує, як структуровати
кореневий маршрут.
Тут “welcome” є контроллером, та “index” є акцією в
контролері. Щоб
активувати кореневий маршрут, розкоментуйте цей рядок,
видаливши символ решітки, та потім замістити його на код
в Лістингу
1.10, що наказує Rails
надсилати кореневий маршрут в акцію hello
контроллера Application.
(Як зазначено в Розділі
1.1.2, вертикальні крапки
вказують на випущений код, та не мають копіюватись
буквально).
Rails.application.routes.draw do
.
.
.
# You can have the root of your site routed with "root"
# root 'welcome#index'
.
.
.
end
Rails.application.routes.draw do
.
.
.
# You can have the root of your site routed with "root"
root 'application#hello'
.
.
.
end
З кодом з Лістингу 1.8 та Лістингу 1.10, кореневий маршрут повертає “hello, world!”, як ми і сподівались (Малюнок 1.12).
1.4 Контроль версій за допомогою Git
Тепер, коли ми маємо свіже та працююче застосування Rails, ми викроїмо момент для кроку, що хоча і є технічно опціональним, але повинно розглядатися досвідченими розробниками як практично обов’язковий: розміщення первинного коду нашого додатку під контроль версій. Системи контролю версій дозволяють нам відстежувати зміни в нашому коді проекту, співпрацювати більш просто, та відкочувати любі необачні помилки (такі, як випадкове видалення файлів). Знаючи, як використовувати системи контролю версій, є необхідною навичкою для кожного розробника професійного рівня.
Є багато опцій для контролю версій, але спільнота Rails широко стандартизується на Git, розгалуженій системі контролю версій, оригінально розробленої Linus Torvalds для зберігання ядра Linux. Git є обширним предметом, і в цій книжці ми тільки зверхньо ознайомимось з ним, але є багато добрих онлайн ресурсів; я особливо рекомендую Bitbucket 101 для стислого огляду та Pro Gitвід Scott Chacon вступу довжиною в книжку. Покладаючи ваш код під контроль версій за допомогою Git є дуже рекомендованим, не тільки тому, що це майже універсальна практика в світі Rails, але також тому, що це дозволить вам робити копії та поширювати ваш код більш просто (Розділ 1.4.3) та розгорнути ваше застосування прямо тут, в першій главі (Розділ 1.5).
1.4.1 Встановлення та налаштування
Хмарне IDE, рекомендоване в Розділі 1.2.1, включає Git по замовчанню, так що в цьому випадку ви не потребуєте встановлення. В іншому випадку InstallRails.com (Розділ 1.2) включає інструкції для встановлення Git на вашій системі.
Перше налаштування системи
Перед використанням Git, вам потрібно виконати одноразове початкове налаштування. Це системненалаштування, що означає, що ви маєте виконати ії тільки один раз для комп’ютера:
$ git config --global user.name "Your Name"
$ git config --global user.email your.email@example.com
$ git config --global push.default matching
$ git config --global alias.co checkout
Зауважте, що ім’я та електронна адреса, що ви
використовуєте в вашій конфігурації Git, буде доступна в
кожному репозитарії, що ви зробите публічним.
(Тільки два перші рядки вище є винятково потрібними.
Третій рядок включено тільки для впевненості в
сумісності з майбутньою версією Git.
Опціональний четвертий рядок включений, щоб ви могли
використовувати co замість більш
довгої команди checkout.
Для максимальної сумісності з системами, що не мають
сконфігурованої команди co, ми будемо
використовувати повну команду checkout,
але в реальному житті я майже завжди використовую git
co.)
Одноразове налаштування репозитарію
Тепер ми пройдеме деякі кроки, необхідні кожного разу, коли ми створюємо новий репозитарій (іноді для краткості називаємий репо). Спершу перейдіть в кореневий каталог першого застосування, та ініціюйте новий репозитарій:
$ git init
Initialized empty Git repository in /home/ubuntu/workspace/hello_app/.git/
Наступний крок - додати всі файли проекту до
репозитарію, використовуючи git add -A:
$ git add -A
Ця команда додає всі файли в поточному каталозі, крім
тих, що співпадають з шаблонами в спеціальному файлі .gitignore. Команда rails
new автоматично генерує файл .gitignore,
як треба для Rails проекту, але ви можете додати також і
власні шаблони.12
Додані файли спочатку розміщуються в підготовчій
області, що містить очікувані зміни в вашому
проекті. Ви
можете побачити, які файли знаходяться в фазі
очікування, з використанням команди status:
$ git status
On branch master
Initial commit
Changes to be committed:
(use "git rm --cached <file>..." to unstage)
new file: .gitignore
new file: Gemfile
new file: Gemfile.lock
new file: README.rdoc
new file: Rakefile
.
.
.
(Результат буде довгим, так що ми використовуємо вертикальні крапки для позначення пропущених рядків.)
Щоб сповістити Git, що ви бажаєте закріпити ці зміни,
використовуйте команду commit:
$ git commit -m "Initialize repository"
[master (root-commit) df0a62f] Initialize repository
.
.
.
Флаг -m дозволяє вам додати повідомлення
до команди; якщо ви не вкажете -m, Git
відкриватиме системний редактор по замовчанню, та вам
буде треба ввести повідомлення там.
(Всі приклади в цій книжці використовують флаг -m).
Є важливим, що Git закріплює зміни локально,
записуючи тільки на машині, на який виконується ця
команда. Ми побачимо, як протовкати зміни далі на
віддалений репозитарій (використовуючи git push)
в Розділі
1.4.4.
До речі, ви можете побачити список ваших повідомлень з
використанням команди log:
$ git log
commit df0a62f3f091e53ffa799309b3e32c27b0b38eb4
Author: Michael Hartl <michael@michaelhartl.com>
Date: Wed August 20 19:44:43 2014 +0000
Initialize repository
В залежності від довжини журнала вашого репозитарію вам
може знадобитись натиснути на q для
виходу.
1.4.2 Що гарного робить Git для вас?
Якщо ви ніколи не використовували контроль версій до
цього, зараз може бути не дуже зрозумілим, що це все
робить гарного для вас, так що дозвольте мені навести лише
один приклад.
Допустімо, що ви зробили якусь випадкову зміну, таку як,
(жах!) видалили критичний каталог app/controllers/
.
$ ls app/controllers/
application_controller.rb concerns/
$ rm -rf app/controllers/
$ ls app/controllers/
ls: app/controllers/: No such file or directory
Тут ми використовуємо команду Unix ls для
отримання вмісту каталогу app/controllers/
та потім команду rm для його видалення (Таблиця 1.1). Флаг -rf
означає “примусово і рекурсивно”, що рекурсивно видаляє
всі файли, каталоги, підкаталоги, і таке інше, без
запитання явного підтвердження кожного видалення.
Давайте перевіримо статус, щоб побачити що змінилось:
$ git status
On branch master
Changed but not updated:
(use "git add/rm <file>..." to update what will be committed)
(use "git checkout -- <file>..." to discard changes in working directory)
deleted: app/controllers/application_controller.rb
no changes added to commit (use "git add" and/or "git commit -a")
Ми бачимо, що файли були видалені, але зміни тільки на
"робочому дереві"; вони ще не були закріплені.
Це означає, що що ми можемо відмінити зміни,
використовуючи команду checkout з флагом -f,
щоб примусити перезапис поточних змін:
$ git checkout -f
$ git status
# On branch master
nothing to commit (working directory clean)
$ ls app/controllers/
application_controller.rb concerns/
Втрачені файли та каталоги повернулись. Це чудово!
1.4.3 Bitbucket
Тепер, коли ми поклали наш проект під контроль версій за допомогою Git, прийшов час заштовхати наш код на Bitbucket, сайт, оптимізований для зберігання та обміну Git репозитаріями. (Попередні редакції цього підручника використовували GitHub замість цього; дивіться Врізку 1.4 щоб зрозуміти причини цієї зміни). Викладання копії вашого Git репозитарію на сервери Bitbucket має два призначення: це буде резервною копією вашого коду (включаючи повну історію версій), та це зробить любу майбутню співпрацю значно простішою.Безумовно, два найбільш популярних сайтів для хостингу Git репозитаріїв є GitHub та Bitbucket. Ці два сервіси мають багато подібностей: обоє сайти дозволяють хостинг Git репозитаріїв та співпрацю, так само, як і надають зручні шляхі для перегляду та пошуку репозитаріїв. Важливі розбіжності (з нашої перспективи), в тому, що коли GitHub пропонує необмежені безкоштовні репозитарії (зі співпрацею) для репозитаріїв з відкритим кодом, та беруть гроші за приватні репозитарії. Bitbucket, замість цього, дозволяє необмежені безкоштовні приватні репозитарії, та бере гроші за деяку кількість співпрацюючих. Який сервіс ви використовуєте для окремого репозитарію, залежить від ваших потреб.
Попередні редакції цієї книжки використовували GitHub, завдяки його наголосу на відкритому коді, але зростаюча стурбованість щодо безпеки призвели до того, що я рекомендую всімрепозитаріям веб застосувань бути приватними по замовчанню. Питання в тому, що репозитарій веб застосування може містити важливу інформацію, таку, як криптографічні ключі або паролі, що може бути використано для обходу безпеки сайту, що виконує цей код. Звичайно, можливо так використовувати цю інформацію, щоб тримати її безпечною (наприклад, налаштувавши Git на ігнорування), але це підштовхує до помилок, та потребує значної експертизи.
Насправді застосування-приклади, створені в цьому підручнику, безпечні для показу в мережі, але загалом небезпечно позраховувати на цей факт. Таким чином, щоб бути в небезпеці, ми примемо сторону обережності, та будем використовувати приватні репозитарії по замовчанню. Оскільки GitHub бере гроші за приватні репозитарії, тоді як Bitbucket безкоштовно пропонує репозитарії без обмежень, для наших цілей Bitbucket є кращим, ніж GitHub.
Почати з Bitbucket нескладно:
- Зареєструйтесь на Bitbucket , якщо ви ще це не зробили.
- Скопіюйте ваш публічний ключ в
кліпборд. Як
вказано в Лістингу
1.11, користувачі
хмарного IDE можуть побачити свій публічний ключ за
допомогою команди
cat, що може бути потім виділений та скопійований. Якщо ви використовуєте вашу власну систему, та не бачите результату команди Лістингу 1.11, слідуйте інструкціям як встановити публічний ключ в вашому рахунку Bitbucket. - Додайте ваш публічний ключ до Bitbucket, клацнувши на зображенні аватара зправа, та оберіть “Manage account”, та потім “SSH keys” (Малюнок 1.13).
cat.
$ cat ~/.ssh/id_rsa.pub

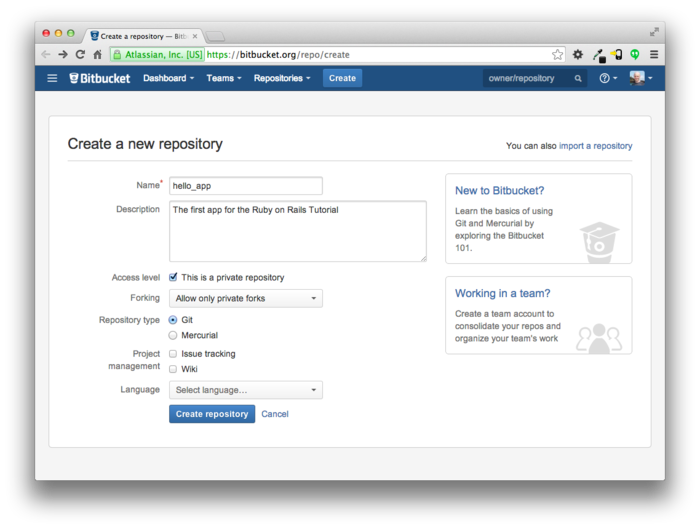
Коли ви додасте ваш публічний ключ, клацніть на “Create” для створення нового репозитарія, як показано на Малюнку 1.14. Коли заповнюватимете інформацію про проект, попілкуйтесь про то, щоб залишити відміченим “This is a private repository”. Після клацніть на “Create repository”, слідуйте інструкціям під “Command line > I have an existing project”, що має виглядати подібно до Лістингу 1.12. (Якщо це не виглядає як Лістинг 1.12, це може бути через те, що публічний ключ не був доданий. В цьому разі я пропоную спробувати цей крок ще раз). Коли будете підіймати репозитарій, відповідайте yes, якщо побачите питання “Are you sure you want to continue connecting (yes/no)?”
$ git remote add origin git@bitbucket.org:<username>/hello_app.git
$ git push -u origin --all # pushes up the repo and its refs for the first time
Команди в Лістингу
1.12 спочатку наказують
Git, щоб він додав Bitbucket в якості походження
для вашого репозитарію, та тоді проштовхуємо ваш
репозитарій на віддалене походження.
(Не тербуйтесь про те, що робить флаг
-u; якщо ви
зацікавлені, зробіть пошук на предмет “git set upstream”). Звісно, вам треба
замінити <username>
на ваше дійсне ім’я.
Наприклад, команда для мене виглядає так
$ git remote add origin git@bitbucket.org:mhartl/hello_app.git
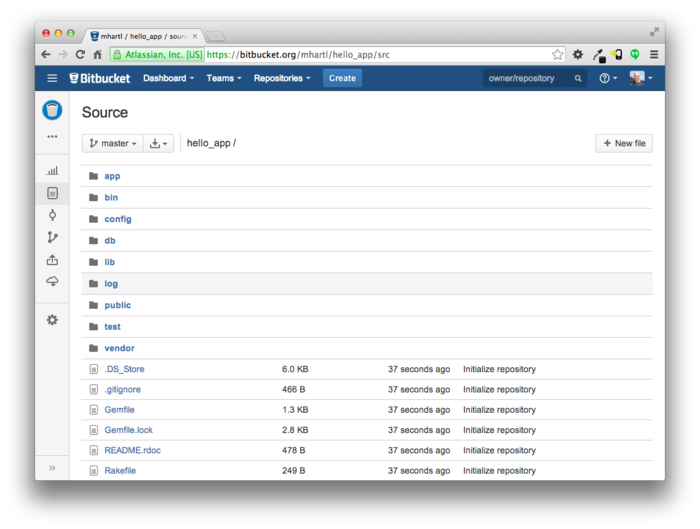
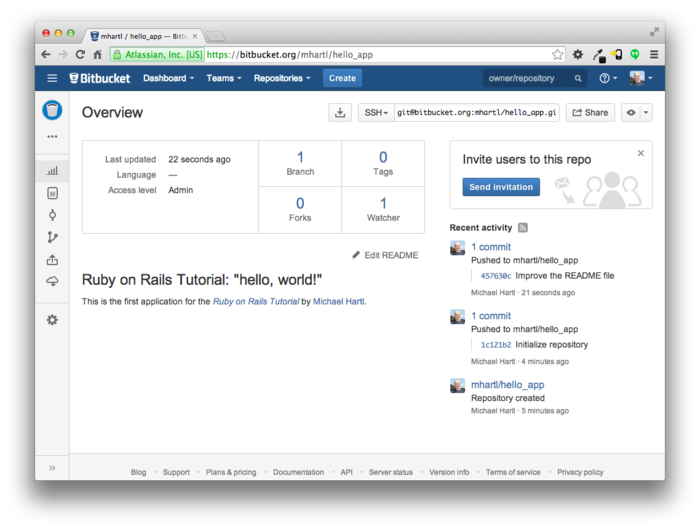
Це в результаті дає сторінку на Bitbucket для репозитарію hello_app, з переглядом файлів, повною історією підтверджень, та безліччю інших корисностей (Малюнок 1.15).
1.4.4 Branch, edit, commit, merge
Якщо ви слідували крокам в Розділі
1.4.3, ви можете помітити,
що Bitbucket автоматично не розпізнав файл README.rdoc
з нашого репозитарію, і замість цього скаржиться на
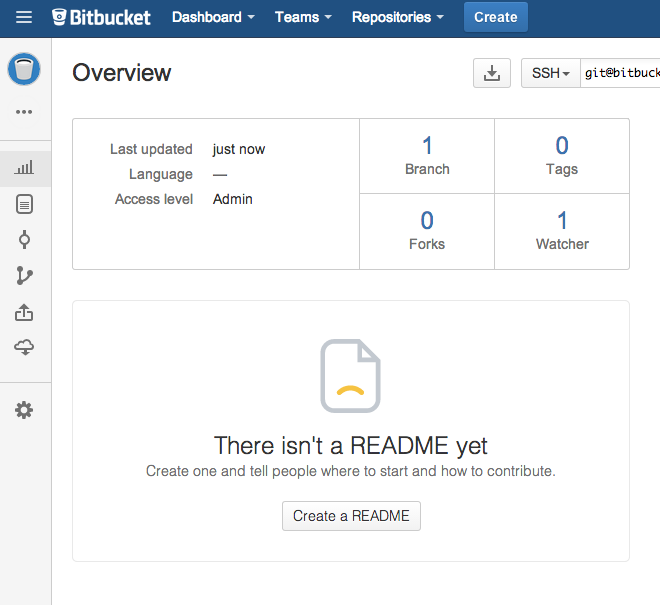
головній сторінці репозитарію, що немає README (Малюнок 1.16). Це вказує на те, що
формат rdoc не є досить загальним для того,
щоб Bitbucket підтримував його автоматично, чому я, та
майже кожний інший розробник, якого я знаю, замість обирає
використовувати Markdown.
В цьому розділі ми змінимо файл README.rdoc
на README.md, в спробі додати деякий
особливий вміст Rails Tutorial до файлу README.
В процесі цього ми побачимо перший приклад процесу
branch-edit-commit-merge, що я рекомендую використовувати
разом з Git.13
Branch
Git є неймовірно гарним для утворення відгалужень,
що є ефективною копією репозитарію, де ми можемо зробити
(можливо, експеріментальні) зміни, без модифікації
батьківської вітки. В більшості випадків, батьківською є
відгалуження master, та ми можемо створити
нове відгалуження, використовуючи checkout
з флагом -b:
$ git checkout -b modify-README
Switched to a new branch 'modify-README'
$ git branch
master
* modify-README
Є інша команда, git branch, що просто
перелічує всі локальні відгалуження, та зірочка *
вказує, яке відгалуження наразі є поточним. Зауважте,
що git checkout -b modify-README
створює нове відгалуження, а також і перемикається на
нього, як на це вказує зірочка перед modify-README. (Якщо ви встановили
скорочення co в Розділі 1.4,
ви можете використовувати git co -b modify-README
замість цього).
Повне значення відгалужень стає зрозумілим тільки коли робите над проектом разом з декільками розробниками,14 але відгалуження є корисними навіть для одного розробника, як в нашому випадку. Зокрема, головне (master) відгалуження захищене від любих змін, що ми робимо в окремих відгалуженнях, так що навіть якщо ми дійсноскуйовдимо код, ми завжди зможемо відкинути зміни, виконавши перевірку (checking out) з головним відгалуженням, та знищивши окреме відгалуження. В кінці цього розділу ми побачимо, як це зробити.
До речі, для таких малих змін, як цього разу, я зазвичай не починаю борсатись з новим відгалуженням, але в нагальному контексті наша головна можливість є почати практиковати гарні звички.
Edit
Після створення тематичного відгалуження, ми
відредактуємо його, щоб зробити його трохи більше
описовим. Я обираю мову розмітки Markdown, замість RDoc по
замовчанню для ціх цілей, і якщо ви використовуєте
розширення файлу .md, Bitbucket буде
автоматично форматувати його за вас.
Так що спершу ми використаємо версію Git команди Unix mv
(перемістити) для зміни імені:
$ git mv README.rdoc README.md
Потім заповнимо README.md з вмістом Лістингу 1.13.
README,
README.md. # Ruby on Rails Tutorial: "hello, world!"
This is the first application for the
[*Ruby on Rails Tutorial*](http://www.railstutorial.org/)
by [Michael Hartl](http://www.michaelhartl.com/).
Commit
Коли зміни були зроблені, ми передивляємось статус нашого відгалуження:
$ git status
On branch modify-README
Changes to be committed:
(use "git reset HEAD <file>..." to unstage)
renamed: README.rdoc -> README.md
Changes not staged for commit:
(use "git add <file>..." to update what will be committed)
(use "git checkout -- <file>..." to discard changes in working directory)
modified: README.md
В цій точці ми можемо використати git add -A
як в Розділі
1.4.1.2, але git
commit провадить флаг -a як
скорочення для (дуже поширеного) випадку затвердження
всіх модифікацій до існуючих файлів (або файлів, що
створені з використанням git mv, що не
рахується для Git як новий файл):
$ git commit -a -m "Improve the README file"
2 files changed, 5 insertions(+), 243 deletions(-)
delete mode 100644 README.rdoc
create mode 100644 README.md
Будьте уважні, щоб не використовувати флаг -a
помилковим чином; якщо ви додали любі нові файли до
проекту з часу останнього затвердження, ви з початку
маєте повідомити Git про них, використовуючи git
add -A.
Зауважте, що ми пишемо повідомлення затвердження в теперішньомучасі (та, технічно кажучи, в імперативному наклоні). Git моделює затвердження як серію патчів, і в цьому контексті має сенс описувати, що кожне затвердження робить, скоріше, чим що воно зробило. Більше того, це використання співпадає з повідомленнями затвердження, що генеруються командами самого Git. Дивіться статтю “Блискучо нові стилі затверджень” для отримання додаткової інформації.
Merge
Тепер, коли ми завершили робити зміни, ми готові до злиттярезультатів з нашим головним відгалуженням:
$ git checkout master
Switched to branch 'master'
$ git merge modify-README
Updating 34f06b7..2c92bef
Fast forward
README.rdoc | 243 --------------------------------------------------
README.md | 5 +
2 files changed, 5 insertions(+), 243 deletions(-)
delete mode 100644 README.rdoc
create mode 100644 README.md
Зверніть увагу, що вивід Git часто включає речі на
кшталт 34f06b7, що відноситься до
внутрішньої репрезентації репозитаріїв в Git.
Ваш точний результат буде відрізнятися в деталях, але в
іншому має здебільшого співпадати з наведеним вище.
Після того, як ви злили зміни, ви можете очистити ваші
відгалуження, видаливши додаткове відгалуження,
використавши git branch -d, якщо ви вже
закінчили з ним :
$ git branch -d modify-README
Deleted branch modify-README (was 2c92bef).
Цей крок є опціональним, та фактично є доволі загальним залишати відгалуження без змін. Таким чином ви можете перемикатись назад та вперед між тематичним та головним відгалуженням, зливаючи зміни кожного разу, коли досягаєте натуральної точки зупинки.
Як зазначалось вище, також можливо відмінити зміни в
вашому відокремленому відгалуженні, на цей раз за
допомогою git branch -D:
# For illustration only; don't do this unless you mess up a branch
$ git checkout -b topic-branch
$ <really screw up the branch>
$ git add -A
$ git commit -a -m "Major screw up"
$ git checkout master
$ git branch -D topic-branch
На відміну від флага -d, флаг -D
буде видаляти відгалуження навіть в випадку, коли воно
не було злито зі змінами.
Push
Тепер, коли ми оновили README, ми можемо
проштовхнути зміни на Bitbucket, щоб подивитись на
результат.
Оскількі ми вже робили одне просування (Розділ 1.4.3),
на більшості систем ми можемо оминути origin
master, та виконати тільки git push:
$ git push
Як ми обіцяли в Розділі 1.4.4.2, Bitbucket гарно форматує новий файл з використанням Markdown (Малюнок 1.17).
README, форматований за
допомогою Markdown. 1.5 Розгортання
Навіть на цій простий стадії ми збираємось розгорнути наше (майже пусте) застосування Rails в промисловий стан. Цей крок є опціональним, але ранішнє та часте розгортання дозволить нам впіймати любі проблеми розгортання на ранішній фазі нашої розробки. Альтернатива - розгортання тільки після кропітких зусиль в стінах оточення розробки — часто призводить до жахливих головних болей інтеграції, коли настає час для запуску.15
Розгортання застосувань Rails було болючим, але екосистема розгортання швидко покращувалась протягом останніх декількох років, та зараз є декілька чудових опцій. Це включає розділені або віртуальні приватні сервери, що виконують Phusion Passenger (модуль для веб серверів Apache та Nginx16), компанії розгортання з повним сервісом, такі як Engine Yard та Rails Machine, та хмарне розгортання, таке, як Engine Yard Cloud, Ninefold та Heroku.
Мія улюблена опція розгортання Rails є Heroku, що є хостованою платформою, побудованою спеціально для розгортання Rails та інших веб застосувань. Heroku робить розгортання Rails застосувань до смішного протсим — доки ваш код знаходиться під контролем версій Git. (Це ще один привід слідувати крокам налаштування Git за Розділом 1.4, якщо ви ще не зробили це). Залишок цього розділу присвячений розгортанню нашого першого застосування на Heroku. Деякі з ідей є досить просунутими, так що не турбуйтесь щодо розуміння всіх деталей; що важливо, це що в кінці процесу ми будемо мати наше застосування розгорнутим в справжньому веб.
1.5.1 Налаштування Heroku
Heroku використовує базу даних PostgreSQL (вимовляється “пост-грес-кю-ель”, та часто називається скорочено, “Postgres”), що означає, що що нам треба додати pg gem в промислое оточення, щоб дозволити Rails розмоіляти Postgres:17
group :production do
gem 'pg', '0.17.1'
gem 'rails_12factor', '0.0.2'
end
Зауважте додавання rails_12factor
gem, що використовується Heroku для обслуговування
статичних активів, таких, як зображення або сторінки
стилів.
Результуючий Gemfile виглядає як в Лістингу 1.14.
Gemfile з доданими
gems. source 'https://rubygems.org'
gem 'rails', '4.2.0'
gem 'sass-rails', '5.0.1'
gem 'uglifier', '2.5.3'
gem 'coffee-rails', '4.1.0'
gem 'jquery-rails', '4.0.3'
gem 'turbolinks', '2.3.0'
gem 'jbuilder', '2.2.3'
gem 'sdoc', '0.4.0', group: :doc
group :development, :test do
gem 'sqlite3', '1.3.9'
gem 'byebug', '3.4.0'
gem 'web-console', '2.0.0.beta3'
gem 'spring', '1.1.3'
end
group :production do
gem 'pg', '0.17.1'
gem 'rails_12factor', '0.0.2'
end
Щоб підготувати систему до розгортання в промисловому
оточенні, ми виконуємо bundle install з
особливим флагом, щоб запобігти локального встановлення
любих промислових gems (що в нашому випадку складає pg та rails_12factor):
$ bundle install --without production
Оскільки додані нами gems в Лістингу 1.14
обмежені тільки промисловим оточенням, прямо зараз це
команда насправді не встановлює жодних додаткових
локальних gems, але це треба для оновлення Gemfile.lock
з pg та rails_12factor
gems. Ми можемо
затвердити зміну наступним чином:
$ git commit -a -m "Update Gemfile.lock for Heroku"
Далі ми маємо створити та сконфігурувати новий рахунок Heroku. Перший крок - зареєструватися на Heroku. Далі перевірте, чи ваша система вже має кліент командного рядка Heroku:
$ heroku version
Під хмарним IDE ви побачите номер версії Heroku, що
вказує на те, що heroku CLI доступний, але
на інших системах може бути потрібним встановити його,
використовуючи Heroku
Toolbelt.18
Коли ви перевірили, що інтерфейс Heroku командного рядка
встановлений, використовуйте команду heroku
для входу та додавання вашого SSH ключа:
$ heroku login
$ heroku keys:add
Нарешті, використовуйте команду heroku create
для створення місця на серверах Heroku, де буде жити наше
застосування (Лістинг
1.15).
$ heroku create
Creating damp-fortress-5769... done, stack is cedar
http://damp-fortress-5769.herokuapp.com/ | git@heroku.com:damp-fortress-5769.git
Git remote heroku added
Команда heroku створює новий субдомен для
нашого застосування, доступного для безпосереднього
перегляду. Зараз
там нічого немає, так що почнемо розгортання.
1.5.2 Розгортання Heroku, крок один
Щоб розгорнути застосування першим кроком є застосування Git для просування головної гілки до Heroku:
$ git push heroku master
(Ви можете бачити деякі застережливі повідомлення, що ви поки можете ігнорувати. Ми обговоримо їх пізніше в Розділі 7.5.)
1.5.3
Розгортання Heroku, крок два
Нема кроку два!
Він вже виконаний.
Щоб побачити тільки що розгорнуте застосування, зайдіть за
адресою, що ви бачили, коли виконували heroku
create (Лістинг
1.15).
(Якщо ви робите на локальній машині, замість хмарного IDE,
ви також можете використовувати heroku open).
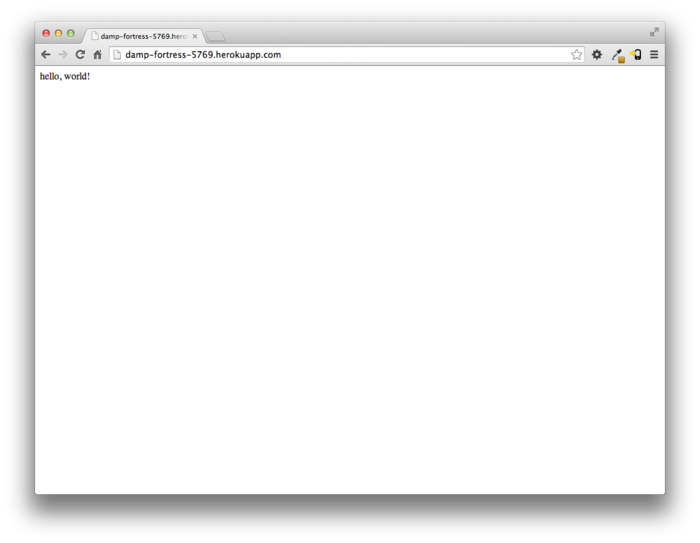
Результат виглядатиме, як на Малюнку 1.18. Сторінка, подібна до
Малюнка
1.12, але вона виконується
в промисловому оточенні на справжньому веб.
1.5.4 Команди Heroku
Є багато команд Heroku, але ми тільки доторкнулись до них в цій книжці. Давайте витратимо хвилину, щоб переіменувати застосування, як показано нижче:
$ heroku rename rails-tutorial-hello
Не використовуйте це ім’я, бо я вже зайняв його! Фактично, вам не треба перейматися цім прямо зараз; використання імені по замовчанню від Heroku є гарним. Але якщо ви бажаєте переіменувати ваше застосування, ви можете зробити його досить безпечним, використовуючи випадковий або прихований субдомен, як нижче:
hwpcbmze.herokuapp.com seyjhflo.herokuapp.com jhyicevg.herokuapp.com
З випадковим субдоменом хтось може відвідати ваш сайт, тільки якщо ви надасте йому адресу. (До речі, як попередній перегляд неймовірної компактності Ruby, ось код, що я використовую для генерації випадкових субдоменів:
('a'..'z').to_a.shuffle[0..7].join
Дуже мило .)
На додаток до підтримки субдоменів, Heroku також підтримує власні домени. (Фактично, сайт Ruby on Rails Tutorial розташований на Heroku; якщо ви читаєте цю книжку онлайн, ви прямо зараз дивитесь на Heroku сайт!). Дивіться документацію Heroku для додаткової інформації щодо власних доменів та інших можливостей Heroku.
1.6 Висновок
Ми пройшли довгий шлях в цій главі: встановлення, налагодження оточення для розробки, контроль версій та розгортання. В наступній главі ми, на основі досягнутого в Главі 1, побудуємо основане на базі даних іграшкове застосування, що дасть нам перший реальний присмак того, що може Rails.
Якщо ви бажаєте поділитися вашим прогресом в цій точці, будьте такі ласкаві надіслати твіт або оновите Facebook статус з чимось, на кшталт:
Я також рекомендую підписатись на список розсилки Rails Tutorial email list19Ruby on Rails Tutorial.
1.6.1 Що ми вивчили в цій главі
- Ruby on Rails є фреймворком для веб розробки, написаним на мові програмування Ruby.
- Встановлення Rails, генерація застосування та редагування результуючих файлів є простими за допомогою зазадалегідь сконфігурованого хмарного оточення.
- Rails іде з командою командного рядка
rails,що може генерувати нові застосування (rails new) та виконувати локальний сервер (rails server). - Ми додали акцію контроллера та модифікували кореневий маршрут для створення застосування “hello, world”.
- Ми захистились від втради даних, та при цьому забезпечили можливість співпраці, розмістивши код нашого застосування під контроль версій Git та проштовхнули результуючй код в приватний репозитарій на Bitbucket.
- Ми розгорнули наше застосування в промислове оточення, використовуючи Heroku.
1.7 Вправи
Зауваження: Рішення до вправ, де даються роз’вязання всіх завдань в книжці Ruby on Rails Tutorial, включене безкоштовно до кожного придбання на www.railstutorial.org.
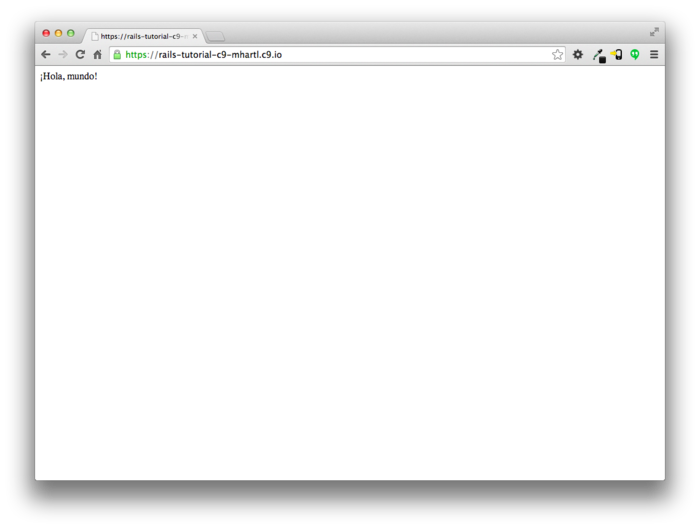
- Змініть вміст акції
helloв Лістингу 1.8 щоб друкувати “hola, mundo!” замість “hello, world!”. Додатково: Покажіть, що Rails підтримує не-ASCII символи, включивши перевернутий знак наголосу, як в “¡Hola, mundo!” (Малюнок 1.19).20 - Слідуя прикладу з акцією
helloв Лістингу 1.8, додайте другу акцію,goodbye, що малює текст “goodbye, world!”. Відредагуйте файл маршрутів з Лістингу 1.10, щоб кореневий маршрут вів доgoodbyeзамістьhello(Малюнок 1.20).

- Найбільш сучасна версія Ruby on Rails Tutorialможе бути знайдена на сайті книжки за адресою http://www.railstutorial.org/. Якщо ви читаєте цю книжку офлайн, будьте впевнені, що перевірили онлайн версію книжки Rails Tutorial за адресою http://www.railstutorial.org/book, щоб отримати останні оновлення. ↑
- URI означає Uniform Resource Identifier, тоді як трохи менш загальне URLозначає Uniform Resource Locator. На практиці, URL зазвичай є еквівалентом до “те річ, яку ви бачите в адресному рядку вашого браузера”. ↑
- http://tryruby.org/ ↑
- http://www.railstutorial.org/#help ↑
- Навіть коли і так, користувачі Windows повинні бути попереджені, що встановлювач Rails, рекомендований InstallRails, часто є простроченим, та, дуже вірогідно, є несумісним з ціми настановами . ↑
- Наприклад, щоб знайти визначення
функції, названою
foo, ви можете зробити глобальний пошук для “def foo”. ↑ - https://c9.io/web/sign-up/free ↑
- Зараз Cloud9 включає старішу версію Rails, не сумісну з даним підручником, що є однією з причин, чому так важливо вітановити її самотужки. ↑
- Як зауважено в Таблиці 3.1,
ви можете навіть не вказувати
install, оскількі командаbundleсама по собі є синонімом дляbundle install. ↑ - Зазвичай веб сайти роблять на порту 80, але це звичайно потребує особливих прівелеїв, так що є загально уживаним використовувати менш обмежені вищі номери портів для серверів розробки. (Насправді, налаштування багатьох систем вимагає, щоб номер непрівелійованого порта був більше 1024. Але це обмеження робить тільки для зовнішніх підключень: для доступу до localhost це все не стосується. прим. перекладача). ↑
- Насправді це “Ctrl-c”— немає потреби натискати клавішу Shift для отримання великої “C”— але за якоїсь причини це завжди пишеться як “Ctrl-C”. ↑
- Хоча ми ніколи не потребуємо
редагування його в цій книжці, приклад додавання
правил до файлу
.gitignoreє в Розділі 3.7.3, що є частиною опціонального розширеного налагодження тестування в Розділі 3.7. ↑ - Для зручного шляху візуалізації репозитаріїв Git, погляньте на застосування Atlassian’s SourceTree. ↑
- Дивіться главу Git Branching in Pro Gitдля деталей. ↑
- Хоча це не має значення для прикладів застосувань в Rails Tutorial, якщо ви турбуєтесь щодо випадкового передчасного викладання вашого застсування на публіку, є декілька опцій; дивіться Розділ 1.5.4 щоб отримату одну з них. ↑
- Вимовляється “Engine X”. ↑
- Загалом кажучі, є гарною ідеєю для розробки та промислового оточення бути подібними як можливо більше, що включає використання тієї ж бази даних, але для потреб цього підручника ми завжди використовуємо SQLite локально, та PostgreSQL у виробничому режимі. Дивіться Розділ 3.1 для додаткової інформації . ↑
- https://toolbelt.heroku.com/ ↑
- http://www.railstutorial.org/#email ↑
- Ваш редактор може відібражати повідомлення, на кшталт “invalid multibyte character”, але це не є причиною для турботи. Ви можете пошукати помилку в Google, якщо ви бажаєте знати, як зробити щоб вона зникла. ↑
Глава 2 Іграшкове застосування
В цьому розділі ми розробимо ігршкове застосування, щоб висвітити деякі потужні сторони Rails. Ціллю є надати високорівневий огляд програмування на Ruby on Rails (та веб розобки загалом), швидко генеруючи застосування з викоританням генераторів підпорок (scaffold generators), що створює велику кількість функціональності автоматично. Як дискутується у Врізці 1.2, решта книги буде використовувати інший підхід, розробляючи приклад повного застосування послідовно, та пояснюючи кожну нову концепцію, що виникатиме. Але для швидкого огляду (та деякого самозадоволення) для підпорок немає заміни. Отримана іграшка буде дозволяти взаємодію з собою через URL, даючи розуміння структури Rails застосування, включаючи перший приклад архитектури REST, характерної для Rails.
Як і в випадку майбутнього застосування-приклада, іграшкове застосування буде скаладатись користувачів та асоційованих з ними мікропостів (таким чином це буде мінімальський застосунок в стилі Twitter). Функціональність буде повністю недоробленою, та багато кроків будуть виглядати як магія, але не хвилюйтесь: повний приклад буде розробляти подібне застосування з самого початку, починаючи з Глави 3, та я буду провадити безліч попередніх пояснень до подальшого матеріалу. В найближчому майбутньому запасіться терпінням та трохи довірою. Кінцеве призначення цього туторіала — вивести вас за межі цього штучного, базованого на підпорках, підоходу, щоб досягти глибшого розуміння Rails.
2.1 Планування застосування
В цьому розділі ми окреслимо наші плани для іграшкового
застосування. Як і в розділі Розділі 1.3,
ми почнемо з генерування скелету застосування,
використовуючи команду rails new з
особливою версією Rails:
$ cd ~/workspace
$ rails _4.2.0_ new toy_app
$ cd toy_app/
Якщо команда вище повертає помилку на кшталт “Could not find ’railties”’, це означає, що ви не маєте потрібної встановленої версії Rails, та вам треба ще раз перевірити, що ви слідували командам в Лістингу 1.1 буквально як написано. (Якщо ви використовуєте хмарне IDE, як було рекомендовано в Розділі 1.2.1, зауважте, що це друге застосування може бути створене в тому ж робочому просторі, що і перше. Немає потреби створювати новий робочий простір. Щоб файли з'явились вам, можливо, знадобиться клацтнути на іконці механізму в полі файлового навігатора та обрати “Refresh File Tree”.)
Далі ми використаємо тексторий редактор для оновлення
файлу Gemfile , оновивши компоненти,
потрібні для Bundler, як опказано в Лістингу 2.1.
Gemfile
для іграшкового застосування. source 'https://rubygems.org'
gem 'rails', '4.2.0'
gem 'sass-rails', '5.0.1'
gem 'uglifier', '2.5.3'
gem 'coffee-rails', '4.1.0'
gem 'jquery-rails', '4.0.3'
gem 'turbolinks', '2.3.0'
gem 'jbuilder', '2.2.3'
gem 'sdoc', '0.4.0', group: :doc
group :development, :test do
gem 'sqlite3', '1.3.9'
gem 'byebug', '3.4.0'
gem 'web-console', '2.0.0.beta3'
gem 'spring', '1.1.3'
end
group :production do
gem 'pg', '0.17.1'
gem 'rails_12factor', '0.0.2'
end
Зауважте, що Лістинг 2.1 ідентичний до Лістингу 1.14.
Як і в Розділі 1.5.1, ми встановимо локальні джеми, при цьому запобігаючи інсталяції виробничих джемів, використовуючи опцію --without production:
$ bundle install --without production
Нарешті, ми покладемо наше іграшкове застосування під контроль версій за допомогою Git:
$ git init
$ git add -A
$ git commit -m "Initialize repository"
Ви також повинні створити новий репозитарій, клацнувши кнопку “Create” на Bitbucket (Малюнок 2.1), та потім просунути проект на віддалений репозитарій:
$ git remote add origin git@bitbucket.org:<username>/toy_app.git
$ git push -u origin --all # просуває проект на сервер

Нарешті, ніколи не зарано для розгортання, так що я раджу пройти кроки, такі як і для “hello, world!” Лістингу 1.8 та Лістингу 1.9.1 Потім закріпіть зміни та знову просуньте їх на Heroku:
$ git commit -am "Add hello"
$ heroku create
$ git push heroku master
(Як в Розділі 1.5, ви можете побачити деякі повідомлення застереження, що поки що ви можете ігнорувати. Ми позбудемось від них в Розділі 7.5). Окрім адреси застосування Heroku, результат повинен бути таким самим, що і на Малюнку 1.18.
Тепер ми готові почати будувати саме застосування. Типовий перший крок при побудові веб застосування - це створення моделі даних, що є представленням структур, що потрібні нашому застосуванню. В нашому випадку іграшкове застосування є мікроблогом, де є тільки користувачі та короткі (мікро)пости. Таким чином ми почнемо з моделі для користувачів застосування (Розділ 2.1.1), та потім ми додамо модель для мікропостів (Розділ 2.1.2).
2.1.1 Іграшкова модель для користувачів
Є багато виборів для моделі даних користувача, так, як і
є багато реєстраційних форм в веб; ми почнемо з вкрай
мінімалістичного підходу.
Користувачі нашого іграшкового застосування будуть мати
унікальний цілий ідентифікатор id,
публічне ім'я name (з типом string),
та адресу email (також як string),
що також буде і ім'ям користувача. Підсумовуючи, модель
даних для користувачів показана на Малюнку 2.2.
Як ми побачимо починаючи з Розділу 6.1.1,
мітка users на Малюнку 2.2
відповідає до таблиці
в базі даних, та атрибути id, name
та email є ствпчиками в цій
таблиці.
2.1.2 Іграшкова модель для мікропостів
Ядро моделі даних для мікропостів є навіт простішим, ніж
для користувачів: мікропост має тільки поля id
та content для тексту мікропоста (з типом text).2 Однак є додаткове
ускладнення: ми бажаємо асоціювати кожний
мікропост з окремим користувачем.
Ми досягнемо цього, записуючи user_id
для власника посту. Результат показаний на Малюнку 2.3.
Ми побачимо в Розділі 2.3.3
(та ще повніше в Розділі
11), як цей атрибут user_id
дозволяє нам успішно відзеркалити той факт, що користувач
потенційно має багато асоційованих мікропостів.
2.2 Ресурс Users
В цьому розділі ми реалізуємо модель даних для користувачів з Розділу 2.1.1, разом з веб інтерфейсом для цієї моделі. Комбінація буде складати ресурс Users, що дозволить нам міркувати про користувачів, як про об'єкт, що може бути створений, прочитаний, оновлений, та видалений через веб по протоколу HTTP. Як ми і обіцяли у вступі, ресурс Users буде створено програмою генерації підпорок, що стандартно іде з кожним проектом Rails. Я застерігаю вас не дуже придивлятись до згенерованого коду; на цьому етапі це тільки прислужиться вашому збентеженню.
Підпорки Rails генеруються, передаючи команду scaffold
в скрипт rails generate.
Аргумент команди scaffold є сингулярною
версією імені ресурсу (в цьому випадку User),
разом з опціональними параметрами для атрибутів моделі
даних:3
$ rails generate scaffold User name:string email:string
invoke active_record
create db/migrate/20140821011110_create_users.rb
create app/models/user.rb
invoke test_unit
create test/models/user_test.rb
create test/fixtures/users.yml
invoke resource_route
route resources :users
invoke scaffold_controller
create app/controllers/users_controller.rb
invoke erb
create app/views/users
create app/views/users/index.html.erb
create app/views/users/edit.html.erb
create app/views/users/show.html.erb
create app/views/users/new.html.erb
create app/views/users/_form.html.erb
invoke test_unit
create test/controllers/users_controller_test.rb
invoke helper
create app/helpers/users_helper.rb
invoke test_unit
create test/helpers/users_helper_test.rb
invoke jbuilder
create app/views/users/index.json.jbuilder
create app/views/users/show.json.jbuilder
invoke assets
invoke coffee
create app/assets/javascripts/users.js.coffee
invoke scss
create app/assets/stylesheets/users.css.scss
invoke scss
create app/assets/stylesheets/scaffolds.css.scss
Включаючи name:string та email:string,
ми створили для моделі User форму, відображену на Малюнку 2.2. (Зауважте, що ми не
включили параметр для id; він створений
автоматично самим Rails, щоб використовуватись як первинний
ключ в базі даних).
Щоб просунути іграшкове застосування, спочатку нам треба мігрувати базу даних за допомогою Rake (Врізка 2.1):
$ bundle exec rake db:migrate
== CreateUsers: migrating ====================================================
-- create_table(:users)
-> 0.0017s
== CreateUsers: migrated (0.0018s) ===========================================
Це просто оновлює базу даних новою моделлю users. (Ми вивчимо більше щодо
міграції баз даних починаючи з Розділу 6.1.1).
Зауважте, що для впевненості, що команда використовує версію
Rake, що відповідає нашому Gemfile, ми
потребуємо виконати rake з використанням bundle
exec. На
багатьох системах, включаючи хмарне IDE, ви можете оминути bundle
exec, але це потрібно на деяких системах, так що я
включаю це для повноти викладання.
$ rails server -b $IP -p $PORT # Якщо ви не на хмарі, виконуйте `rails server`
Тепер іграшкове застосування повинне бути доступне на локальному сервері як описано в Розділі 1.3.2. (Якщо ви використовуєте хмарне IDE, переконайтесь, що отриманий сервер розробки відкривається в новій вкладинці переглядача, а не в самому IDE).
В традиції Unix, утіліта make відігравала важливу роль в побудові виконавчих програм з первинного коду; багато хакерів на рівні мускульної пам'яті запам'ятали рядок
$ ./configure && make && sudo make install
що має загальне використання для користування коду Unix систем (включаючи Linux та Mac OS X).
Rake - це Ruby make, make-подібна мова,
написана на Ruby. Rails екстенсивно
використовує Rake, особливо для незчісленних малих
адміністративних завдань, потрібних для розробки веб
застосунків з підтримкою баз даних.
Команда rake db:migrate вірогідно є найбільш
загальною, та є багато інших; Ви можете бачати перелік
завдань баз даних виконавши -T db:
$ bundle exec rake -T db
Щоб побачити всі можливі завдання, виконайте
$ bundle exec rake -T
Список буде приголомшливим, але не хвилюйтесь, ви не повинні знати всі (або навіть більшість) з ціх команд. До кінця Rails Tutorial ви будете знати більшість важливих команд.
2.2.1 Тур по користувачам
Якщо ви зайдете на кореневий URL по / (читається “слеш” або коса лінія, як зазначено в Розділі 1.3.4), ми отримаємо ту ж саму сторінку Rails по замовчанню, показану на Малюнку 1.9, але в генерації підпорок для ресурсу Users ми також створили велику кількість сторінок для маніпулювання користувачами. Наприклад, сторінка для переліку всіх користувачів знаходиться на /users, та сторінка для створення нового користувача на /users/new. Залишок цього розділу присвячений карколомному туру по цім сторінках. По мірі просування може допомогти посилання на Таблицю 2.1, що показує відповідність між сторінками та URL.
| URL | Дія | Призначення |
| /users | index |
перелік всіх користувачів |
| /users/1 | show |
сторінка для відображення
кристувача з id 1 |
| /users/new | new |
сторінка для створення нового користувача |
| /users/1/edit | edit |
сторінка для редагування
користувача з id 1 |
Ми почали з сторінки, що відображує всіх користувачів в нашому застосуванні, що називається index; як ми, можливо, очікували, спочатку немає жодних користувачів (Малюнок 2.4).
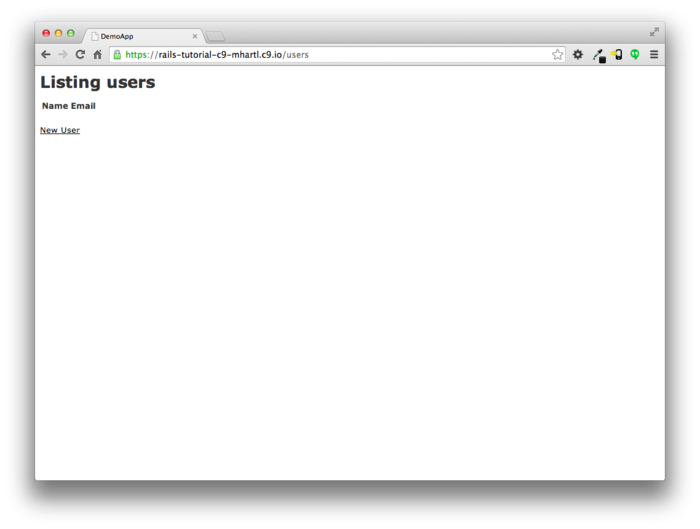
Щоб створити нового користувача, ми заходимо на сторінку new, як показано на Малюнку 2.5. (Оскільки http://0.0.0.0:3000 або частина адреси в хмарній IDE є неявною, коли ми розробляємо локально, відтепер я буду випускати її). В Главі 7, це перетвориться в сторінку реєстрації користувача.
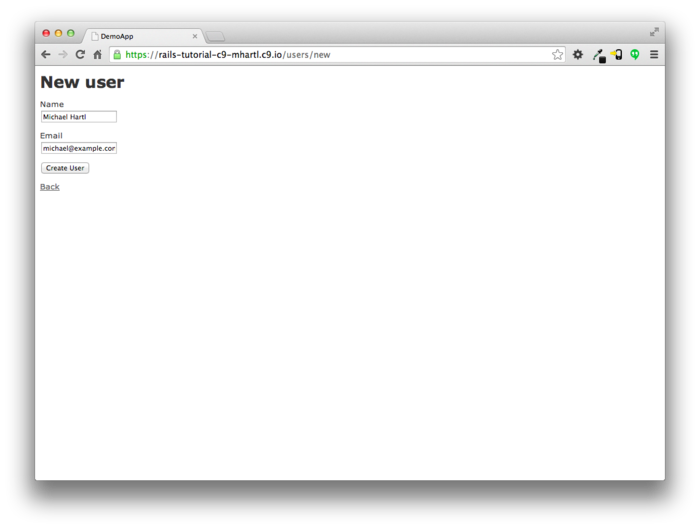
Ми можемо створити користувача, ввівши значення ім'я та електронної
пошти, на потім натиснувши на кнопку Create User.
Результатом буде сторінка користувача show, як
показано на Малюнку
2.6.
(Зелене повідомлення привітання зроблене з використанням flash,
який ми вивчимо в Розділі
7.4.2.)
Зауважте, що URL є /users/1; як ви могли підозрювати,
число 1 є просто атрибут id
користувача з Малюнка
2.2.
В Розділі
7.1 ця сторінка
перетвориться на профіль користувача.
Щоб змінити інформацію про користувача, ми завітаємо на сторінку edit (Малюнок 2.7). Модифікуючи інформацію про користувача ми натискаємо на кнопку Update User, та так змінюємо інформацію щодо користувача в іграшковому застосуванні (Малюнок 2.8). (Як ми побачимо в деталях в Розділі 6, Ці дані зберігаються в базі даних). Ми додамо функціонал редагування/оновлення до простого застосування в Розділі 9.1.
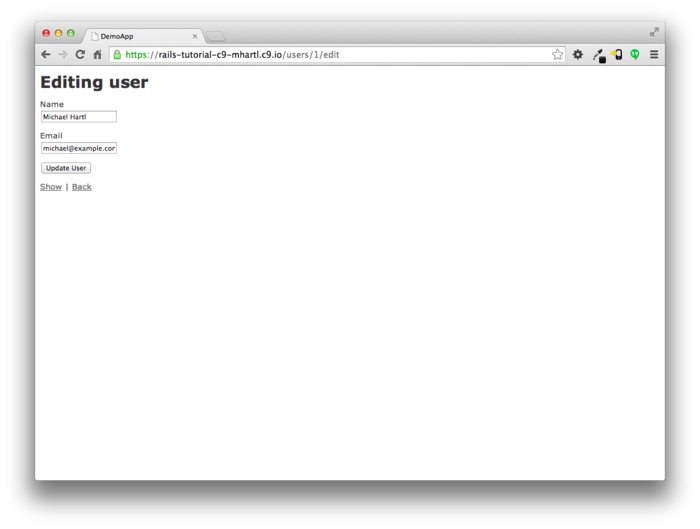

Тепер ми створими другого користувача, знову навідавшись на сторінку new, та ввівши другий набір інформації користувача; утворена сторінка користувача index показана на Малюнку 2.9. Розділ 7.1 присвячений розробці списку користувачів в більш відполірованому стилі, де відображатимуться всі користувачі.

Показавши, як створювати, відображати та редагувати користувачів, ми нарешті дійшли до їх знищення (Малюнок 2.10).Ви повинні перевірити, що клацнувши на посиланні на Малюнку 2.10 знищить другого користувача, залишивши тілько одного в списку. (Якщо це не працює, переконайтесь, що JavaScript ввімкнено в вашому переглядачеві; Rails використовує JavaScript, щоб віддавати запити, потрібні для знищення користувача). Розділ 9.4 додає видалення користувача до простого застосування, пілкуючись про його використання окремим класом адміністративних користувачів.
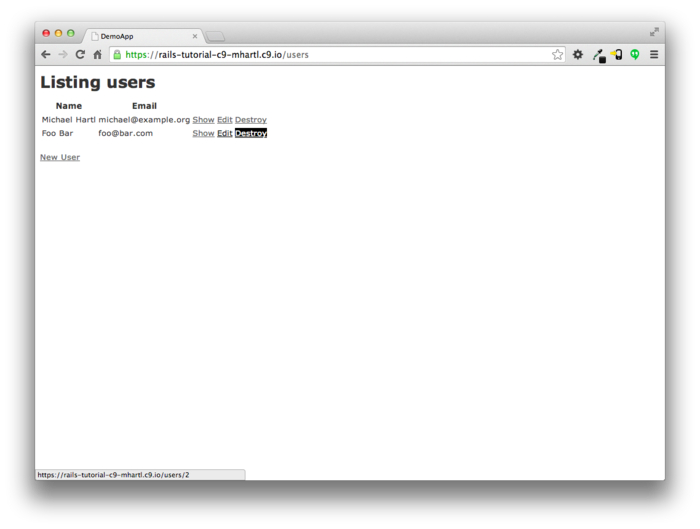
2.2.2 MVC в дії
Тепер, коли ми закінчили швидкий огляд ресурсу Users, давайте перевіримо одну окрему його частину в контексті шаблону Model-View-Controller (MVC), що ми розглядали в Розділі 1.3.3. Наша стратегія буде описати результати типового влучання переглядача — візит до списку користувачів на /users—в термінах MVC (Малюнок 2.11).
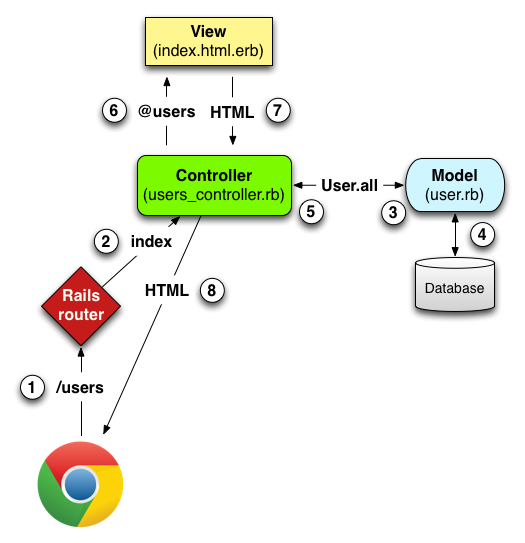
Ось підсумок кроків, показаних на Малюнку 2.11:
- Переглядач віддає запит для URL /users.
- Rails маршрутизує /users до акції
indexв контролері Users. - Акція
indexзапитує модель User щоб отримати всіх користувачів (User.all). - Модель User підтягує всіх користувачів з бази даних.
- Модель User повертає список користувачів в контролер.
- Контролер захоплює користувачів в змінній
@users, що передається до переглядуindex. - Перегляд використовує вбудований Ruby для малювання сторінки як HTML.
- Контролер передає HTML назад в переглядач.5
Тепер давайте поглянемо на перелічені кроки більш детально. Ми починаємо з запиту,
що походить від переглядача — тобто, результат набору URL
в адресному рядку або клацання по посиланню (Step 1 на Малюнку 2.11).
Цей запит потрапляє до маршрутизатора Rails
(Step 2), що пересилає його до відповідної дії
контролера базуючись на URL (та, як ми побачимо у Врізці 3.2,
типі запиту). Код,
що створює відображення користувацьких URL на дії
контролера для ресурсу Usersпоказано в Лістингу 2.2;
цей код ефективно встановлює таблицю пар URL/дія, що
показана в Таблиці
2.1.
(Дивна нотація :users є символом,
що ми вивчимо в Розділі
4.3.3.)
Rails.application.routes.draw do
resources :users
.
.
.
end
Покі ми дивимось на файл маршрутів, давайте улучимо момент, та асоціюємо кореневий маршрут зі списком користувачів, так щоб “коса” вела до /users. Дивіться що ми змінюємо відносно Лістингу 1.10
# root 'welcome#index'
на наступне
root 'application#hello'
Таким чином кореневий маршрут приведе до дії hello
контролеру Application.
В попередньому випадку ми бажаємо використовувати дію index
в контролері Users, що ми можемо оброблити з використанням
коду з Лістингу
2.3.
(На цей момент я також рекомендую видалити дію hello
з контрелера Application, якщо ви додали її на початку
цього розділу).
Rails.application.routes.draw do
resources :users
root 'users#index'
.
.
.
end
Сторінки, показані в турі Розділу
2.2.1 відповідають діям
в контролері Users, що є набором пов'язаних дій. Контролер,
згенерований підпорками, схематично показаний на Лістингу 2.4. Зауважте нотацію class
UsersController < ApplicationController, що є
прикладом Ruby класу знаслідуванням. (Ми обсудимо
наслідування поверхнево в Розділі 2.3.4
та накриємо обоє теми більш детально в Розділі 4.4.)
class UsersController < ApplicationController
.
.
.
def index
.
.
.
end
def show
.
.
.
end
def new
.
.
.
end
def edit
.
.
.
end
def create
.
.
.
end
def update
.
.
.
end
def destroy
.
.
.
end
end
Ви можете зауважити, що є більше дій, ніж сторінок; дії index,
show, new та edit
всі відповідають сторінкам з Розділу
2.2.1, але також є
додаткові дій create, update
та destroy.
Ці дії типово не рисують сторінки (хоча вони можуть);
замість цього їх головне призначення модифікувати
інформацію щодо користувачів в базі даних.
Це повний набір дій користувачів, підсумованих в Таблиці 2.2,
представляє реалізацію REST архітектури в Rails (Врізка 2.2),
що базується на ідеях представницької передачі стану
сформульовану та названу ком'ютерним дослідником Roy Fielding.6 Зауважте з таблиці Таблиці
2.2 що є деяке перекриття
URL; наприклад, обоє дії з користувачами, show
та update відповідають до URL /users/1. Різниця
між ними є метод запиту HTTP , на який вони
відповідають. Ми
познайомимось з запитами HTTP починаючи з Розділу 3.3.
| HTTP запит | URL | Дія | Призначення |
| GET | /users | index |
сторінка для переліку всіх користувачів |
| GET | /users/1 | show |
сторінка для відображення
користувача з id 1 |
| GET | /users/new | new |
сторінка щоб створити нового користувача |
| POST | /users | create |
створити нового користувача |
| GET | /users/1/edit | edit |
сторінка для редагування
користувача з id 1 |
| PATCH | /users/1 | update |
оновити користувача з id 1 |
| DELETE | /users/1 | destroy |
видалити користувача з id 1 |
Якщо ви читаєте більше про веб розробку на Ruby on Rails, ви побачите багато посилань на “REST”, що є акронімом від REpresentational State Transfer. REST є архитектурним стилем для розробки розгалужених, мережевих систем та програмних застосувань, таких, як World Wide Web та веб застосування. Хоча теорія REST є дещо абстрактною, в контексті Rails застосувань REST означає, що більшість компонент застосування (такі, як користувачі або мікропости) моделюються як ресурси, що можуть бути створені, прочитані, оновлені та видалені — операції, що відповідають обом, CRUD операціям реляційних баз даних та чотирьом фундаментальним методам запитів HTTP: POST, GET, PATCH та DELETE.7 (Ми вивчимо більше про HTTP в Розділі 3.3 та особливо Врізці 3.2.)
Як для розробника Rails застосувань, RESTful стиль розробки допоможе вам зробити вибір щодо того, які конролери та дії писати: ви просто структуруєте застосування з використанням ресурсів, що можна створити, прочитати, оновити та видалити. В випадку користувачів та мікропостів цей процес прямолінійний, оскільки вони природно є ресурсами самі по собі. В Главі 12 ми побачимо приклад, де принципи REST дозволяють нам змоделювати тонкіші проблеми, “слідування користувачів”, в природний та зручний спосіб.
Щоб дослідити відношення між контролером Users та моделлю
User, давайте сфокусуємось на спрощеній версії дії index,
показаній на Лістингу
2.5.
(Код підпорок огидний та збентежуючий, так що я не
показиватиму його).
index
для іграшкового застосування.
app/controllers/users_controller.rb
class UsersController < ApplicationController
.
.
.
def index
@users = User.all
end
.
.
.
end
Ця дія index має рядок @users =
User.all (Step 3 на Малюнку 2.11),
що
змушує модель User отримати перелік всіх користувачів з
бази даних (Step 4), т опотім розташувати їх в
змінній @users (вимовляється “ет-юзерс”)
(Step 5).
Модель User сама по собі з'являється у Лістингу 2.6;
хоча вона досить пласка, вона іде оздоблена великою
кількістю функціональності завдяки наслідуванню (Розділ 2.3.4
та Розділ 4.4).
Зокрема, з використанню бібліотеки Rails з назвою Active
Record, код в Лістингу
2.6 розуміє User.all
для повернення всіх користувачів з бази даних.
class User < ActiveRecord::Base
end
Як тільки змінна @users визначена,
контролер викликає view (Step 6),
показаний в Лістингу
2.7.
Змінні, що починаються зі знаку @,
називаються змінними екземпляру, та автоматично
доступні для переглядів; в цьому випадку перегляд index.html.erb
в Лістингу
2.7 ітерує по списку @users
та виводить рядок HTML для кожного елементу.
(Пам'ятайте, ви не маєте розуміти цей код прямо зараз. Він показаний тільки
для цілей ілюстрації).
<h1>Listing users</h1>
<table>
<thead>
<tr>
<th>Name</th>
<th>Email</th>
<th colspan="3"></th>
</tr>
</thead>
<% @users.each do |user| %>
<tr>
<td><%= user.name %></td>
<td><%= user.email %></td>
<td><%= link_to 'Show', user %></td>
<td><%= link_to 'Edit', edit_user_path(user) %></td>
<td><%= link_to 'Destroy', user, method: :delete,
data: { confirm: 'Are you sure?' } %></td>
</tr>
<% end %>
</table>
<br>
<%= link_to 'New User', new_user_path %>
Перегляд конвертує свій вміст в HTML (Step 7), що потім повертається контролером в переглядач для відображення (Step 8).
2.2.3 Слабкість ресурсу Users
Хоча гарні для отримання загального огляду Rails, підпорки ресурсу Users потерпають від декількох слабкостей.
- Немає перевірки даних. Наша модель User сприймає дані, такі як пусті імена та недійсні поштові адреси без заперечень.
- Немає аутентифікації. Немає поняття входу в систему, або виходу, та немає шляху запобігти користувачам від виконання довільних операцій.
- Немає тестів. Технічно це невірно — підпорки включають рудиментарні тести — але згенеровані тести не тестують жодних перевірок, аутентифікації, або жодних специфічних вимог.
- Немає а ні стилю, а ні розташування. Немає узгодженного стилю сайту або навігації.
- Немає дійсного розуміння. Якщо ви розумієте роботу коду підпорок, вам, напевне, не треба читати цю книжку.
2.3 Ресурс мікропостів
Маючи згенерований та вивчений ресурс Users, ми переходимо тепер до ресурсу Microposts. На протязі цього розділу я рекомендую порівняти елементи ресурсу Microposts з аналогічними елементами з Розділу 2.2; ви повинні побачити, що ці два ресурси повторюють один одний в багатьох аспектах. RESTful структура застосувань Rails найкраще просякнута цім типом повторення форми — біль того, спостереження за паральною структурою Users та Microposts навіть на ранішній стадії є одною з примітивних мотивацій цього розділу.
2.3.1 Мікротур в мікропости
Як і з ресурсом Users ми згенеруємо код підпорок для
ресурсу Microposts з використанням rails generate
scaffold, в цьому випадку реалізуючи модель даних
на Малюнку
2.3:8
$ rails generate scaffold Micropost content:text user_id:integer
invoke active_record
create db/migrate/20140821012832_create_microposts.rb
create app/models/micropost.rb
invoke test_unit
create test/models/micropost_test.rb
create test/fixtures/microposts.yml
invoke resource_route
route resources :microposts
invoke scaffold_controller
create app/controllers/microposts_controller.rb
invoke erb
create app/views/microposts
create app/views/microposts/index.html.erb
create app/views/microposts/edit.html.erb
create app/views/microposts/show.html.erb
create app/views/microposts/new.html.erb
create app/views/microposts/_form.html.erb
invoke test_unit
create test/controllers/microposts_controller_test.rb
invoke helper
create app/helpers/microposts_helper.rb
invoke test_unit
create test/helpers/microposts_helper_test.rb
invoke jbuilder
create app/views/microposts/index.json.jbuilder
create app/views/microposts/show.json.jbuilder
invoke assets
invoke coffee
create app/assets/javascripts/microposts.js.coffee
invoke scss
create app/assets/stylesheets/microposts.css.scss
invoke scss
identical app/assets/stylesheets/scaffolds.css.scss
(Якщо ви отримали помилку, пов'язану зі Spring, просто виконайте команду ще раз). Щоб оновити нашу базу даних новою моделлю даних нам треба виконати міграцію, як в Розділі 2.2:
$ bundle exec rake db:migrate
== CreateMicroposts: migrating ===============================================
-- create_table(:microposts)
-> 0.0023s
== CreateMicroposts: migrated (0.0026s) ======================================
Тепер ми на позиції створення мікропостів в той же
спосіб, як ми створювали користувачів в Розділі 2.2.1. Як ви могли
здогадатись, генератор підпорок оновив файл маршрутів
Rails для ресурсу Microposts, як бачимо у Лістингу 2.8.9 Як і з користувачами,
правило маршрутизації resources :microposts
відзеркалює URL мікропостів на дії в контролері
Microposts, як бачимо а Таблиці 2.3.
Rails.application.routes.draw do
resources :microposts
resources :users
.
.
.
end
| HTTP запит | URL | Дія | Призначення |
| GET | /microposts | index |
сторінка для відображення всіх мікропостів |
| GET | /microposts/1 | show |
сторінка для відображення
мікропосту з id 1 |
| GET | /microposts/new | new |
сторінка для створення нового мікропосту |
| POST | /microposts | create |
створення нового мікропосту |
| GET | /microposts/1/edit | edit |
сторінка для редагування
мікропосту з id 1 |
| PATCH | /microposts/1 | update |
оновлення мікропосту з id 1 |
| DELETE | /microposts/1 | destroy |
видалення мікропосту з id 1 |
Контролер Microposts сам з'являється в схематичному
вигляді в Лістингу
2.9.
Зауважте, що окрім маючи MicropostsController
замість UsersController, Лістинг 2.9
є ідентичним до коду Лістингу 2.4. Це відображення
архітектури REST, загальної для обох ресурсів.
class MicropostsController < ApplicationController
.
.
.
def index
.
.
.
end
def show
.
.
.
end
def new
.
.
.
end
def edit
.
.
.
end
def create
.
.
.
end
def update
.
.
.
end
def destroy
.
.
.
end
end
Щоб створити декілька реальних мікропостів ми введемо інформацію на сторінці нового мікропосту, /microposts/new, як показано на Малюнку 2.12.
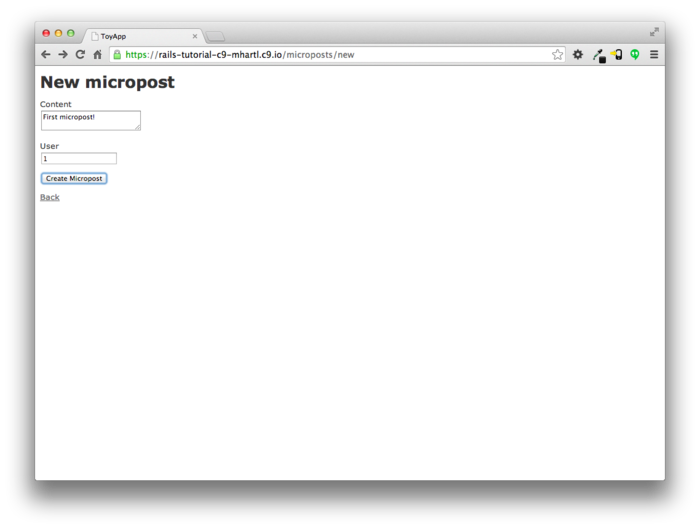
На цьому місці введіть один або два мікропости, пілкуючись,
щоб щонайменьше один мав user_id рівне 1,
щоб співпадати з id першого користувача, створеного в Розділі 2.2.1.
Результат повинен виглядати дещо схожим на Малюнок 2.13.

2.3.2 Додаємо мікро до мікропостів
Кожний мікропост, що вартий свого ім'я, повинен
мати деякі механізми для змушення довжини постів.
Реалізація цього обмеження в Rails легка, за допомогою валідаторів;
щоб сприймати мікропости щонайбільше 140 символів (à la
Twitter), ми використовуємо валідатор довжини.
В цей момент ви відкриваєте файл app/models/micropost.rb
в вашому текстовому редакторі або IDE та вводите туди
наступний вміст з Лістингу 2.10.
class Micropost < ActiveRecord::Base
validates :content, length: { maximum: 140 }
end
Код в Лістингу 2.10 може виглядати дещо містичним — ми розкажемо про валідацію більш докладно починаючи з Розділу 6.2 — але її ефект вже зрозумілий, якщо ми перейдемо створення нового мікропосту, та введемо більше ніж 140 символів в якості тексту мікропоста. Як бачимо на Малюнку 2.14, Rails відтворює повідомлення про помилку, що вказує, що вміст мікропосту задовгий. (Ми вивчимо більше про повідомлення помилок в Розділі 7.3.3.)

2.3.3 Користувач has_many
мікропостів
Одна з найбільш потужних можливостей Rails є спроможність формувати асоціації між різними можелями даних. В випадку нашої моделі User кожний користувач потенційно має декілька мікропостів. Ми можемо виразити це в коді, оновивши моделі User та Micropost, як у Лістингу 2.11 та Лістингу 2.12.
class User < ActiveRecord::Base
has_many :microposts
end
class Micropost < ActiveRecord::Base
belongs_to :user
validates :content, length: { maximum: 140 }
end
Ми можемо візуалізувати результат цієї асоціації на Малюнку
2.15.
Оскільки стовпчик user_id в таблиці microposts,
Rails (з використанням Active Record) може вивести, що
мікропости асоційовані з кожним користувачем.

В Главі
11 та Главі 12
ми будемо використовувати асоціації користувачей та
мікропостів обох, щоб відобразити всі з мікропостів
користувача, та створити фід мікропостів в стилі Twitter. Поки що ми можемо
перевірити вплив асоціації користувач-мікропост з
використанням консолі, що є корисним
інструментом для взаємодії з застосуваннями Rails.
Спочатку ми викличемо консоль за допомогою rails
consoleв командному рядку , та потім отримаємо
першого користувача з бази данихз використанням User.first
(зберігаючи результат в змінній first_user):10
$ rails console
>> first_user = User.first
=> #<User id: 1, name: "Michael Hartl", email: "michael@example.org",
created_at: "2014-07-21 02:01:31", updated_at: "2014-07-21 02:01:31">
>> first_user.microposts
=> [#<Micropost id: 1, content: "First micropost!", user_id: 1, created_at:
"2014-07-21 02:37:37", updated_at: "2014-07-21 02:37:37">, #<Micropost id: 2,
content: "Second micropost", user_id: 1, created_at: "2014-07-21 02:38:54",
updated_at: "2014-07-21 02:38:54">]
>> micropost = first_user.microposts.first # Micropost.first would also work.
=> #<Micropost id: 1, content: "First micropost!", user_id: 1, created_at:
"2014-07-21 02:37:37", updated_at: "2014-07-21 02:37:37">
>> micropost.user
=> #<User id: 1, name: "Michael Hartl", email: "michael@example.org",
created_at: "2014-07-21 02:01:31", updated_at: "2014-07-21 02:01:31">
>> exit
(Я включив exit в останній рядок тільки для
демонстрації як вийти з консолі.
На більшості систем ви також можете використовувати Ctrl-D
для тієї ж цілі).11 Тут ми отримали
доступ до мікропостів користувача використовуючи код first_user.microposts. Маючи цей код Active
Record автоматично повертає всі мікропости з user_id
, що дорівнює id з first_user (в цьому
випадку 1).
Ми навчимось більше щодо можливостей асоціації в Active
Record в Главі
11 та Главі 12.
2.3.4 Наслідування наслідувань
Ми завершили наше обговорення іграшкового застосування з короткого опису ієрархій класів контролерів та моделей в Rails. Ця дискуссія набере більше сенсу, якщо ми матимемо деякий досвід з об'єктно-орієнтовним програмуванням; якщо ви не вивчали його, можете вільно пропустити цей розділ. Зокрема, якщо ви не знайомі з класами (що обговорюються в Розділі 4.4), я рекомендую повернутись до цього розділу піздніше.
Ми почнемо з структури наслідування моделей. Порівнюючи Лістинг 2.13 та Лістинг 2.14,
ми бачимо, що обоє моделі, User
та Micropost наслідують (через ліву кутову дужку <)
від ActiveRecord::Base, що є базовим класом
для моделей, що провадить ActiveRecord; діаграма, що
підсумовує це відношення, зображена на Малюнку 2.16. Це завдячуючи
наслідуванню від ActiveRecord::Base
об'єкти нашої моделі отримують можливість взаємодіяти з
базою даних, трактувати стовпчики бази даних як атрибути
Ruby, і таке інше.
User,
наслідування виділене.
app/models/user.rb
class User < ActiveRecord::Base
.
.
.
end
Micropost,
наслідування виділене.
app/models/micropost.rb
class Micropost < ActiveRecord::Base
.
.
.
end
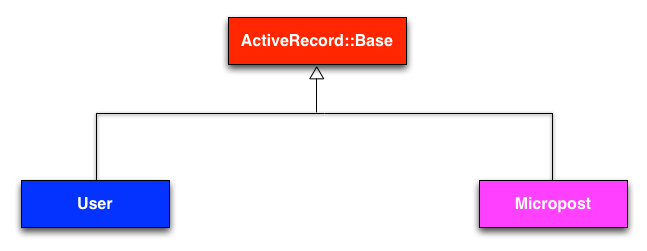
Структура наслідування для контролерів є тільки трхи
складнішою.
Порівнюючи Лістинг
2.15 та Лістинг 2.16,
ми бачимо, що обоє контролери, Users та Microposts,
походять від контролеру Application.
Вивчаючи Лістинг 2.17
ми бачимо, що цей ApplicationController сам
походить від ActionController::Base;
це базовий клас для контролерів, що провадяться
бібліотекою Rails Action Pack.
Відношення між ціма класами проілючтровано на Малюнку 2.17.
UsersController,
наслідування виділене.
app/controllers/users_controller.rb
class UsersController < ApplicationController
.
.
.
end
MicropostsController,
наслідування виділене.
app/controllers/microposts_controller.rb
class MicropostsController < ApplicationController
.
.
.
end
ApplicationController,
наслідування виділене.
app/controllers/application_controller.rb
class ApplicationController < ActionController::Base
.
.
.
end
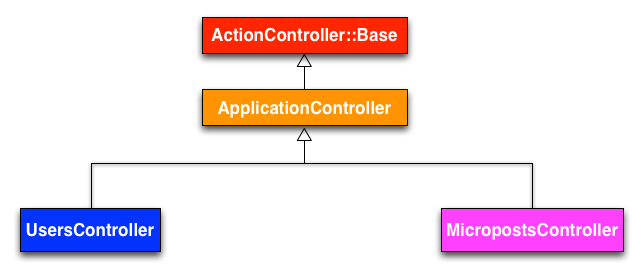
Як і з наслідуванням моделей, обоє контролери, Users та
Microposts, отримують велику кількість функціональності,
наслідуя від базового класу (в цьому випадку від ActionController::Base),
включаючи
можливість маніпулювати об'єктами моделей, фільтрувати
входящі запити HTTP, та малювати перегляди як HTML.
Оскільки всі контролери Rails наслідують від ApplicationController,
правила, визначені в контролері Application автоматично
застосовуються до кожної дії в застосуванні.
Наприклад, в Розділі
8.4 ми побачимо, як
включити допоміжники для журналювання всіх контролерів в
застосуванні-прикладі.
2.3.5 Розгортання іграшкового застосування
З завершенням ресурсу Microposts тепер є гарна нагода для просування нашого репозитарію на Bitbucket:
$ git status
$ git add -A
$ git commit -m "Finish toy app"
$ git push
Звичайно ви будете мати меньші, більш части коміти, але для цілей цього розділу один великий коміт є достатньо гарним.
На цьому місці ви можете також розгорнути ваше іграшкове застосування на Heroku як в Розділі 1.5:
$ git push heroku
(Вважається, що ви створили Heroku застосування в Розділі 2.1. Інакше ви маєте
виконати heroku create та потім git
push heroku master.)
Щоб отримати робочу базу даних вам треба також мігрувати на виробничу базу даних:
$ heroku run rake db:migrate
Це оновить базу даних на Heroku необхідними моделями користувача та мікропоста. Після виконання міграції ви маєте бути в змозі використовувати іграшкове застосування в реальному оточенні, з підтримкою справжньої бази даних PostgreSQL (Малюнок 2.18).
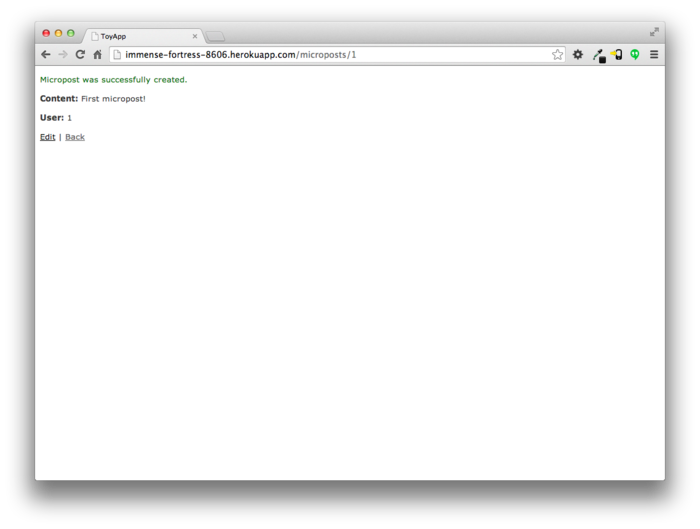
2.4 Висновок
Тепер ми дійшли кінця високорівневого огляду застосування Rails. Іграшкове застосування, розроблене в цій главі, має деяких потужних можливостей, та купу недоліків.
Сильни сторони
- Високорівневий погляд на Rails
- Вступ до MVC
- Перший присмак архитектури REST
- Початок моделювання даних
- Живе, основане на базах даних, веб застосування в інтернеті
Слабкості
- Немає власного розташування або стилю
- Немає статичних сторінок (таких як “Головна” або “Про нас”)
- Немає паролів користувачів
- Немає зображень користувачів
- Немає входу на сайт
- Немає безпеки
- Немає автоматичної асоціації користувач/мікропост
- Немає нотації “слідування”
- Немає фіду мікропостів
- Немає осмислених тестів
- Немає дійсного розуміння
Залишок цього туторіала присвячено побудові на сильних сторнах та уникання слабким.
2.4.1 Що ми вивчили в цій главі
- Підпорки автоматично створюють код та модель даних, та взаємодіють з ними через веб.
- Підпорти гарні для швидкого старту, але погані для розуміння.
- Rails використовує шаблон Model-View-Controller (MVC) для структурування веб застосувань.
- Інтерпретована Rails, REST архітектура включає стандартний набір URL та дій контролера для взаємодії з моделями даних.
- Rails підтримує валідацію даних, щоб надавати обмежень на значення атрибутів моделі даних.
- Rails іде з вбудованими функціями для визначення асоціацій між різними моделями даних.
- Ми можемо взаємодіяти з застосуваннями Rails з командного рядка з використанням консолі Rails.
2.5 Вправи
Зауваженя: Рішення вправ, з рішенням кожного завдання в книжці Ruby on Rails Tutorial, включене безкоштовно з кожним придбанням на www.railstutorial.org.
- Код Лістингу 2.18 показує, як додати перевірку для наявності вмісту мікропосту, щоб впевнитись, що мікропост не може бути пустим. Перевірте, що отримали поведінку, що показана на Малюнку 2.19.
- Оновіть Лістинг
2.19 замінюючи
FILL_INна відповідний код, щоб перевірити наявність атрибутів імені та поштової адреси в моделі User (Малюнок 2.20).
class Micropost < ActiveRecord::Base
belongs_to :user
validates :content, length: { maximum: 140 },
presence: true
end
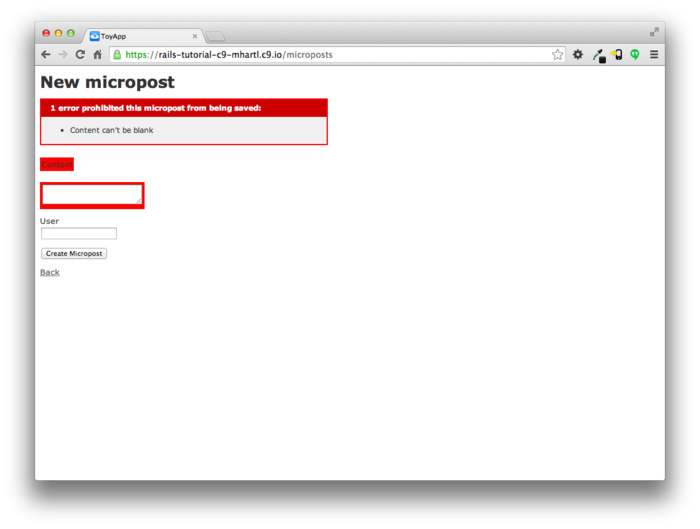
class User < ActiveRecord::Base
has_many :microposts
validates FILL_IN, presence: true
validates FILL_IN, presence: true
end
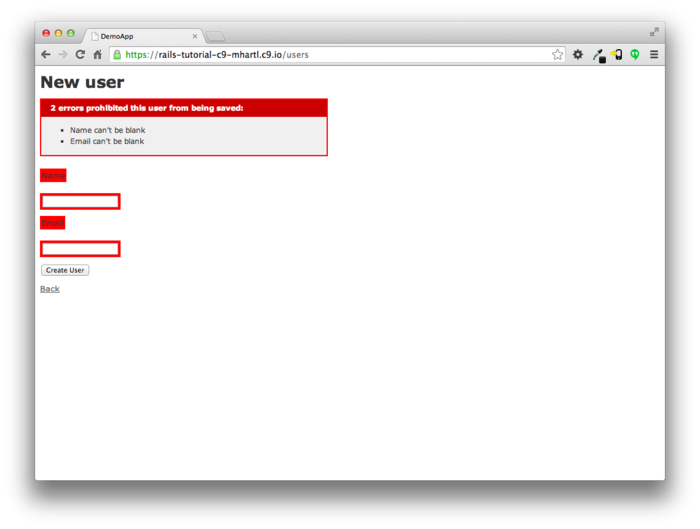
- Головна причина для цього в тому, що сторінка по замовчанню Rails типово не працює на Heroku, що робить складним сказати, чи було розгорнення вдалим чи ні. ↑
- Оскільки мікропости стислі по
задуму, тип
stringнасправді є досить довгим, щоб містити їх, але використанняtextкраще виказує наші наміри, при тому надаючи нам більшу гнучкість, якщо в майбутньому ми вирішимо пом'якшити обмеження на довжину. ↑ - Ім'я підпорок слідує домовленості
моделей, що є сингулярним, скоріше, ніж для
ресурсів та контролерів, що є множинним. Таким чином, ми
маємо
UserзамістьUsers. ↑ - Скрипт
railsзадуманий так, що вам не треба використовуватиbundle exec. ↑ - Деякі посилання вказують, що перегляд повертає HTML напряму до переглядача (через веб сервер, такий, як Apache або Nginx). Безвідносно від деталей реалізації я обираю мислити про контролер як про центральний хаб, через який проходять всі потоки застосування. ↑
- Fielding, Roy Thomas. Architectural Styles and the Design of Network-based Software Architectures. Doctoral dissertation, University of California, Irvine, 2000. ↑
- Ранішні версії Rails використовували PUT для оновлень даних, але PATCH є більше відповідним методом згідно стандарту HTTP. ↑
- Як з підпорками User, генератор
підпорок для мікропостів слідує сингулярній домовленості
для моделей Rails; таким чином ми маємо
generate Micropost. ↑ - Код підпорок може мати додаткові нові рядки порівняно з Листингом 2.8. Це не спричинятиме турботу, оскільки Ruby ігнорує нові рядки. ↑
- Ваша підказка консолі може бути щось подібне до 2.1.1 :001 >, але приклад використовує >> , оскільки версії Ruby будуть відрізнятись. ↑
- Як і з “Ctrl-C”, домовились писати “Ctrl-D”, навіть хоча насправді це “Ctrl-d”. ↑
Глава 3Здебільше статичні сторінки
В цій главі ми почнемо розробляти приклад застосування професійного рівня, що буде служити як наш приклад на протязі залишку цієї книги. Хоча приклад застосування буде мати користувачів, мікропости, та повний фреймворк логіну та аутентифікації, ми будемо починати з досить обмеженої теми: створення статичних сторінок. Не зажаючи на простоту, створення статичних сторінок є високозмістовним прикладом, багатим на застосування — чудовий початок для нашого майбутнього застосунку.
Хоча Rails розроблений для створення динамічних веб сайтів з підтримкою баз даних, він також блискуче здібний створювати той тип статичних сторінок, що ми можемо зробити з використанням тільки HTML файлів. Фактично, використовуючи Rails навіть для статичних сторінок надає помітну перевагу: ми можемо просто додати тільки невелику кількість динамічного вмісту. В цій главі ми навчимось як. По ходу дії ми набумо першого досвіду в автоматичному тестуванні, що допоможе нам бути більше впевненими, що наш код вірний. Більше того, маючи гарний тестовий інструмент дозволить нам рефакторизувати наш код з легкістю, змінюючи його форму без зміни функціональності.
3.1 Настроювання простого застосування
Як і в Главі
2, перед початком нам треба
створити новий проект Rails, цього разу з назвою sample_app,
як показано в Лістингу
3.1.1 Якщо команда в Лістингу 3.1
повертає помилку на кшталт “Could not find ’railties”’, це
означає, що ви не маєте встановленою вірну версію Rails, та
вам треба ще раз перевірити, що ви слідували командам
в Лістингу
1.1 точно по написаному.
$ cd ~/workspace
$ rails _4.2.0_ new sample_app
$ cd sample_app/
(Як в Розділі 2.1, зауважте, що користувачі хмарної IDE можуть створювати проект в тому ж робочому просторі, що і застосування з двох попередніх глав. Не треба створювати новий робочий простір).
Як в Розділі
2.1, наш наступний крок в
використанні текстового редактора для оновлення Gemfile
новими джемами, що треба для нашого застосування.
Лістинг
3.2 ідентичний до Лістинга 1.5
та Лістинга
2.1, за винятком джемів з
групи test, що треба для опціонального
розширеного налаштування тестування (Розділ 3.7). Зауваження:
Якщо ви бажаєте встановити всі джеми, що треба для
прикладу застосування, вам треба використовувати код з Лістингу 11.66
в такому випадку.
Gemfile для прикладу
застосування. source 'https://rubygems.org'
gem 'rails', '4.2.0'
gem 'sass-rails', '5.0.1'
gem 'uglifier', '2.5.3'
gem 'coffee-rails', '4.1.0'
gem 'jquery-rails', '4.0.3'
gem 'turbolinks', '2.3.0'
gem 'jbuilder', '2.2.3'
gem 'sdoc', '0.4.0', group: :doc
group :development, :test do
gem 'sqlite3', '1.3.9'
gem 'byebug', '3.4.0'
gem 'web-console', '2.0.0.beta3'
gem 'spring', '1.1.3'
end
group :test do
gem 'minitest-reporters', '1.0.5'
gem 'mini_backtrace', '0.1.3'
gem 'guard-minitest', '2.3.1'
end
group :production do
gem 'pg', '0.17.1'
gem 'rails_12factor', '0.0.2'
end
Як в двох попередніх главах, ми виконуємо bundle
install для встановлення та включення джемів,
вказаних в Gemfile, для пропуску
встановлення виробничих джемів використовуючи опцію --without
production:2
$ bundle install --without production
Це призведе до пропуску джему pg
для PostgreSQL під розробкою, та використаємо SQLite для
розробки та тестування.
Heroku
рекомендує не використовувати різні бази даних під розробкою
та в продакшині, але для простого застосування це не зробить
жодної різниці, та SQLite значно простіше
встановити на налаштувати локально, ніж PostgreSQL.3 В випадку, коли ви вже
заздалегідь встановили версію джема (такого, як сам Rails),
інший, ніж вказаний в Gemfile, буде гарною
ідеєю обновитиджеми за допомогою bundle
update, щоб впевнитись, що версії співпадають:
$ bundle update
Маюче це, все що залишилось - це ініціалізувати наш репозитарій Git:
$ git init
$ git add -A
$ git commit -m "Initialize repository"
Як і з перзим застосуванням, я рекомендую оновити файл README
(розміщений в кореневому каталозі застосування), щоб він був
більш корисним та описовим.
Ми починаємо змінюючи формат з RDoc на Markdown:
$ git mv README.rdoc README.md
Потім ми заповнюємо вміст на показаний в Лістингу 3.3.
README
для прикладу застосування. # Ruby on Rails Tutorial: sample application
This is the sample application for the
[*Ruby on Rails Tutorial:
Learn Web Development with Rails*](http://www.railstutorial.org/)
by [Michael Hartl](http://www.michaelhartl.com/).
Нарешті, ми комітимо зміни:
$ git commit -am "Improve the README"
Ви можете пригадати з Розділу
1.4.4, що ми використовували
команду Git git commit -a -m "Message",
з флагами “всі зміни” (-a) та повідомлення (-m). Як показано в другій
команді вище, Git також дозволяє надавати два флаги
разом git commit -am "Message".
Оскільки ми будемо використовувати цей приклад до кінця книги, буде доброю ідєю створити новий репозиторій на Bitbucket та заштовхнути його туди:
$ git remote add origin git@bitbucket.org:<username>/sample_app.git
$ git push -u origin --all # pushes up the repo and its refs for the first time
Щоб запобігти головнякам інтеграції в майбутньому, також буде гарною ідеєю розвернути застосування на Heroku, навіть на цій ранішній стадії. Як в Главі 1 та Главі 2, я рекомендую слідувати крокам “hello, world!” в Лістингу 1.8 та Лістингу 1.9.4 Потім закомітьте зміни, та проштовхніть їх на Heroku:
$ git commit -am "Add hello"
$ heroku create
$ git push heroku master
(Як в Розділі 1.5, ви можете побачити деякі попередження, що ви повинні покі що ігнорувати. Ми здихаємось їх Розділі 7.5). За винятком імені застосування Heroku, результат повинен співпадати з Лістингом 1.18.
По мірі просування по залишку книжки, я рекомендую просувати репозитарій та розгортати застосування регулярно, що автоматично робить віддалені резервні копії, та дозволяє вам перехоплювати любі помилки так швидко, як це можливо. Якщо ви маєте проблеми на Heroku, впевніться, що подивились на журнали, щоб спробувати діагностувати проблему:
$ heroku logs
Зауваження: Якщо ви дійдете використання Heroku для справжнього застосування, впевніться, що слідуєте конфігурації сервера для продакшина з Розділу 7.5.
3.2 Статичні сторінки
Коли закінчено всі приготування з Розділу 3.1,
ми готові почати розробку приклада застосування.
В цьому розділі ми зробимо перший крок в напрямку динамічних
сторінок, створивши набір дій та переглядів Rails,
що містять тільки статичний HTML.5 Дії Rails зібрані разом
в контролерах(це C в MVC з Розділу
1.3.3), що містять набори
дій, зв'язаних загальним призначенням.
Ми мали декілька контролерів в Главі
2, та будемо набувати
глибшого розуміння, коли ми ознайомимось з REST-архитектурою більш докладно
(починаючи з Глави
6).
Щоб знайти наших підопічних буде корисним нагадати структуру
каталогів Rails з Розділу
1.3 (Малюнок 1.4).
В цьому розділі ми будемо робити здебільшого в каталогах app/controllers
та app/views.
Згадайте з Розділу 1.4.4 що, коли ви використовуєте Git, є гарною практикою робити нашу роботу на окремомій гілці, ніж на головній. Якщо ви використовуєте Git для контроля версій, ви повинні виконати наступну команду для чек-аута гілки для статичних сторінок:
$ git checkout master
$ git checkout -b static-pages
(Тут перший рядок треба тільки для того, щоб переконатись,
що ми починаємо з мастер бранчу, так що гілка static-pages
базується на master.
Ви можете пропустити цю команду, якщо ви вже на мастер гілці).
3.2.1 Згенеровані статичні сторінки
Щоб почати зі статичними сторінками, ми зпочатку
згенеруємо контролер, використовуючи той же скрипт Rails generate,
що ми використовували в Главі
2 для генерації підпорок. Оскільки ми будемо
робити для обробки статичних сторінок, ми назвемо його
контролером статичних сторінок, що враховуючи домовленіст
по іменуванню дасть ім'я StaticPages.
Ми також плануємо зробити дії для Головної сторінки та
сторінки Допомога та Про нас, тому створимо дії з
іменами home, help та about. Скрипт generate
приймає опціональний список дій, так що включимо дії для
Головної та ДОпомоги прямо в командний рядок, тоді як навмисне
залишимо дію для сторінки Про нас, так що ми зможемо
побачити, як додавати її (Розділ 3.3). Отримана команда для
генерації контролера статичних сторінок показана в Лістингу 3.4.
$ rails generate controller StaticPages home help
create app/controllers/static_pages_controller.rb
route get 'static_pages/help'
route get 'static_pages/home'
invoke erb
create app/views/static_pages
create app/views/static_pages/home.html.erb
create app/views/static_pages/help.html.erb
invoke test_unit
create test/controllers/static_pages_controller_test.rb
invoke helper
create app/helpers/static_pages_helper.rb
invoke test_unit
create test/helpers/static_pages_helper_test.rb
invoke assets
invoke coffee
create app/assets/javascripts/static_pages.js.coffee
invoke scss
create app/assets/stylesheets/static_pages.css.scss
By the way, it’s worth noting that rails g
is a shortcut for rails generate, which is
only one of several shortcuts supported by Rails (Table 3.1). For clarity, this
tutorial always uses the full command, but in real life
most Rails developers use one or more of the shortcuts
shown in Table 3.1.
| Full command | Shortcut |
$ rails
server |
$ rails s |
$ rails
console |
$ rails c |
$ rails
generate |
$ rails g |
$ bundle
install |
$ bundle |
$ rake
test |
$ rake |
Before moving on, if you’re using Git it’s a good idea to add the files for the Static Pages controller to the remote repository:
$ git status
$ git add -A
$ git commit -m "Add a Static Pages controller"
$ git push -u origin static-pages
The final command here arranges to push the static-pages
topic branch up to Bitbucket.
Subsequent pushes can omit the other arguments and write
simply
$ git push
The commit and push sequence above represents the kind of pattern I would ordinarily follow in real-life development, but for simplicity I’ll typically omit such intermediate commits from now on.
In Listing 3.4, note that we have passed
the controller name as CamelCase, which leads to the
creation of a controller file written in snake case, so that a controller
called StaticPages yields a file called static_pages_controller.rb. This is merely a
convention, and in fact using snake case at the command
line also works: the command
$ rails generate controller static_pages ...
also generates a controller called static_pages_controller.rb. Because Ruby uses
CamelCase for class names (Section 4.4), my preference is to refer
to controllers using their CamelCase names, but this is a
matter of taste.
(Since Ruby filenames typically use snake case, the Rails
generator converts CamelCase to snake case using the underscore
method.)
By the way, if you ever make a mistake when generating code, it’s useful to know how to reverse the process. See Box 3.1 for some techniques on how to undo things in Rails.
Even when you’re very careful, things can sometimes go wrong when developing Rails applications. Happily, Rails has some facilities to help you recover.
One common scenario is wanting to undo code generation—for example, when you change your mind on the name of a controller and want to eliminate the generated files. Because Rails creates a substantial number of auxiliary files along with the controller (as seen in Listing 3.4), this isn’t as easy as removing the controller file itself; undoing the generation means removing not only the principal generated file, but all the ancillary files as well. (In fact, as we saw in Section 2.2 and Section 2.3, rails generate can make automatic edits to the routes.rb file, which we also want to undo automatically.) In Rails, this can be accomplished with rails destroy followed by the name of the generated element. In particular, these two commands cancel each other out:
$ rails generate controller StaticPages home help $ rails destroy controller StaticPages home help
Similarly, in Chapter 6 we’ll generate a model as follows:
$ rails generate model User name:string email:string
This can be undone using
$ rails destroy model User
(In this case, it turns out we can omit the other command-line arguments. When you get to Chapter 6, see if you can figure out why.)
Another technique related to models involves undoing migrations, which we saw briefly in Chapter 2 and will see much more of starting in Chapter 6. Migrations change the state of the database using the command
$ bundle exec rake db:migrate
We can undo a single migration step using
$ bundle exec rake db:rollback
To go all the way back to the beginning, we can use
$ bundle exec rake db:migrate VERSION=0
As you might guess, substituting any other number for 0 migrates to that version number, where the version numbers come from listing the migrations sequentially.
With these techniques in hand, we are well-equipped to recover from the inevitable development snafus.
The Static Pages controller generation in Listing 3.4
automatically updates the routes file (config/routes.rb),
which we saw briefly in Section 1.3.4.
The routes file is responsible for implementing the router
(seen in Figure 2.11) that defines the
correspondence between URLs and web pages.
The routes file is located in the config
directory, where Rails collects files needed for the
application configuration (Figure 3.1).
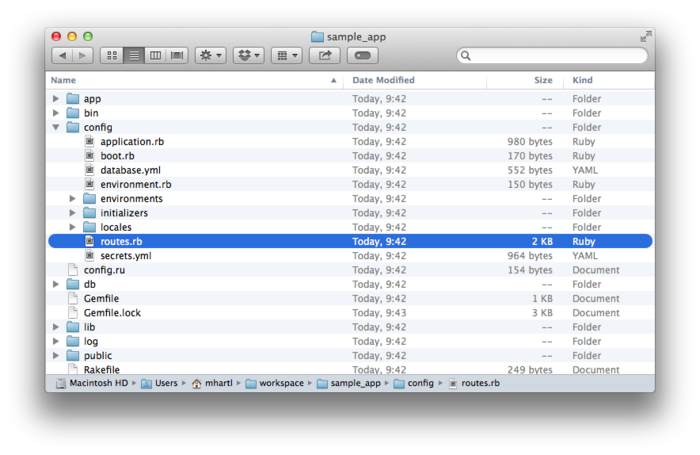
config
directory. Since we included the home and help
actions in Listing 3.4, the routes file already
has a rule for each one, as seen in Listing 3.5.
home
and help actions in the Static Pages
controller. config/routes.rb
Rails.application.routes.draw do
get 'static_pages/home'
get 'static_pages/help'
.
.
.
end
Here the rule
get 'static_pages/home'
maps requests for the URL /static_pages/home to the home
action in the Static Pages controller.
Moreover, by using get we arrange for the
route to respond to a GET
request, which is one of the fundamental HTTP verbs
supported by the hypertext transfer protocol (Box 3.2). In our case, this
means that when we generate a home action
inside the Static Pages controller we automatically get a
page at the address /static_pages/home.
To see the result, start a Rails development server as
described in Section 1.3.2:
$ rails server -b $IP -p $PORT # Use only `rails server` if running locally
Then navigate to /static_pages/home (Figure 3.2).
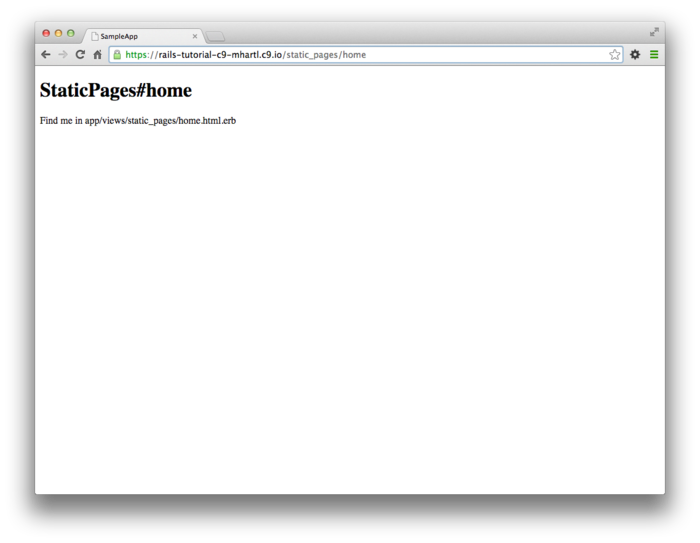
The hypertext transfer protocol (HTTP) defines the basic operations GET, POST, PATCH, and DELETE. These refer to operations between a client computer (typically running a web browser such as Chrome, Firefox, or Safari) and a server (typically running a web server such as Apache or Nginx). (It’s important to understand that, when developing Rails applications on a local computer, the client and server are the same physical machine, but in general they are different.) An emphasis on HTTP verbs is typical of web frameworks (including Rails) influenced by the REST architecture, which we saw briefly in Chapter 2 and will start learning about more in Chapter 7.
GET is the most common HTTP operation, used for reading data on the web; it just means “get a page”, and every time you visit a site like http://www.google.com/ or http://www.wikipedia.org/ your browser is submitting a GET request. POST is the next most common operation; it is the request sent by your browser when you submit a form. In Rails applications, POST requests are typically used for creating things (although HTTP also allows POST to perform updates). For example, the POST request sent when you submit a registration form creates a new user on the remote site. The other two verbs, PATCH and DELETE, are designed for updating and destroying things on the remote server. These requests are less common than GET and POST since browsers are incapable of sending them natively, but some web frameworks (including Ruby on Rails) have clever ways of making it seem like browsers are issuing such requests. As a result, Rails supports all four of the request types GET, POST, PATCH, and DELETE.
To understand where this page comes from, let’s start by taking a look at the Static Pages controller in a text editor, which should look something like Listing 3.6. You may note that, unlike the demo Users and Microposts controllers from Chapter 2, the Static Pages controller does not use the standard REST actions. This is normal for a collection of static pages: the REST architecture isn’t the best solution to every problem.
class StaticPagesController < ApplicationController
def home
end
def help
end
end
We see from the class keyword in Listing 3.6
that static_pages_controller.rb defines a class,
in this case called StaticPagesController. Classes are simply a
convenient way to organize functions (also
called methods) like the home and
help actions, which are defined using the def
keyword. As
discussed in Section 2.3.4, the angle bracket <
indicates that StaticPagesController inherits
from the Rails class ApplicationController;
as we’ll see momentarily, this means that our pages come
equipped with a large amount of Rails-specific
functionality.
(We’ll learn more about both classes and inheritance in Section 4.4.)
In the case of the Static Pages controller, both of its methods are initially empty:
def home
end
def help
end
In plain Ruby, these methods would simply do nothing. In Rails, the
situation is different—StaticPagesController
is a Ruby class, but because it inherits from ApplicationController
the behavior of its methods is specific to Rails: when
visiting the URL /static_pages/home, Rails looks in the
Static Pages controller and executes the code in the home
action, and then renders the view (the V in MVC
from Section 1.3.3) corresponding to the
action. In the
present case, the home action is empty, so
all visiting /static_pages/home does is render the view. So, what does a view
look like, and how do we find it?
If you take another look at the output in Listing 3.4,
you might be able to guess the correspondence between
actions and views: an action like home has a
corresponding view called home.html.erb. We’ll learn in Section 3.4
what the .erb part means; from the .html
part you probably won’t be surprised that it basically
looks like HTML (Listing 3.7).
<h1>StaticPages#home</h1>
<p>Find me in app/views/static_pages/home.html.erb</p>
The view for the help action is analogous (Listing 3.8).
<h1>StaticPages#help</h1>
<p>Find me in app/views/static_pages/help.html.erb</p>
Both of these views are just placeholders: they have a
top-level heading (inside the h1 tag) and a
paragraph (p tag) with the full path to the
corresponding file.
3.2.2 Custom static pages
We’ll add some (very slightly) dynamic content starting in Section 3.4, but as they stand the views in Listing 3.7 and Listing 3.8 underscore an important point: Rails views can simply contain static HTML. This means we can begin customizing the Home and Help pages even with no knowledge of Rails, as shown in Listing 3.9 and Listing 3.10.
<h1>Sample App</h1>
<p>
This is the home page for the
<a href="http://www.railstutorial.org/">Ruby on Rails Tutorial</a>
sample application.
</p>
<h1>Help</h1>
<p>
Get help on the Ruby on Rails Tutorial at the
<a href="http://www.railstutorial.org/#help">Rails Tutorial help section</a>.
To get help on this sample app, see the
<a href="http://www.railstutorial.org/book"><em>Ruby on Rails Tutorial</em>
book</a>.
</p>
The results of Listing 3.9 and Listing 3.10 are shown in Figure 3.3 and Figure 3.4.
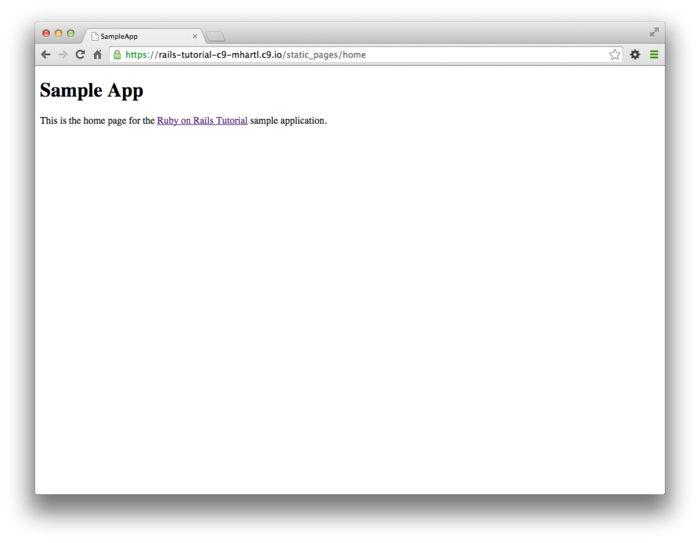
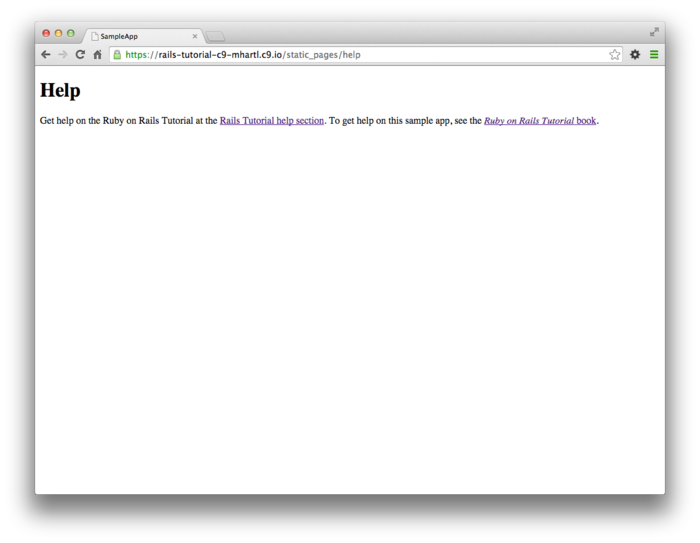
3.3 Getting started with testing
Having created and filled in the Home and Help pages for our sample app (Section 3.2.2), now we’re going to add an About page as well. When making a change of this nature, it’s a good practice to write an automated test to verify that the feature is implemented correctly. Developed over the course of building an application, the resulting test suite serves as a safety net and as executable documentation of the application source code. When done right, writing tests also allows us to develop faster despite requiring extra code, because we’ll end up wasting less time trying to track down bugs. This is true only once we get good at writing tests, though, which is one reason it’s important to start practicing as early as possible.
Although virtually all Rails developers agree that testing is a good idea, there is a diversity of opinion on the details. There is an especially lively debate over the use of test-driven development (TDD),6 a testing technique in which the programmer writes failing tests first, and then writes the application code to get the tests to pass. The Ruby on Rails Tutorial takes a lightweight, intuitive approach to testing, employing TDD when convenient without being dogmatic about it (Box 3.3).
When deciding when and how to test, it’s helpful to understand why to test. In my view, writing automated tests has three main benefits:
- Tests protect against regressions, where a functioning feature stops working for some reason.
- Tests allow code to be refactored (i.e., changing its form without changing its function) with greater confidence.
- Tests act as a client for the application code, thereby helping determine its design and its interface with other parts of the system.
Although none of the above benefits require that tests be written first, there are many circumstances where test-driven development (TDD) is a valuable tool to have in your kit. Deciding when and how to test depends in part on how comfortable you are writing tests; many developers find that, as they get better at writing tests, they are more inclined to write them first. It also depends on how difficult the test is relative to the application code, how precisely the desired features are known, and how likely the feature is to break in the future.
In this context, it’s helpful to have a set of guidelines on when we should test first (or test at all). Here are some suggestions based on my own experience:
- When a test is especially short or simple compared to the application code it tests, lean toward writing the test first.
- When the desired behavior isn’t yet crystal clear, lean toward writing the application code first, then write a test to codify the result.
- Because security is a top priority, err on the side of writing tests of the security model first.
- Whenever a bug is found, write a test to reproduce it and protect against regressions, then write the application code to fix it.
- Lean against writing tests for code (such as detailed HTML structure) likely to change in the future.
- Write tests before refactoring code, focusing on testing error-prone code that’s especially likely to break.
In practice, the guidelines above mean that we’ll usually write controller and model tests first and integration tests (which test functionality across models, views, and controllers) second. And when we’re writing application code that isn’t particularly brittle or error-prone, or is likely to change (as is often the case with views), we’ll often skip testing altogether.
Our main testing tools will be controller tests (starting in this section), model tests (starting in Chapter 6), and integration tests (starting in Chapter 7). Integration tests are especially powerful, as they allow us to simulate the actions of a user interacting with our application using a web browser. Integration tests will eventually be our primary testing technique, but controller tests give us an easier place to start.
3.3.1 Our first test
Now it’s time to add an About page to our application. As we’ll see, the test is short and simple, so we’ll follow the guidelines from Box 3.3 and write the test first. We’ll then use the failing test to drive the writing of the application code.
Getting started with testing can be challenging,
requiring extensive knowledge of both Rails and Ruby. At this early stage,
writing tests might thus seem hopelessly intimidating. Luckily, Rails has
already done the hardest part for us, because rails
generate controller (Listing 3.4)
automatically generated a test file to get us started:
$ ls test/controllers/
static_pages_controller_test.rb
Let’s take a look at it (Listing 3.11).
require 'test_helper'
class StaticPagesControllerTest < ActionController::TestCase
test "should get home" do
get :home
assert_response :success
end
test "should get help" do
get :help
assert_response :success
end
end
It’s not important at this point to understand the syntax
in Listing 3.11 in detail, but we can see
that there are two tests, one for each controller action
we included on the command line in Listing 3.4. Each test simply gets
an action and verifies (via an assertion) that
the result is a success.
Here the use of get indicates that our tests
expect the Home and Help pages to be ordinary web pages,
accessed using a GET request (Box 3.2). The response :success
is an abstract representation of the underlying HTTP status code (in this case, 200 OK).
In other words, a test like
test "should get home" do
get :home
assert_response :success
end
says “Let’s test the Home page by issuing a GET
request to the home action and then making
sure we receive a ‘success’ status code in response.”
To begin our testing cycle, we need to run our test suite
to verify that the tests currently pass.
We can do this with the rake utility (Box 2.1)
as follows:7
$ bundle exec rake test
2 tests, 2 assertions, 0 failures, 0 errors, 0 skips
As required, initially our test suite is passing (green). (You won’t actually see the color green unless you add MiniTest reporters in the optional Section 3.7.1.) By the way, the tests take some time to start, which is due to two factors: (1) starting the Spring server to preload parts of the Rails environment, which only happens the first time; and (2) overhead associated with Ruby startup time. (The second factor is ameliorated when using Guard as suggested in Section 3.7.3.)
3.3.2 Red
As noted in Box 3.3, test-driven development involves writing a failing test first, writing the application code needed to get it to pass, and then refactoring the code if necessary. Because many testing tools represent failing tests with the color red and passing tests with the color green, this sequence is sometimes known as the “Red, Green, Refactor” cycle. In this section, we’ll complete the first step in this cycle, getting to red by writing a failing test. Then we’ll get to green in Section 3.3.3, and refactor in Section 3.4.3.8
Our first step is to write a failing test for the About page. Following the models from Listing 3.11, you can probably guess the right test, which is shown in Listing 3.13.
require 'test_helper'
class StaticPagesControllerTest < ActionController::TestCase
test "should get home" do
get :home
assert_response :success
end
test "should get help" do
get :help
assert_response :success
end
test "should get about" do
get :about
assert_response :success
end
end
We see from the highlighted lines in Listing 3.13 that the test for the About page is the same as the Home and Help tests with the word “about” in place of “home” or “help”.
As required, the test initially fails:
$ bundle exec rake test
3 tests, 2 assertions, 0 failures, 1 errors, 0 skips
3.3.3 Green
Now that we have a failing test (red), we’ll use the failing test’s error messages to guide us to a passing test (green), thereby implementing a working About page.
We can get started by examining the error message output by the failing test:9
$ bundle exec rake test
ActionController::UrlGenerationError:
No route matches {:action=>"about", :controller=>"static_pages"}
The error message here says that no route matches the desired action/controller combination, which is a hint that we need to add a line to the routes file. We can accomplish this by following the pattern in Listing 3.5, as shown in Listing 3.16.
about
route. red
config/routes.rb
Rails.application.routes.draw do
get 'static_pages/home'
get 'static_pages/help'
get 'static_pages/about'
.
.
.
end
The highlighted line in Listing 3.16 tells Rails to route a GET request for the URL
/static_pages/about to the about action in
the Static Pages controller.
Running our test suite again, we see that it is still red, but now the error message has changed:
$ bundle exec rake test
AbstractController::ActionNotFound:
The action 'about' could not be found for StaticPagesController
The error message now indicates a missing about
action in the Static Pages controller, which we can add by
following the model provided by home and help
in Listing 3.6, as shown in Listing 3.18.
about action.
red app/controllers/static_pages_controller.rb
class StaticPagesController < ApplicationController
def home
end
def help
end
def about
end
end
As before, our test suite is still red, but the error message has changed again:
$ bundle exec rake test
ActionView::MissingTemplate: Missing template static_pages/about
This indicates a missing template, which in the context
of Rails is essentially the same thing as a view.
As described in Section 3.2.1, an action called home
is associated with a view called home.html.erb
located in the app/views/static_pages
directory, which means that we need to create a new file
called about.html.erb in the same directory.
The way to create a file varies by system setup, but most text editors will let you control-click inside the directory where you want to create the file to bring up a menu with a “New File” menu item. Alternately, you can use the File menu to create a new file and then pick the proper directory when saving it. Finally, you can use my favorite trick by applying the Unix touch command as follows:
$ touch app/views/static_pages/about.html.erb
Although touch is designed to update the
modification timestamp of a file or directory without
otherwise affecting it, as a side-effect it creates a new
(blank) file if one doesn’t already exist.
(If using the cloud IDE, you may have to refresh the file
tree as described in Section 1.3.1.)
Once you’ve created the about.html.erb file
in the right directory, you should fill it with the
contents shown in Listing 3.19.
<h1>About</h1>
<p>
The <a href="http://www.railstutorial.org/"><em>Ruby on Rails
Tutorial</em></a> is a
<a href="http://www.railstutorial.org/book">book</a> and
<a href="http://screencasts.railstutorial.org/">screencast series</a>
to teach web development with
<a href="http://rubyonrails.org/">Ruby on Rails</a>.
This is the sample application for the tutorial.
</p>
At this point, running rake test should get
us back to green:
$ bundle exec rake test
3 tests, 3 assertions, 0 failures, 0 errors, 0 skips
Of course, it’s never a bad idea to take a look at the page in a browser to make sure our tests aren’t completely crazy (Figure 3.5).
3.3.4 Refactor
Now that we’ve gotten to green, we are free to refactor our code with confidence. When developing an application, often code will start to “smell”, meaning that it gets ugly, bloated, or filled with repetition. The computer doesn’t care what the code looks like, of course, but humans do, so it is important to keep the code base clean by refactoring frequently. Although our sample app is a little too small to refactor right now, code smell seeps in at every crack, and we’ll get started refactoring in Section 3.4.3.
3.4 Slightly dynamic pages
Now that we’ve created the actions and views for some static pages, we’ll make them slightly dynamic by adding some content that changes on a per-page basis: we’ll have the title of each page change to reflect its content. Whether a changing title represents truly dynamic content is debatable, but in any case it lays the necessary foundation for unambiguously dynamic content in Chapter 7.
Our plan is to edit the Home, Help, and About pages to make
page titles that change on each page.
This will involve using the <title> tag
in our page views.
Most browsers display the contents of the title tag at the
top of the browser window, and it is also important for
search-engine optimization.
We’ll be using the full “Red, Green, Refactor” cycle: first
by adding simple tests for our page titles (red), then by adding titles to
each of our three pages (green), and finally using a layout
file to eliminate duplication (Refactor).
By the end of this section, all three of our static pages
will have titles of the form “<page name> | Ruby on
Rails Tutorial Sample App”, where the first part of the
title will vary depending on the page (Table 3.2).
The rails new command (Listing 3.1)
creates a layout file by default, but it’s instructive to
ignore it initially, which we can do by changing its name:
$ mv app/views/layouts/application.html.erb layout_file # temporary change
You wouldn’t normally do this in a real application, but it’s easier to understand the purpose of the layout file if we start by disabling it.
| Page | URL | Base title | Variable title |
| Home | /static_pages/home | "Ruby on Rails Tutorial
Sample App" |
"Home" |
| Help | /static_pages/help | "Ruby on Rails Tutorial
Sample App" |
"Help" |
| About | /static_pages/about | "Ruby on Rails Tutorial
Sample App" |
"About" |
3.4.1 Testing titles (Red)
To add page titles, we need to learn (or review) the structure of a typical web page, which takes the form shown in Listing 3.21.
<!DOCTYPE html>
<html>
<head>
<title>Greeting</title>
</head>
<body>
<p>Hello, world!</p>
</body>
</html>
The structure in Listing 3.21 includes a document
type, or doctype, declaration at the top to tell
browsers which version of HTML we’re using (in this case,
HTML5);10
a head section, in this case with “Greeting”
inside a title tag; and a body
section, in this case with “Hello, world!”
inside a p (paragraph) tag.
(The indentation is optional—HTML is not sensitive to
whitespace, and ignores both tabs and spaces—but it makes
the document’s structure easier to see.)
We’ll write simple tests for each of the titles in Table 3.2
by combining the tests in Listing 3.13 with the assert_select
method, which lets us test for the presence of a
particular HTML tag (sometimes called a “selector”, hence
the name):11
assert_select "title", "Home | Ruby on Rails Tutorial Sample App"
In particular, the code above checks for the presence of
a <title> tag containing the string
“Home | Ruby on Rails Tutorial Sample App”.
Applying this idea to all three static pages gives the
tests shown in Listing 3.22.
require 'test_helper'
class StaticPagesControllerTest < ActionController::TestCase
test "should get home" do
get :home
assert_response :success
assert_select "title", "Home | Ruby on Rails Tutorial Sample App"
end
test "should get help" do
get :help
assert_response :success
assert_select "title", "Help | Ruby on Rails Tutorial Sample App"
end
test "should get about" do
get :about
assert_response :success
assert_select "title", "About | Ruby on Rails Tutorial Sample App"
end
end
(If the repetition of the base title “Ruby on Rails Tutorial Sample App” bothers you, see the Вправи in Section 3.6.)
With the tests from Listing 3.22 in place, you should verify that the test suite is currently red:
$ bundle exec rake test
3 tests, 6 assertions, 3 failures, 0 errors, 0 skips
3.4.2 Adding page titles (Green)
Now we’ll add a title to each page, getting the tests from Section 3.4.1 to pass in the process. Applying the basic HTML structure from Listing 3.21 to the custom Home page from Listing 3.9 yields Listing 3.24.
<!DOCTYPE html>
<html>
<head>
<title>Home | Ruby on Rails Tutorial Sample App</title>
</head>
<body>
<h1>Sample App</h1>
<p>
This is the home page for the
<a href="http://www.railstutorial.org/">Ruby on Rails Tutorial</a>
sample application.
</p>
</body>
</html>
The corresponding web page appears in Figure 3.6.12
Following this model for the Help page (Listing 3.10) and the About page (Listing 3.19) yields the code in Listing 3.25 and Listing 3.26.
<!DOCTYPE html>
<html>
<head>
<title>Help | Ruby on Rails Tutorial Sample App</title>
</head>
<body>
<h1>Help</h1>
<p>
Get help on the Ruby on Rails Tutorial at the
<a href="http://www.railstutorial.org/#help">Rails Tutorial help
section</a>.
To get help on this sample app, see the
<a href="http://www.railstutorial.org/book"><em>Ruby on Rails
Tutorial</em> book</a>.
</p>
</body>
</html>
<!DOCTYPE html>
<html>
<head>
<title>About | Ruby on Rails Tutorial Sample App</title>
</head>
<body>
<h1>About</h1>
<p>
The <a href="http://www.railstutorial.org/"><em>Ruby on Rails
Tutorial</em></a> is a
<a href="http://www.railstutorial.org/book">book</a> and
<a href="http://screencasts.railstutorial.org/">screencast series</a>
to teach web development with
<a href="http://rubyonrails.org/">Ruby on Rails</a>.
This is the sample application for the tutorial.
</p>
</body>
</html>
At this point, the test suite should be back to green:
$ bundle exec rake test
3 tests, 6 assertions, 0 failures, 0 errors, 0 skips
3.4.3 Layouts and embedded Ruby (Refactor)
We’ve achieved a lot already in this section, generating three valid pages using Rails controllers and actions, but they are purely static HTML and hence don’t show off the power of Rails. Moreover, they suffer from terrible duplication:
- The page titles are almost (but not quite) exactly the same.
- “Ruby on Rails Tutorial Sample App” is common to all three titles.
- The entire HTML skeleton structure is repeated on each page.
This repeated code is a violation of the important “Don’t Repeat Yourself” (DRY) principle; in this section we’ll “DRY out our code” by removing the repetition. At the end, we’ll re-run the tests from Section 3.4.2 to verify that the titles are still correct.
Paradoxically, we’ll take the first step toward eliminating duplication by first adding some more: we’ll make the titles of the pages, which are currently quite similar, match exactly. This will make it much simpler to remove all the repetition at a stroke.
The technique involves using embedded Ruby in
our views. Since
the Home, Help, and About page titles have a variable
component, we’ll use a special Rails function called provide
to set a different title on each page.
We can see how this works by replacing the literal title
“Home” in the home.html.erb view with the
code in Listing 3.28.
<% provide(:title, "Home") %>
<!DOCTYPE html>
<html>
<head>
<title><%= yield(:title) %> | Ruby on Rails Tutorial Sample App</title>
</head>
<body>
<h1>Sample App</h1>
<p>
This is the home page for the
<a href="http://www.railstutorial.org/">Ruby on Rails Tutorial</a>
sample application.
</p>
</body>
</html>
Listing 3.28 is our first example of
embedded Ruby, also called ERb.
(Now you know why HTML views have the file extension .html.erb.) ERb is the primary
template system for including dynamic content in web
pages.13
The code
<% provide(:title, "Home") %>
indicates using <% ...
%> that Rails should call the provide
function and associate the string "Home"
with the label :title.14 Then, in the title,
we use the closely related notation <%=
... %> to insert the title into the template
using Ruby’s yield function:15
<title><%= yield(:title) %> | Ruby on Rails Tutorial Sample App</title>
(The distinction between the two types of embedded Ruby is that <% ... %> executes the code inside, while <%= ... %> executes it and inserts the result into the template.) The resulting page is exactly the same as before, only now the variable part of the title is generated dynamically by ERb.
We can verify that all this works by running the tests from Section 3.4.2 and see that they are still green:
$ bundle exec rake test
3 tests, 6 assertions, 0 failures, 0 errors, 0 skips
Then we can make the corresponding replacements for the Help and About pages (Listing 3.30 and Listing 3.31).
<% provide(:title, "Help") %>
<!DOCTYPE html>
<html>
<head>
<title><%= yield(:title) %> | Ruby on Rails Tutorial Sample App</title>
</head>
<body>
<h1>Help</h1>
<p>
Get help on the Ruby on Rails Tutorial at the
<a href="http://www.railstutorial.org/#help">Rails Tutorial help
section</a>.
To get help on this sample app, see the
<a href="http://www.railstutorial.org/book"><em>Ruby on Rails
Tutorial</em> book</a>.
</p>
</body>
</html>
<% provide(:title, "About") %>
<!DOCTYPE html>
<html>
<head>
<title><%= yield(:title) %> | Ruby on Rails Tutorial Sample App</title>
</head>
<body>
<h1>About</h1>
<p>
The <a href="http://www.railstutorial.org/"><em>Ruby on Rails
Tutorial</em></a> is a
<a href="http://www.railstutorial.org/book">book</a> and
<a href="http://screencasts.railstutorial.org/">screencast series</a>
to teach web development with
<a href="http://rubyonrails.org/">Ruby on Rails</a>.
This is the sample application for the tutorial.
</p>
</body>
</html>
Now that we’ve replaced the variable part of the page titles with ERb, each of our pages looks something like this:
<% provide(:title, "The Title") %>
<!DOCTYPE html>
<html>
<head>
<title><%= yield(:title) %> | Ruby on Rails Tutorial Sample App</title>
</head>
<body>
Contents
</body>
</html>
In other words, all the pages are identical in structure,
including the contents of the title tag, with the sole
exception of the material inside the body
tag.
In order to factor out this common structure, Rails comes
with a special layout file called application.html.erb,
which we renamed in the beginning of this section (Section 3.4)
and which we’ll now restore:
$ mv layout_file app/views/layouts/application.html.erb
To get the layout to work, we have to replace the default title with the embedded Ruby from the examples above:
<title><%= yield(:title) %> | Ruby on Rails Tutorial Sample App</title>
The resulting layout appears in Listing 3.32.
<!DOCTYPE html>
<html>
<head>
<title><%= yield(:title) %> | Ruby on Rails Tutorial Sample App</title>
<%= stylesheet_link_tag 'application', media: 'all',
'data-turbolinks-track' => true %>
<%= javascript_include_tag 'application', 'data-turbolinks-track' => true %>
<%= csrf_meta_tags %>
</head>
<body>
<%= yield %>
</body>
</html>
Note here the special line
<%= yield %>
This code is responsible for inserting the contents of
each page into the layout.
It’s not important to know exactly how this works; what
matters is that using this layout ensures that, for
example, visiting the page /static_pages/home converts the
contents of home.html.erb to HTML and then
inserts it in place of <%=
yield %>.
It’s also worth noting that the default Rails layout includes several additional lines:
<%= stylesheet_link_tag ... %>
<%= javascript_include_tag "application", ... %>
<%= csrf_meta_tags %>
This code arranges to include the application stylesheet
and JavaScript, which are part of the asset pipeline (Section 5.2.1),
together with the Rails method csrf_meta_tags,
which prevents cross-site request forgery (CSRF), a
type of malicious web attack.
Of course, the views in Listing 3.28, Listing 3.30, and Listing 3.31 are still filled with all the HTML structure included in the layout, so we have to remove it, leaving only the interior contents. The resulting cleaned-up views appear in Listing 3.33, Listing 3.34, and Listing 3.35.
<% provide(:title, "Home") %>
<h1>Sample App</h1>
<p>
This is the home page for the
<a href="http://www.railstutorial.org/">Ruby on Rails Tutorial</a>
sample application.
</p>
<% provide(:title, "Help") %>
<h1>Help</h1>
<p>
Get help on the Ruby on Rails Tutorial at the
<a href="http://www.railstutorial.org/#help">Rails Tutorial help section</a>.
To get help on this sample app, see the
<a href="http://www.railstutorial.org/book"><em>Ruby on Rails Tutorial</em>
book</a>.
</p>
<% provide(:title, "About") %>
<h1>About</h1>
<p>
The <a href="http://www.railstutorial.org/"><em>Ruby on Rails
Tutorial</em></a> is a
<a href="http://www.railstutorial.org/book">book</a> and
<a href="http://screencasts.railstutorial.org/">screencast series</a>
to teach web development with
<a href="http://rubyonrails.org/">Ruby on Rails</a>.
This is the sample application for the tutorial.
</p>
With these views defined, the Home, Help, and About pages are the same as before, but they have much less duplication.
Experience shows that even fairly simple refactoring is error-prone and can easily go awry. This is one reason why having a good test suite is so valuable. Rather than double-checking every page for correctness—a procedure that isn’t too hard early on but rapidly becomes unwieldy as an application grows—we can simply verify that the test suite is still green:
$ bundle exec rake test
3 tests, 6 assertions, 0 failures, 0 errors, 0 skips
This isn’t a proof that our code is still correct, but it greatly increases the probability, thereby providing a safety net to protect us against future bugs.
3.4.4 Setting the root route
Now that we’ve customized our site’s pages and gotten a
good start on the test suite, let’s set the application’s
root route before moving on.
As in Section 1.3.4 and Section 2.2.2,
this involves editing the routes.rb file to
connect / to a page of our choice, which in this case will
be the Home page.
(At this point, I also recommend removing the hello
action from the Application controller if you added it in
Section 3.1.)
As shown in Listing 3.37, this means replacing the
generated get rule from Listing 3.5
with the following code:
root 'static_pages#home'
This changes the URL static_pages/home to
the controller/action pair static_pages#home,
which ensures that GET requests
for / get routed to the home action in the
Static Pages controller.
The resulting routes file is shown in Figure 3.7. (Note that, with the
code in Listing 3.37, the previous route static_pages/home
will no longer work.)
Rails.application.routes.draw do
root 'static_pages#home'
get 'static_pages/help'
get 'static_pages/about'
end
3.5 Висновок
Seen from the outside, this chapter hardly accomplished anything: we started with static pages, and ended with…mostly static pages. But appearances are deceiving: by developing in terms of Rails controllers, actions, and views, we are now in a position to add arbitrary amounts of dynamic content to our site. Seeing exactly how this plays out is the task for the rest of this tutorial.
Before moving on, let’s take a minute to commit the changes on our topic branch and merge them into the master branch. Back in Section 3.2 we created a Git branch for the development of static pages. If you haven’t been making commits as we’ve been moving along, first make a commit indicating that we’ve reached a stopping point:
$ git add -A
$ git commit -m "Finish static pages"
Then merge the changes back into the master branch using the same technique as in Section 1.4.4:16
$ git checkout master
$ git merge static-pages
Once you reach a stopping point like this, it’s usually a good idea to push your code up to a remote repository (which, if you followed the steps in Section 1.4.3, will be Bitbucket):
$ git push
I also recommend deploying the application to Heroku:
$ bundle exec rake test
$ git push heroku
Here we’ve taken care to run the test suite before deploying, which is a good habit to develop.
3.5.1 Що ми вивчили в цій главі
- For a third time, we went through the full procedure of creating a new Rails application from scratch, installing the necessary gems, pushing it up to a remote repository, and deploying it to production.
- The
railsscript generates a new controller withrails generate controller ControllerName <optional action names>. - New routes are defined in the file
config/routes.rb. - Rails views can contain static HTML or embedded Ruby (ERb).
- Automated testing allows us to write test suites that drive the development of new features, allow for confident refactoring, and catch regressions.
- Test-driven development uses a “Red, Green, Refactor” cycle.
- Rails layouts allow the use of a common template for pages in our application, thereby eliminating duplication.
3.6 Вправи
Note: The Solutions Manual for Вправи, with solutions to every exercise in the Ruby on Rails Tutorial book, is included for free with every purchase at www.railstutorial.org.
From this point until the end of the tutorial, I recommend solving the Вправи on a separate topic branch:
$ git checkout static-pages
$ git checkout -b static-pages-Вправи
This practice will prevent conflicts with the main tutorial.
Once you’re satisfied with your solutions, you can push up the Вправи branch to a remote repository (if you’ve set one up):
<solve first exercise>
$ git commit -am "Eliminate repetition (solves exercise 3.1)"
<solve second exercise>
$ git add -A
$ git commit -m "Add a Contact page (solves exercise 3.2)"
$ git push -u origin static-pages-Вправи
$ git checkout master
(As preparation for future development, the last step here checks out the master branch, but we don’t merge in the changes in order to avoid conflicts with the rest of the tutorial.) In future chapters, the branches and commit messages will differ, of course, but the basic idea is the same.
- You may have noticed some repetition in the Static Pages
controller test (Listing 3.22).
In particular, the base title, “Ruby on Rails Tutorial
Sample App”, is the same for every title test.
Using the special function
setup, which is automatically run before every test, verify that the tests in Listing 3.38 are still green. (Listing 3.38 uses an instance variable, seen briefly in Section 2.2.2 and covered further in Section 4.4.5, combined with string interpolation, which is covered further in Section 4.2.2.) - Make a Contact page for the sample app.17 Following the model in Listing 3.13, first write a test for the existence of a page at the URL /static_pages/contact by testing for the title “Contact | Ruby on Rails Tutorial Sample App”. Get your test to pass by following the same steps as when making the About page in Section 3.3.3, including filling the Contact page with the content from Listing 3.39. (Note that, to keep the Вправи independent, Listing 3.39 doesn’t incorporate the changes made in Listing 3.38.)
require 'test_helper'
class StaticPagesControllerTest < ActionController::TestCase
def setup
@base_title = "Ruby on Rails Tutorial Sample App"
end
test "should get home" do
get :home
assert_response :success
assert_select "title", "Home | #{@base_title}"
end
test "should get help" do
get :help
assert_response :success
assert_select "title", "Help | #{@base_title}"
end
test "should get about" do
get :about
assert_response :success
assert_select "title", "About | #{@base_title}"
end
end
<% provide(:title, "Contact") %>
<h1>Contact</h1>
<p>
Contact the Ruby on Rails Tutorial about the sample app at the
<a href="http://www.railstutorial.org/#contact">contact page</a>.
</p>
3.7 Advanced testing setup
This optional section describes the testing setup used in the Ruby on Rails Tutorial screencast series. There are three main elements: an enhanced pass/fail reporter (Section 3.7.1), a utility to filter the backtrace produced by failing tests (Section 3.7.2), and an automated test runner that detects file changes and automatically runs the corresponding tests (Section 3.7.3). The code in this section is advanced and is presented for convenience only; you are not expected to understand it at this time.
The changes in this section should be made on the master branch:
$ git checkout master
3.7.1 MiniTest reporters
To get the default Rails tests to show red and green at the appropriate times, I recommend adding the code in Listing 3.40 to your test helper file,18 thereby making use of the minitest-reporters gem included in Listing 3.2.
ENV['RAILS_ENV'] ||= 'test'
require File.expand_path('../../config/environment', __FILE__)
require 'rails/test_help'
require "minitest/reporters"
Minitest::Reporters.use!
class ActiveSupport::TestCase
# Setup all fixtures in test/fixtures/*.yml for all tests in alphabetical
# order.
fixtures :all
# Add more helper methods to be used by all tests here...
end
The resulting transition from red to green in the cloud IDE appears as in Figure 3.8.
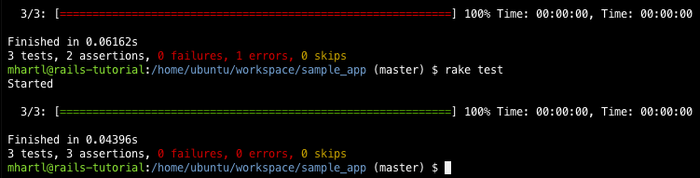
3.7.2 Backtrace silencer
Upon encountering an error or failing test, the test runner shows a “stack trace” or “backtrace” that traces the course of a failed test through the application. While this backtrace is usually very useful for tracking down the problem, on some systems (including the cloud IDE) it goes past the application code and into the various gem dependencies, including Rails itself. The resulting backtrace is often inconveniently long, especially since the source of the problem is usually the application and not one of its dependencies.
The solution is to filter the backtrace to eliminate
unwanted lines.
This requires the mini_backtrace
gem included in Listing 3.2, combined with a backtrace
silencer.
On the cloud IDE, most unwanted lines contain the string rvm
(referring to the Ruby Version Manager), so I recommend
using the silencer shown in Listing 3.41
to filter them out.
# Be sure to restart your server when you modify this file.
# You can add backtrace silencers for libraries that you're using but don't
# wish to see in your backtraces.
Rails.backtrace_cleaner.add_silencer { |line| line =~ /rvm/ }
# You can also remove all the silencers if you're trying to debug a problem
# that might stem from framework code.
# Rails.backtrace_cleaner.remove_silencers!
As noted in a comment in Listing 3.41, you should restart the local webserver after adding the silencer.
3.7.3 Automated tests with Guard
One annoyance associated with using the rake test
command is having to switch to the command line and run
the tests by hand.
To avoid this inconvenience, we can use Guard to automate the
running of the tests.
Guard monitors changes in the filesystem so that, for
example, when we change the static_pages_controller_test.rb
file, only those tests get run.
Even better, we can configure Guard so that when, say, the
home.html.erb file is modified, the static_pages_controller_test.rb
automatically runs.
The Gemfile in Listing 3.2
has already included the guard
gem in our application, so to get started we just need to
initialize it:
$ bundle exec guard init
Writing new Guardfile to /home/ubuntu/workspace/sample_app/Guardfile
00:51:32 - INFO - minitest guard added to Guardfile, feel free to edit it
We then edit the resulting Guardfile so
that Guard will run the right tests when the integration
tests and views are updated (Listing 3.42).
(Given its length and advanced nature, I recommend just
copy-and-pasting the contents of Listing 3.42.)
Guardfile.
# Defines the matching rules for Guard.
guard :minitest, spring: true, all_on_start: false do
watch(%r{^test/(.*)/?(.*)_test\.rb$})
watch('test/test_helper.rb') { 'test' }
watch('config/routes.rb') { integration_tests }
watch(%r{^app/models/(.*?)\.rb$}) do |matches|
"test/models/#{matches[1]}_test.rb"
end
watch(%r{^app/controllers/(.*?)_controller\.rb$}) do |matches|
resource_tests(matches[1])
end
watch(%r{^app/views/([^/]*?)/.*\.html\.erb$}) do |matches|
["test/controllers/#{matches[1]}_controller_test.rb"] +
integration_tests(matches[1])
end
watch(%r{^app/helpers/(.*?)_helper\.rb$}) do |matches|
integration_tests(matches[1])
end
watch('app/views/layouts/application.html.erb') do
'test/integration/site_layout_test.rb'
end
watch('app/helpers/sessions_helper.rb') do
integration_tests << 'test/helpers/sessions_helper_test.rb'
end
watch('app/controllers/sessions_controller.rb') do
['test/controllers/sessions_controller_test.rb',
'test/integration/users_login_test.rb']
end
watch('app/controllers/account_activations_controller.rb') do
'test/integration/users_signup_test.rb'
end
watch(%r{app/views/users/*}) do
resource_tests('users') +
['test/integration/microposts_interface_test.rb']
end
end
# Returns the integration tests corresponding to the given resource.
def integration_tests(resource = :all)
if resource == :all
Dir["test/integration/*"]
else
Dir["test/integration/#{resource}_*.rb"]
end
end
# Returns the controller tests corresponding to the given resource.
def controller_test(resource)
"test/controllers/#{resource}_controller_test.rb"
end
# Returns all tests for the given resource.
def resource_tests(resource)
integration_tests(resource) << controller_test(resource)
end
Here the line
guard :minitest, spring: true, all_on_start: false do
causes Guard to use the Spring server supplied by Rails to speed up loading times, while also preventing Guard from running the full test suite upon starting.
To prevent conflicts between Spring and Git when using
Guard, you should add the spring/ directory
to the .gitignore file used by Git to
determine what to ignore when adding files or directories
to the repository.
The way to do this using the cloud IDE is as follows:
- Click on the gear icon in the upper right part of the file navigation pane (Figure 3.9).
- Select “Show hidden files” to show the
.gitignorefile in the application’s root directory (Figure 3.10). - Double-click on the
.gitignorefile (Figure 3.11) to open it, and then fill it with the contents of Listing 3.43.
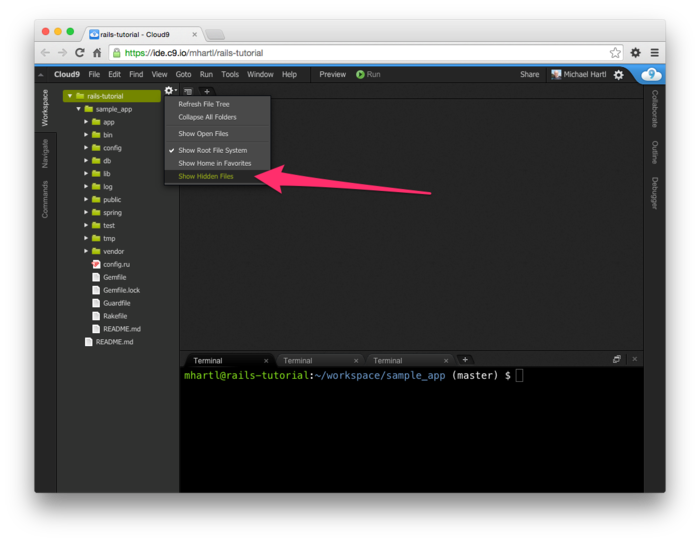
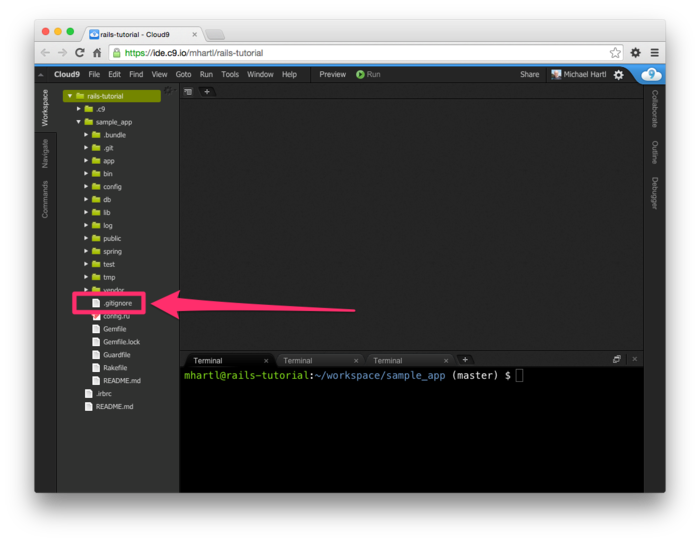
.gitignore
file made visible. .gitignore
file. # See https://help.github.com/articles/ignoring-files for more about ignoring
# files.
#
# If you find yourself ignoring temporary files generated by your text editor
# or operating system, you probably want to add a global ignore instead:
# git config --global core.excludesfile '~/.gitignore_global'
# Ignore bundler config.
/.bundle
# Ignore the default SQLite database.
/db/*.sqlite3
/db/*.sqlite3-journal
# Ignore all logfiles and tempfiles.
/log/*.log
/tmp
# Ignore Spring files.
/spring/*.pid
The Spring server is still a little quirky as of this writing, and sometimes Spring processes will accumulate and slow performance of your tests. If your tests seem to be getting unusually sluggish, it’s thus a good idea to inspect the system processes and kill them if necessary (Box 3.4).
On Unix-like systems such as Linux and OS X, user and system tasks each take place within a well-defined container called a process. To see all the processes on your system, you can use the ps command with the aux options:
$ ps aux
To filter the processes by type, you can run the results of ps through the grep pattern-matcher using a Unix pipe |:
$ ps aux | grep spring ubuntu 12241 0.3 0.5 589960 178416 ? Ssl Sep20 1:46 spring app | sample_app | started 7 hours ago
The result shown gives some details about the process, but the most important thing is the first number, which is the process id, or pid. To eliminate an unwanted process, use the kill command to issue the Unix kill code (which happens to be 9) to the pid:
$ kill -9 12241
This is the technique I recommend for killing individual processes, such as a rogue Rails server (with the pid found via ps aux | grep server), but sometimes it’s convenient to kill all the processes matching a particular process name, such as when you want to kill all the spring processes gunking up your system. In this particular case, you should first try stopping the processes with the spring command itself:
$ spring stop
Sometimes this doesn’t work, though, and you can kill all the processes with name spring using the pkill command as follows:
$ pkill -9 -f spring
Any time something isn’t behaving as expected or a process appears to be frozen, it’s a good idea to run ps aux to see what’s going on, and then run kill -9 <pid> or pkill -9 -f <name> to clear things up.
Once Guard is configured, you should open a new terminal and (as with the Rails server in Section 1.3.2) run it at the command line as follows:
$ bundle exec guard
The rules in Listing 3.42 are optimized for this
tutorial, automatically running (for example) the
integration tests when a controller is changed.
To run all the tests, hit return at the guard>
prompt. (This may
sometimes give an error indicating a failure to connect to
the Spring server.
To fix the problem, just hit return again.)
To exit Guard, press Ctrl-D. To add additional matchers to Guard, refer to the examples in Listing 3.42, the Guard README, and the Guard wiki.
- If you’re using the cloud IDE,
it’s often useful to use the “Goto Anything” command,
which makes it easy to navigate the filesystem by typing
in partial filenames.
In this context, having the hello, toy, and sample apps
present in the same project can be inconvenient due to the
many common filenames.
For example, when searching for a file called “Gemfile”,
six possibilities will show up, because each project has
matching files called
GemfileandGemfile.lock. Thus, you may want to consider removing the first two apps before proceeding, which you can do by navigating to theworkspacedirectory and runningrm -rf hello_app/ toy_app/(Table 1.1). (As long as you pushed the corresponding repositories up to Bitbucket, you can always recover them later.) ↑ - It’s worth noting that --without
production is a
“remembered option”, which means it will be included
automatically the next time we run
bundle install. ↑ - I recommend eventually learning how to install and configure PostgreSQL in development, but the chances are now is not that time. When the time comes, Google “install configure postgresql <your system>” and “rails postgresql setup” and prepare for a challenge. (On the cloud IDE, <your system> is Ubuntu.) ↑
- As noted in Chapter 2, the main reason for this is that the default Rails page typically breaks at Heroku, which makes it hard to tell if the deployment was successful or not. ↑
- Our method for making static pages is probably the simplest, but it’s not the only way. The optimal method really depends on your needs; if you expect a large number of static pages, using a Static Pages controller can get quite cumbersome, but in our sample app we’ll only need a few. If you do need a lot of static pages, take a look at the high_voltage gem. For a dated but still useful discussion of this issue, see the simple pages post on hasmanythrough. ↑
- See, e.g., “TDD is dead. Long live testing.” by Rails creator David Heinemeier Hansson. ↑
- As noted in Section 2.2,
the use of
bundle execis unnecessary on some systems, including the cloud IDE recommended in Section 1.2.1, but I include it for completeness. In practice, my usual algorithm is to omitbundle execunless I get an error, in which case I re-try withbundle execand see if it works. ↑ - By default,
rake testshows red when the tests fail, but doesn’t show green when the tests pass. To arrange for a true Red–Green cycle, see Section 3.7.1. ↑ - On some systems, you may have to scroll past the “stack trace” or “backtrace” that traces the error’s path through the source code. See Section 3.7.2 for information on how to filter this backtrace to eliminate unwanted lines. ↑
- HTML changes with time; by
explicitly making a doctype declaration we make it
likelier that browsers will render our pages properly in
the future. The
simple doctype
<!DOCTYPE html>is characteristic of the latest HTML standard, HTML5. ↑ - For a list of common MiniTest assertions, see the table of available assertions in the Rails Guides testing article. ↑
- Most of the screenshots in this book use Google Chrome, but Figure 3.6 uses Safari because Chrome doesn’t display the full page title. ↑
- There is a second popular template system called Haml, which I personally love, but it’s not quite standard enough yet for use in an introductory tutorial. ↑
- Experienced Rails developers
might have expected the use of
content_forat this point, but it doesn’t work well with the asset pipeline. Theprovidefunction is its replacement. ↑ - If you’ve studied Ruby before, you might suspect that Rails is yielding the contents to a block, and your suspicion would be correct. But you don’t need to know this to develop applications with Rails. ↑
- If you get an error message
saying that the Spring process id (pid) file would be
overwritten by the merge, just remove the file using
rm -f *.pidat the command line. ↑ - This exercise is solved in Section 5.3.1. ↑
- The code in Listing 3.40
mixes single- and double-quoted strings.
This is because
rails newgenerates single-quoted strings, whereas the MiniTest reporters documentation uses double-quoted strings. This mixing of the two string types is common in Ruby; see Section 4.2.2 for more information. ↑
Chapter 4 Rails-flavored Ruby
Grounded in examples from Chapter 3, this chapter explores some elements of the Ruby programming language that are important for Rails. Ruby is a big language, but fortunately the subset needed to be productive as a Rails developer is relatively small. It also differs somewhat from the usual material covered in an introduction to Ruby. This chapter is designed to give you a solid foundation in Rails-flavored Ruby, whether or not you have prior experience in the language. It covers a lot of material, and it’s OK not to get it all on the first pass. I’ll refer back to it frequently in future chapters.
4.1 Motivation
As we saw in the last chapter, it’s possible to develop the skeleton of a Rails application, and even start testing it, with essentially no knowledge of the underlying Ruby language. We did this by relying on the test code provided by the tutorial and addressing each error message until the test suite was passing. This situation can’t last forever, though, and we’ll open this chapter with an addition to the site that brings us face-to-face with our Ruby limitations.
When we last saw our new application, we had just updated our mostly static pages to use Rails layouts to eliminate duplication in our views, as shown in Listing 4.1 (which is the same as Listing 3.32).
<!DOCTYPE html>
<html>
<head>
<title><%= yield(:title) %> | Ruby on Rails Tutorial Sample App</title>
<%= stylesheet_link_tag 'application', media: 'all',
'data-turbolinks-track' => true %>
<%= javascript_include_tag 'application', 'data-turbolinks-track' => true %>
<%= csrf_meta_tags %>
</head>
<body>
<%= yield %>
</body>
</html>
Let’s focus on one particular line in Listing 4.1:
<%= stylesheet_link_tag 'application', media: 'all',
'data-turbolinks-track' => true %>
This uses the built-in Rails function stylesheet_link_tag
(which you can read more about at the Rails API) to include application.css
for all media
types (including computer screens and printers). To an experienced Rails
developer, this line looks simple, but there are at least
four potentially confusing Ruby ideas: built-in Rails
methods, method invocation with missing parentheses,
symbols, and hashes.
We’ll cover all of these ideas in this chapter.
In addition to coming equipped with a large number of built-in functions for use in the views, Rails also allows the creation of new ones. Such functions are called helpers; to see how to make a custom helper, let’s start by examining the title line from Listing 4.1:
<%= yield(:title) %> | Ruby on Rails Tutorial Sample App
This relies on the definition of a page title (using provide)
in each view, as in
<% provide(:title, "Home") %>
<h1>Sample App</h1>
<p>
This is the home page for the
<a href="http://www.railstutorial.org/">Ruby on Rails Tutorial</a>
sample application.
</p>
But what if we don’t provide a title?
It’s a good convention to have a base title we use
on every page, with an optional page title if we want to be
more specific. We’ve
almost achieved that with our current layout, with
one wrinkle: as you can see if you delete the provide
call in one of the views, in the absence of a page-specific
title the full title appears as follows:
| Ruby on Rails Tutorial Sample App
In other words, there’s a suitable base title, but there’s
also a leading vertical bar character | at the
beginning.
To solve the problem of a missing page title, we’ll define
a custom helper called full_title.
The full_title helper returns a base title,
“Ruby on Rails Tutorial Sample App”, if no page title is
defined, and adds a vertical bar preceded by the page title
if one is defined (Listing 4.2).1
full_title
helper.
app/helpers/application_helper.rb
module ApplicationHelper
# Returns the full title on a per-page basis.
def full_title(page_title = '')
base_title = "Ruby on Rails Tutorial Sample App"
if page_title.empty?
base_title
else
"#{page_title} | #{base_title}"
end
end
end
Now that we have a helper, we can use it to simplify our layout by replacing
<title><%= yield(:title) %> | Ruby on Rails Tutorial Sample App</title>
with
<title><%= full_title(yield(:title)) %></title>
as seen in Listing 4.3.
full_title
helper. green
app/views/layouts/application.html.erb
<!DOCTYPE html>
<html>
<head>
<title><%= full_title(yield(:title)) %></title>
<%= stylesheet_link_tag 'application', media: 'all',
'data-turbolinks-track' => true %>
<%= javascript_include_tag 'application', 'data-turbolinks-track' => true %>
<%= csrf_meta_tags %>
</head>
<body>
<%= yield %>
</body>
</html>
To put our helper to work, we can eliminate the unnecessary
word “Home” from the Home page, allowing it to revert to the
base title. We do
this by first updating our test with the code in Listing 4.4,
which updates the previous title test and adds one to test
for the absence of the custom "Home" string in
the title. (Note:
If you completed the exercise corresponding to Listing 3.38,
you should retain the setup method defining
the @base_title variable.)
require 'test_helper'
class StaticPagesControllerTest < ActionController::TestCase
test "should get home" do
get :home
assert_response :success
assert_select "title", "Ruby on Rails Tutorial Sample App"
end
test "should get help" do
get :help
assert_response :success
assert_select "title", "Help | Ruby on Rails Tutorial Sample App"
end
test "should get about" do
get :about
assert_response :success
assert_select "title", "About | Ruby on Rails Tutorial Sample App"
end
end
Let’s run the test suite to verify that one test fails:
$ bundle exec rake test
3 tests, 6 assertions, 1 failures, 0 errors, 0 skips
To get the test suite to pass, we’ll remove the provide
line from the Home page’s view, as seen in Listing 4.6.
<h1>Sample App</h1>
<p>
This is the home page for the
<a href="http://www.railstutorial.org/">Ruby on Rails Tutorial</a>
sample application.
</p>
At this point the tests should pass:
$ bundle exec rake test
(Note: Previous examples have included partial
output of running rake test, including the
number of passing and failing tests, but for brevity these
will usually be omitted from here on.)
As with the line to include the application stylesheet, the code in Listing 4.2 may look simple to the eyes of an experienced Rails developer, but it’s full of important Ruby ideas: modules, method definition, optional method arguments, comments, local variable assignment, booleans, control flow, string interpolation, and return values. This chapter will cover all of these ideas as well.
4.2 Strings and methods
Our principal tool for learning Ruby will be the Rails
console, a command-line tool for interacting with
Rails applications first seen in Section 2.3.3. The console itself is
built on top of interactive Ruby (irb), and
thus has access to the full power of the Ruby language. (As we’ll see in Section 4.4.4,
the console also has access to the Rails environment.)
If you’re using the cloud IDE, there are a couple of irb
configuration parameters I recommend including.
Using the simple nano text editor, fill a file
called .irbrc in the home directory with the
contents of Listing 4.8:
$ nano ~/.irbrc
Listing 4.8 arranges to simplify the irb prompt and suppress some annoying auto-indent behavior.
IRB.conf[:PROMPT_MODE] = :SIMPLE
IRB.conf[:AUTO_INDENT_MODE] = false
Whether you included the configuration in Listing 4.8, you can start the console at the command line as follows:
$ rails console
Loading development environment
>>
By default, the console starts in a development environment, which is one of three separate environments defined by Rails (the others are test and production). This distinction won’t be important in this chapter, but we’ll learn more about environments in Section 7.1.1.
The console is a great learning tool, and you should feel
free to explore—don’t worry, you (probably) won’t break
anything. When using
the console, type Ctrl-C if you get stuck, or Ctrl-D to exit
the console altogether.
Throughout the rest of this chapter, you might find it
helpful to consult the Ruby
API. It’s
packed (perhaps even too packed) with information;
for example, to learn more about Ruby strings you can look
at the Ruby API entry for the String class.
4.2.1 Comments
Ruby comments start with the pound sign #
(also called the “hash mark” or (more poetically) the
“octothorpe”) and extend to the end of the line.
Ruby ignores comments, but they are useful for human
readers (including, often, the original author!).
In the code
# Returns the full title on a per-page basis.
def full_title(page_title = '')
.
.
.
end
the first line is a comment indicating the purpose of the subsequent function definition.
You don’t ordinarily include comments in console sessions, but for instructional purposes I’ll include some comments in what follows, like this:
$ rails console
>> 17 + 42 # Integer addition
=> 59
If you follow along in this section typing or copying-and-pasting commands into your own console, you can of course omit the comments if you like; the console will ignore them in any case.
4.2.2 Strings
Strings are probably the most important data structure for web applications, since web pages ultimately consist of strings of characters sent from the server to the browser. Let’s start exploring strings with the console:
$ rails console
>> "" # An empty string
=> ""
>> "foo" # A nonempty string
=> "foo"
These are string literals (also, amusingly,
called literal strings), created using the
double quote character ".
The console prints the result of evaluating each line,
which in the case of a string literal is just the string
itself.
We can also concatenate strings with the +
operator:
>> "foo" + "bar" # String concatenation
=> "foobar"
Here the result of evaluating "foo" plus "bar"
is the string "foobar".2
Another way to build up strings is via interpolation
using the special syntax #{}:3
>> first_name = "Michael" # Variable assignment
=> "Michael"
>> "#{first_name} Hartl" # String interpolation
=> "Michael Hartl"
Here we’ve assigned the value "Michael"
to the variable first_name and then
interpolated it into the string "#{first_name}
Hartl".
We could also assign both strings a variable name:
>> first_name = "Michael"
=> "Michael"
>> last_name = "Hartl"
=> "Hartl"
>> first_name + " " + last_name # Concatenation, with a space in between
=> "Michael Hartl"
>> "#{first_name} #{last_name}" # The equivalent interpolation
=> "Michael Hartl"
Note that the final two expressions are equivalent, but I
prefer the interpolated version; having to add the single
space " " seems a bit awkward.
Printing
To print a string, the most commonly used
Ruby function is puts (pronounced “put
ess”, for “put string”):
>> puts "foo" # put string
foo
=> nil
The puts method operates as a side-effect:
the expression puts "foo" prints the
string to the screen and then returns literally nothing: nil
is a special Ruby value for “nothing at all”.
(In what follows, I’ll sometimes suppress the =>
nil part for simplicity.)
As seen in the examples above, using puts
automatically appends a newline character \n
to the output.
The related print method does not:
>> print "foo" # print string (same as puts, but without the newline)
foo=> nil
>> print "foo\n" # Same as puts "foo"
foo
=> nil
Single-quoted strings
All the examples so far have used double-quoted strings, but Ruby also supports single-quoted strings. For many uses, the two types of strings are effectively identical:
>> 'foo' # A single-quoted string
=> "foo"
>> 'foo' + 'bar'
=> "foobar"
There’s an important difference, though; Ruby won’t interpolate into single-quoted strings:
>> '#{foo} bar' # Single-quoted strings don't allow interpolation
=> "\#{foo} bar"
Note how the console returns values using double-quoted
strings, which requires a backslash to escape
special character combinations such as #{.
If double-quoted strings can do everything that single-quoted strings can do, and interpolate to boot, what’s the point of single-quoted strings? They are often useful because they are truly literal, and contain exactly the characters you type. For example, the “backslash” character is special on most systems, as in the literal newline \n. If you want a variable to contain a literal backslash, single quotes make it easier:
>> '\n' # A literal 'backslash n' combination
=> "\\n"
As with the #{ combination in our
previous example, Ruby needs to escape the backslash
with an additional backslash; inside double-quoted
strings, a literal backslash is represented with two
backslashes. For
a small example like this, there’s not much savings, but
if there are lots of things to escape it can be a real
help:
>> 'Newlines (\n) and tabs (\t) both use the backslash character \.'
=> "Newlines (\\n) and tabs (\\t) both use the backslash character \\."
Finally, it’s worth noting that, in the common case that single and double quotes are essentially interchangeable, you’ll often find that the source code switches between the two without any apparent pattern. There’s really nothing to be done about this, except to say, “Welcome to Ruby!”
4.2.3 Objects and message passing
Everything in Ruby, including strings and even nil,
is an object.
We’ll see the technical meaning of this in Section 4.4.2,
but I don’t think anyone ever understood objects by
reading the definition in a book; you have to build up
your intuition for objects by seeing lots of examples.
It’s easier to describe what objects do, which
is respond to messages.
An object like a string, for example, can respond to the
message length, which returns the number of
characters in the string:
>> "foobar".length # Passing the "length" message to a string
=> 6
Typically, the messages that get passed to objects are methods,
which are functions defined on those objects.4 Strings also respond
to the empty? method:
>> "foobar".empty?
=> false
>> "".empty?
=> true
Note the question mark at the end of the empty?
method. This is a
Ruby convention indicating that the return value is boolean:
true or false.
Booleans are especially useful for control flow:
>> s = "foobar"
>> if s.empty?
>> "The string is empty"
>> else
>> "The string is nonempty"
>> end
=> "The string is nonempty"
To include more than one clause, we can use elsif
(else + if):
>> if s.nil?
>> "The variable is nil"
>> elsif s.empty?
>> "The string is empty"
>> elsif s.include?("foo")
>> "The string includes 'foo'"
>> end
=> "The string includes 'foo'"
Booleans can also be combined using the &&
(“and”), || (“or”), and !
(“not”) operators:
>> x = "foo"
=> "foo"
>> y = ""
=> ""
>> puts "Both strings are empty" if x.empty? && y.empty?
=> nil
>> puts "One of the strings is empty" if x.empty? || y.empty?
"One of the strings is empty"
=> nil
>> puts "x is not empty" if !x.empty?
"x is not empty"
=> nil
Since everything in Ruby is an object, it follows that nil
is an object, so it too can respond to methods.
One example is the to_s method that can
convert virtually any object to a string:
>> nil.to_s
=> ""
This certainly appears to be an empty string, as we can
verify by chaining the messages we pass to nil:
>> nil.empty?
NoMethodError: undefined method `empty?' for nil:NilClass
>> nil.to_s.empty? # Message chaining
=> true
We see here that the nil object doesn’t
itself respond to the empty? method, but nil.to_s
does.
There’s a special method for testing for nil-ness,
which you might be able to guess:
>> "foo".nil?
=> false
>> "".nil?
=> false
>> nil.nil?
=> true
The code
puts "x is not empty" if !x.empty?
also shows an alternate use of the if
keyword: Ruby allows you to write a statement that is
evaluated only if the statement following if
is true. There’s a
complementary unless keyword that works the
same way:
>> string = "foobar"
>> puts "The string '#{string}' is nonempty." unless string.empty?
The string 'foobar' is nonempty.
=> nil
It’s worth noting that the nil object is
special, in that it is the only Ruby object that
is false in a boolean context, apart from false
itself. We can see
this using !! (read “bang bang”), which
negates an object twice, thereby coercing it to its
boolean value:
>> !!nil
=> false
In particular, all other Ruby objects are true, even 0:
>> !!0
=> true
4.2.4 Method definitions
The console allows us to define methods the same way we
did with the home action from Listing 3.6
or the full_title helper from Listing 4.2. (Defining methods in
the console is a bit cumbersome, and ordinarily you would
use a file, but it’s convenient for demonstration
purposes.) For
example, let’s define a function string_message
that takes a single argument and returns a
message based on whether the argument is empty or not:
>> def string_message(str = '')
>> if str.empty?
>> "It's an empty string!"
>> else
>> "The string is nonempty."
>> end
>> end
=> :string_message
>> puts string_message("foobar")
The string is nonempty.
>> puts string_message("")
It's an empty string!
>> puts string_message
It's an empty string!
As seen in the final example, it’s possible to leave out the argument entirely (in which case we can also omit the parentheses). This is because the code
def string_message(str = '')
contains a default argument, which in this case
is the empty string.
This makes the str argument optional, and if
we leave it off it automatically takes the given default
value.
Note that Ruby functions have an implicit return,
meaning they return the last statement evaluated—in this
case, one of the two message strings, depending on whether
the method’s argument str is empty or not. Ruby also has an
explicit return option; the following function is
equivalent to the one above:
>> def string_message(str = '')
>> return "It's an empty string!" if str.empty?
>> return "The string is nonempty."
>> end
(The alert reader might notice at this point that the
second return here is actually
unnecessary—being the last expression in the function, the
string "The string is nonempty." will be
returned regardless of the return keyword,
but using return in both places has a
pleasing symmetry to it.)
It’s also important to understand that the name of the
function argument is irrelevant as far as the caller is
concerned. In
other words, the first example above could replace str
with any other valid variable name, such as the_function_argument,
and it would work just the same:
>> def string_message(the_function_argument = '')
>> if the_function_argument.empty?
>> "It's an empty string!"
>> else
>> "The string is nonempty."
>> end
>> end
=> nil
>> puts string_message("")
It's an empty string!
>> puts string_message("foobar")
The string is nonempty.
4.2.5 Back to the title helper
We are now in a position to understand the full_title
helper from Listing 4.2,5
which appears with commented annotations in Listing 4.9.
title_helper.
app/helpers/application_helper.rb
module ApplicationHelper
# Returns the full title on a per-page basis. # Documentation comment
def full_title(page_title = '') # Method def, optional arg
base_title = "Ruby on Rails Tutorial Sample App" # Variable assignment
if page_title.empty? # Boolean test
base_title # Implicit return
else
"#{page_title} | #{base_title}" # String interpolation
end
end
end
These elements—function definition (with an optional
argument), variable assignment, boolean tests, control
flow, and string interpolation—come together to make a
compact helper method for use in our site layout.
The final element is module ApplicationHelper:
modules give us a way to package together related methods,
which can then be mixed in to Ruby classes using
include.
When writing ordinary Ruby, you often write modules and
include them explicitly yourself, but in the case of a
helper module Rails handles the inclusion for us.
The result is that the full_title method is
automagically available in all our
views.
4.3 Other data structures
Although web apps are ultimately about strings, actually making those strings requires using other data structures as well. In this section, we’ll learn about some Ruby data structures important for writing Rails applications.
4.3.1 Arrays and ranges
An array is just a list of elements in a particular
order. We haven’t
discussed arrays yet in the Rails Tutorial, but
understanding them gives a good foundation for
understanding hashes (Section 4.3.3) and for aspects of Rails
data modeling (such as the has_many
association seen in Section 2.3.3
and covered more in Section 11.1.3).
So far we’ve spent a lot of time understanding strings,
and there’s a natural way to get from strings to arrays
using the split method:
>> "foo bar baz".split # Split a string into a three-element array.
=> ["foo", "bar", "baz"]
The result of this operation is an array of three
strings. By
default, split divides a string into an
array by splitting on whitespace, but you can split on
nearly anything else as well:
>> "fooxbarxbazx".split('x')
=> ["foo", "bar", "baz"]
As is conventional in most computer languages, Ruby arrays are zero-offset, which means that the first element in the array has index 0, the second has index 1, and so on:
>> a = [42, 8, 17]
=> [42, 8, 17]
>> a[0] # Ruby uses square brackets for array access.
=> 42
>> a[1]
=> 8
>> a[2]
=> 17
>> a[-1] # Indices can even be negative!
=> 17
We see here that Ruby uses square brackets to access array elements. In addition to this bracket notation, Ruby offers synonyms for some commonly accessed elements:6
>> a # Just a reminder of what 'a' is
=> [42, 8, 17]
>> a.first
=> 42
>> a.second
=> 8
>> a.last
=> 17
>> a.last == a[-1] # Comparison using ==
=> true
This last line introduces the equality comparison
operator ==, which Ruby shares with many
other languages, along with the associated !=
(“not equal”), etc.:
>> x = a.length # Like strings, arrays respond to the 'length' method.
=> 3
>> x == 3
=> true
>> x == 1
=> false
>> x != 1
=> true
>> x >= 1
=> true
>> x < 1
=> false
In addition to length (seen in the first
line above), arrays respond to a wealth of other methods:
>> a
=> [42, 8, 17]
>> a.empty?
=> false
>> a.include?(42)
=> true
>> a.sort
=> [8, 17, 42]
>> a.reverse
=> [17, 8, 42]
>> a.shuffle
=> [17, 42, 8]
>> a
=> [42, 8, 17]
Note that none of the methods above changes a
itself. To mutate
the array, use the corresponding “bang” methods (so-called
because the exclamation point is usually pronounced “bang”
in this context):
>> a
=> [42, 8, 17]
>> a.sort!
=> [8, 17, 42]
>> a
=> [8, 17, 42]
You can also add to arrays with the push
method or its equivalent operator, <<:
>> a.push(6) # Pushing 6 onto an array
=> [42, 8, 17, 6]
>> a << 7 # Pushing 7 onto an array
=> [42, 8, 17, 6, 7]
>> a << "foo" << "bar" # Chaining array pushes
=> [42, 8, 17, 6, 7, "foo", "bar"]
This last example shows that you can chain pushes together, and also that, unlike arrays in many other languages, Ruby arrays can contain a mixture of different types (in this case, integers and strings).
Before we saw split convert a string to an
array. We can also
go the other way with the join method:
>> a
=> [42, 8, 17, 7, "foo", "bar"]
>> a.join # Join on nothing.
=> "428177foobar"
>> a.join(', ') # Join on comma-space.
=> "42, 8, 17, 7, foo, bar"
Closely related to arrays are ranges, which can
probably most easily be understood by converting them to
arrays using the to_a method:
>> 0..9
=> 0..9
>> 0..9.to_a # Oops, call to_a on 9.
NoMethodError: undefined method `to_a' for 9:Fixnum
>> (0..9).to_a # Use parentheses to call to_a on the range.
=> [0, 1, 2, 3, 4, 5, 6, 7, 8, 9]
Though 0..9 is a valid range, the second
expression above shows that we need to add parentheses to
call a method on it.
Ranges are useful for pulling out array elements:
>> a = %w[foo bar baz quux] # Use %w to make a string array.
=> ["foo", "bar", "baz", "quux"]
>> a[0..2]
=> ["foo", "bar", "baz"]
A particularly useful trick is to use the index -1 at the end of the range to select every element from the starting point to the end of the array without explicitly having to use the array’s length:
>> a = (0..9).to_a
=> [0, 1, 2, 3, 4, 5, 6, 7, 8, 9]
>> a[2..(a.length-1)] # Explicitly use the array's length.
=> [2, 3, 4, 5, 6, 7, 8, 9]
>> a[2..-1] # Use the index -1 trick.
=> [2, 3, 4, 5, 6, 7, 8, 9]
Ranges also work with characters:
>> ('a'..'e').to_a
=> ["a", "b", "c", "d", "e"]
4.3.2 Blocks
Both arrays and ranges respond to a host of methods that accept blocks, which are simultaneously one of Ruby’s most powerful and most confusing features:
>> (1..5).each { |i| puts 2 * i }
2
4
6
8
10
=> 1..5
This code calls the each method on the
range (1..5) and passes it the block {
|i| puts 2 * i }.
The vertical bars around the variable name in |i|
are Ruby syntax for a block variable, and it’s up to the
method to know what to do with the block.
In this case, the range’s each method can
handle a block with a single local variable, which we’ve
called i, and it just executes the block
for each value in the range.
Curly braces are one way to indicate a block, but there is a second way as well:
>> (1..5).each do |i|
?> puts 2 * i
>> end
2
4
6
8
10
=> 1..5
Blocks can be more than one line, and often are.
In the Rails Tutorial we’ll follow the common
convention of using curly braces only for short one-line
blocks and the do..end syntax for longer
one-liners and for multi-line blocks:
>> (1..5).each do |number|
?> puts 2 * number
>> puts '--'
>> end
2
--
4
--
6
--
8
--
10
--
=> 1..5
Here I’ve used number in place of i
just to emphasize that any variable name will do.
Unless you already have a substantial programming
background, there is no shortcut to understanding blocks;
you just have to see them a lot, and eventually you’ll get
used to them.7
Luckily, humans are quite good at making generalizations
from concrete examples; here are a few more, including a
couple using the map method:
>> 3.times { puts "Betelgeuse!" } # 3.times takes a block with no variables.
"Betelgeuse!"
"Betelgeuse!"
"Betelgeuse!"
=> 3
>> (1..5).map { |i| i**2 } # The ** notation is for 'power'.
=> [1, 4, 9, 16, 25]
>> %w[a b c] # Recall that %w makes string arrays.
=> ["a", "b", "c"]
>> %w[a b c].map { |char| char.upcase }
=> ["A", "B", "C"]
>> %w[A B C].map { |char| char.downcase }
=> ["a", "b", "c"]
As you can see, the map method returns the
result of applying the given block to each element in the
array or range. In
the final two examples, the block inside map
involves calling a particular method on the block
variable, and in this case there’s a commonly used
shorthand:
>> %w[A B C].map { |char| char.downcase }
=> ["a", "b", "c"]
>> %w[A B C].map(&:downcase)
=> ["a", "b", "c"]
(This strange-looking but compact code uses a symbol, which we’ll discuss in Section 4.3.3.) One interesting thing about this construction is that it was originally added to Ruby on Rails, and people liked it so much that it has now been incorporated into core Ruby.
As one final example of blocks, we can take a look at an individual test from the file in Listing 4.4:
test "should get home" do
get :home
assert_response :success
assert_select "title", "Ruby on Rails Tutorial Sample App"
end
It’s not important to understand the details (and in fact
I don’t know the details offhand), but we can
infer from the presence of the do keyword
that the body of the test is a block.
The test method takes in a string argument
(the description) and a block, and then executes the body
of the block as part of running the test suite.
By the way, we’re now in a position to understand the line of Ruby I threw into Section 1.5.4 to generate random subdomains:
('a'..'z').to_a.shuffle[0..7].join
Let’s build it up step-by-step:
>> ('a'..'z').to_a # An alphabet array
=> ["a", "b", "c", "d", "e", "f", "g", "h", "i", "j", "k", "l", "m", "n", "o",
"p", "q", "r", "s", "t", "u", "v", "w", "x", "y", "z"]
>> ('a'..'z').to_a.shuffle # Shuffle it.
=> ["c", "g", "l", "k", "h", "z", "s", "i", "n", "d", "y", "u", "t", "j", "q",
"b", "r", "o", "f", "e", "w", "v", "m", "a", "x", "p"]
>> ('a'..'z').to_a.shuffle[0..7] # Pull out the first eight elements.
=> ["f", "w", "i", "a", "h", "p", "c", "x"]
>> ('a'..'z').to_a.shuffle[0..7].join # Join them together to make one string.
=> "mznpybuj"
4.3.3 Hashes and symbols
Hashes are essentially arrays that aren’t limited to integer indices. (In fact, some languages, especially Perl, sometimes call hashes associative arrays for this reason.) Instead, hash indices, or keys, can be almost any object. For example, we can use strings as keys:
>> user = {} # {} is an empty hash.
=> {}
>> user["first_name"] = "Michael" # Key "first_name", value "Michael"
=> "Michael"
>> user["last_name"] = "Hartl" # Key "last_name", value "Hartl"
=> "Hartl"
>> user["first_name"] # Element access is like arrays.
=> "Michael"
>> user # A literal representation of the hash
=> {"last_name"=>"Hartl", "first_name"=>"Michael"}
Hashes are indicated with curly braces containing
key-value pairs; a pair of braces with no key-value
pairs—i.e., {}—is an empty hash.
It’s important to note that the curly braces for hashes
have nothing to do with the curly braces for blocks. (Yes, this can be
confusing.)
Although hashes resemble arrays, one important difference
is that hashes don’t generally guarantee keeping their
elements in a particular order.8 If order matters, use
an array.
Instead of defining hashes one item at a time using
square brackets, it’s easy to use a literal representation
with keys and values separated by =>,
called a “hashrocket”:
>> user = { "first_name" => "Michael", "last_name" => "Hartl" }
=> {"last_name"=>"Hartl", "first_name"=>"Michael"}
Here I’ve used the usual Ruby convention of putting an extra space at the two ends of the hash—a convention ignored by the console output. (Don’t ask me why the spaces are conventional; probably some early influential Ruby programmer liked the look of the extra spaces, and the convention stuck.)
So far we’ve used strings as hash keys, but in Rails it
is much more common to use symbols instead. Symbols look kind of
like strings, but prefixed with a colon instead of
surrounded by quotes.
For example, :name is a symbol.
You can think of symbols as basically strings without all
the extra baggage:9
>> "name".split('')
=> ["n", "a", "m", "e"]
>> :name.split('')
NoMethodError: undefined method `split' for :name:Symbol
>> "foobar".reverse
=> "raboof"
>> :foobar.reverse
NoMethodError: undefined method `reverse' for :foobar:Symbol
Symbols are a special Ruby data type shared with very few other languages, so they may seem weird at first, but Rails uses them a lot, so you’ll get used to them fast. Unlike strings, not all characters are valid:
>> :foo-bar
NameError: undefined local variable or method `bar' for main:Object
>> :2foo
SyntaxError
As long as you start your symbols with a letter and stick to normal word characters, you should be fine.
In terms of symbols as hash keys, we can define a user
hash as follows:
>> user = { :name => "Michael Hartl", :email => "michael@example.com" }
=> {:name=>"Michael Hartl", :email=>"michael@example.com"}
>> user[:name] # Access the value corresponding to :name.
=> "Michael Hartl"
>> user[:password] # Access the value of an undefined key.
=> nil
We see here from the last example that the hash value for
an undefined key is simply nil.
Since it’s so common for hashes to use symbols as keys, as of version 1.9 Ruby supports a new syntax just for this special case:
>> h1 = { :name => "Michael Hartl", :email => "michael@example.com" }
=> {:name=>"Michael Hartl", :email=>"michael@example.com"}
>> h2 = { name: "Michael Hartl", email: "michael@example.com" }
=> {:name=>"Michael Hartl", :email=>"michael@example.com"}
>> h1 == h2
=> true
The second syntax replaces the symbol/hashrocket combination with the name of the key followed by a colon and a value:
{ name: "Michael Hartl", email: "michael@example.com" }
This construction more closely follows the hash notation
in other languages (such as JavaScript) and enjoys growing
popularity in the Rails community.
Because both hash syntaxes are still in common use, it’s
essential to be able to recognize both of them.
Unfortunately, this can be confusing, especially since :name
is valid on its own (as a standalone symbol) but name:
has no meaning by itself.
The bottom line is that :name => and name:
are effectively the same only inside literal hashes,
so that
{ :name => "Michael Hartl" }
and
{ name: "Michael Hartl" }
are equivalent, but otherwise you need to use :name
(with the colon coming first) to denote a symbol
Hash values can be virtually anything, even other hashes, as seen in Listing 4.10.
>> params = {} # Define a hash called 'params' (short for 'parameters').
=> {}
>> params[:user] = { name: "Michael Hartl", email: "mhartl@example.com" }
=> {:name=>"Michael Hartl", :email=>"mhartl@example.com"}
>> params
=> {:user=>{:name=>"Michael Hartl", :email=>"mhartl@example.com"}}
>> params[:user][:email]
=> "mhartl@example.com"
These sorts of hashes-of-hashes, or nested hashes, are heavily used by Rails, as we’ll see starting in Section 7.3.
As with arrays and ranges, hashes respond to the each
method. For
example, consider a hash named flash with
keys for two conditions, :success and :danger:
>> flash = { success: "It worked!", danger: "It failed." }
=> {:success=>"It worked!", :danger=>"It failed."}
>> flash.each do |key, value|
?> puts "Key #{key.inspect} has value #{value.inspect}"
>> end
Key :success has value "It worked!"
Key :danger has value "It failed."
Note that, while the each method for arrays
takes a block with only one variable, each
for hashes takes two, a key and a value. Thus, the each
method for a hash iterates through the hash one key-value
pair at a time.
The last example uses the useful inspect
method, which returns a string with a literal
representation of the object it’s called on:
>> puts (1..5).to_a # Put an array as a string.
1
2
3
4
5
>> puts (1..5).to_a.inspect # Put a literal array.
[1, 2, 3, 4, 5]
>> puts :name, :name.inspect
name
:name
>> puts "It worked!", "It worked!".inspect
It worked!
"It worked!"
By the way, using inspect to print an
object is common enough that there’s a shortcut for it,
the p function:10
>> p :name # Same output as 'puts :name.inspect'
:name
4.3.4 CSS revisited
It’s time now to revisit the line from Listing 4.1 used in the layout to include the cascading style sheets:
<%= stylesheet_link_tag 'application', media: 'all',
'data-turbolinks-track' => true %>
We are now nearly in a position to understand this. As mentioned briefly in Section 4.1, Rails defines a special function to include stylesheets, and
stylesheet_link_tag 'application', media: 'all',
'data-turbolinks-track' => true
is a call to this function. But there are several mysteries. First, where are the parentheses? In Ruby, they are optional, so these two are equivalent:
# Parentheses on function calls are optional.
stylesheet_link_tag('application', media: 'all',
'data-turbolinks-track' => true)
stylesheet_link_tag 'application', media: 'all',
'data-turbolinks-track' => true
Second, the media argument sure looks like
a hash, but where are the curly braces?
When hashes are the last argument in a function
call, the curly braces are optional, so these two are
equivalent:
# Curly braces on final hash arguments are optional.
stylesheet_link_tag 'application', { media: 'all',
'data-turbolinks-track' => true }
stylesheet_link_tag 'application', media: 'all',
'data-turbolinks-track' => true
Next, why does the data-turbolinks-track
key-value pair use the old-style hashrocket syntax?
This is because using the newer syntax to write
data-turbolinks-track: true
is invalid because of the hyphens. (Recall from Section 4.3.3 that hyphens can’t be used in symbols.) This forces us to use the older syntax, yielding
'data-turbolinks-track' => true
Finally, why does Ruby correctly interpret the lines
stylesheet_link_tag 'application', media: 'all',
'data-turbolinks-track' => true
even with a line break between the final elements? The answer is that Ruby doesn’t distinguish between newlines and other whitespace in this context.11 The reason I chose to break the code into pieces is that I prefer to keep lines of source code under 80 characters for legibility.12
So, we see now that the line
stylesheet_link_tag 'application', media: 'all',
'data-turbolinks-track' => true
calls the stylesheet_link_tag function with
two arguments: a string, indicating the path to the
stylesheet, and a hash with two elements, indicating the
media type and telling Rails to use the turbolinks feature added in
Rails 4.0.
Because of the <%= %>
brackets, the results are inserted into the template by
ERb, and if you view the source of the page in your
browser you should see the HTML needed to include a
stylesheet (Listing 4.11).
(You may see some extra things, like ?body=1,
after the CSS filenames.
These are inserted by Rails to ensure that browsers reload
the CSS when it changes on the server.)
<link data-turbolinks-track="true" href="/assets/application.css" media="all"
rel="stylesheet" />
If you actually view the CSS file by navigating to http://localhost:3000/assets/application.css, you’ll see that (apart from some comments) it is empty. We’ll set about changing this in Chapter 5.
4.4 Ruby classes
We’ve said before that everything in Ruby is an object, and in this section we’ll finally get to define some of our own. Ruby, like many object-oriented languages, uses classes to organize methods; these classes are then instantiated to create objects. If you’re new to object-oriented programming, this may sound like gibberish, so let’s look at some concrete examples.
4.4.1 Constructors
We’ve seen lots of examples of using classes to instantiate objects, but we have yet to do so explicitly. For example, we instantiated a string using the double quote characters, which is a literal constructor for strings:
>> s = "foobar" # A literal constructor for strings using double quotes
=> "foobar"
>> s.class
=> String
We see here that strings respond to the method class,
and simply return the class they belong to.
Instead of using a literal constructor, we can use the
equivalent named constructor, which involves
calling the new method on the class name:13
>> s = String.new("foobar") # A named constructor for a string
=> "foobar"
>> s.class
=> String
>> s == "foobar"
=> true
This is equivalent to the literal constructor, but it’s more explicit about what we’re doing.
Arrays work the same way as strings:
>> a = Array.new([1, 3, 2])
=> [1, 3, 2]
Hashes, in contrast, are different.
While the array constructor Array.new takes
an initial value for the array, Hash.new
takes a default value for the hash, which is the
value of the hash for a nonexistent key:
>> h = Hash.new
=> {}
>> h[:foo] # Try to access the value for the nonexistent key :foo.
=> nil
>> h = Hash.new(0) # Arrange for nonexistent keys to return 0 instead of nil.
=> {}
>> h[:foo]
=> 0
When a method gets called on the class itself, as in the
case of new, it’s called a class method. The result of calling
new on a class is an object of that class,
also called an instance of the class.
A method called on an instance, such as length,
is called an instance method.
4.4.2 Class inheritance
When learning about classes, it’s useful to find out the
class hierarchy using the superclass
method:
>> s = String.new("foobar")
=> "foobar"
>> s.class # Find the class of s.
=> String
>> s.class.superclass # Find the superclass of String.
=> Object
>> s.class.superclass.superclass # Ruby 1.9 uses a new BasicObject base class
=> BasicObject
>> s.class.superclass.superclass.superclass
=> nil
A diagram of this inheritance hierarchy appears in Figure 4.1. We see here that the
superclass of String is Object
and the superclass of Object is BasicObject,
but BasicObject has no superclass.
This pattern is true of every Ruby object: trace back the
class hierarchy far enough and every class in Ruby
ultimately inherits from BasicObject, which
has no superclass itself.
This is the technical meaning of “everything in Ruby is an
object”.
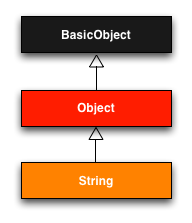
String class. To understand classes a little more deeply, there’s no
substitute for making one of our own.
Let’s make a Word class with a palindrome?
method that returns true if the word is the
same spelled forward and backward:
>> class Word
>> def palindrome?(string)
>> string == string.reverse
>> end
>> end
=> :palindrome?
We can use it as follows:
>> w = Word.new # Make a new Word object.
=> #<Word:0x22d0b20>
>> w.palindrome?("foobar")
=> false
>> w.palindrome?("level")
=> true
If this example strikes you as a bit contrived, good—this
is by design. It’s
odd to create a new class just to create a method that
takes a string as an argument.
Since a word is a string, it’s more natural to
have our Word class inherit from String,
as seen in Listing 4.12.
(You should exit the console and re-enter it to clear out
the old definition of Word.)
Word
class in the console. >> class Word < String # Word inherits from String.
>> # Returns true if the string is its own reverse.
>> def palindrome?
>> self == self.reverse # self is the string itself.
>> end
>> end
=> nil
Here Word < String is the Ruby syntax
for inheritance (discussed briefly in Section 3.2),
which ensures that, in addition to the new palindrome?
method, words also have all the same methods as strings:
>> s = Word.new("level") # Make a new Word, initialized with "level".
=> "level"
>> s.palindrome? # Words have the palindrome? method.
=> true
>> s.length # Words also inherit all the normal string methods.
=> 5
Since the Word class inherits from String,
we can use the console to see the class hierarchy
explicitly:
>> s.class
=> Word
>> s.class.superclass
=> String
>> s.class.superclass.superclass
=> Object
This hierarchy is illustrated in Figure 4.2.
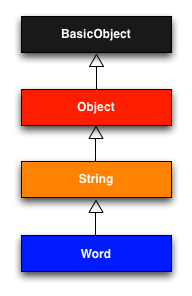
Word class from Listing 4.12.
In Listing 4.12, note that checking that
the word is its own reverse involves accessing the word
inside the Word class.
Ruby allows us to do this using the self
keyword: inside the Word class, self
is the object itself, which means we can use
self == self.reverse
to check if the word is a palindrome.14 In fact, inside the
String class the use of self. is optional on
a method or attribute (unless we’re making an assignment),
so
self == reverse
would work as well.
4.4.3 Modifying built-in classes
While inheritance is a powerful idea, in the case of
palindromes it might be even more natural to add the palindrome?
method to the String class itself, so that
(among other things) we can call palindrome?
on a string literal, which we currently can’t do:
>> "level".palindrome?
NoMethodError: undefined method `palindrome?' for "level":String
Amazingly, Ruby lets you do just this; Ruby classes can be opened and modified, allowing ordinary mortals such as ourselves to add methods to them:
>> class String
>> # Returns true if the string is its own reverse.
>> def palindrome?
>> self == self.reverse
>> end
>> end
=> nil
>> "deified".palindrome?
=> true
(I don’t know which is cooler: that Ruby lets you add
methods to built-in classes, or that "deified"
is a palindrome.)
Modifying built-in classes is a powerful technique, but
with great power comes great responsibility, and it’s
considered bad form to add methods to built-in classes
without having a really good reason for doing
so. Rails does
have some good reasons; for example, in web applications
we often want to prevent variables from being blank—e.g.,
a user’s name should be something other than spaces and
other whitespace—so Rails adds a blank?
method to Ruby.
Since the Rails console automatically includes the Rails
extensions, we can see an example here (this won’t work in
plain irb):
>> "".blank?
=> true
>> " ".empty?
=> false
>> " ".blank?
=> true
>> nil.blank?
=> true
We see that a string of spaces is not empty,
but it is blank.
Note also that nil is blank; since nil
isn’t a string, this is a hint that Rails actually adds blank?
to String’s base class, which (as we saw at
the beginning of this section) is Object
itself. We’ll see
some other examples of Rails additions to Ruby classes in
Section 8.4.
4.4.4 A controller class
All this talk about classes and inheritance may have triggered a flash of recognition, because we have seen both before, in the Static Pages controller (Listing 3.18):
class StaticPagesController < ApplicationController
def home
end
def help
end
def about
end
end
You’re now in a position to appreciate, at least vaguely,
what this code means: StaticPagesController
is a class that inherits from ApplicationController,
and comes equipped with home, help,
and about methods.
Since each Rails console session loads the local Rails
environment, we can even create a controller explicitly
and examine its class hierarchy:15
>> controller = StaticPagesController.new
=> #<StaticPagesController:0x22855d0>
>> controller.class
=> StaticPagesController
>> controller.class.superclass
=> ApplicationController
>> controller.class.superclass.superclass
=> ActionController::Base
>> controller.class.superclass.superclass.superclass
=> ActionController::Metal
>> controller.class.superclass.superclass.superclass.superclass
=> AbstractController::Base
>> controller.class.superclass.superclass.superclass.superclass.superclass
=> Object
A diagram of this hierarchy appears in Figure 4.3.
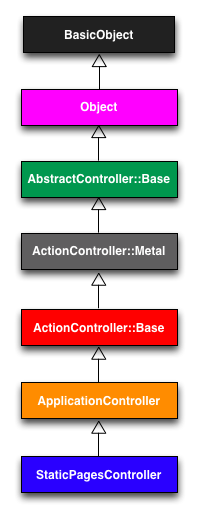
We can even call the controller actions inside the console, which are just methods:
>> controller.home
=> nil
Here the return value is nil because the home
action is blank.
But wait—actions don’t have return values, at least not
ones that matter.
The point of the home action, as we saw in Chapter 3, is to render a web page, not
to return a value.
And I sure don’t remember ever calling StaticPagesController.new
anywhere. What’s
going on?
What’s going on is that Rails is written in Ruby, but Rails isn’t Ruby. Some Rails classes are used like ordinary Ruby objects, but some are just grist for Rails’ magic mill. Rails is sui generis, and should be studied and understood separately from Ruby.
4.4.5 A user class
We end our tour of Ruby with a complete class of our own,
a User class that anticipates the User model
coming up in Chapter 6.
So far we’ve entered class definitions at the console,
but this quickly becomes tiresome; instead, create the
file example_user.rb in your application
root directory and fill it with the contents of Listing 4.13.
class User
attr_accessor :name, :email
def initialize(attributes = {})
@name = attributes[:name]
@email = attributes[:email]
end
def formatted_email
"#{@name} <#{@email}>"
end
end
There’s quite a bit going on here, so let’s take it step by step. The first line,
attr_accessor :name, :email
creates attribute accessors corresponding to a
user’s name and email address.
This creates “getter” and “setter” methods that allow us
to retrieve (get) and assign (set) @name and
@email instance variables, which
were mentioned briefly in Section 2.2.2 and Section 3.6. In Rails, the
principal importance of instance variables is that they
are automatically available in the views, but in general
they are used for variables that need to be available
throughout a Ruby class.
(We’ll have more to say about this in a moment.)
Instance variables always begin with an @
sign, and are nil when undefined.
The first method, initialize, is special in
Ruby: it’s the method called when we execute User.new. This particular initialize
takes one argument, attributes:
def initialize(attributes = {})
@name = attributes[:name]
@email = attributes[:email]
end
Here the attributes variable has a default
value equal to the empty hash, so that we can
define a user with no name or email address.
(Recall from Section 4.3.3 that hashes return nil
for nonexistent keys, so attributes[:name]
will be nil if there is no :name
key, and similarly for attributes[:email].)
Finally, our class defines a method called formatted_email
that uses the values of the assigned @name
and @email variables to build up a nicely
formatted version of the user’s email address using string
interpolation (Section 4.2.2):
def formatted_email
"#{@name} <#{@email}>"
end
Because @name and @email are
both instance variables (as indicated with the @
sign), they are automatically available in the formatted_email
method.
Let’s fire up the console, require the
example user code, and take our User class out for a spin:
>> require './example_user' # This is how you load the example_user code.
=> true
>> example = User.new
=> #<User:0x224ceec @email=nil, @name=nil>
>> example.name # nil since attributes[:name] is nil
=> nil
>> example.name = "Example User" # Assign a non-nil name
=> "Example User"
>> example.email = "user@example.com" # and a non-nil email address
=> "user@example.com"
>> example.formatted_email
=> "Example User <user@example.com>"
Here the ’.’
is Unix for “current directory”, and ’./example_user’
tells Ruby to look for an example user file relative to
that location. The
subsequent code creates an empty example user and then
fills in the name and email address by assigning directly
to the corresponding attributes (assignments made possible
by the attr_accessor line in Listing 4.13). When we write
example.name = "Example User"
Ruby is setting the @name variable to "Example
User" (and similarly for the email
attribute), which we then use in the formatted_email
method.
Recalling from Section 4.3.4 we can omit the curly
braces for final hash arguments, we can create another
user by passing a hash to the initialize
method to create a user with pre-defined attributes:
>> user = User.new(name: "Michael Hartl", email: "mhartl@example.com")
=> #<User:0x225167c @email="mhartl@example.com", @name="Michael Hartl">
>> user.formatted_email
=> "Michael Hartl <mhartl@example.com>"
We will see starting in Chapter 7 that initializing objects using a hash argument, a technique known as mass assignment, is common in Rails applications.
4.5 Висновок
This concludes our overview of the Ruby language. In Chapter 5, we’ll start putting it to good use in developing the sample application.
We won’t be using the example_user.rb file
from Section 4.4.5, so I suggest removing it:
$ rm example_user.rb
Then commit the other changes to the main source code repository, push up to Bitbucket, and deploy to Heroku:
$ git status
$ git commit -am "Add a full_title helper"
$ git push
$ bundle exec rake test
$ git push heroku
4.5.1 Що ми вивчили в цій главі
- Ruby has a large number of methods for manipulating strings of characters.
- Everything in Ruby is an object.
- Ruby supports method definition via the
defkeyword. - Ruby supports class definition via the
classkeyword. - Rails views can contain static HTML or embedded Ruby (ERb).
- Built-in Ruby data structures include arrays, ranges, and hashes.
- Ruby blocks are a flexible construct that (among other things) allow natural iteration over enumerable data structures.
- Symbols are labels, like strings without any additional structure.
- Ruby supports object inheritance.
- It is possible to open up and modify built-in Ruby classes.
- The word “deified” is a palindrome.
4.6 Вправи
Note: The Solutions Manual for Вправи, with solutions to every exercise in the Ruby on Rails Tutorial book, is included for free with every purchase at www.railstutorial.org.
- By replacing the question marks in Listing 4.14
with the appropriate methods, combine
split,shuffle, andjointo write a function that shuffles the letters in a given string. - Using Listing 4.15 as a guide, add a
shufflemethod to theStringclass. - Create three hashes called
person1,person2, andperson3, with first and last names under the keys:firstand:last. Then create aparamshash so thatparams[:father]isperson1,params[:mother]isperson2, andparams[:child]isperson3. Verify that, for example,params[:father][:first]has the right value. - Find an online version of the Ruby API and read about
the Hash method
merge. What is the value of the following expression?{ "a" => 100, "b" => 200 }.merge({ "b" => 300 })
>> def string_shuffle(s)
>> s.?('').?.?
>> end
>> string_shuffle("foobar")
=> "oobfra"
shuffle
method attached to the String class.
>> class String
>> def shuffle
>> self.?('').?.?
>> end
>> end
>> "foobar".shuffle
=> "borafo"
- If a helper is specific to a
particular controller, you should put it in the
corresponding helper file; for example, helpers for the
Static Pages controller generally go in
app/helpers/static_pages_helper.rb. In our case, we expect thefull_titlehelper to be used on all the site’s pages, and Rails has a special helper file for this case:app/helpers/application_helper.rb. ↑ - For more on the origins of “foo” and “bar”—and, in particular, the possible non-relation of “foobar” to “FUBAR”—see the Jargon File entry on “foo”. ↑
- Programmers familiar with Perl or
PHP should compare this to the automatic interpolation of
dollar sign variables in expressions like
"foo $bar". ↑ - Apologies in advance for switching haphazardly between function and method throughout this chapter; in Ruby, they’re the same thing: all methods are functions, and all functions are methods, because everything is an object. ↑
- Well, there will still be one
thing left that we don’t understand, which is how Rails
ties this all together: mapping URLs to actions, making
the
full_titlehelper available in views, etc. This is an interesting subject, and I encourage you to investigate it further, but knowing exactly how Rails works is not necessary when using Rails. (For a deeper understanding, I recommend The Rails 4 Way by Obie Fernandez.) ↑ - The
secondmethod used here isn’t currently part of Ruby itself, but rather is added by Rails. It works in this case because the Rails console automatically includes the Rails extensions to Ruby. ↑ - Programming experts, on the other hand, might benefit from knowing that blocks are closures, which are one-shot anonymous functions with data attached. ↑
- Ruby versions 1.9 and later actually guarantee that hashes keep their elements in the same order entered, but it would be unwise ever to count on a particular ordering. ↑
- As a result of having less baggage, symbols are easier to compare to each other; strings need to be compared character by character, while symbols can be compared all in one go. This makes them ideal for use as hash keys. ↑
- There’s actually a subtle
difference, which is that
preturns the object being printed whileputsalways returnsnil. Thanks to reader Katarzyna Siwek for pointing this out. ↑ - A newline is what comes at the end of a line, thereby starting a new line. In code, it is represented by the character \n. ↑
- Actually counting columns could drive you crazy, which is why many text editors have a visual aid to help you. For example, if you take a look back at Figure 1.5, you’ll see a small vertical line on the right to help keep code under 80 characters. The cloud IDE (Section 1.2.1) includes such a line by default. If you use TextMate, you can find this feature under View > Wrap Column > 78. In Sublime Text, you can use View > Ruler > 78 or View > Ruler > 80. ↑
- These results will vary based on the version of Ruby you are using. This example assumes you are using Ruby 1.9.3 or later. ↑
- For more on Ruby classes and the
selfkeyword, see the RailsTips post “Class and Instance Variables in Ruby”. ↑ - You don’t have to know what each class in this hierarchy does. I don’t know what they all do, and I’ve been programming in Ruby on Rails since 2005. This means either that (a) I’m grossly incompetent or (b) you can be a skilled Rails developer without knowing all its innards. I hope for both our sakes that it’s the latter. ↑
Chapter 5 Filling in the layout
In the process of taking a brief tour of Ruby in Chapter 4, we learned about including the application stylesheet into the sample application (Section 4.1), but (as noted in Section 4.3.4) the stylesheet doesn’t yet contain any CSS. In this chapter, we’ll start filling in the custom stylesheet by incorporating a CSS framework into our application, and then we’ll add some custom styles of our own.1 We’ll also start filling in the layout with links to the pages (such as Home and About) that we’ve created so far (Section 5.1). Along the way, we’ll learn about partials, Rails routes, and the asset pipeline, including an introduction to Sass (Section 5.2). We’ll end by taking a first important step toward letting users sign up to our site (Section 5.4).
Most of the changes in this chapter involve adding and editing markup in the sample application’s site layout, which (based on the guidelines in Box 3.3) is exactly the kind of work that we wouldn’t ordinarily test-drive, or even test at all. As a result, we’ll spend most of our time in our text editor and browser, using TDD only to add a Contact page (Section 5.3.1). We will add an important new test, though, writing our first integration test to check that the links on the final layout are correct (Section 5.3.4).
5.1 Adding some structure
The Ruby on Rails Tutorial is a book on web development, not web design, but it would be depressing to work on an application that looks like complete crap, so in this section we’ll add some structure to the layout and give it some minimal styling with CSS. In addition to using some custom CSS rules, we’ll make use of Bootstrap, an open-source web design framework from Twitter. We’ll also give our code some styling, so to speak, using partials to tidy up the layout once it gets a little cluttered.
When building web applications, it is often useful to get a high-level overview of the user interface as early as possible. Throughout the rest of this book, I will thus often include mockups (in a web context often called wireframes), which are rough sketches of what the eventual application will look like.2 In this chapter, we will principally be developing the static pages introduced in Section 3.2, including a site logo, a navigation header, and a site footer. A mockup for the most important of these pages, the Home page, appears in Figure 5.1. You can see the final result in Figure 5.7. You’ll note that it differs in some details—for example, we’ll end up adding a Rails logo on the page—but that’s fine, since a mockup need not be exact.
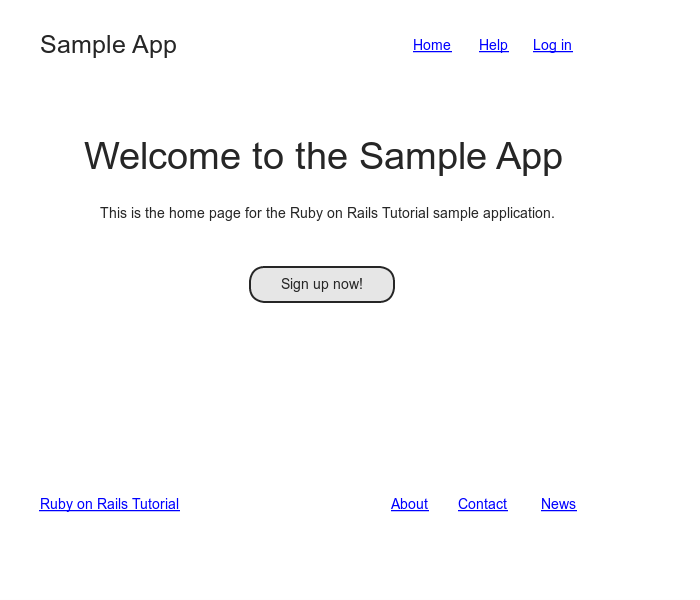
As usual, if you’re using Git for version control, now would be a good time to make a new branch:
$ git checkout master
$ git checkout -b filling-in-layout
5.1.1 Site navigation
As a first step toward adding links and styles to the
sample application, we’ll update the site layout file application.html.erb
(last seen in Listing 4.3)
with additional HTML structure.
This includes some additional divisions, some CSS classes,
and the start of our site navigation.
The full file is in Listing 5.1;
explanations for the various pieces follow immediately
thereafter. If
you’d rather not delay gratification, you can see the
results in Figure 5.2.
(Note: it’s not (yet) very gratifying.)
<!DOCTYPE html>
<html>
<head>
<title><%= full_title(yield(:title)) %></title>
<%= stylesheet_link_tag 'application', media: 'all',
'data-turbolinks-track' => true %>
<%= javascript_include_tag 'application', 'data-turbolinks-track' => true %>
<%= csrf_meta_tags %>
<!--[if lt IE 9]>
<script src="//cdnjs.cloudflare.com/ajax/libs/html5shiv/r29/html5.min.js">
</script>
<![endif]-->
</head>
<body>
<header class="navbar navbar-fixed-top navbar-inverse">
<div class="container">
<%= link_to "sample app", '#', id: "logo" %>
<nav>
<ul class="nav navbar-nav navbar-right">
<li><%= link_to "Home", '#' %></li>
<li><%= link_to "Help", '#' %></li>
<li><%= link_to "Log in", '#' %></li>
</ul>
</nav>
</div>
</header>
<div class="container">
<%= yield %>
</div>
</body>
</html>
Let’s look at the new elements in Listing 5.1
from top to bottom.
As alluded to briefly in Section 3.4.1, Rails uses HTML5 by
default (as indicated by the doctype <!DOCTYPE
html>); since the HTML5 standard is relatively
new, some browsers (especially older versions of Internet
Explorer) don’t fully support it, so we include some
JavaScript code (known as an “HTML5 shim (or shiv)”)3
to work around the issue:
<!--[if lt IE 9]>
<script src="//cdnjs.cloudflare.com/ajax/libs/html5shiv/r29/html5.min.js">
</script>
<![endif]-->
The somewhat odd syntax
<!--[if lt IE 9]>
includes the enclosed line only if the version of
Microsoft Internet Explorer (IE) is less than 9
(if lt IE 9).
The weird [if lt IE 9] syntax is not
part of Rails; it’s actually a conditional comment supported by
Internet Explorer browsers for just this sort of
situation. It’s a
good thing, too, because it means we can include the HTML5
shim only for IE browsers less than
version 9, leaving other browsers such as Firefox,
Chrome, and Safari unaffected.
The next section includes a header for the
site’s (plain-text) logo, a couple of divisions (using the
div tag), and a list of elements with
navigation links:
<header class="navbar navbar-fixed-top navbar-inverse">
<div class="container">
<%= link_to "sample app", '#', id: "logo" %>
<nav>
<ul class="nav navbar-nav navbar-right">
<li><%= link_to "Home", '#' %></li>
<li><%= link_to "Help", '#' %></li>
<li><%= link_to "Log in", '#' %></li>
</ul>
</nav>
</div>
</header>
Here the header tag indicates elements that
should go at the top of the page.
We’ve given the header tag three CSS
classes,4 called navbar,
navbar-fixed-top, and navbar-inverse,
separated by spaces:
<header class="navbar navbar-fixed-top navbar-inverse">
All HTML elements can be assigned both classes and ids; these are merely labels, and are useful for styling with CSS (Section 5.1.2). The main difference between classes and ids is that classes can be used multiple times on a page, but ids can be used only once. In the present case, all the navbar classes have special meaning to the Bootstrap framework, which we’ll install and use in Section 5.1.2.
Inside the header tag, we see a div
tag:
<div class="container">
The div tag is a generic division; it
doesn’t do anything apart from divide the document into
distinct parts. In
older-style HTML, div tags are used for
nearly all site divisions, but HTML5 adds the header,
nav, and section elements for
divisions common to many applications.
In this case, the div has a CSS class as
well (container).
As with the header tag’s classes, this class
has special meaning to Bootstrap.
After the div, we encounter some embedded Ruby:
<%= link_to "sample app", '#', id: "logo" %>
<nav>
<ul class="nav navbar-nav navbar-right">
<li><%= link_to "Home", '#' %></li>
<li><%= link_to "Help", '#' %></li>
<li><%= link_to "Log in", '#' %></li>
</ul>
</nav>
This uses the Rails helper link_to to
create links (which we created directly with the anchor
tag a in Section 3.2.2);
the first argument to link_to is the link
text, while the second is the URL. We’ll fill in the URLs
with named routes in Section 5.3.3,
but for now we use the stub URL ’#’ commonly
used in web design.
The third argument is an options hash, in this case adding
the CSS id logo to the sample app link. (The other three
links have no options hash, which is fine since it’s
optional.) Rails
helpers often take options hashes in this way, giving us
the flexibility to add arbitrary HTML options without ever
leaving Rails.
The second element inside the divs is a list of
navigation links, made using the unordered list
tag ul, together with the list item
tag li:
<nav>
<ul class="nav navbar-nav navbar-right">
<li><%= link_to "Home", '#' %></li>
<li><%= link_to "Help", '#' %></li>
<li><%= link_to "Log in", '#' %></li>
</ul>
</nav>
The <nav> tag, though formally
unnecessary here, is used to more clearly communicate the
purpose of the navigation links.
Meanwhile, the nav, navbar-nav,
and navbar-right classes on the ul
tag have special meaning to Bootstrap and will be styled
automatically when we include the Bootstrap CSS in Section 5.1.2. As you can verify by
inspecting the navigation in your browser, once Rails has
processed the layout and evaluated the embedded Ruby the
list looks like this:5
<nav>
<ul class="nav navbar-nav navbar-right">
<li><a href="#">Home</a></li>
<li><a href="#">Help</a></li>
<li><a href="#">Log in</a></li>
</ul>
</nav>
This is the text that will be returned to the browser.
The final part of the layout is a div for
the main content:
<div class="container">
<%= yield %>
</div>
As before, the container class has special
meaning to Bootstrap.
As we learned in Section 3.4.3,
the yield method inserts the contents of
each page into the site layout.
Apart from the site footer, which we’ll add in Section 5.1.3,
our layout is now complete, and we can look at the results
by visiting the Home page.
To take advantage of the upcoming style elements, we’ll
add some extra elements to the home.html.erb
view (Listing 5.2).
<div class="center jumbotron">
<h1>Welcome to the Sample App</h1>
<h2>
This is the home page for the
<a href="http://www.railstutorial.org/">Ruby on Rails Tutorial</a>
sample application.
</h2>
<%= link_to "Sign up now!", '#', class: "btn btn-lg btn-primary" %>
</div>
<%= link_to image_tag("rails.png", alt: "Rails logo"),
'http://rubyonrails.org/' %>
In preparation for adding users to our site in Chapter 7,
the first link_to creates a stub link of the
form
<a href="#" class="btn btn-lg btn-primary">Sign up now!</a>
In the div tag, the jumbotron
CSS class has a special meaning to Bootstrap, as do the btn,
btn-lg, and btn-primary classes
in the signup button.
The second link_to shows off the image_tag
helper, which takes as arguments the path to an image and
an optional options hash, in this case setting the alt
attribute of the image tag using symbols.
For this to work, there needs to be an image called rails.png,
which you should download from the main Ruby on Rails page
at http://rubyonrails.org/images/rails.png
and place in the app/assets/images/
directory. If
you’re using the cloud IDE or another Unix-like system,
you can accomplish this with the curl
utility as follows:6
$ curl -O http://rubyonrails.org/images/rails.png
$ mv rails.png app/assets/images/
(For more on curl, see Chapter 3 of Conquering the Command
Line.)
Because we used the image_tag helper in Listing 5.2, Rails will automatically
find any images in the app/assets/images/
directory using the asset pipeline (Section 5.2).
To make the effects of image_tag clearer,
let’s look at the HTML it produces:7
<img alt="Rails logo" src="/assets/rails-9308b8f92fea4c19a3a0d8385b494526.png" />
Here the string 9308b8f92fea4c19a3a0d8385b494526
(which will differ on your system) is added by Rails to
ensure that the filename is unique, which causes browsers
to load images properly when they have been updated
(instead of retrieving them from the browser cache). Note that the src
attribute doesn’t include images,
instead using an assets directory common to
all assets (images, JavaScript, CSS, etc.).
On the server, Rails associates images in the assets
directory with the proper app/assets/images
directory, but as far as the browser is concerned all the
assets look like they are in the same directory, which
allows them to be served faster.
Meanwhile, the alt attribute is what will be
displayed if the page is accessed by a program that can’t
display images (such as screen readers for the visually
impaired).
Now we’re finally ready to see the fruits of our labors, as shown in Figure 5.2. Pretty underwhelming, you say? Perhaps so. Happily, though, we’ve done a good job of giving our HTML elements sensible classes, which puts us in a great position to add style to the site with CSS.
5.1.2 Bootstrap and custom CSS
In Section 5.1.1, we associated many of the HTML elements with CSS classes, which gives us considerable flexibility in constructing a layout based on CSS. As noted in Section 5.1.1, many of these classes are specific to Bootstrap, a framework from Twitter that makes it easy to add nice web design and user interface elements to an HTML5 application. In this section, we’ll combine Bootstrap with some custom CSS rules to start adding some style to the sample application. It’s worth noting that using Bootstrap automatically makes our application’s design responsive, ensuring that it looks sensible across a wide range of devices.
Our first step is to add Bootstrap, which in Rails applications can be accomplished with the bootstrap-sass gem, as shown in Listing 5.3. The Bootstrap framework natively uses the Less CSS language for making dynamic stylesheets, but the Rails asset pipeline supports the (very similar) Sass language by default (Section 5.2), so bootstrap-sass converts Less to Sass and makes all the necessary Bootstrap files available to the current application.8
Gemfile. source 'https://rubygems.org'
gem 'rails', '4.2.0'
gem 'bootstrap-sass', '3.2.0.0'
.
.
.
To install Bootstrap, we run bundle install
as usual:
$ bundle install
Although rails generate automatically
creates a separate CSS file for each controller, it’s
surprisingly hard to include them all properly and in the
right order, so for simplicity we’ll put all of the CSS
needed for this tutorial in a single file.
The first step toward getting custom CSS to work is to
create such a custom CSS file:
$ touch app/assets/stylesheets/custom.css.scss
(This uses the touch trick from Section 3.3.3
en route, but you can create the file however you like.) Here both the
directory name and filename extension are important. The directory
app/assets/stylesheets/
is part of the asset pipeline (Section 5.2),
and any stylesheets in this directory will automatically
be included as part of the application.css
file included in the site layout.
Furthermore, the filename custom.css.scss
includes the .css extension, which indicates
a CSS file, and the .scss extension, which
indicates a “Sassy CSS” file and arranges for the asset
pipeline to process the file using Sass.
(We won’t be using Sass until Section 5.2.2, but it’s needed now for
the bootstrap-sass gem to work
its magic.)
Inside the file for the custom CSS, we can use the @import
function to include Bootstrap (together with the
associated Sprockets utility), as shown in Listing 5.4.9
@import "bootstrap-sprockets";
@import "bootstrap";
The two lines in Listing 5.4 include the entire
Bootstrap CSS framework.
After restarting the web server to incorporate the changes
into the development application (by pressing Ctrl-C and
then running rails server as in Section 1.3.2),
the results appear as in Figure 5.3. The placement of the
text isn’t good and the logo doesn’t have any style, but
the colors and signup button look promising.
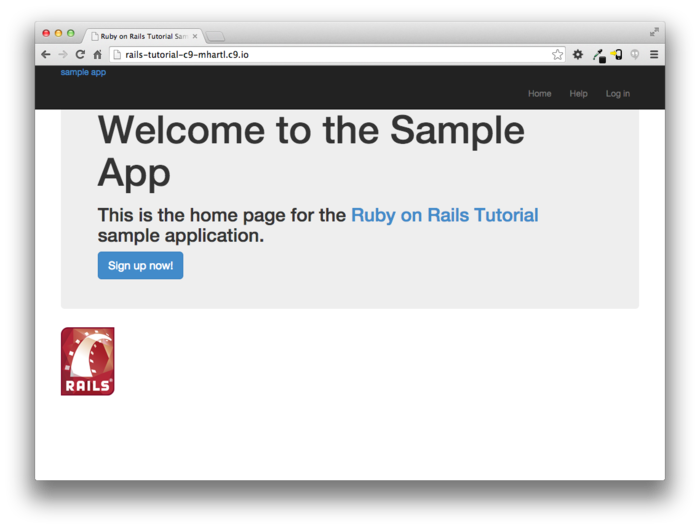
Next we’ll add some CSS that will be used site-wide for
styling the layout and each individual page, as shown in Listing 5.5.
The result is shown in Figure 5.4. (There are quite a
few rules in Listing 5.5; to get a sense of what a
CSS rule does, it’s often helpful to comment it out using
CSS comments, i.e., by putting it inside /* … */,
and seeing what changes.)
@import "bootstrap-sprockets";
@import "bootstrap";
/* universal */
body {
padding-top: 60px;
}
section {
overflow: auto;
}
textarea {
resize: vertical;
}
.center {
text-align: center;
}
.center h1 {
margin-bottom: 10px;
}
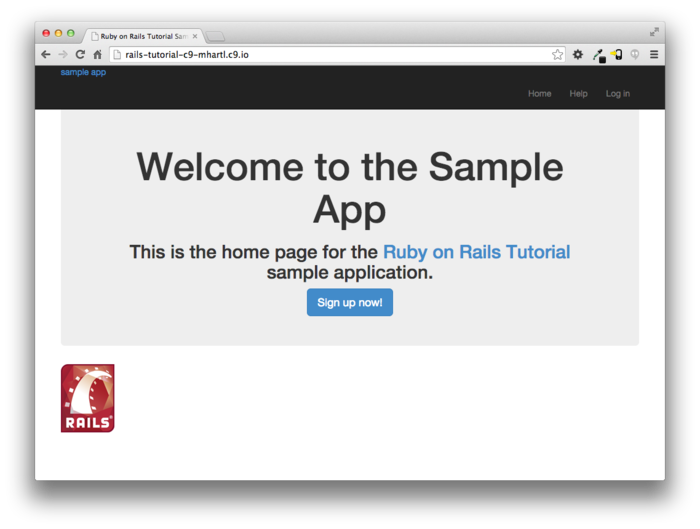
Note that the CSS in Listing 5.5 has a consistent form. In general, CSS rules refer either to a class, an id, an HTML tag, or some combination thereof, followed by a list of styling commands. For example,
body {
padding-top: 60px;
}
puts 60 pixels of padding at the top of the page. Because of the navbar-fixed-top
class in the header tag, Bootstrap fixes the
navigation bar to the top of the page, so the padding
serves to separate the main text from the navigation. (Because the default
navbar color changed after Bootstrap 2.0, we need the navbar-inverse
class to make it dark instead of light.)
Meanwhile, the CSS in the rule
.center {
text-align: center;
}
associates the center class with the text-align:
center property.
In other words, the dot .
in .center indicates that the rule styles a
class. (As we’ll
see in Listing 5.7, the pound sign #
identifies a rule to style a CSS id.)
This means that elements inside any tag (such as a div)
with class center will be centered on the
page. (We saw an
example of this class in Listing 5.2.)
Although Bootstrap comes with CSS rules for nice typography, we’ll also add some custom rules for the appearance of the text on our site, as shown in Listing 5.6. (Not all of these rules apply to the Home page, but each rule here will be used at some point in the sample application.) The result of Listing 5.6 is shown in Figure 5.5.
@import "bootstrap-sprockets";
@import "bootstrap";
.
.
.
/* typography */
h1, h2, h3, h4, h5, h6 {
line-height: 1;
}
h1 {
font-size: 3em;
letter-spacing: -2px;
margin-bottom: 30px;
text-align: center;
}
h2 {
font-size: 1.2em;
letter-spacing: -1px;
margin-bottom: 30px;
text-align: center;
font-weight: normal;
color: #777;
}
p {
font-size: 1.1em;
line-height: 1.7em;
}
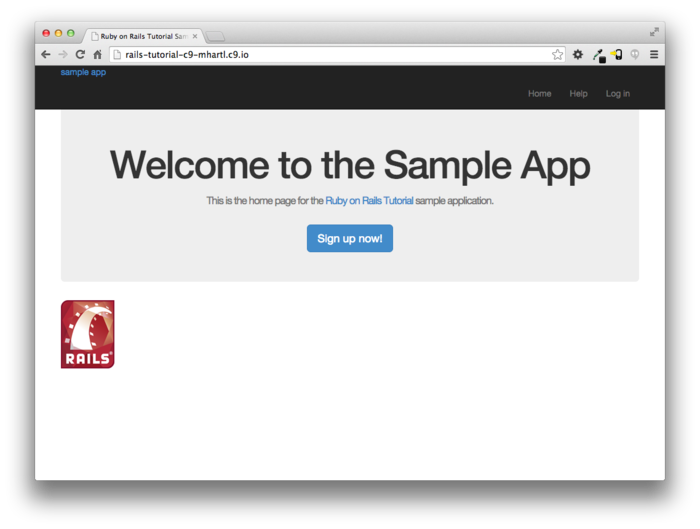
Finally, we’ll add some rules to style the site’s logo, which simply consists of the text “sample app”. The CSS in Listing 5.7 converts the text to uppercase and modifies its size, color, and placement. (We’ve used a CSS id because we expect the site logo to appear on the page only once, but you could use a class instead.)
@import "bootstrap-sprockets";
@import "bootstrap";
.
.
.
/* header */
#logo {
float: left;
margin-right: 10px;
font-size: 1.7em;
color: #fff;
text-transform: uppercase;
letter-spacing: -1px;
padding-top: 9px;
font-weight: bold;
}
#logo:hover {
color: #fff;
text-decoration: none;
}
Here color: #fff changes the color of the
logo to white.
HTML colors can be coded with three pairs of base-16
(hexadecimal) numbers, one each for the primary colors
red, green, and blue (in that order).
The code #ffffff maxes out all three colors,
yielding pure white, and #fff is a shorthand
for the full #ffffff.
The CSS standard also defines a large number of synonyms
for common HTML colors, including white
for #fff.
The result of the CSS in Listing 5.7 is shown in Figure 5.6.
5.1.3 Partials
Although the layout in Listing 5.1 serves its purpose, it’s getting a little cluttered. The HTML shim takes up three lines and uses weird IE-specific syntax, so it would be nice to tuck it away somewhere on its own. In addition, the header HTML forms a logical unit, so it should all be packaged up in one place. The way to achieve this in Rails is to use a facility called partials. Let’s first take a look at what the layout looks like after the partials are defined (Listing 5.8).
<!DOCTYPE html>
<html>
<head>
<title><%= full_title(yield(:title)) %></title>
<%= stylesheet_link_tag 'application', media: 'all',
'data-turbolinks-track' => true %>
<%= javascript_include_tag 'application', 'data-turbolinks-track' => true %>
<%= csrf_meta_tags %>
<%= render 'layouts/shim' %>
</head>
<body>
<%= render 'layouts/header' %>
<div class="container">
<%= yield %>
</div>
</body>
</html>
In Listing 5.8, we’ve replaced the HTML
shim stylesheet lines with a single call to a Rails helper
called render:
<%= render 'layouts/shim' %>
The effect of this line is to look for a file called app/views/layouts/_shim.html.erb,
evaluate its contents, and insert the results into the
view.10
(Recall that <%= ...
%> is the embedded Ruby syntax needed to
evaluate a Ruby expression and then insert the results
into the template.)
Note the leading underscore on the filename _shim.html.erb;
this underscore is the universal convention for naming
partials, and among other things makes it possible to
identify all the partials in a directory at a glance.
Of course, to get the partial to work, we have to create the corresponding file and fill it with some content. In the case of the shim partial, this is just the three lines of shim code from Listing 5.1. The result appears in Listing 5.9.
<!--[if lt IE 9]>
<script src="//cdnjs.cloudflare.com/ajax/libs/html5shiv/r29/html5.min.js">
</script>
<![endif]-->
Similarly, we can move the header material into the
partial shown in Listing 5.10 and insert it into the
layout with another call to render.
(As usual with partials, you will have to create the file
by hand using your text editor.)
<header class="navbar navbar-fixed-top navbar-inverse">
<div class="container">
<%= link_to "sample app", '#', id: "logo" %>
<nav>
<ul class="nav navbar-nav navbar-right">
<li><%= link_to "Home", '#' %></li>
<li><%= link_to "Help", '#' %></li>
<li><%= link_to "Log in", '#' %></li>
</ul>
</nav>
</div>
</header>
Now that we know how to make partials, let’s add a site
footer to go along with the header.
By now you can probably guess that we’ll call it _footer.html.erb
and put it in the layouts directory (Listing 5.11).11
As with the header, in the footer we’ve used link_to
for the internal links to the About and Contact pages and
stubbed out the URLs with ’#’ for now. (As with header,
the footer tag is new in HTML5.)
We can render the footer partial in the layout by following the same pattern as the stylesheets and header partials (Listing 5.12).
Of course, the footer will be ugly without some styling (Listing 5.13). The results appear in Figure 5.7.

5.2 Sass and the asset pipeline
One of the most notable additions in recent versions of Rails is the asset pipeline, which significantly improves the production and management of static assets such as CSS, JavaScript, and images. This section first gives a high-level overview of the asset pipeline, and then shows how to use Sass, a powerful tool for writing CSS.
5.2.1 The asset pipeline
The asset pipeline involves lots of changes under Rails’ hood, but from the perspective of a typical Rails developer there are three principal features to understand: asset directories, manifest files, and preprocessor engines.12 Let’s consider each in turn.
Asset directories
In Rails version 3.0 and earlier, static assets lived
in the public/ directory, as follows:
public/stylesheetspublic/javascriptspublic/images
Files in these directories are (even post-3.0) automatically served up via requests to http://www.example.com/stylesheets, etc.
In the latest version of Rails, there are three canonical directories for static assets, each with its own purpose:
app/assets: assets specific to the present applicationlib/assets: assets for libraries written by your dev teamvendor/assets: assets from third-party vendors
As you might guess, each of these directories has a subdirectory for each asset class, e.g.,
$ ls app/assets/
images/ javascripts/ stylesheets/
At this point, we’re in a position to understand the
motivation behind the location of the custom CSS file in
Section 5.1.2: custom.css.scss
is specific to the sample application, so it goes in app/assets/stylesheets.
Manifest files
Once you’ve placed your assets in their logical locations, you can use manifest files to tell Rails (via the Sprockets gem) how to combine them to form single files. (This applies to CSS and JavaScript but not to images.) As an example, let’s take a look at the default manifest file for app stylesheets (Listing 5.14).
/*
* This is a manifest file that'll be compiled into application.css, which
* will include all the files listed below.
*
* Any CSS and SCSS file within this directory, lib/assets/stylesheets,
* vendor/assets/stylesheets, or vendor/assets/stylesheets of plugins, if any,
* can be referenced here using a relative path.
*
* You're free to add application-wide styles to this file and they'll appear
* at the bottom of the compiled file so the styles you add here take
* precedence over styles defined in any styles defined in the other CSS/SCSS
* files in this directory. It is generally better to create a new file per
* style scope.
*
*= require_tree .
*= require_self
*/
The key lines here are actually CSS comments, but they are used by Sprockets to include the proper files:
/*
.
.
.
*= require_tree .
*= require_self
*/
Here
*= require_tree .
ensures that all CSS files in the app/assets/stylesheets
directory (including the tree subdirectories) are
included into the application CSS. The line
*= require_self
specifies where in the loading sequence the CSS in application.css
itself gets included.
Rails comes with sensible default manifest files, and in the Rails Tutorial we won’t need to make any changes, but the Rails Guides entry on the asset pipeline has more detail if you need it.
Preprocessor engines
After you’ve assembled your assets, Rails prepares them
for the site template by running them through several
preprocessing engines and using the manifest files to
combine them for delivery to the browser.
We tell Rails which processor to use using filename
extensions; the three most common cases are .scss
for Sass, .coffee for CoffeeScript, and .erb
for embedded Ruby (ERb).
We first covered ERb in Section 3.4.3,
and cover Sass in Section 5.2.2.
We won’t be needing CoffeeScript in this tutorial, but
it’s an elegant little language that compiles to
JavaScript. (The
RailsCast on CoffeeScript basics
is a good place to start.)
The preprocessor engines can be chained, so that
foobar.js.coffee
gets run through the CoffeeScript processor, and
foobar.js.erb.coffee
gets run through both CoffeeScript and ERb (with the code running from right to left, i.e., CoffeeScript first).
Efficiency in production
One of the best things about the asset pipeline is that
it automatically results in assets that are optimized to
be efficient in a production application.
Traditional methods for organizing CSS and JavaScript
involve splitting functionality into separate files and
using nice formatting (with lots of indentation).
While convenient for the programmer, this is inefficient
in production.
In particular, including multiple full-sized files can
significantly slow page-load times, which is one of the
most important factors affecting the quality of the user
experience. With
the asset pipeline, we don’t have to choose between
speed and convenience: we can work with multiple nicely
formatted files in development, and then use the asset
pipeline to make efficient files in production.
In particular, the asset pipeline combines all the
application stylesheets into one CSS file (application.css),
combines all the application JavaScript into one
JavaScript file (application.js), and then
minifies them to remove the unnecessary spacing
and indentation that bloats file size.
The result is the best of both worlds: convenience in
development and efficiency in production.
5.2.2 Syntactically awesome stylesheets
Sass is a language for writing stylesheets that improves on CSS in many ways. In this section, we cover two of the most important improvements, nesting and variables. (A third technique, mixins, is introduced in Section 7.1.1.)
As noted briefly in Section 5.1.2, Sass supports a format
called SCSS (indicated with a .scss filename
extension), which is a strict superset of CSS itself; that
is, SCSS only adds features to CSS, rather than
defining an entirely new syntax.13 This means that every
valid CSS file is also a valid SCSS file, which is
convenient for projects with existing style rules.
In our case, we used SCSS from the start in order to take
advantage of Bootstrap.
Since the Rails asset pipeline automatically uses Sass to
process files with the .scss extension, the
custom.css.scss file will be run through the
Sass preprocessor before being packaged up for delivery to
the browser.
Nesting
A common pattern in stylesheets is having rules that
apply to nested elements.
For example, in Listing 5.5 we have rules both for .center
and for .center h1:
.center {
text-align: center;
}
.center h1 {
margin-bottom: 10px;
}
We can replace this in Sass with
.center {
text-align: center;
h1 {
margin-bottom: 10px;
}
}
Here the nested h1 rule automatically
inherits the .center context.
There’s a second candidate for nesting that requires a slightly different syntax. In Listing 5.7, we have the code
#logo {
float: left;
margin-right: 10px;
font-size: 1.7em;
color: #fff;
text-transform: uppercase;
letter-spacing: -1px;
padding-top: 9px;
font-weight: bold;
}
#logo:hover {
color: #fff;
text-decoration: none;
}
Here the logo id #logo appears twice,
once by itself and once with the hover
attribute (which controls its appearance when the mouse
pointer hovers over the element in question).
In order to nest the second rule, we need to reference
the parent element #logo; in SCSS, this is
accomplished with the ampersand character &
as follows:
#logo {
float: left;
margin-right: 10px;
font-size: 1.7em;
color: #fff;
text-transform: uppercase;
letter-spacing: -1px;
padding-top: 9px;
font-weight: bold;
&:hover {
color: #fff;
text-decoration: none;
}
}
Sass changes &:hover into #logo:hover
as part of converting from SCSS to CSS.
Both of these nesting techniques apply to the footer CSS in Listing 5.13, which can be transformed into the following:
footer {
margin-top: 45px;
padding-top: 5px;
border-top: 1px solid #eaeaea;
color: #777;
a {
color: #555;
&:hover {
color: #222;
}
}
small {
float: left;
}
ul {
float: right;
list-style: none;
li {
float: left;
margin-left: 15px;
}
}
}
Converting Listing 5.13 by hand is a good exercise, and you should verify that the CSS still works properly after the conversion.
Variables
Sass allows us to define variables to eliminate duplication and write more expressive code. For example, looking at Listing 5.6 and Listing 5.13, we see that there are repeated references to the same color:
h2 {
.
.
.
color: #777;
}
.
.
.
footer {
.
.
.
color: #777;
}
In this case, #777 is a light gray, and
we can give it a name by defining a variable as follows:
$light-gray: #777;
This allows us to rewrite our SCSS like this:
$light-gray: #777;
.
.
.
h2 {
.
.
.
color: $light-gray;
}
.
.
.
footer {
.
.
.
color: $light-gray;
}
Because variable names such as $light-gray
are more descriptive than #777, it’s often
useful to define variables even for values that aren’t
repeated.
Indeed, the Bootstrap framework defines a large number
of variables for colors, available online on the Bootstrap page of Less variables. That page defines
variables using Less, not Sass, but the bootstrap-sass
gem provides the Sass equivalents.
It is not difficult to guess the correspondence; where
Less uses an “at” sign @, Sass uses a
dollar sign $.
Looking at the Bootstrap variable page, we see that
there is a variable for light gray:
@gray-light: #777;
This means that, via the bootstrap-sass
gem, there should be a corresponding SCSS variable $gray-light. We can use this to
replace our custom variable, $light-gray,
which gives
h2 {
.
.
.
color: $gray-light;
}
.
.
.
footer {
.
.
.
color: $gray-light;
}
Applying the Sass nesting and variable definition
features to the full SCSS file gives the file in Listing 5.15. This uses both Sass
variables (as inferred from the Bootstrap Less variable
page) and built-in named colors (i.e., white
for #fff).
Note in particular the dramatic improvement in the rules
for the footer tag.
@import "bootstrap-sprockets";
@import "bootstrap";
/* mixins, variables, etc. */
$gray-medium-light: #eaeaea;
/* universal */
body {
padding-top: 60px;
}
section {
overflow: auto;
}
textarea {
resize: vertical;
}
.center {
text-align: center;
h1 {
margin-bottom: 10px;
}
}
/* typography */
h1, h2, h3, h4, h5, h6 {
line-height: 1;
}
h1 {
font-size: 3em;
letter-spacing: -2px;
margin-bottom: 30px;
text-align: center;
}
h2 {
font-size: 1.2em;
letter-spacing: -1px;
margin-bottom: 30px;
text-align: center;
font-weight: normal;
color: $gray-light;
}
p {
font-size: 1.1em;
line-height: 1.7em;
}
/* header */
#logo {
float: left;
margin-right: 10px;
font-size: 1.7em;
color: white;
text-transform: uppercase;
letter-spacing: -1px;
padding-top: 9px;
font-weight: bold;
&:hover {
color: white;
text-decoration: none;
}
}
/* footer */
footer {
margin-top: 45px;
padding-top: 5px;
border-top: 1px solid $gray-medium-light;
color: $gray-light;
a {
color: $gray;
&:hover {
color: $gray-darker;
}
}
small {
float: left;
}
ul {
float: right;
list-style: none;
li {
float: left;
margin-left: 15px;
}
}
}
Sass gives us even more ways to simplify our stylesheets, but the code in Listing 5.15 uses the most important features and gives us a great start. See the Sass website for more details.
5.3 Layout links
Now that we’ve finished a site layout with decent styling,
it’s time to start filling in the links we’ve stubbed out
with ’#’.
Of course, we could hard-code links like
<a href="/static_pages/about">About</a>
but that isn’t the Rails Way™. For one, it would be nice if the URL for the about page were /about rather than /static_pages/about. Moreover, Rails conventionally uses named routes, which involves code like
<%= link_to "About", about_path %>
This way the code has a more transparent meaning, and it’s
also more flexible since we can change the definition of about_path
and have the URL change everywhere about_path
is used.
The full list of our planned links appears in Table 5.1, along with their mapping to URLs and routes. We took care of the first route in Section 3.4.4, and we’ll have implemented all but the last one by the end of this chapter. (We’ll make the last one in Chapter 8.)
| Page | URL | Named route |
| Home | / | root_path |
| About | /about | about_path |
| Help | /help | help_path |
| Contact | /contact | contact_path |
| Sign up | /signup | signup_path |
| Log in | /login | login_path |
5.3.1 Contact page
For completeness, we’ll add the Contact page, which was left as an exercise in Chapter 3. The test appears as in Listing 5.16, which simply follows the model last seen in Listing 3.22.
require 'test_helper'
class StaticPagesControllerTest < ActionController::TestCase
test "should get home" do
get :home
assert_response :success
assert_select "title", "Ruby on Rails Tutorial Sample App"
end
test "should get help" do
get :help
assert_response :success
assert_select "title", "Help | Ruby on Rails Tutorial Sample App"
end
test "should get about" do
get :about
assert_response :success
assert_select "title", "About | Ruby on Rails Tutorial Sample App"
end
test "should get contact" do
get :contact
assert_response :success
assert_select "title", "Contact | Ruby on Rails Tutorial Sample App"
end
end
At this point, the tests in Listing 5.16 should be red:
$ bundle exec rake test
The application code parallels the addition of the About
page in Section 3.3: first we update the routes
(Listing 5.18), then we add a contact
action to the Static Pages controller (Listing 5.19),
and finally we create a Contact view (Listing 5.20).
Rails.application.routes.draw do
root 'static_pages#home'
get 'static_pages/help'
get 'static_pages/about'
get 'static_pages/contact'
end
class StaticPagesController < ApplicationController
.
.
.
def contact
end
end
<% provide(:title, 'Contact') %>
<h1>Contact</h1>
<p>
Contact the Ruby on Rails Tutorial about the sample app at the
<a href="http://www.railstutorial.org/#contact">contact page</a>.
</p>
Now make sure that the tests are green:
$ bundle exec rake test
5.3.2 Rails routes
To add the named routes for the sample app’s static
pages, we’ll edit the routes file, config/routes.rb,
that Rails uses to define URL mappings.
We’ll begin by reviewing the route for the Home page
(defined in Section 3.4.4), which is a special
case, and then define a set of routes for the remaining
static pages.
So far, we’ve seen three examples of how to define a root route, starting with the code
root 'application#hello'
in the hello app (Listing 1.10), the code
root 'users#index'
in the toy app (Listing 2.3), and the code
root 'static_pages#home'
in the sample app (Listing 3.37).
In each case, the root method arranges for
the root path / to be routed to a controller and action of
our choice.
Defining the root route in this way has a second important
effect, which is to create named routes that allow us to
refer to routes by a name rather than by the raw URL. In
this case, these routes are root_path and root_url,
with the only difference being that the latter includes
the full URL:
root_path -> '/'
root_url -> 'http://www.example.com/'
In the Rails Tutorial, we’ll follow the common
convention of using the _path form except
when doing redirects, where we’ll use the _url
form. (This is
because the HTTP standard technically requires a full URL
after redirects, though in most browsers it will work
either way.)
To define the named routes for the Help, About, and
Contact pages, we need to make changes to the get
rules from Listing 5.18, transforming lines like
get 'static_pages/help'
to
get 'help' => 'static_pages#help'
The second of these patterns routes a GET
request for the URL /help to the help action
in the Static Pages controller, so that we can use the URL
/help in place of the more verbose /static_pages/help. As with the rule for
the root route, this creates two named routes, help_path
and help_url:
help_path -> '/help'
help_url -> 'http://www.example.com/help'
Applying this rule change to the remaining static page routes from Listing 5.18 gives Listing 5.22.
Rails.application.routes.draw do
root 'static_pages#home'
get 'help' => 'static_pages#help'
get 'about' => 'static_pages#about'
get 'contact' => 'static_pages#contact'
end
5.3.3 Using named routes
With the routes defined in Listing 5.22,
we’re now in a position to use the resulting named routes
in the site layout.
This simply involves filling in the second arguments of
the link_to functions with the proper named
routes. For
example, we’ll convert
<%= link_to "About", '#' %>
to
<%= link_to "About", about_path %>
and so on.
We’ll start in the header partial, _header.html.erb
(Listing 5.23), which has links to the
Home and Help pages.
While we’re at it, we’ll follow a common web convention
and link the logo to the Home page as well.
<header class="navbar navbar-fixed-top navbar-inverse">
<div class="container">
<%= link_to "sample app", root_path, id: "logo" %>
<nav>
<ul class="nav navbar-nav navbar-right">
<li><%= link_to "Home", root_path %></li>
<li><%= link_to "Help", help_path %></li>
<li><%= link_to "Log in", '#' %></li>
</ul>
</nav>
</div>
</header>
We won’t have a named route for the “Log in” link until Chapter 8, so we’ve left it as ’#’
for now.
The other place with links is the footer partial, _footer.html.erb,
which has links for the About and Contact pages (Listing 5.24).
With that, our layout has links to all the static pages created in Chapter 3, so that, for example, /about goes to the About page (Figure 5.8).
5.3.4 Layout link tests
Now that we’ve filled in several of the layout links,
it’s a good idea to test them to make sure they’re working
correctly. We
could do this by hand with a browser, first visiting the
root path and then checking the links by hand, but this
quickly becomes cumbersome.
Instead, we’ll simulate the same series of steps using an
integration test, which allows us to write an
end-to-end test of our application’s behavior.
We can get started by generating a template test, which
we’ll call site_layout:
$ rails generate integration_test site_layout
invoke test_unit
create test/integration/site_layout_test.rb
Note that the Rails generator automatically appends _test
to the name of the test file.
Our plan for testing the layout links involves checking the HTML structure of our site:
- Get the root path (Home page)
- Verify that the right page template is rendered
- Check for the correct links to the Home, Help, About, and Contact pages
Listing 5.25 shows how we can use Rails
integration tests to translate these steps into code,
beginning with the assert_template method to
verify that the Home page is rendered using the correct
view.14
require 'test_helper'
class SiteLayoutTest < ActionDispatch::IntegrationTest
test "layout links" do
get root_path
assert_template 'static_pages/home'
assert_select "a[href=?]", root_path, count: 2
assert_select "a[href=?]", help_path
assert_select "a[href=?]", about_path
assert_select "a[href=?]", contact_path
end
end
Listing 5.25 uses some of the more
advanced options of the assert_select
method, seen before in Listing 3.22 and Listing 5.16. In this case, we use
a syntax that allows us to test for the presence of a
particular link–URL combination by specifying the tag
name a and attribute href,
as in
assert_select "a[href=?]", about_path
Here Rails automatically inserts the value of about_path
in place of the question mark (escaping any special
characters if necessary), thereby checking for an HTML tag
of the form
<a href="/about">...</a>
Note that the assertion for the root path verifies that there are two such links (one each for the logo and navigation menu element):
assert_select "a[href=?]", root_path, count: 2
This ensures that both links to the Home page defined in Listing 5.23 are present.
Some more uses of assert_select appear in Table 5.2.
While assert_select is flexible and powerful
(having many more options than the ones shown here),
experience shows that it’s wise to take a lightweight
approach by testing only HTML elements (such as site
layout links) that are unlikely to change much over time.
| Code | Matching HTML |
assert_select "div" |
<div>foobar</div> |
assert_select "div",
"foobar" |
<div>foobar</div> |
assert_select "div.nav" |
<div class="nav">foobar</div> |
assert_select
"div#profile" |
<div id="profile">foobar</div> |
assert_select
"div[name=yo]" |
<div name="yo">hey</div> |
assert_select
"a[href=?]", ’/’, count: 1 |
<a href="/">foo</a> |
assert_select
"a[href=?]", ’/’, text: "foo" |
<a href="/">foo</a> |
assert_select.
To check that the new test in Listing 5.25 passes, we can run just the integration tests using the following Rake task:
$ bundle exec rake test:integration
If all went well, you should run the full test suite to verify that all the tests are green:
$ bundle exec rake test
With the added integration test for layout links, we are now in a good position to catch regressions quickly using our test suite.
5.4 User signup: A first step
As a capstone to our work on the layout and routing, in this section we’ll make a route for the signup page, which will mean creating a second controller along the way. This is a first important step toward allowing users to register for our site; we’ll take the next step, modeling users, in Chapter 6, and we’ll finish the job in Chapter 7.
5.4.1 Users controller
We created our first controller, the Static Pages
controller, in Section 3.2.
It’s time to create a second one, the Users controller. As before, we’ll use
generate to make the simplest controller that
meets our present needs, namely, one with a stub signup
page for new users.
Following the conventional REST architecture favored by Rails,
we’ll call the action for new users new,
which we can arrange to create automatically by passing new
as an argument to generate.
The result is shown in Listing 5.28.
new action). $ rails generate controller Users new
create app/controllers/users_controller.rb
route get 'users/new'
invoke erb
create app/views/users
create app/views/users/new.html.erb
invoke test_unit
create test/controllers/users_controller_test.rb
invoke helper
create app/helpers/users_helper.rb
invoke test_unit
create test/helpers/users_helper_test.rb
invoke assets
invoke coffee
create app/assets/javascripts/users.js.coffee
invoke scss
create app/assets/stylesheets/users.css.scss
As required, Listing 5.28 creates a Users controller
with a new action (Listing 5.30)
and a stub user view (Listing 5.31).
It also creates a minimal test for the new user page (Listing 5.32),
which should currently pass:
$ bundle exec rake test
new action.
app/controllers/users_controller.rb
class UsersController < ApplicationController
def new
end
end
new
view for Users.
app/views/users/new.html.erb
<h1>Users#new</h1>
<p>Find me in app/views/users/new.html.erb</p>
require 'test_helper'
class UsersControllerTest < ActionController::TestCase
test "should get new" do
get :new
assert_response :success
end
end
5.4.2 Signup URL
With the code from Section 5.4.1, we already have a
working page for new users at /users/new, but recall from
Table 5.1 that we want the URL to be
/signup instead.
We’ll follow the examples from Listing 5.22
and add a get ’/signup’ rule for the signup
URL, as shown in Listing 5.33.
Rails.application.routes.draw do
root 'static_pages#home'
get 'help' => 'static_pages#help'
get 'about' => 'static_pages#about'
get 'contact' => 'static_pages#contact'
get 'signup' => 'users#new'
end
Next, we’ll use the newly defined named route to add the
proper link to the button on the Home page.
As with the other routes, get ’signup’
automatically gives us the named route signup_path,
which we put to use in Listing 5.34. Adding a test for the
signup page is left as an exercise (Section 5.6.)
<div class="center jumbotron">
<h1>Welcome to the Sample App</h1>
<h2>
This is the home page for the
<a href="http://www.railstutorial.org/">Ruby on Rails Tutorial</a>
sample application.
</h2>
<%= link_to "Sign up now!", signup_path, class: "btn btn-lg btn-primary" %>
</div>
<%= link_to image_tag("rails.png", alt: "Rails logo"),
'http://rubyonrails.org/' %>
Finally, we’ll add a custom stub view for the signup page (Listing 5.35).
<% provide(:title, 'Sign up') %>
<h1>Sign up</h1>
<p>This will be a signup page for new users.</p>
With that, we’re done with the links and named routes, at least until we add a route for logging in (Chapter 8). The resulting new user page (at the URL /signup) appears in Figure 5.9.
5.5 Висновок
In this chapter, we’ve hammered our application layout into shape and polished up the routes. The rest of the book is dedicated to fleshing out the sample application: first, by adding users who can sign up, log in, and log out; next, by adding user microposts; and, finally, by adding the ability to follow other users.
At this point, if you are using Git, you should merge your changes back into the master branch:
$ bundle exec rake test
$ git add -A
$ git commit -m "Finish layout and routes"
$ git checkout master
$ git merge filling-in-layout
Then push up to Bitbucket:
$ git push
Finally, deploy to Heroku:
$ git push heroku
The result of the deployment should be a working sample application on the production server (Figure 5.10).
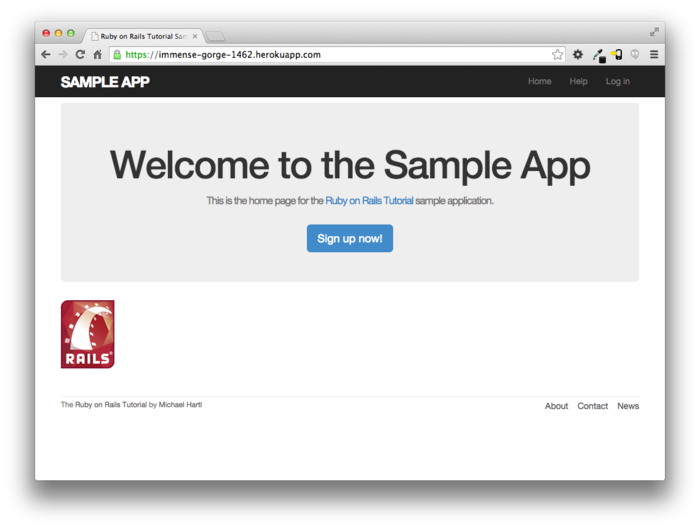
5.5.1 Що ми вивчили в цій главі
- Using HTML5, we can define a site layout with logo, header, footer, and main body content.
- Rails partials are used to place markup in a separate file for convenience.
- CSS allows us to style the site layout based on CSS classes and ids.
- The Bootstrap framework makes it easy to make a nicely designed site quickly.
- Sass and the asset pipeline allow us to eliminate duplication in our CSS while packaging up the results efficiently for production.
- Rails allows us to define custom routing rules, thereby providing named routes.
- Integration tests effectively simulate a browser clicking from page to page.
5.6 Вправи
Note: The Solutions Manual for Вправи, with solutions to every exercise in the Ruby on Rails Tutorial book, is included for free with every purchase at www.railstutorial.org.
For a suggestion on how to avoid conflicts between Вправи and the main tutorial, see the note on exercise topic branches in Section 3.6.
- As suggested in Section 5.2.2, go through the steps to convert the footer CSS from Listing 5.13 to Listing 5.15 to SCSS by hand.
- In the integration test from Listing 5.25,
add code to visit the signup page using the
getmethod and verify that the resulting page title is correct. - It’s convenient to use the
full_titlehelper in the tests by including the Application helper into the test helper, as shown in Listing 5.36. We can then test for the right title using code like Listing 5.37 (which extends the solution from the previous exercise). This is brittle, though, because now any typo in the base title (such as “Ruby on Rails Tutoial”) won’t be caught by the test suite. Fix this problem by writing a direct test of thefull_titlehelper, which involves creating a file to test the application helper and then filling in the code indicated withFILL_INin Listing 5.38. (Listing 5.38 uses theassert_equalmethod, which verifies that its two arguments are the same when compared with the==operator.)
ENV['RAILS_ENV'] ||= 'test'
.
.
.
class ActiveSupport::TestCase
fixtures :all
include ApplicationHelper
.
.
.
end
full_title
helper in a test.
green test/integration/site_layout_test.rb
require 'test_helper'
class SiteLayoutTest < ActionDispatch::IntegrationTest
test "layout links" do
get root_path
assert_template 'static_pages/home'
assert_select "a[href=?]", root_path, count: 2
assert_select "a[href=?]", help_path
assert_select "a[href=?]", about_path
assert_select "a[href=?]", contact_path
get signup_path
assert_select "title", full_title("Sign up")
end
end
full_title
helper.
test/helpers/application_helper_test.rb
require 'test_helper'
class ApplicationHelperTest < ActionView::TestCase
test "full title helper" do
assert_equal full_title, FILL_IN
assert_equal full_title("Help"), FILL_IN
end
end
- Thanks to reader Colm Tuite for his excellent work in helping to convert the sample application over to the Bootstrap CSS framework. ↑
- The mockups in the Ruby on Rails Tutorial are made with an excellent online mockup application called Mockingbird. ↑
- The words shim and shiv are used interchangably in this context; the former is the proper term, based on the English word whose meaning is “a washer or thin strip of material used to align parts, make them fit, or reduce wear”, while the latter (meaning “a knife or razor used as a weapon”) is apparently a play on the name of the shim’s original author, Sjoerd Visscher. ↑
- These are completely unrelated to Ruby classes. ↑
- The spacing might look slightly different, which is fine because (as noted in Section 3.4.1) HTML is insensitive to whitespace. ↑
- If you have Homebrew on OS X, you can
install
curlusingbrew install curl. ↑ - You might notice that the
imgtag, rather than looking like <img>...</img>, instead looks like <img ... />. Tags that follow this form are known as self-closing tags. ↑ - It is also possible to use Less with the asset pipeline; see the less-rails-bootstrap gem for details. ↑
- If these steps seem mysterious, take heart: I’m just following the instructions from the bootstrap-sass README file. ↑
- Many Rails developers use a
shareddirectory for partials shared across different views. I prefer to use thesharedfolder for utility partials that are useful on multiple views, while putting partials that are literally on every page (as part of the site layout) in thelayoutsdirectory. (We’ll create theshareddirectory starting in Chapter 7.) That seems to me a logical division, but putting them all in thesharedfolder certainly works fine, too. ↑ - You may wonder why we use both
the
footertag and.footerclass. The answer is that the tag has a clear meaning to human readers, and the class is used by Bootstrap. Using adivtag in place offooterwould work as well. ↑ - The structure of this section is based on the excellent blog post “The Rails 3 Asset Pipeline in (about) 5 Minutes” by Michael Erasmus. For more details, see the Rails Guide on the Asset Pipeline. ↑
- The older
.sassformat, also supported by Sass, defines a new language which is less verbose (and has fewer curly braces) but is less convenient for existing projects and is harder to learn for those already familiar with CSS. ↑ - Some developers insist that a single test shouldn’t contain multiple assertions. I find this practice to be unnecessarily complicated, while also incurring an extra overhead if there are common setup tasks needed before each test. In addition, a well-written test tells a coherent story, and breaking it up into individual pieces disrupts the narrative. I thus have a strong preference for including multiple assertions in a test, relying on Ruby (via MiniTest) to tell me the exact lines of any failed assertions. ↑
Chapter 6 Modeling users
In Chapter 5, we ended with a stub page for creating new users (Section 5.4). Over the course of the next five chapters, we’ll fulfill the promise implicit in this incipient signup page. In this chapter, we’ll take the first critical step by creating a data model for users of our site, together with a way to store that data. In Chapter 7, we’ll give users the ability to sign up for our site and create a user profile page. Once users can sign up, we’ll let them log in and log out as well (Chapter 8), and in Chapter 9 (Section 9.2.1) we’ll learn how to protect pages from improper access. Finally, in Chapter 10 we’ll add account activation (thereby confirming a valid email address) and password resets. Taken together, the material in Chapter 6 through Chapter 10 develops a full Rails login and authentication system. As you may know, there are various pre-built authentication solutions for Rails; Box 6.1 explains why, at least at first, it’s probably a better idea to roll your own.
Virtually all web applications require a login and authentication system of some sort. As a result, most web frameworks have a plethora of options for implementing such systems, and Rails is no exception. Examples of authentication and authorization systems include Clearance, Authlogic, Devise, and CanCan (as well as non-Rails-specific solutions built on top of OpenID or OAuth). It’s reasonable to ask why we should reinvent the wheel. Why not just use an off-the-shelf solution instead of rolling our own?
For one, practical experience shows that authentication on most sites requires extensive customization, and modifying a third-party product is often more work than writing the system from scratch. In addition, off-the-shelf systems can be “black boxes”, with potentially mysterious innards; when you write your own system, you are far more likely to understand it. Moreover, recent additions to Rails (Section 6.3) make it easy to write a custom authentication system. Finally, if you do end up using a third-party system later on, you’ll be in a much better position to understand and modify it if you’ve first built one yourself.
6.1 User model
Although the ultimate goal of the next three chapters is to make a signup page for our site (as mocked up in Figure 6.1), it would do little good now to accept information for new users: we don’t currently have any place to put it. Thus, the first step in signing up users is to make a data structure to capture and store their information.
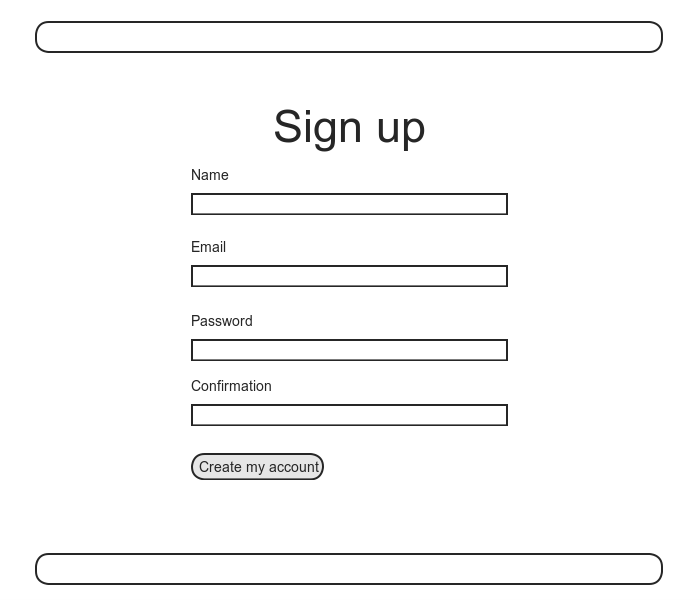
In Rails, the default data structure for a data model is called, naturally enough, a model (the M in MVC from Section 1.3.3). The default Rails solution to the problem of persistence is to use a database for long-term data storage, and the default library for interacting with the database is called Active Record.1 Active Record comes with a host of methods for creating, saving, and finding data objects, all without having to use the structured query language (SQL)2 used by relational databases. Moreover, Rails has a feature called migrations to allow data definitions to be written in pure Ruby, without having to learn an SQL data definition language (DDL). The effect is that Rails insulates you almost entirely from the details of the data store. In this book, by using SQLite for development and PostgreSQL (via Heroku) for deployment (Section 1.5), we have developed this theme even further, to the point where we barely ever have to think about how Rails stores data, even for production applications.
As usual, if you’re following along using Git for version control, now would be a good time to make a topic branch for modeling users:
$ git checkout master
$ git checkout -b modeling-users
6.1.1 Database migrations
You may recall from Section 4.4.5 that we have already
encountered, via a custom-built User class,
user objects with name and email
attributes. That
class served as a useful example, but it lacked the
critical property of persistence: when we
created a User object at the Rails console, it disappeared
as soon as we exited.
Our goal in this section is to create a model for users
that won’t disappear quite so easily.
As with the User class in Section 4.4.5, we’ll start by modeling
a user with two attributes, a name and an email
address, the latter of which we’ll use as a unique
username.3
(We’ll add an attribute for passwords in Section 6.3.) In Listing 4.13,
we did this with Ruby’s attr_accessor
method:
class User
attr_accessor :name, :email
.
.
.
end
In contrast, when using Rails to model users we don’t
need to identify the attributes explicitly.
As noted briefly above, to store data Rails uses a
relational database by default, which consists of tables
composed of data rows, where each row has columns
of data attributes.
For example, to store users with names and email
addresses, we’ll create a users table with name
and email columns (with each row
corresponding to one user).
An example of such a table appears in Figure 6.2,
corresponding to the data model shown in Figure 6.3. (Figure 6.3
is just a sketch; the full data model appears in Figure 6.4.) By naming the columns
name and email, we’ll let
Active Record figure out the User object attributes for
us.
users
table. 
You may recall from Listing 5.28
that we created a Users controller (along with a new
action) using the command
$ rails generate controller Users new
The analogous command for making a model is generate
model, which we can use to generate a User model
with name and email
attributes, as shown in Listing 6.1.
$ rails generate model User name:string email:string
invoke active_record
create db/migrate/20140724010738_create_users.rb
create app/models/user.rb
invoke test_unit
create test/models/user_test.rb
create test/fixtures/users.yml
(Note that, in contrast to the plural convention for
controller names, model names are singular: a Users
controller, but a User model.)
By passing the optional parameters name:string
and email:string, we tell Rails about the
two attributes we want, along with which types those
attributes should be (in this case, string). Compare this with
including the action names in Listing 3.4
and Listing 5.28.
One of the results of the generate command
in Listing 6.1 is a new file called a migration. Migrations provide a
way to alter the structure of the database incrementally,
so that our data model can adapt to changing requirements. In the case of the
User model, the migration is created automatically by the
model generation script; it creates a users
table with two columns, name and email,
as shown in Listing 6.2.
(We’ll see starting in Section 6.2.5
how to make a migration from scratch.)
users table).
db/migrate/[timestamp]_create_users.rb
class CreateUsers < ActiveRecord::Migration
def change
create_table :users do |t|
t.string :name
t.string :email
t.timestamps null: false
end
end
end
Note that the name of the migration file is prefixed by a timestamp based on when the migration was generated. In the early days of migrations, the filenames were prefixed with incrementing integers, which caused conflicts for collaborating teams if multiple programmers had migrations with the same number. Barring the improbable scenario of migrations generated the same second, using timestamps conveniently avoids such collisions.
The migration itself consists of a change
method that determines the change to be made to the
database. In the
case of Listing 6.2, change uses
a Rails method called create_table to create
a table in the database for storing users.
The create_table method accepts a block (Section 4.3.2)
with one block variable, in this case called t
(for “table”).
Inside the block, the create_table method
uses the t object to create name
and email columns in the database, both of
type string.4 Here the table name
is plural (users) even though the model name
is singular (User), which reflects a linguistic convention
followed by Rails: a model represents a single user,
whereas a database table consists of many users.
The final line in the block, t.timestamps null:
false, is a special command that creates two magic
columns called created_at and updated_at,
which are timestamps that automatically record when a
given user is created and updated.
(We’ll see concrete examples of the magic columns starting
in Section 6.1.3.)
The full data model represented by the migration in Listing 6.2
is shown in Figure 6.4.
(Note the addition of the magic columns, which weren’t
present in the sketch shown in Figure 6.3.)
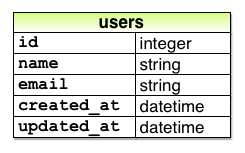
We can run the migration, known as “migrating up”, using
the rake command (Box 2.1) as follows:
$ bundle exec rake db:migrate
(You may recall that we ran this command in a similar
context in Section 2.2.)
The first time db:migrate is run, it creates
a file called db/development.sqlite3, which
is an SQLite5
database. We can
see the structure of the database by opening development.sqlite3
with DB
Browser for SQLite.
(If you’re using the cloud IDE, you should first download
the database file to the local disk, as shown in Figure 6.5.) The result appears in
Figure 6.6); compare with the diagram
in Figure 6.4.
You might note that there’s one column in Figure 6.6
not accounted for in the migration: the id
column. As noted
briefly in Section 2.2, this column is created
automatically, and is used by Rails to identify each row
uniquely.
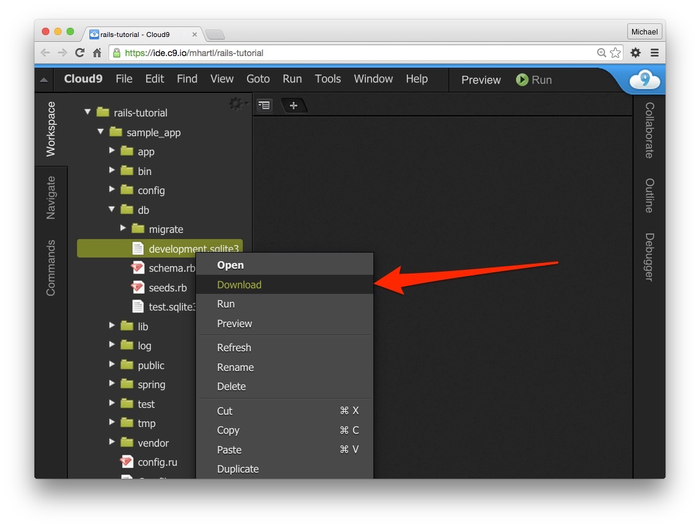
users table. Most migrations (including all the ones in this tutorial)
are reversible, which means we can “migrate
down” and undo them with a single Rake task, called db:rollback:
$ bundle exec rake db:rollback
(See Box 3.1 for another technique
useful for reversing migrations.)
Under the hood, this command executes the drop_table
command to remove the users table from the database. The reason this works
is that the change method knows that drop_table
is the inverse of create_table, which means
that the rollback migration can be easily inferred.
In the case of an irreversible migration, such as one to
remove a database column, it is necessary to define
separate up and down methods
in place of the single change method.
Read about migrations in the Rails Guides for
more information.
If you rolled back the database, migrate up again before proceeding:
$ bundle exec rake db:migrate
6.1.2 The model file
We’ve seen how the User model generation in Listing 6.1
generated a migration file (Listing 6.2),
and we saw in Figure 6.6 the results of running this
migration: it updated a file called development.sqlite3
by creating a table users with columns id,
name, email, created_at,
and updated_at.
Listing 6.1 also created the model
itself. The rest
of this section is dedicated to understanding it.
We begin by looking at the code for the User model, which
lives in the file user.rb inside the app/models/
directory. It is,
to put it mildly, very compact (Listing 6.3).
class User < ActiveRecord::Base
end
Recall from Section 4.4.2 that the syntax class
User < ActiveRecord::Base means that the User
class inherits from ActiveRecord::Base,
so that the User model automatically has all the
functionality of the ActiveRecord::Base
class. Of course,
this knowledge doesn’t do us any good unless we know what
ActiveRecord::Base contains, so let’s get
started with some concrete examples.
6.1.3 Creating user objects
As in Chapter 4, our tool of choice for exploring data models is the Rails console. Since we don’t (yet) want to make any changes to our database, we’ll start the console in a sandbox:
$ rails console --sandbox
Loading development environment in sandbox
Any modifications you make will be rolled back on exit
>>
As indicated by the helpful message “Any modifications you make will be rolled back on exit”, when started in a sandbox the console will “roll back” (i.e., undo) any database changes introduced during the session.
In the console session in Section 4.4.5, we created a new user
object with User.new, which we had access to
only after requiring the example user file in Listing 4.13. With models, the
situation is different; as you may recall from Section 4.4.4,
the Rails console automatically loads the Rails
environment, which includes the models.
This means that we can make a new user object without any
further work:
>> User.new
=> #<User id: nil, name: nil, email: nil, created_at: nil, updated_at: nil>
We see here the default console representation of a user object.
When called with no arguments, User.new
returns an object with all nil attributes. In Section 4.4.5,
we designed the example User class to take an initialization
hash to set the object attributes; that design
choice was motivated by Active Record, which allows
objects to be initialized in the same way:
>> user = User.new(name: "Michael Hartl", email: "mhartl@example.com")
=> #<User id: nil, name: "Michael Hartl", email: "mhartl@example.com",
created_at: nil, updated_at: nil>
Here we see that the name and email attributes have been set as expected.
The notion of validity is important for
understanding Active Record model objects.
We’ll explore this subject in more depth in Section 6.2,
but for now it’s worth noting that our initial user
object is valid, which we can verify by calling the
boolean valid? method on it:
>> user.valid?
true
So far, we haven’t touched the database: User.new
only creates an object in memory, while user.valid?
merely checks to see if the object is valid.
In order to save the User object to the database, we need
to call the save method on the user
variable:
>> user.save
(0.2ms) begin transaction
User Exists (0.2ms) SELECT 1 AS one FROM "users" WHERE LOWER("users".
"email") = LOWER('mhartl@example.com') LIMIT 1
SQL (0.5ms) INSERT INTO "users" ("created_at", "email", "name", "updated_at)
VALUES (?, ?, ?, ?) [["created_at", "2014-09-11 14:32:14.199519"],
["email", "mhartl@example.com"], ["name", "Michael Hartl"], ["updated_at",
"2014-09-11 14:32:14.199519"]]
(0.9ms) commit transaction
=> true
The save method returns true
if it succeeds and false otherwise.
(Currently, all saves should succeed because there are as
yet no validations; we’ll see cases in Section 6.2
when some will fail.)
For reference, the Rails console also shows the SQL
command corresponding to user.save (namely,
INSERT INTO "users"…).
We’ll hardly ever need raw SQL in this book,6
and I’ll omit discussion of the SQL commands from now on,
but you can learn a lot by reading the SQL corresponding
to Active Record commands.
You may have noticed that the new user object had nil
values for the id and the magic columns created_at
and updated_at attributes.
Let’s see if our save changed anything:
>> user
=> #<User id: 1, name: "Michael Hartl", email: "mhartl@example.com",
created_at: "2014-07-24 00:57:46", updated_at: "2014-07-24 00:57:46">
We see that the id has been assigned a
value of 1, while the magic columns have
been assigned the current time and date.7 Currently, the
created and updated timestamps are identical; we’ll see
them differ in Section 6.1.5.
As with the User class in Section 4.4.5, instances of the User model allow access to their attributes using a dot notation:
>> user.name
=> "Michael Hartl"
>> user.email
=> "mhartl@example.com"
>> user.updated_at
=> Thu, 24 Jul 2014 00:57:46 UTC +00:00
As we’ll see in Chapter 7, it’s often convenient to
make and save a model in two steps as we have above, but
Active Record also lets you combine them into one step
with User.create:
>> User.create(name: "A Nother", email: "another@example.org")
#<User id: 2, name: "A Nother", email: "another@example.org", created_at:
"2014-07-24 01:05:24", updated_at: "2014-07-24 01:05:24">
>> foo = User.create(name: "Foo", email: "foo@bar.com")
#<User id: 3, name: "Foo", email: "foo@bar.com", created_at: "2014-07-24
01:05:42", updated_at: "2014-07-24 01:05:42">
Note that User.create, rather than
returning true or false,
returns the User object itself, which we can optionally
assign to a variable (such as foo in the
second command above).
The inverse of create is destroy:
>> foo.destroy
=> #<User id: 3, name: "Foo", email: "foo@bar.com", created_at: "2014-07-24
01:05:42", updated_at: "2014-07-24 01:05:42">
Like create, destroy returns
the object in question, though I can’t recall ever having
used the return value of destroy.
In addition, the destroyed object still exists in memory:
>> foo
=> #<User id: 3, name: "Foo", email: "foo@bar.com", created_at: "2014-07-24
01:05:42", updated_at: "2014-07-24 01:05:42">
So how do we know if we really destroyed an object? And for saved and non-destroyed objects, how can we retrieve users from the database? To answer these questions, we need to learn how to use Active Record to find user objects.
6.1.4 Finding user objects
Active Record provides several options for finding
objects. Let’s use
them to find the first user we created while verifying
that the third user (foo) has been destroyed. We’ll start with the
existing user:
>> User.find(1)
=> #<User id: 1, name: "Michael Hartl", email: "mhartl@example.com",
created_at: "2014-07-24 00:57:46", updated_at: "2014-07-24 00:57:46">
Here we’ve passed the id of the user to User.find;
Active Record returns the user with that id.
Let’s see if the user with an id of 3
still exists in the database:
>> User.find(3)
ActiveRecord::RecordNotFound: Couldn't find User with ID=3
Since we destroyed our third user in Section 6.1.3,
Active Record can’t find it in the database.
Instead, find raises an exception,
which is a way of indicating an exceptional event in the
execution of a program—in this case, a nonexistent Active
Record id, which causes find to raise an ActiveRecord::RecordNotFound
exception.8
In addition to the generic find, Active
Record also allows us to find users by specific
attributes:
>> User.find_by(email: "mhartl@example.com")
=> #<User id: 1, name: "Michael Hartl", email: "mhartl@example.com",
created_at: "2014-07-24 00:57:46", updated_at: "2014-07-24 00:57:46">
Since we will be using email addresses as usernames, this
sort of find will be useful when we learn
how to let users log in to our site (Chapter 7). If you’re worried
that find_by will be inefficient if there
are a large number of users, you’re ahead of the game;
we’ll cover this issue, and its solution via database
indices, in Section 6.2.5.
We’ll end with a couple of more general ways of finding
users. First,
there’s first:
>> User.first
=> #<User id: 1, name: "Michael Hartl", email: "mhartl@example.com",
created_at: "2014-07-24 00:57:46", updated_at: "2014-07-24 00:57:46">
Naturally, first just returns the first
user in the database.
There’s also all:
>> User.all
=> #<ActiveRecord::Relation [#<User id: 1, name: "Michael Hartl",
email: "mhartl@example.com", created_at: "2014-07-24 00:57:46",
updated_at: "2014-07-24 00:57:46">, #<User id: 2, name: "A Nother",
email: "another@example.org", created_at: "2014-07-24 01:05:24",
updated_at: "2014-07-24 01:05:24">]>
As you can see from the console output, User.all
returns all the users in the database as an object of
class ActiveRecord::Relation, which is
effectively an array (Section 4.3.1).
6.1.5 Updating user objects
Once we’ve created objects, we often want to update them. There are two basic ways to do this. First, we can assign attributes individually, as we did in Section 4.4.5:
>> user # Just a reminder about our user's attributes
=> #<User id: 1, name: "Michael Hartl", email: "mhartl@example.com",
created_at: "2014-07-24 00:57:46", updated_at: "2014-07-24 00:57:46">
>> user.email = "mhartl@example.net"
=> "mhartl@example.net"
>> user.save
=> true
Note that the final step is necessary to write the
changes to the database.
We can see what happens without a save by using reload,
which reloads the object based on the database
information:
>> user.email
=> "mhartl@example.net"
>> user.email = "foo@bar.com"
=> "foo@bar.com"
>> user.reload.email
=> "mhartl@example.net"
Now that we’ve updated the user by running user.save,
the magic columns differ, as promised in Section 6.1.3:
>> user.created_at
=> "2014-07-24 00:57:46"
>> user.updated_at
=> "2014-07-24 01:37:32"
The second main way to update multiple attributes is to
use update_attributes:9
>> user.update_attributes(name: "The Dude", email: "dude@abides.org")
=> true
>> user.name
=> "The Dude"
>> user.email
=> "dude@abides.org"
The update_attributes method accepts a hash
of attributes, and on success performs both the update and
the save in one step (returning true to
indicate that the save went through).
Note that if any of the validations fail, such as when a
password is required to save a record (as implemented in Section 6.3), the call to update_attributes
will fail. If we
need to update only a single attribute, using the singular
update_attribute bypasses this restriction:
>> user.update_attribute(:name, "The Dude")
=> true
>> user.name
=> "The Dude"
6.2 User validations
The User model we created in Section 6.1 now has working name
and email attributes, but they are completely
generic: any string (including an empty one) is currently
valid in either case.
And yet, names and email addresses are more specific than
this. For example, name
should be non-blank, and email should match
the specific format characteristic of email addresses. Moreover, since we’ll
be using email addresses as unique usernames when users log
in, we shouldn’t allow email duplicates in the database.
In short, we shouldn’t allow name and email
to be just any strings; we should enforce certain
constraints on their values.
Active Record allows us to impose such constraints using validations
(seen briefly before in Section 2.3.2). In this section, we’ll
cover several of the most common cases, validating presence,
length, format and uniqueness. In Section 6.3.2
we’ll add a final common validation, confirmation. And we’ll see in Section 7.3
how validations give us convenient error messages when users
make submissions that violate them.
6.2.1 A validity test
As noted in Box 3.3, test-driven development isn’t always the right tool for the job, but model validations are exactly the kind of features for which TDD is a perfect fit. It’s difficult to be confident that a given validation is doing exactly what we expect it to without writing a failing test and then getting it to pass.
Our method will be to start with a valid model object, set one of its attributes to something we want to be invalid, and then test that it in fact is invalid. As a safety net, we’ll first write a test to make sure the initial model object is valid. This way, when the validation tests fail we’ll know it’s for the right reason (and not because the initial object was invalid in the first place).
To get us started, the command in Listing 6.1 produced an initial test for testing users, though in this case it’s practically blank (Listing 6.4).
require 'test_helper'
class UserTest < ActiveSupport::TestCase
# test "the truth" do
# assert true
# end
end
To write a test for a valid object, we’ll create an
initially valid User model object @user
using the special setup method (discussed
briefly in the Chapter 3 Вправи), which automatically
gets run before each test.
Because @user is an instance variable, it’s
automatically available in all the tests, and we can test
its validity using the valid? method (Section 6.1.3). The result appears in
Listing 6.5.
require 'test_helper'
class UserTest < ActiveSupport::TestCase
def setup
@user = User.new(name: "Example User", email: "user@example.com")
end
test "should be valid" do
assert @user.valid?
end
end
Listing 6.5 uses the plain assert
method, which in this case succeeds if @user.valid? returns true
and fails if it returns false.
Because our User model doesn’t currently have any validations, the initial test should pass:
$ bundle exec rake test:models
Here we’ve used rake test:models to run
just the model tests (compare to rake
test:integration from Section 5.3.4).
6.2.2 Validating presence
Perhaps the most elementary validation is presence, which simply verifies that a given attribute is present. For example, in this section we’ll ensure that both the name and email fields are present before a user gets saved to the database. In Section 7.3.3, we’ll see how to propagate this requirement up to the signup form for creating new users.
We’ll start with a test for the presence of a name
attribute by building on the test in Listing 6.5. As seen in Listing 6.7,
all we need to do is set the @user
variable’s name attribute to a blank string
(in this case, a string of spaces) and then check (using
the assert_not method) that the resulting
User object is not valid.
name
attribute. red
test/models/user_test.rb
require 'test_helper'
class UserTest < ActiveSupport::TestCase
def setup
@user = User.new(name: "Example User", email: "user@example.com")
end
test "should be valid" do
assert @user.valid?
end
test "name should be present" do
@user.name = " "
assert_not @user.valid?
end
end
At this point, the model tests should be red:
$ bundle exec rake test:models
As we saw briefly before in the Chapter 2
Вправи, the way to validate the presence of the name
attribute is to use the validates method
with argument presence: true, as shown in Listing 6.9.
The presence: true argument is a one-element
options hash; recall from Section 4.3.4
that curly braces are optional when passing hashes as the
final argument in a method.
(As noted in Section 5.1.1, the use of options
hashes is a recurring theme in Rails.)
name
attribute. green app/models/user.rb
class User < ActiveRecord::Base
validates :name, presence: true
end
Listing 6.9 may look like magic, but validates
is just a method.
An equivalent formulation of Listing 6.9
using parentheses is as follows:
class User < ActiveRecord::Base
validates(:name, presence: true)
end
Let’s drop into the console to see the effects of adding a validation to our User model:10
$ rails console --sandbox
>> user = User.new(name: "", email: "mhartl@example.com")
>> user.valid?
=> false
Here we check the validity of the user
variable using the valid? method, which
returns false when the object fails one or
more validations, and true when all
validations pass.
In this case, we only have one validation, so we know
which one failed, but it can still be helpful to check
using the errors object generated on
failure:
>> user.errors.full_messages
=> ["Name can't be blank"]
(The error message is a hint that Rails validates the
presence of an attribute using the blank?
method, which we saw at the end of Section 4.4.3.)
Because the user isn’t valid, an attempt to save the user to the database automatically fails:
>> user.save
=> false
As a result, the test in Listing 6.7 should now be green:
$ bundle exec rake test:models
Following the model in Listing 6.7,
writing a test for email attribute presence
is easy (Listing 6.11), as is the application
code to get it to pass (Listing 6.12).
email
attribute. red
test/models/user_test.rb
require 'test_helper'
class UserTest < ActiveSupport::TestCase
def setup
@user = User.new(name: "Example User", email: "user@example.com")
end
test "should be valid" do
assert @user.valid?
end
test "name should be present" do
@user.name = ""
assert_not @user.valid?
end
test "email should be present" do
@user.email = " "
assert_not @user.valid?
end
end
email attribute.
green app/models/user.rb
class User < ActiveRecord::Base
  validates :name,  presence: true
  validates :email, presence: true
end
At this point, the presence validations are complete, and the test suite should be green:
$ bundle exec rake test
6.2.3 Length validation
We’ve constrained our User model to require a name for each user, but we should go further: the user’s names will be displayed on the sample site, so we should enforce some limit on their length. With all the work we did in Section 6.2.2, this step is easy.
There’s no science to picking a maximum length; we’ll
just pull 50 out of thin air as a
reasonable upper bound, which means verifying that names
of 51 characters are too long.
In addition, although it’s unlikely ever to be a problem,
there’s a chance that a user’s email address could overrun
the maximum length of strings, which for many databases is
255. Because the
format validation in Section 6.2.4 won’t enforce such a
constraint, we’ll add one in this section for
completeness. Listing 6.14 shows the resulting tests.
name
length validation.
red test/models/user_test.rb
require 'test_helper'
class UserTest < ActiveSupport::TestCase
def setup
@user = User.new(name: "Example User", email: "user@example.com")
end
.
.
.
test "name should not be too long" do
@user.name = "a" * 51
assert_not @user.valid?
end
test "email should not be too long" do
@user.email = "a" * 244 + "@example.com"
assert_not @user.valid?
end
end
For convenience, we’ve used “string multiplication” in Listing 6.14 to make a string 51 characters long. We can see how this works using the console:
>> "a" * 51
=> "aaaaaaaaaaaaaaaaaaaaaaaaaaaaaaaaaaaaaaaaaaaaaaaaaaa"
>> ("a" * 51).length
=> 51
The email length validation arranges to make a valid email address that’s one character too long:
>> "a" * 244 + "@example.com"
=> "aaaaaaaaaaaaaaaaaaaaaaaaaaaaaaaaaaaaaaaaaaaaaaaaaaaaaaaaaaaaaaaaaaaaaaaaaaa
aaaaaaaaaaaaaaaaaaaaaaaaaaaaaaaaaaaaaaaaaaaaaaaaaaaaaaaaaaaaaaaaaaaaaaaaaaaaaaa
aaaaaaaaaaaaaaaaaaaaaaaaaaaaaaaaaaaaaaaaaaaaaaaaaaaaaaaaaaaaaaaaaaaaaaaaaaaaaaa
aaaaaaaaaaa@example.com"
>> ("a" * 244 + "@example.com").length
=> 256
At this point, the tests in Listing 6.14 should be red:
$ bundle exec rake test
To get them to pass, we need to use the validation
argument to constrain length, which is just length,
along with the maximum parameter to enforce
the upper bound (Listing 6.16).
name attribute.
green app/models/user.rb
class User < ActiveRecord::Base
validates :name, presence: true, length: { maximum: 50 }
validates :email, presence: true, length: { maximum: 255 }
end
Now the tests should be green:
$ bundle exec rake test
With our test suite passing again, we can move on to a more challenging validation: email format.
6.2.4 Format validation
Our validations for the name attribute
enforce only minimal constraints—any non-blank name under
51 characters will do—but of course the email
attribute must satisfy the more stringent requirement of
being a valid email address.
So far we’ve only rejected blank email addresses; in this
section, we’ll require email addresses to conform to the
familiar pattern user@example.com.
Neither the tests nor the validation will be exhaustive,
just good enough to accept most valid email addresses and
reject most invalid ones.
We’ll start with a couple of tests involving collections
of valid and invalid addresses.
To make these collections, it’s worth knowing about the
useful %w[] technique for making arrays of
strings, as seen in this console session:
>> %w[foo bar baz]
=> ["foo", "bar", "baz"]
>> addresses = %w[USER@foo.COM THE_US-ER@foo.bar.org first.last@foo.jp]
=> ["USER@foo.COM", "THE_US-ER@foo.bar.org", "first.last@foo.jp"]
>> addresses.each do |address|
?> puts address
>> end
USER@foo.COM
THE_US-ER@foo.bar.org
first.last@foo.jp
Here we’ve iterated over the elements of the addresses
array using the each method (Section 4.3.2). With this technique
in hand, we’re ready to write some basic email format
validation tests.
Because email format validation is tricky and error-prone, we’ll start with some passing tests for valid email addresses to catch any errors in the validation. In other words, we want to make sure not just that invalid email addresses like user@example,com are rejected, but also that valid addresses like user@example.com are accepted, even after we impose the validation constraint. (Right now, of course, they’ll be accepted because all non-blank email addresses are currently valid.) The result for a representative sample of valid email addresses appears in Listing 6.18.
require 'test_helper'
class UserTest < ActiveSupport::TestCase
def setup
@user = User.new(name: "Example User", email: "user@example.com")
end
.
.
.
test "email validation should accept valid addresses" do
valid_addresses = %w[user@example.com USER@foo.COM A_US-ER@foo.bar.org
first.last@foo.jp alice+bob@baz.cn]
valid_addresses.each do |valid_address|
@user.email = valid_address
assert @user.valid?, "#{valid_address.inspect} should be valid"
end
end
end
Note that we’ve included an optional second argument to the assertion with a custom error message, which in this case identifies the address causing the test to fail:
assert @user.valid?, "#{valid_address.inspect} should be valid"
(This uses the interpolated inspect method
mentioned in Section 4.3.3.)
Including the specific address that causes any failure is
especially useful in a test with an each
loop like Listing 6.18; otherwise, any failure
would merely identify the line number, which is the same
for all the email addresses, and which wouldn’t be
sufficient to identify the source of the problem.
Next we’ll add tests for the invalidity of a variety of invalid email addresses, such as user@example,com (comma in place of dot) and user_at_foo.org (missing the ‘@’ sign). As in Listing 6.18, Listing 6.19 includes a custom error message to identify the exact address causing any failure.
require 'test_helper'
class UserTest < ActiveSupport::TestCase
def setup
@user = User.new(name: "Example User", email: "user@example.com")
end
.
.
.
test "email validation should reject invalid addresses" do
invalid_addresses = %w[user@example,com user_at_foo.org user.name@example.
foo@bar_baz.com foo@bar+baz.com]
invalid_addresses.each do |invalid_address|
@user.email = invalid_address
assert_not @user.valid?, "#{invalid_address.inspect} should be invalid"
end
end
end
At this point, the tests should be red:
$ bundle exec rake test
The application code for email format validation uses the
format validation, which works like this:
validates :email, format: { with: /<regular expression>/ }
This validates the attribute with the given regular expression (or regex), which is a powerful (and often cryptic) language for matching patterns in strings. This means we need to construct a regular expression to match valid email addresses while not matching invalid ones.
There actually exists a full regex for matching email addresses according to the official email standard, but it’s enormous, obscure, and quite possibly counter-productive.11 In this tutorial, we’ll adopt a more pragmatic regex that has proven to be robust in practice. Here’s what it looks like:
VALID_EMAIL_REGEX = /\A[\w+\-.]+@[a-z\d\-.]+\.[a-z]+\z/i
To help understand where this comes from, Table 6.1 breaks it into bite-sized pieces.12
| Expression | Meaning |
| /\A[\w+\-.]+@[a-z\d\-.]+\.[a-z]+\z/i | full regex |
| / | start of regex |
| \A | match start of a string |
| [\w+\-.]+ | at least one word character, plus, hyphen, or dot |
| @ | literal “at sign” |
| [a-z\d\-.]+ | at least one letter, digit, hyphen, or dot |
| \. | literal dot |
| [a-z]+ | at least one letter |
| \z | match end of a string |
| / | end of regex |
| i | case-insensitive |
Although you can learn a lot by studying Table 6.1, to really understand regular expressions I consider using an interactive regular expression matcher like Rubular to be essential (Figure 6.7).13 The Rubular website has a beautiful interactive interface for making regular expressions, along with a handy regex quick reference. I encourage you to study Table 6.1 with a browser window open to Rubular—no amount of reading about regular expressions can replace playing with them interactively. (Note: If you use the regex from Table 6.1 in Rubular, I recommend leaving off the \A and \z characters so that you can match more than one email address at a time in the given test string.)
Applying the regular expression from Table 6.1
to the email format validation yields the
code in Listing 6.21.
class User < ActiveRecord::Base
validates :name, presence: true, length: { maximum: 50 }
VALID_EMAIL_REGEX = /\A[\w+\-.]+@[a-z\d\-.]+\.[a-z]+\z/i
validates :email, presence: true, length: { maximum: 255 },
format: { with: VALID_EMAIL_REGEX }
end
Here the regex VALID_EMAIL_REGEX is a constant,
indicated in Ruby by a name starting with a capital
letter. The code
VALID_EMAIL_REGEX = /\A[\w+\-.]+@[a-z\d\-.]+\.[a-z]+\z/i
validates :email, presence: true, length: { maximum: 255 },
format: { with: VALID_EMAIL_REGEX }
ensures that only email addresses that match the pattern
will be considered valid.
(The expression above has one notable weakness: it allows
invalid addresses that contain consecutive dots, such as foo@bar..com. Fixing this blemish
requires a significantly more complicated regular
expression and is left as an exercise (Section 6.5).)
At this point, the tests should be green:
$ bundle exec rake test:models
This means that there’s only one constraint left: enforcing email uniqueness.
6.2.5 Uniqueness validation
To enforce uniqueness of email addresses (so that we can
use them as usernames), we’ll be using the :unique
option to the validates method.
But be warned: there’s a major caveat, so don’t
just skim this section—read it carefully.
We’ll start with some short tests.
In our previous model tests, we’ve mainly used User.new,
which just creates a Ruby object in memory, but for
uniqueness tests we actually need to put a record into the
database.14
The initial duplicate email test appears in Listing 6.23.
require 'test_helper'
class UserTest < ActiveSupport::TestCase
def setup
@user = User.new(name: "Example User", email: "user@example.com")
end
.
.
.
test "email addresses should be unique" do
duplicate_user = @user.dup
@user.save
assert_not duplicate_user.valid?
end
end
The method here is to make a user with the same email
address as @user using @user.dup,
which creates a duplicate user with the same attributes. Since we then save @user,
the duplicate user has an email address that already
exists in the database, and hence should not be valid.
We can get the new test in Listing 6.23
to pass by adding uniqueness: true to the email
validation, as shown in Listing 6.24.
class User < ActiveRecord::Base
validates :name, presence: true, length: { maximum: 50 }
VALID_EMAIL_REGEX = /\A[\w+\-.]+@[a-z\d\-.]+\.[a-z]+\z/i
validates :email, presence: true, length: { maximum: 255 },
format: { with: VALID_EMAIL_REGEX },
uniqueness: true
end
We’re not quite done, though.
Email addresses are typically processed as if they were
case-insensitive—i.e., foo@bar.com is
treated the same as FOO@BAR.COM or FoO@BAr.coM—so
our validation should incorporate this as well.15 It’s thus important
to test for case-insensitivity, which we do with the code
in Listing 6.25.
require 'test_helper'
class UserTest < ActiveSupport::TestCase
def setup
@user = User.new(name: "Example User", email: "user@example.com")
end
.
.
.
test "email addresses should be unique" do
duplicate_user = @user.dup
duplicate_user.email = @user.email.upcase
@user.save
assert_not duplicate_user.valid?
end
end
Here we are using the upcase method on
strings (seen briefly in Section 4.3.2).
This test does the same thing as the initial duplicate
email test, but with an upper-case email address instead. If this test feels a
little abstract, go ahead and fire up the console:
$ rails console --sandbox
>> user = User.create(name: "Example User", email: "user@example.com")
>> user.email.upcase
=> "USER@EXAMPLE.COM"
>> duplicate_user = user.dup
>> duplicate_user.email = user.email.upcase
>> duplicate_user.valid?
=> true
Of course, duplicate_user.valid? is
currently true because the uniqueness
validation is case-sensitive, but we want it to be false. Fortunately, :uniqueness
accepts an option, :case_sensitive, for just
this purpose (Listing 6.26).
class User < ActiveRecord::Base
validates :name, presence: true, length: { maximum: 50 }
VALID_EMAIL_REGEX = /\A[\w+\-.]+@[a-z\d\-.]+\.[a-z]+\z/i
validates :email, presence: true, length: { maximum: 255 },
format: { with: VALID_EMAIL_REGEX },
uniqueness: { case_sensitive: false }
end
Note that we have simply replaced true in Listing 6.24 with case_sensitive:
false in Listing 6.26. (Rails infers that uniqueness
should be true as well.)
At this point, our application—with an important caveat—enforces email uniqueness, and our test suite should pass:
$ bundle exec rake test
There’s just one small problem, which is that the Active Record uniqueness validation does not guarantee uniqueness at the database level. Here’s a scenario that explains why:
- Alice signs up for the sample app, with address alice@wonderland.com.
- Alice accidentally clicks on “Submit” twice, sending two requests in quick succession.
- The following sequence occurs: request 1 creates a user in memory that passes validation, request 2 does the same, request 1’s user gets saved, request 2’s user gets saved.
- Result: two user records with the exact same email address, despite the uniqueness validation
If the above sequence seems implausible, believe me, it isn’t: it can happen on any Rails website with significant traffic (which I once learned the hard way). Luckily, the solution is straightforward to implement: we just need to enforce uniqueness at the database level as well as at the model level. Our method is to create a database index on the email column (Box 6.2), and then require that the index be unique.
When creating a column in a database, it is important to consider whether we will need to find records by that column. Consider, for example, the email attribute created by the migration in Listing 6.2. When we allow users to log in to the sample app starting in Chapter 7, we will need to find the user record corresponding to the submitted email address. Unfortunately, based on the naïve data model, the only way to find a user by email address is to look through each user row in the database and compare its email attribute to the given email—which means we might have to examine every row (since the user could be the last one in the database). This is known in the database business as a full-table scan, and for a real site with thousands of users it is a Bad Thing.
Putting an index on the email column fixes the problem. To understand a database index, it’s helpful to consider the analogy of a book index. In a book, to find all the occurrences of a given string, say “foobar”, you would have to scan each page for “foobar”—the paper version of a full-table scan. With a book index, on the other hand, you can just look up “foobar” in the index to see all the pages containing “foobar”. A database index works essentially the same way.
The email index represents an update to our data modeling
requirements, which (as discussed in Section 6.1.1)
is handled in Rails using migrations.
We saw in Section 6.1.1 that generating the User
model automatically created a new migration (Listing 6.2);
in the present case, we are adding structure to an
existing model, so we need to create a migration directly
using the migration generator:
$ rails generate migration add_index_to_users_email
Unlike the migration for users, the email uniqueness migration is not pre-defined, so we need to fill in its contents with Listing 6.28.16
class AddIndexToUsersEmail < ActiveRecord::Migration
def change
add_index :users, :email, unique: true
end
end
This uses a Rails method called add_index
to add an index on the email column of the users
table. The index
by itself doesn’t enforce uniqueness, but the option unique:
true does.
The final step is to migrate the database:
$ bundle exec rake db:migrate
(If this fails, try exiting any running sandbox console sessions, which can lock the database and prevent migrations.)
At this point, the test suite should be red due to a violation of the uniqueness constraint in the fixtures, which contain sample data for the test database. User fixtures were generated automatically in Listing 6.1, and as shown in Listing 6.29 the email addresses are not unique. (They’re not valid either, but fixture data doesn’t get run through the validations.)
# Read about fixtures at http://api.rubyonrails.org/classes/ActiveRecord/
# FixtureSet.html
one:
name: MyString
email: MyString
two:
name: MyString
email: MyString
Because we won’t need fixtures until Chapter 8, for now we’ll just remove them, leaving an empty fixtures file (Listing 6.30).
# empty
Having addressed the uniqueness caveat, there’s one more
change we need to make to be assured of email uniqueness. Some database
adapters use case-sensitive indices, considering the
strings “Foo@ExAMPle.CoM” and “foo@example.com” to be
distinct, but our application treats those addresses as
the same. To avoid
this incompatibility, we’ll standardize on all lower-case
addresses, converting “Foo@ExAMPle.CoM” to
“foo@example.com” before saving it to the database.
The way to do this is with a callback, which is a method
that gets invoked at a particular point in the lifecycle
of an Active Record object.
In the present case, that point is before the object is
saved, so we’ll use a before_save callback
to downcase the email attribute before saving the user.17 The result appears in
Listing 6.31.
(This is just a first implementation; we’ll discuss this
subject again in Section 8.4, where we’ll use the
preferred method reference convention for
defining callbacks.)
class User < ActiveRecord::Base
before_save { self.email = email.downcase }
validates :name, presence: true, length: { maximum: 50 }
VALID_EMAIL_REGEX = /\A[\w+\-.]+@[a-z\d\-.]+\.[a-z]+\z/i
validates :email, presence: true, length: { maximum: 255 },
format: { with: VALID_EMAIL_REGEX },
uniqueness: { case_sensitive: false }
end
The code in Listing 6.31 passes a block to the before_save
callback and sets the user’s email address to a lower-case
version of its current value using the downcase
string method.
(Writing a test for email downcasing is left as an
exercise (Section 6.5).)
In Listing 6.31, we could have written the assignment as
self.email = self.email.downcase
(where self refers to the current user),
but inside the User model the self keyword
is optional on the right-hand side:
self.email = email.downcase
We encountered this idea briefly in the context of reverse
in the palindrome method (Section 4.4.2),
which also noted that self is not
optional in an assignment, so
email = email.downcase
wouldn’t work. (We’ll discuss this subject in more depth in Section 8.4.)
At this point, the Alice scenario above will work fine:
the database will save a user record based on the first
request, and it will reject the second save for violating
the uniqueness constraint.
(An error will appear in the Rails log, but that doesn’t
do any harm.)
Moreover, adding this index on the email attribute
accomplishes a second goal, alluded to briefly in Section 6.1.4:
as noted in Box 6.2, the index on the email
attribute fixes a potential efficiency problem by
preventing a full-table scan when finding users by email
address.
6.3 Adding a secure password
Now that we’ve defined validations for the name and email fields, we’re ready to add the last of the basic User attributes: a secure password. The method is to require each user to have a password (with a password confirmation), and then store a hashed version of the password in the database. (There is some potential for confusion here. In the present context, a hash refers not to the Ruby data structure from Section 4.3.3 but rather to the result of applying an irreversible hash function to input data.) We’ll also add a way to authenticate a user based on a given password, a method we’ll use in Chapter 8 to allow users to log in to the site.
The method for authenticating users will be to take a submitted password, hash it, and compare the result to the hashed value stored in the database. If the two match, then the submitted password is correct and the user is authenticated. By comparing hashed values instead of raw passwords, we will be able to authenticate users without storing the passwords themselves. This means that, even if our database is compromised, our users’ passwords will still be secure.
6.3.1 A hashed password
Most of the secure password machinery will be implemented
using a single Rails method called has_secure_password,
which we’ll include in the User model as follows:
class User < ActiveRecord::Base
  .
  .
  .
  has_secure_password
end
When included in a model as above, this one method adds the following functionality:
- The ability to save a securely hashed
password_digestattribute to the database - A pair of virtual attributes18
(
passwordandpassword_confirmation), including presence validations upon object creation and a validation requiring that they match - An
authenticatemethod that returns the user when the password is correct (andfalseotherwise)
The only requirement for has_secure_password
to work its magic is for the corresponding model to have
an attribute called password_digest.
(The name digest comes from the terminology of cryptographic hash functions.
In this context, hashed password and password
digest are synonyms.)19
In the case of the User model, this leads to the data
model shown in Figure 6.8.
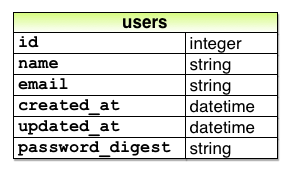
password_digest attribute. To implement the data model in Figure 6.8
, we first generate an appropriate migration for the password_digest
column. We can
choose any migration name we want, but it’s convenient to
end the name with to_users, since in this
case Rails automatically constructs a migration to add
columns to the users table.
The result, with migration name add_password_digest_to_users,
appears as follows:
$ rails generate migration add_password_digest_to_users password_digest:string
Here we’ve also supplied the argument password_digest:string
with the name and type of attribute we want to create. (Compare this to the
original generation of the users table in Listing 6.1, which included the
arguments name:string and email:string.) By including password_digest:string,
we’ve given Rails enough information to construct the
entire migration for us, as seen in Listing 6.32.
password_digest
column to the users table.
db/migrate/[timestamp]_add_password_digest_to_users.rb
class AddPasswordDigestToUsers < ActiveRecord::Migration
def change
add_column :users, :password_digest, :string
end
end
Listing 6.32 uses the add_column
method to add a password_digest column to
the users table.
To apply it, we just migrate the database:
$ bundle exec rake db:migrate
To make the password digest, has_secure_password
uses a state-of-the-art hash function called bcrypt.
By hashing the password with bcrypt, we ensure that an
attacker won’t be able to log in to the site even if they
manage to obtain a copy of the database.
To use bcrypt in the sample application, we need to add
the bcrypt gem to our Gemfile
(Listing 6.33).
bcrypt to
the Gemfile. source 'https://rubygems.org'
gem 'rails', '4.2.0'
gem 'bcrypt', '3.1.7'
.
.
.
Then run bundle install as usual:
$ bundle install
6.3.2 User has secure password
Now that we’ve supplied the User model with the required
password_digest attribute and installed
bcrypt, we’re ready to add has_secure_password
to the User model, as shown in Listing 6.34.
has_secure_password
to the User model.
red app/models/user.rb
class User < ActiveRecord::Base
before_save { self.email = email.downcase }
validates :name, presence: true, length: { maximum: 50 }
VALID_EMAIL_REGEX = /\A[\w+\-.]+@[a-z\d\-.]+\.[a-z]+\z/i
validates :email, presence: true, length: { maximum: 255 },
format: { with: VALID_EMAIL_REGEX },
uniqueness: { case_sensitive: false }
has_secure_password
end
As indicated by the red indicator in Listing 6.34, the tests are now failing, as you can confirm at the command line:
$ bundle exec rake test
The reason is that, as noted in Section 6.3.1,
has_secure_password enforces validations on
the virtual password and password_confirmation
attributes, but the tests in Listing 6.25
create an @user variable without these
attributes:
def setup
@user = User.new(name: "Example User", email: "user@example.com")
end
So, to get the test suite passing again, we just need to add a password and its confirmation, as shown in Listing 6.36.
require 'test_helper'
class UserTest < ActiveSupport::TestCase
def setup
@user = User.new(name: "Example User", email: "user@example.com",
password: "foobar", password_confirmation: "foobar")
end
.
.
.
end
Now the tests should be green:
$ bundle exec rake test
We’ll see in just a moment the benefits of adding has_secure_password
to the User model (Section 6.3.4),
but first we’ll add a minimal requirement on password
security.
6.3.3 Minimum password length
It’s good practice in general to enforce some minimum standards on passwords to make them harder to guess. There are many options for enforcing password strength in Rails, but for simplicity we’ll just enforce a minimum length. Picking a length of 6 as a reasonable minimum leads to the validation test shown in Listing 6.38.
require 'test_helper'
class UserTest < ActiveSupport::TestCase
def setup
@user = User.new(name: "Example User", email: "user@example.com",
password: "foobar", password_confirmation: "foobar")
end
.
.
.
test "password should have a minimum length" do
@user.password = @user.password_confirmation = "a" * 5
assert_not @user.valid?
end
end
Note the use of the compact multiple assignment
@user.password = @user.password_confirmation = "a" * 5
in Listing 6.38. This arranges to assign a particular value to the password and its confirmation at the same time (in this case, a string of length 5, constructed using string multiplication as in Listing 6.14).
You may be able to guess the code for enforcing a minimum
length constraint by referring to the corresponding maximum
validation for the user’s name (Listing 6.16):
validates :password, length: { minimum: 6 }
This leads to the User model shown in Listing 6.39.
class User < ActiveRecord::Base
before_save { self.email = email.downcase }
validates :name, presence: true, length: { maximum: 50 }
VALID_EMAIL_REGEX = /\A[\w+\-.]+@[a-z\d\-.]+\.[a-z]+\z/i
validates :email, presence: true, length: { maximum: 255 },
format: { with: VALID_EMAIL_REGEX },
uniqueness: { case_sensitive: false }
has_secure_password
validates :password, length: { minimum: 6 }
end
At this point, the tests should be green:
$ bundle exec rake test:models
6.3.4 Creating and authenticating a user
Now that the basic User model is complete, we’ll create a
user in the database as preparation for making a page to
show the user’s information in Section 7.1. We’ll also take a
more concrete look at the effects of adding has_secure_password
to the User model, including an examination of the
important authenticate method.
Since users can’t yet sign up for the sample application
through the web—that’s the goal of Chapter 7—we’ll
use the Rails console to create a new user by hand.
For convenience, we’ll use the create method
discussed in Section 6.1.3, but in the present case
we’ll take care not to start in a sandbox so
that the resulting user will be saved to the database. This means starting
an ordinary rails console session and then
creating a user with a valid name and email address
together with a valid password and matching confirmation:
$ rails console
>> User.create(name: "Michael Hartl", email: "mhartl@example.com",
?> password: "foobar", password_confirmation: "foobar")
=> #<User id: 1, name: "Michael Hartl", email: "mhartl@example.com",
created_at: "2014-09-11 14:26:42", updated_at: "2014-09-11 14:26:42",
password_digest: "$2a$10$sLcMI2f8VglgirzjSJOln.Fv9NdLMbqmR4rdTWIXY1G...">
To check that this worked, let’s look at the resulting users
table in the development database using DB Browser for
SQLite, as shown in Figure 6.9.20 (If you’re using the
cloud IDE, you should download the database file as in Figure 6.5.)
Note that the columns correspond to the attributes of the
data model defined in Figure 6.8.
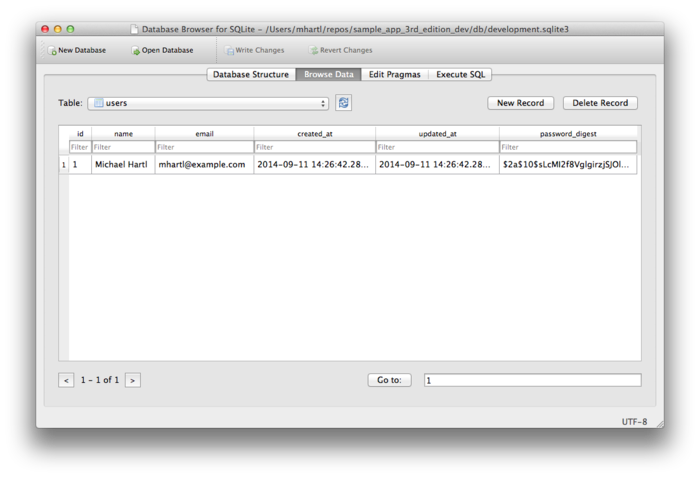
db/development.sqlite3. Returning to the console, we can see the effect of has_secure_password
from Listing 6.39 by looking at the password_digest
attribute:
>> user = User.find_by(email: "mhartl@example.com")
>> user.password_digest
=> "$2a$10$YmQTuuDNOszvu5yi7auOC.F4G//FGhyQSWCpghqRWQWITUYlG3XVy"
This is the hashed version of the password ("foobar")
used to initialize the user object.
Because it’s constructed using bcrypt, it is
computationally impractical to use the digest to discover
the original password.21
As noted in Section 6.3.1, has_secure_password
automatically adds an authenticate method to
the corresponding model objects.
This method determines if a given password is valid for a
particular user by computing its digest and comparing the
result to password_digest in the database. In the case of the
user we just created, we can try a couple of invalid
passwords as follows:
>> user.authenticate("not_the_right_password")
false
>> user.authenticate("foobaz")
false
Here user.authenticate returns false
for invalid password.
If we instead authenticate with the correct password, authenticate
returns the user itself:
>> user.authenticate("foobar")
=> #<User id: 1, name: "Michael Hartl", email: "mhartl@example.com",
created_at: "2014-07-25 02:58:28", updated_at: "2014-07-25 02:58:28",
password_digest: "$2a$10$YmQTuuDNOszvu5yi7auOC.F4G//FGhyQSWCpghqRWQW...">
In Chapter 8, we’ll use the authenticate
method to sign registered users into our site.
In fact, it will turn out not to be important that authenticate
returns the user itself; all that will matter is that it
returns a value that is true in a boolean
context. Since a
user object is neither nil nor false,
it does the job nicely:22
>> !!user.authenticate("foobar")
=> true
6.4 Висновок
Starting from scratch, in this chapter we created a working User model with name, email, and password attributes, together with validations enforcing several important constraints on their values. In addition, we have the ability to securely authenticate users using a given password. This is a remarkable amount of functionality for only twelve lines of code.
In the next chapter, Chapter 7, we’ll make a working signup form to create new users, together with a page to display each user’s information. In Chapter 8, we’ll then use the authentication machinery from Section 6.3 to let users log into the site.
If you’re using Git, now would be a good time to commit if you haven’t done so in a while:
$ bundle exec rake test
$ git add -A
$ git commit -m "Make a basic User model (including secure passwords)"
Then merge back into the master branch and push to the remote repository:
$ git checkout master
$ git merge modeling-users
$ git push
To get the User model working in production, we need to run
the migrations at Heroku, which we can do with heroku
run:
$ bundle exec rake test
$ git push heroku
$ heroku run rake db:migrate
We can verify that this worked by running a console in production:
$ heroku run console --sandbox
>> User.create(name: "Michael Hartl", email: "michael@example.com",
?> password: "foobar", password_confirmation: "foobar")
=> #<User id: 1, name: "Michael Hartl", email: "michael@example.com",
created_at: "2014-08-29 03:27:50", updated_at: "2014-08-29 03:27:50",
password_digest: "$2a$10$IViF0Q5j3hsEVgHgrrKH3uDou86Ka2lEPz8zkwQopwj...">
6.4.1 Що ми вивчили в цій главі
- Migrations allow us to modify our application’s data model.
- Active Record comes with a large number of methods for creating and manipulating data models.
- Active Record validations allow us to place constraints on the data in our models.
- Common validations include presence, length, and format.
- Regular expressions are cryptic but powerful.
- Defining a database index improves lookup efficiency while allowing enforcement of uniqueness at the database level.
- We can add a secure password to a model using the
built-in
has_secure_passwordmethod.
6.5 Вправи
Note: The Solutions Manual for Вправи, with solutions to every exercise in the Ruby on Rails Tutorial book, is included for free with every purchase at www.railstutorial.org.
For a suggestion on how to avoid conflicts between Вправи and the main tutorial, see the note on exercise topic branches in Section 3.6.
- Add a test for the email downcasing from Listing 6.31,
as shown in Listing 6.41.
This test uses the
reloadmethod for reloading a value from the database and theassert_equalmethod for testing equality. To verify that Listing 6.41 tests the right thing, comment out thebefore_saveline to get to red, then uncomment it to get to green. - By running the test suite, verify that the
before_savecallback can be written using the “bang” methodemail.downcase!to modify theemailattribute directly, as shown in Listing 6.42. - As noted in Section 6.2.4, the email regex in Listing 6.21 allows invalid email addresses with consecutive dots in the domain name, i.e., addresses of the form foo@bar..com. Add this address to the list of invalid addresses in Listing 6.19 to get a failing test, and then use the more complicated regex shown in Listing 6.43 to get the test to pass.
require 'test_helper'
class UserTest < ActiveSupport::TestCase
def setup
@user = User.new(name: "Example User", email: "user@example.com",
password: "foobar", password_confirmation: "foobar")
end
.
.
.
test "email addresses should be unique" do
duplicate_user = @user.dup
duplicate_user.email = @user.email.upcase
@user.save
assert_not duplicate_user.valid?
end
test "email addresses should be saved as lower-case" do
mixed_case_email = "Foo@ExAMPle.CoM"
@user.email = mixed_case_email
@user.save
assert_equal mixed_case_email.downcase, @user.reload.email
end
test "password should have a minimum length" do
@user.password = @user.password_confirmation = "a" * 5
assert_not @user.valid?
end
end
before_save callback.
green app/models/user.rb
class User < ActiveRecord::Base
before_save { email.downcase! }
validates :name, presence: true, length: { maximum: 50 }
VALID_EMAIL_REGEX = /\A[\w+\-.]+@[a-z\d\-.]+\.[a-z]+\z/i
validates :email, presence: true, length: { maximum: 255 },
format: { with: VALID_EMAIL_REGEX },
uniqueness: { case_sensitive: false }
has_secure_password
validates :password, length: { minimum: 6 }
end
class User < ActiveRecord::Base
before_save { email.downcase! }
validates :name, presence: true, length: { maximum: 50 }
VALID_EMAIL_REGEX = /\A[\w+\-.]+@[a-z\d\-]+(\.[a-z\d\-]+)*\.[a-z]+\z/i
validates :email, presence: true,
format: { with: VALID_EMAIL_REGEX },
uniqueness: { case_sensitive: false }
has_secure_password
validates :password, length: { minimum: 6 }
end
- The name comes from the “active record pattern”, identified and named in Patterns of Enterprise Application Architecture by Martin Fowler. ↑
- Pronounced “ess-cue-ell”, though the alternate pronunciation “sequel” is also common. ↑
- By using an email address as the username, we open the possibility of communicating with our users at a future date (Chapter 10). ↑
- Don’t worry about exactly how the
tobject manages to do this; the beauty of abstraction layers is that we don’t have to know. We can just trust thetobject to do its job. ↑ - Officially pronounced “ess-cue-ell-ite”, although the (mis)pronunciation “sequel-ite” is also common. ↑
- The only exception is in Section 12.3.3. ↑
- In case you’re curious about
"2014-07-24 00:57:46", I’m not writing this after midnight; the timestamps are recorded in Coordinated Universal Time (UTC), which for most practical purposes is the same as Greenwich Mean Time. From the NIST Time and Frequency FAQ: Q: Why is UTC used as the acronym for Coordinated Universal Time instead of CUT? A: In 1970 the Coordinated Universal Time system was devised by an international advisory group of technical experts within the International Telecommunication Union (ITU). The ITU felt it was best to designate a single abbreviation for use in all languages in order to minimize confusion. Since unanimous agreement could not be achieved on using either the English word order, CUT, or the French word order, TUC, the acronym UTC was chosen as a compromise. ↑ - Exceptions and exception handling are somewhat advanced Ruby subjects, and we won’t need them much in this book. They are important, though, and I suggest learning about them using one of the Ruby books recommended in Section 12.4.1. ↑
- The
update_attributesmethod is an alias for the shorterupdatemethod, but I prefer the longer version because of its similarity to the singular version of the method,update_attribute. ↑ - I’ll omit the output of console
commands when they are not particularly instructive—for
example, the results of
User.new. ↑ - For example, did you know that
"Michael Hartl"@example.com, with quotation marks and a space in the middle, is a valid email address according to the standard? Incredibly, it is—but it’s absurd. ↑ - Note that, in Table 6.1,
“letter” really means “lower-case letter”, but the
iat the end of the regex enforces case-insensitive matching. ↑ - If you find it as useful as I do, I encourage you to donate to Rubular to reward developer Michael Lovitt for his wonderful work. ↑
- As noted briefly in the
introduction to this section, there is a dedicated test
database,
db/test.sqlite3, for this purpose. ↑ - Technically, only the domain part of the email address is case-insensitive: foo@bar.com is actually different from Foo@bar.com. In practice, though, it is a bad idea to rely on this fact; as noted at about.com, “Since the case sensitivity of email addresses can create a lot of confusion, interoperability problems and widespread headaches, it would be foolish to require email addresses to be typed with the correct case. Hardly any email service or ISP does enforce case sensitive email addresses, returning messages whose recipient’s email address was not typed correctly (in all upper case, for example).” Thanks to reader Riley Moses for pointing this out. ↑
- Of course, we could just edit
the migration file for the
userstable in Listing 6.2, but that would require rolling back and then migrating back up. The Rails Way™ is to use migrations every time we discover that our data model needs to change. ↑ - See the Rails API entry on callbacks for more information on which callbacks Rails supports. ↑
- In this context, virtual means that the attributes exist on the model object but do not correspond to columns in the database. ↑
- Hashed password digests are
often erroneously referred to as encrypted passwords. For example, the source code of
has_secure_passwordmakes this mistake, as did the first two editions of this tutorial. This terminology is wrong because by design encryption is reversible—the ability to encrypt implies the ability to decrypt as well. In contrast, the whole point of calculating a password’s hash digest is to be irreversible, so that it is computationally intractable to infer the original password from the digest. (Thanks to reader Andy Philips for pointing out this issue and for encouraging me to fix the broken terminology.) ↑ -
If for any reason something went wrong, you can always reset the database as follows:
- Quit the console.
- Run
$ rm -f development.sqlite3at the command line to remove the database. (We’ll learn a more elegant method for doing this in Chapter 7.) - Re-run the migrations using
$ bundle exec rake db:migrate. - Restart the console.
- By design, the bcrypt algorithm produces a salted hash, which protects against two important classes of attacks (dictionary attacks and rainbow table attacks). ↑
- Recall from Section 4.2.3
that
!!converts an object to its corresponding boolean value. ↑
Chapter 7 Sign up
Now that we have a working User model, it’s time to add an ability few websites can live without: letting users sign up. We’ll use an HTML form to submit user signup information to our application (Section 7.2), which will then be used to create a new user and save its attributes to the database (Section 7.4). At the end of the signup process, it’s important to render a profile page with the newly created user’s information, so we’ll begin by making a page for showing users, which will serve as the first step toward implementing the REST architecture for users (Section 2.2.2). Along the way, we’ll build on our work in Section 5.3.4 to write succinct and expressive integration tests.
In this chapter, we’ll rely on the User model validations from Chapter 6 to increase the odds of new users having valid email addresses. In Chapter 10, we’ll make sure of email validity by adding a separate account activation step to user signup.
7.1 Showing users
In this section, we’ll take the first steps toward the final profile by making a page to display a user’s name and profile photo, as indicated by the mockup in Figure 7.1.1 Our eventual goal for the user profile pages is to show the user’s profile image, basic user data, and a list of microposts, as mocked up in Figure 7.2.2 (Figure 7.2 has our first example of lorem ipsum text, which has a fascinating story that you should definitely read about some time.) We’ll complete this task, and with it the sample application, in Chapter 12.
If you’re following along with version control, make a topic branch as usual:
$ git checkout master
$ git checkout -b sign-up
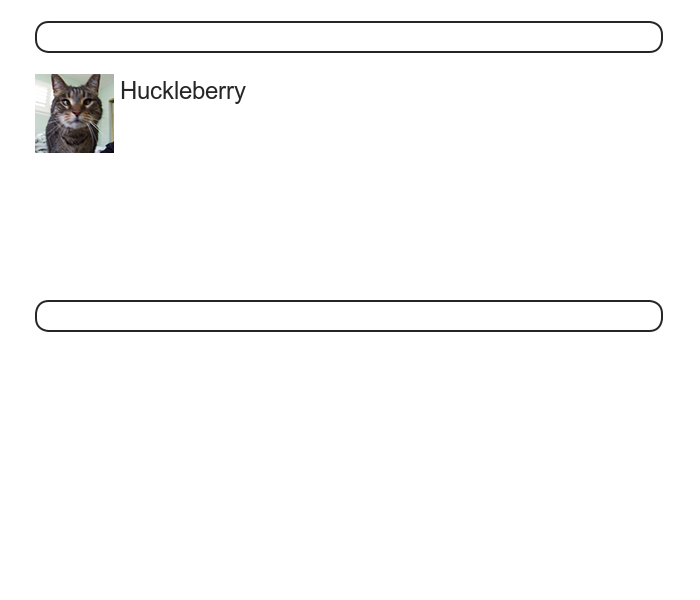
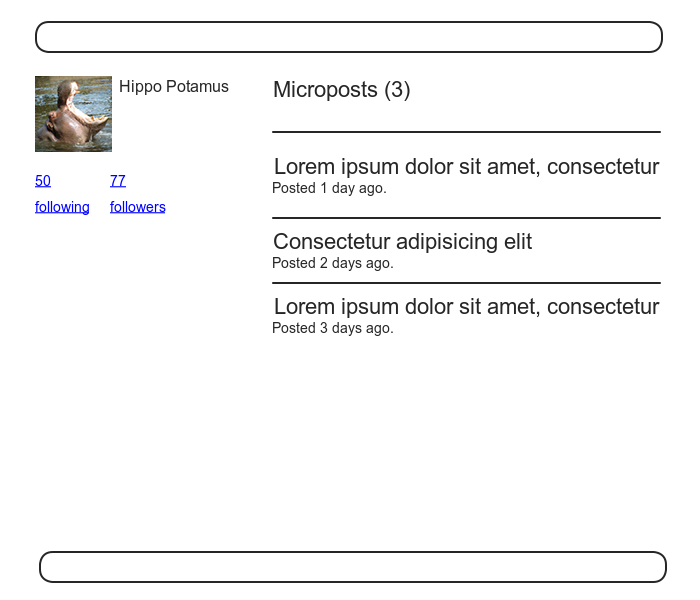
7.1.1 Debug and Rails environments
The profiles in this section will be the first truly
dynamic pages in our application.
Although the view will exist as a single page of code,
each profile will be customized using information
retrieved from the application’s database.
As preparation for adding dynamic pages to our sample
application, now is a good time to add some debug
information to our site layout (Listing 7.1). This displays some
useful information about each page using the built-in debug
method and params variable (which we’ll
learn more about in Section 7.1.2).
<!DOCTYPE html>
<html>
.
.
.
<body>
<%= render 'layouts/header' %>
<div class="container">
<%= yield %>
<%= render 'layouts/footer' %>
<%= debug(params) if Rails.env.development? %>
</div>
</body>
</html>
Since we don’t want to display debug information to users of a deployed application, Listing 7.1 uses
if Rails.env.development?
to restrict the debug information to the development
environment, which is one of three environments
defined by default in Rails (Box 7.1).3 In particular, Rails.env.development?
is true only in a development environment,
so the embedded Ruby
<%= debug(params) if Rails.env.development? %>
won’t be inserted into production applications or tests. (Inserting the debug information into tests probably wouldn’t do any harm, but it probably wouldn’t do any good, either, so it’s best to restrict the debug display to development only.)
Rails comes equipped with three environments: test, development, and production. The default environment for the Rails console is development:
$ rails console Loading development environment >> Rails.env => "development" >> Rails.env.development? => true >> Rails.env.test? => false
As you can see, Rails provides a Rails object with an env attribute and associated environment boolean methods, so that, for example, Rails.env.test? returns true in a test environment and false otherwise.
If you ever need to run a console in a different environment (to debug a test, for example), you can pass the environment as a parameter to the console script:
$ rails console test Loading test environment >> Rails.env => "test" >> Rails.env.test? => true
As with the console, development is the default environment for the Rails server, but you can also run it in a different environment:
$ rails server --environment production
If you view your app running in production, it won’t work without a production database, which we can create by running rake db:migrate in production:
$ bundle exec rake db:migrate RAILS_ENV=production
(I find it confusing that the console, server, and migrate commands specify non-default environments in three mutually incompatible ways, which is why I bothered showing all three.)
By the way, if you have deployed your sample app to Heroku, you can see its environment using heroku run console:
$ heroku run console >> Rails.env => "production" >> Rails.env.production? => true
Naturally, since Heroku is a platform for production sites, it runs each application in a production environment.
To make the debug output look nice, we’ll add some rules to the custom stylesheet created in Chapter 5, as shown in Listing 7.2.
@import "bootstrap-sprockets";
@import "bootstrap";
/* mixins, variables, etc. */
$gray-medium-light: #eaeaea;
@mixin box_sizing {
-moz-box-sizing: border-box;
-webkit-box-sizing: border-box;
box-sizing: border-box;
}
.
.
.
/* miscellaneous */
.debug_dump {
clear: both;
float: left;
width: 100%;
margin-top: 45px;
@include box_sizing;
}
This introduces the Sass mixin facility, in
this case called box_sizing.
A mixin allows a group of CSS rules to be packaged up and
used for multiple elements, converting
.debug_dump {
.
.
.
@include box_sizing;
}
to
.debug_dump {
.
.
.
-moz-box-sizing: border-box;
-webkit-box-sizing: border-box;
box-sizing: border-box;
}
We’ll put this mixin to use again in Section 7.2.1. The result in the case of the debug box is shown in Figure 7.3.
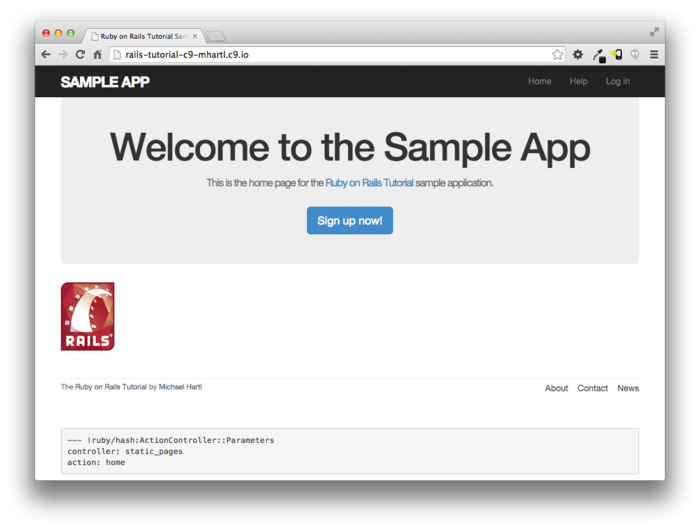
The debug output in Figure 7.3 gives potentially useful information about the page being rendered:
---
controller: static_pages
action: home
This is a YAML4 representation of
params, which is basically a hash, and in
this case identifies the controller and action for the
page. We’ll see
another example in Section 7.1.2.
7.1.2 A Users resource
In order to make a user profile page, we need to have a user in the database, which introduces a chicken-and-egg problem: how can the site have a user before there is a working signup page? Happily, this problem has already been solved: in Section 6.3.4, we created a User record by hand using the Rails console, so there should be one user in the database:
$ rails console
>> User.count
=> 1
>> User.first
=> #<User id: 1, name: "Michael Hartl", email: "mhartl@example.com",
created_at: "2014-08-29 02:58:28", updated_at: "2014-08-29 02:58:28",
password_digest: "$2a$10$YmQTuuDNOszvu5yi7auOC.F4G//FGhyQSWCpghqRWQW...">
(If you don’t currently have a user in your database, you
should visit Section 6.3.4
now and complete it before proceeding.)
We see from the console output above that the user has
id 1, and our goal now is to make a page
to display this user’s information.
We’ll follow the conventions of the REST architecture
favored in Rails applications (Box 2.2), which means representing
data as resources that can be created, shown,
updated, or destroyed—four actions corresponding to the
four fundamental operations POST,
GET, PATCH,
and DELETE defined by the HTTP standard (Box 3.2).
When following REST principles, resources are typically
referenced using the resource name and a unique
identifier. What
this means in the context of users—which we’re now
thinking of as a Users resource—is that we
should view the user with id 1 by
issuing a GET request to the URL
/users/1. Here the
show action is implicit in the type
of request—when Rails’ REST features are activated, GET requests are automatically handled
by the show action.
We saw in Section 2.2.1 that the page for a user
with id 1 has URL /users/1.
Unfortunately, visiting that URL right now just gives an
error, as seen in the server log (Figure 7.4).

We can get the routing for /users/1 to work by adding a
single line to our routes file (config/routes.rb):
resources :users
The result appears in Listing 7.3.
Rails.application.routes.draw do
root 'static_pages#home'
get 'help' => 'static_pages#help'
get 'about' => 'static_pages#about'
get 'contact' => 'static_pages#contact'
get 'signup' => 'users#new'
resources :users
end
Although our immediate motivation is making a page to
show users, the single line resources :users
doesn’t just add a working /users/1 URL; it endows our
sample application with all the actions needed
for a RESTful Users resource,5
along with a large number of named routes (Section 5.3.3)
for generating user URLs.
The resulting correspondence of URLs, actions, and named
routes is shown in Table 7.1.
(Compare to Table 2.2.)
Over the course of the next three chapters, we’ll cover
all of the other entries in Table 7.1
as we fill in all the actions necessary to make Users a
fully RESTful resource.
| HTTP request | URL | Action | Named route | Purpose |
| GET | /users | index |
users_path |
page to list all users |
| GET | /users/1 | show |
user_path(user) |
page to show user |
| GET | /users/new | new |
new_user_path |
page to make a new user (signup) |
| POST | /users | create |
users_path |
create a new user |
| GET | /users/1/edit | edit |
edit_user_path(user) |
page to edit user with id 1 |
| PATCH | /users/1 | update |
user_path(user) |
update user |
| DELETE | /users/1 | destroy |
user_path(user) |
delete user |
With the code in Listing 7.3, the routing works, but there’s still no page there (Figure 7.5). To fix this, we’ll begin with a minimalist version of the profile page, which we’ll flesh out in Section 7.1.4.
We’ll use the standard Rails location for showing a user,
which is app/views/users/show.html.erb. Unlike the new.html.erb
view, which we created with the generator in Listing 5.28,
the show.html.erb file doesn’t currently
exist, so you’ll have to create it by hand, and then fill
it with the content shown in Listing 7.4.
<%= @user.name %>, <%= @user.email %>
This view uses embedded Ruby to display the user’s name
and email address, assuming the existence of an instance
variable called @user.
Of course, eventually the real user show page will look
very different (and won’t display the email address
publicly).
In order to get the user show view to work, we need to
define an @user variable in the
corresponding show action in the Users
controller. As you
might expect, we use the find method on the
User model (Section 6.1.4) to retrieve the user
from the database, as shown in Listing 7.5.
show
action. app/controllers/users_controller.rb
class
                        UsersController < ApplicationController
def show
@user = User.find(params[:id])
end
def new
end
end
Here we’ve used params to retrieve the
user id. When
we make the appropriate request to the Users controller, params[:id]
will be the user id 1, so the
effect is the same as the find method User.find(1)
we saw in Section 6.1.4.
(Technically, params[:id] is the
string "1", but find is
smart enough to convert this to an integer.)
With the user view and action defined, the URL /users/1 works perfectly, as seen in
Figure 7.6.
(If you haven’t restarted the Rails server since adding
bcrypt, you may have to do so at this time.)
Note that the debug information in Figure 7.6
confirms the value of params[:id]:
---
action: show
controller: users
id: '1'
This is why the code
User.find(params[:id])
in Listing 7.5 finds the user with id 1.
7.1.3 Debugger
We saw in Section 7.1.2 how the information in
the debug could help us understand what’s
going on in our application.
As of Rails 4.2, there’s an even more direct way to get
debugging information using the byebug
gem (Listing 3.2).
To see how it works, we just need to add a line consisting
of debugger to our application, as shown in
Listing 7.6.
class UsersController < ApplicationController
def show
@user = User.find(params[:id])
debugger
end
def new
end
end
Now, when we visit /users/1, the Rails server shows a byebug
prompt:
(byebug)
We can treat this like a Rails console, issuing commands to figure out the state of the application:
(byebug) @user.name
"Example User"
(byebug) @user.email
"example@railstutorial.org"
(byebug) params[:id]
"1"
To release the prompt and continue execution of the
application, press Ctrl-D, then remove the debugger
line from the show action (Listing 7.7).
class UsersController < ApplicationController
def show
@user = User.find(params[:id])
end
def new
end
end
Whenever you’re confused about something in a Rails
application, it’s a good practice to put debugger
close to the code you think might be causing the trouble. Inspecting the state
of the system using byebug is a
powerful method for tracking down application errors and
interactively debugging your application.
7.1.4 A Gravatar image and a sidebar
Having defined a basic user page in the previous section, we’ll now flesh it out a little with a profile image for each user and the first cut of the user sidebar. We’ll start by adding a “globally recognized avatar”, or Gravatar, to the user profile.6 Gravatar is a free service that allows users to upload images and associate them with email addresses they control. As a result, Gravatars are a convenient way to include user profile images without going through the trouble of managing image upload, cropping, and storage; all we need to do is construct the proper Gravatar image URL using the user’s email address and the corresponding Gravatar image will automatically appear. (We’ll learn how to handle custom image upload in Section 11.4.)
Our plan is to define a gravatar_for helper
function to return a Gravatar image for a given user, as
shown in Listing 7.8.
<% provide(:title, @user.name) %>
<h1>
<%= gravatar_for @user %>
<%= @user.name %>
</h1>
By default, methods defined in any helper file are
automatically available in any view, but for convenience
we’ll put the gravatar_for method in the
file for helpers associated with the Users controller. As noted in the Gravatar documentation, Gravatar
URLs are based on an MD5 hash of the user’s email
address. In Ruby,
the MD5 hashing algorithm is implemented using the hexdigest
method, which is part of the Digest library:
>> email = "MHARTL@example.COM".
>> Digest::MD5::hexdigest(email.downcase)
=> "1fda4469bcbec3badf5418269ffc5968"
Since email addresses are case-insensitive (Section 6.2.4)
but MD5 hashes are not, we’ve used the downcase
method to ensure that the argument to hexdigest
is all lower-case.
(Because of the email downcasing callback in Listing 6.31,
this will never make a difference in this tutorial, but
it’s a good practice in case the gravatar_for
ever gets used on email addresses from other sources.) The resulting gravatar_for
helper appears in Listing 7.9.
gravatar_for
helper method.
app/helpers/users_helper.rb
module UsersHelper
# Returns the Gravatar for the given user.
def gravatar_for(user)
gravatar_id = Digest::MD5::hexdigest(user.email.downcase)
gravatar_url = "https://secure.gravatar.com/avatar/#{gravatar_id}"
image_tag(gravatar_url, alt: user.name, class: "gravatar")
end
end
The code in Listing 7.9 returns an image tag for
the Gravatar with a gravatar CSS class and
alt text equal to the user’s name (which is especially
convenient for sight-impaired users using a screen
reader).
The profile page appears as in Figure 7.7,
which shows the default Gravatar image, which appears
because user@example.com isn’t a real email
address. (In fact,
as you can see by visiting it, the example.com domain is reserved for
examples like this one.)
To get our application to display a custom Gravatar,
we’ll use update_attributes (Section 6.1.5)
to change the user’s email to something I control:
$ rails console
>> user = User.first
>> user.update_attributes(name: "Example User",
?> email: "example@railstutorial.org",
?> password: "foobar",
?> password_confirmation: "foobar")
=> true
Here we’ve assigned the user the email address example@railstutorial.org,
which I’ve associated with the Rails Tutorial logo, as
seen in Figure 7.8.
The last element needed to complete the mockup from Figure 7.1
is the initial version of the user sidebar.
We’ll implement it using the aside tag,
which is used for content (such as sidebars) that
complements the rest of the page but can also stand alone. We include row
and col-md-4 classes, which are both part of
Bootstrap. The
code for the modified user show page appears in Listing 7.10.
show
view.
app/views/users/show.html.erb
<% provide(:title, @user.name) %>
<div class="row">
<aside class="col-md-4">
<section class="user_info">
<h1>
<%= gravatar_for @user %>
<%= @user.name %>
</h1>
</section>
</aside>
</div>
With the HTML elements and CSS classes in place, we can style the profile page (including the sidebar and the Gravatar) with the SCSS shown in Listing 7.11.7 (Note the nesting of the table CSS rules, which works only because of the Sass engine used by the asset pipeline.) The resulting page is shown in Figure 7.9.
.
.
.
/* sidebar */
aside {
section.user_info {
margin-top: 20px;
}
section {
padding: 10px 0;
margin-top: 20px;
&:first-child {
border: 0;
padding-top: 0;
}
span {
display: block;
margin-bottom: 3px;
line-height: 1;
}
h1 {
font-size: 1.4em;
text-align: left;
letter-spacing: -1px;
margin-bottom: 3px;
margin-top: 0px;
}
}
}
.gravatar {
float: left;
margin-right: 10px;
}
.gravatar_edit {
margin-top: 15px;
}

7.2 Signup form
Now that we have a working (though not yet complete) user profile page, we’re ready to make a signup form for our site. We saw in Figure 5.9 (shown again in Figure 7.10) that the signup page is currently blank: useless for signing up new users. The goal of this section is to start changing this sad state of affairs by producing the signup form mocked up in Figure 7.11.
Since we’re about to add the ability to create new users
through the web, let’s remove the user created at the
console in Section 6.3.4. The cleanest way to do
this is to reset the database with the db:migrate:reset
Rake task:
$ bundle exec rake db:migrate:reset
On some systems you might have to restart the web server (using Ctrl-C) for the changes to take effect.
7.2.1 Using form_for
The heart of the signup page is a form for
submitting the relevant signup information (name, email,
password, confirmation).
We can accomplish this in Rails with the form_for
helper method, which takes in an Active Record object and
constructs a form using the object’s attributes.
Recalling that the signup page /signup is routed to the new
action in the Users controller (Listing 5.33),
our first step is to create the User object required as an
argument to form_for.
The resulting @user variable definition
appears in Listing 7.12.
@user
variable to the new action.
app/controllers/users_controller.rb
class UsersController < ApplicationController
def show
@user = User.find(params[:id])
end
def new
@user = User.new
end
end
The form itself appears as in Listing 7.13. We’ll discuss it in
detail in Section 7.2.2, but first let’s style it
a little with the SCSS in Listing 7.14.
(Note the reuse of the box_sizing mixin from
Listing 7.2.)
Once these CSS rules have been applied, the signup page
appears as in Figure 7.12.
<% provide(:title, 'Sign up') %>
<h1>Sign up</h1>
<div class="row">
<div class="col-md-6 col-md-offset-3">
<%= form_for(@user) do |f| %>
<%= f.label :name %>
<%= f.text_field :name %>
<%= f.label :email %>
<%= f.email_field :email %>
<%= f.label :password %>
<%= f.password_field :password %>
<%= f.label :password_confirmation, "Confirmation" %>
<%= f.password_field :password_confirmation %>
<%= f.submit "Create my account", class: "btn btn-primary" %>
<% end %>
</div>
</div>
.
.
.
/* forms */
input, textarea, select, .uneditable-input {
border: 1px solid #bbb;
width: 100%;
margin-bottom: 15px;
@include box_sizing;
}
input {
height: auto !important;
}
7.2.2 Signup form HTML
To understand the form defined in Listing 7.13,
it’s helpful to break it into smaller pieces.
We’ll first look at the outer structure, which consists of
embedded Ruby opening with a call to form_for
and closing with end:
<%= form_for(@user) do |f| %>
.
.
.
<% end %>
The presence of the do keyword indicates
that form_for takes a block with one
variable, which we’ve called f (for “form”).
As is usually the case with Rails helpers, we don’t need
to know any details about the implementation, but what we
do need to know is what the f
object does: when called with a method corresponding to an
HTML
form element—such as a text field, radio button, or
password field—f returns code for that
element specifically designed to set an attribute of the @user
object. In other
words,
<%= f.label :name %>
<%= f.text_field :name %>
creates the HTML needed to make a labeled text field
element appropriate for setting the name
attribute of a User model.
If you look at the HTML for the generated form by Ctrl-clicking and using the “inspect element” function of your browser, the page’s source should look something like Listing 7.15. Let’s take a moment to discuss its structure.
<form accept-charset="UTF-8" action="/users" class="new_user"
id="new_user" method="post">
<input name="utf8" type="hidden" value="✓" />
<input name="authenticity_token" type="hidden"
value="NNb6+J/j46LcrgYUC60wQ2titMuJQ5lLqyAbnbAUkdo=" />
<label for="user_name">Name</label>
<input id="user_name" name="user[name]" type="text" />
<label for="user_email">Email</label>
<input id="user_email" name="user[email]" type="email" />
<label for="user_password">Password</label>
<input id="user_password" name="user[password]"
type="password" />
<label for="user_password_confirmation">Confirmation</label>
<input id="user_password_confirmation"
name="user[password_confirmation]" type="password" />
<input class="btn btn-primary" name="commit" type="submit"
value="Create my account" />
</form>
We’ll start with the internal structure of the document. Comparing Listing 7.13 with Listing 7.15, we see that the embedded Ruby
<%= f.label :name %>
<%= f.text_field :name %>
produces the HTML
<label for="user_name">Name</label>
<input id="user_name" name="user[name]" type="text" />
while
<%= f.label :email %>
<%= f.email_field :email %>
produces the HTML
<label for="user_email">Email</label>
<input id="user_email" name="user[email]" type="email" />
and
<%= f.label :password %>
<%= f.password_field :password %>
produces the HTML
<label for="user_password">Password</label>
<input id="user_password" name="user[password]" type="password" />
As seen in Figure 7.13, text and email fields (type="text"
and type="email") simply display their
contents, whereas password fields (type="password")
obscure the input for security purposes, as seen in Figure 7.13. (The benefit of using
an email field is that some systems treat it differently
from a text field; for example, the code type="email"
will cause some mobile devices to display a special
keyboard optimized for entering email addresses.)

text
and password fields. As we’ll see in Section 7.4, the key to creating a user
is the special name attribute in each input:
<input id="user_name" name="user[name]" - - - />
.
.
.
<input id="user_password" name="user[password]" - - - />
These name values allow Rails to construct
an initialization hash (via the params
variable) for creating users using the values entered by
the user, as we’ll see in Section 7.3.
The second important element is the form
tag itself. Rails
creates the form tag using the @user
object: because every Ruby object knows its own class (Section 4.4.1), Rails figures out that
@user is of class User;
moreover, since @user is a new
user, Rails knows to construct a form with the post
method, which is the proper verb for creating a new object
(Box 3.2):
<form action="/users" class="new_user" id="new_user" method="post">
Here the class and id
attributes are largely irrelevant; what’s important is action="/users"
and method="post".
Together, these constitute instructions to issue an HTTP POST request to the /users URL. We’ll
see in the next two sections what effects this has.
(You may also have noticed the code that appears just
inside the form tag:
<div style="display:none">
<input name="utf8" type="hidden" value="✓" />
<input name="authenticity_token" type="hidden"
value="NNb6+J/j46LcrgYUC60wQ2titMuJQ5lLqyAbnbAUkdo=" />
</div>
This code, which isn’t displayed in the browser, is used
internally by Rails, so it’s not important for us to
understand what it does.
Briefly, it uses the Unicode character ✓
(a checkmark ✓) to force browsers to submit data
using the right character encoding, and then it includes
an authenticity token, which Rails uses to
thwart an attack called a cross-site request forgery
(CSRF).)8
7.3 Unsuccessful signups
Although we’ve briefly examined the HTML for the form in Figure 7.12 (shown in Listing 7.15), we haven’t yet covered any details, and the form is best understood in the context of signup failure. In this section, we’ll create a signup form that accepts an invalid submission and re-renders the signup page with a list of errors, as mocked up in Figure 7.14.
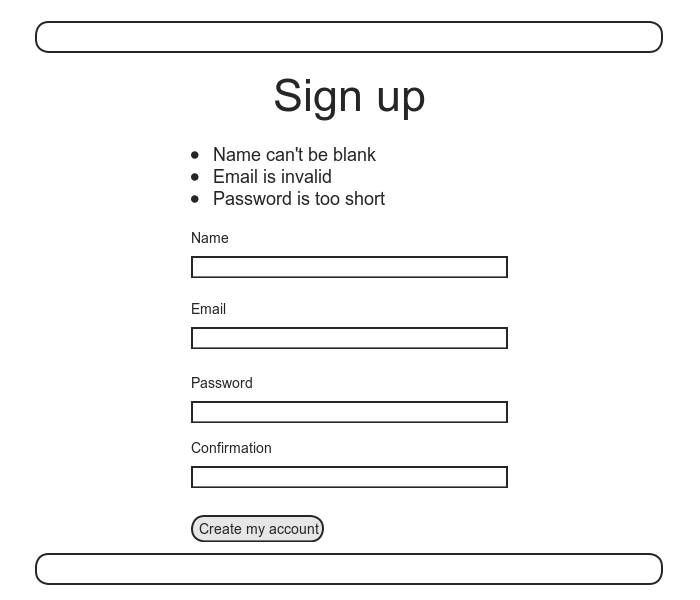
7.3.1 A working form
Recall from Section 7.1.2 that adding resources
:users to the routes.rb file (Listing 7.3)
automatically ensures that our Rails application responds
to the RESTful URLs from Table 7.1.
In particular, it ensures that a POST
request to /users is handled by the create
action. Our
strategy for the create action is to use the
form submission to make a new user object using User.new,
try (and fail) to save that user, and then render the
signup page for possible resubmission.
Let’s get started by reviewing the code for the signup
form:
<form action="/users" class="new_user" id="new_user" method="post">
As noted in Section 7.2.2, this HTML issues a POST request to the /users URL.
Our first step toward a working signup form is adding the
code in Listing 7.16.
This listing includes a second use of the render
method, which we first saw in the context of partials (Section 5.1.3); as you can see, render
works in controller actions as well.
Note that we’ve taken this opportunity to introduce an if-else
branching structure, which allows us to handle the cases
of failure and success separately based on the value of @user.save,
which (as we saw in Section 6.1.3)
is either true or false
depending on whether or not the save succeeds.
create action
that can handle signup failure.
app/controllers/users_controller.rb
class UsersController < ApplicationController
def show
@user = User.find(params[:id])
end
def new
@user = User.new
end
def create
@user = User.new(params[:user]) # Not the final implementation!
if @user.save
# Handle a successful save.
else
render 'new'
end
end
end
Note the comment: this is not the final implementation. But it’s enough to get us started, and we’ll finish the implementation in Section 7.3.2.
The best way to understand how the code in Listing 7.16
works is to submit the form with some invalid
signup data. The
result appears in Figure 7.15, and the full debug
information (with an increased font size) appears in Figure 7.16. (Figure 7.15
also shows the web console, which opens a Rails
console in the browser to assist in debugging.
It’s useful for examining, e.g., the User model, but in
this case we need to inspect params, which
is not available in the web console as far as I can tell.)
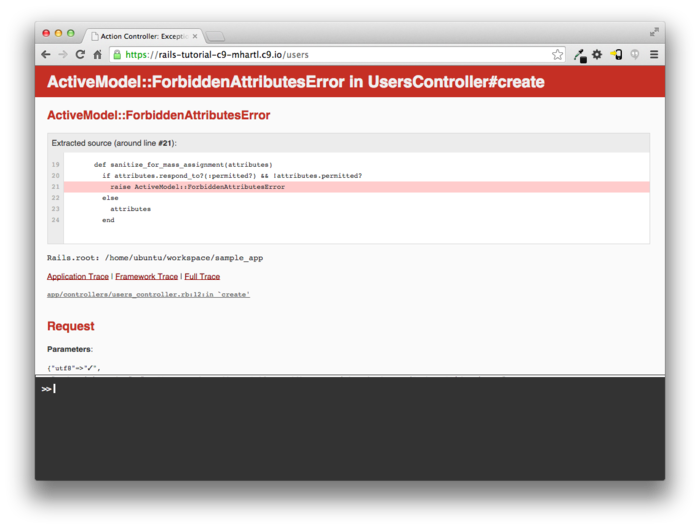
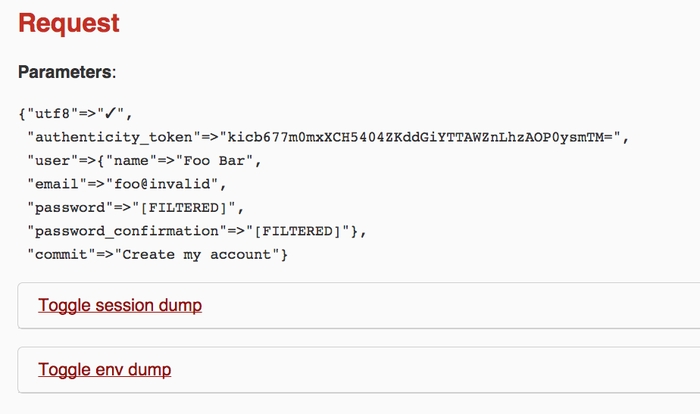
To get a better picture of how Rails handles the
submission, let’s take a closer look at the user
part of the parameters hash from the debug information (Figure 7.16):
"user" => { "name" => "Foo Bar",
"email" => "foo@invalid",
"password" => "[FILTERED]",
"password_confirmation" => "[FILTERED]"
}
This hash gets passed to the Users controller as part of
params, and we saw starting in Section 7.1.2
that the params hash contains information
about each request.
In the case of a URL like /users/1, the value of params[:id]
is the id of the corresponding user (1 in
this example). In
the case of posting to the signup form, params
instead contains a hash of hashes, a construction we first
saw in Section 4.3.3, which introduced the
strategically named params variable in a
console session.
The debug information above shows that submitting the form
results in a user hash with attributes
corresponding to the submitted values, where the keys come
from the name attributes of the input
tags seen in Listing 7.13; for example, the value of
<input id="user_email" name="user[email]" type="email" />
with name "user[email]" is precisely the email
attribute of the user hash.
Although the hash keys appear as strings in the debug
output, we can access them in the Users controller as
symbols, so that params[:user] is the hash
of user attributes—in fact, exactly the attributes needed
as an argument to User.new, as first seen in
Section 4.4.5 and appearing in Listing 7.16. This means that the
line
@user = User.new(params[:user])
is mostly equivalent to
@user = User.new(name: "Foo Bar", email: "foo@invalid",
password: "foo", password_confirmation: "bar")
In previous versions of Rails, using
@user = User.new(params[:user])
actually worked, but it was insecure by default and required a careful and error-prone procedure to prevent malicious users from potentially modifying the application database. In Rails version later than 4.0, this code raises an error (as seen in Figure 7.15 and Figure 7.16 above), which means it is secure by default.
7.3.2 Strong parameters
We mentioned briefly in Section 4.4.5 the idea of mass assignment, which involves initializing a Ruby variable using a hash of values, as in
@user = User.new(params[:user]) # Not the final implementation!
The comment included in Listing 7.16
and reproduced above indicates that this is not the final
implementation.
The reason is that initializing the entire params
hash is extremely dangerous—it arranges to pass
to User.new all data submitted by
a user. In
particular, suppose that, in addition to the current
attributes, the User model included an admin
attribute used to identify administrative users of the
site. (We will
implement just such an attribute in Section 9.4.1.) The way to set such
an attribute to true is to pass the value admin=’1’
as part of params[:user], a task that is
easy to accomplish using a command-line HTTP client such
as curl.
The result would be that, by passing in the entire params
hash to User.new, we would allow any user of
the site to gain administrative access by including admin=’1’
in the web request.
Previous versions of Rails used a method called attr_accessible
in the model layer to solve this problem, and
you may still see that method in legacy Rails
applications, but as of Rails 4.0 the preferred
technique is to use so-called strong parameters
in the controller layer.
This allows us to specify which parameters are required
and which ones are permitted.
In addition, passing in a raw params hash as
above will cause an error to be raised, so that Rails
applications are now immune to mass assignment
vulnerabilities by default.
In the present instance, we want to require the params
hash to have a :user attribute, and we want
to permit the name, email, password, and password
confirmation attributes (but no others).
We can accomplish this as follows:
params.require(:user).permit(:name, :email, :password, :password_confirmation)
This code returns a version of the params
hash with only the permitted attributes (while raising an
error if the :user attribute is missing).
To facilitate the use of these parameters, it’s
conventional to introduce an auxiliary method called user_params
(which returns an appropriate initialization hash) and use
it in place of params[:user]:
@user = User.new(user_params)
Since user_params will only be used
internally by the Users controller and need not be exposed
to external users via the web, we’ll make it private
using Ruby’s private keyword, as shown in Listing 7.17.
(We’ll discuss private in more detail in Section 8.4.)
create action.
app/controllers/users_controller.rb
class UsersController < ApplicationController
.
.
.
def create
@user = User.new(user_params)
if @user.save
# Handle a successful save.
else
render 'new'
end
end
private
def user_params
params.require(:user).permit(:name, :email, :password,
:password_confirmation)
end
end
By the way, the extra level of indentation on the user_params
method is designed to make it visually apparent which
methods are defined after private.
(Experience shows that this is a wise practice; in classes
with a large number of methods, it is easy to define a
private method accidentally, which leads to considerable
confusion when it isn’t available to call on the
corresponding object.)
At this point, the signup form is working, at least in the sense that it no longer produces an error upon submission. On the other hand, as seen in Figure 7.17, it doesn’t display any feedback on invalid submissions (apart from the development-only debug area), which is potentially confusing. It also doesn’t actually create a new user. We’ll fix the first issue in Section 7.3.3 and the second in Section 7.4.
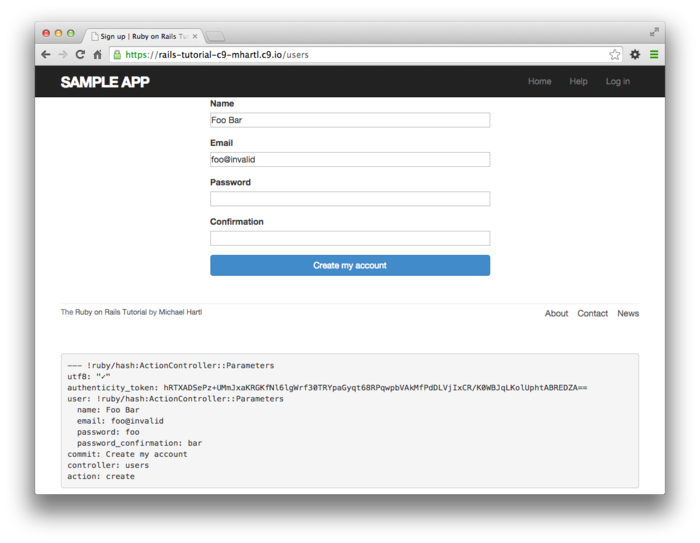
7.3.3 Signup error messages
As a final step in handling failed user creation, we’ll add helpful error messages to indicate the problems that prevented successful signup. Conveniently, Rails automatically provides such messages based on the User model validations. For example, consider trying to save a user with an invalid email address and with a password that’s too short:
$ rails console
>> user = User.new(name: "Foo Bar", email: "foo@invalid",
?> password: "dude", password_confirmation: "dude")
>> user.save
=> false
>> user.errors.full_messages
=> ["Email is invalid", "Password is too short (minimum is 6 characters)"]
Here the errors.full_messages object (which
we saw briefly before in Section 6.2.2)
contains an array of error messages.
As in the console session above, the failed save in Listing 7.16
generates a list of error messages associated with the @user
object. To display
the messages in the browser, we’ll render an
error-messages partial on the user new page
while adding the CSS class form-control
(which has special meaning to Bootstrap) to each entry
field, as shown in Listing 7.18.
It’s worth noting that this error-messages partial is only
a first attempt; the final version appears in Section 11.3.2.
<% provide(:title, 'Sign up') %>
<h1>Sign up</h1>
<div class="row">
<div class="col-md-6 col-md-offset-3">
<%= form_for(@user) do |f| %>
<%= render 'shared/error_messages' %>
<%= f.label :name %>
<%= f.text_field :name, class: 'form-control' %>
<%= f.label :email %>
<%= f.email_field :email, class: 'form-control' %>
<%= f.label :password %>
<%= f.password_field :password, class: 'form-control' %>
<%= f.label :password_confirmation, "Confirmation" %>
<%= f.password_field :password_confirmation, class: 'form-control' %>
<%= f.submit "Create my account", class: "btn btn-primary" %>
<% end %>
</div>
</div>
Notice here that we render a partial called
’shared/error_messages’; this reflects the
common Rails convention of using a dedicated shared/
directory for partials expected to be used in views across
multiple controllers.
(We’ll see this expectation fulfilled in Section 9.1.1.) This means that we
have to create a new app/views/shared
directory using mkdir (Table 1.1):
$ mkdir app/views/shared
We then need to create the _error_messages.html.erb
partial file using our text editor as usual.
The contents of the partial appear in Listing 7.19.
<% if @user.errors.any? %>
<div id="error_explanation">
<div class="alert alert-danger">
The form contains <%= pluralize(@user.errors.count, "error") %>.
</div>
<ul>
<% @user.errors.full_messages.each do |msg| %>
<li><%= msg %></li>
<% end %>
</ul>
</div>
<% end %>
This partial introduces several new Rails and Ruby
constructs, including two methods for Rails error objects. The first method is count,
which simply returns the number of errors:
>> user.errors.count
=> 2
The other new method is any?, which
(together with empty?) is one of a pair of
complementary methods:
>> user.errors.empty?
=> false
>> user.errors.any?
=> true
We see here that the empty? method, which
we first saw in Section 4.2.3
in the context of strings, also works on Rails error
objects, returning true for an empty object
and false otherwise.
The any? method is just the opposite of empty?,
returning true if there are any elements
present and false otherwise.
(By the way, all of these methods—count, empty?,
and any?—work on Ruby arrays as well.
We’ll put this fact to good use starting in Section 11.2.)
The other new idea is the pluralize text
helper. It isn’t
available in the console by default, but we can include it
explicitly through the ActionView::Helpers::TextHelper
module:9
>> include ActionView::Helpers::TextHelper
>> pluralize(1, "error")
=> "1 error"
>> pluralize(5, "error")
=> "5 errors"
We see here that pluralize takes an integer
argument and then returns the number with a properly
pluralized version of its second argument.
Underlying this method is a powerful inflector
that knows how to pluralize a large number of words,
including many with irregular plurals:
>> pluralize(2, "woman")
=> "2 women"
>> pluralize(3, "erratum")
=> "3 errata"
As a result of its use of pluralize, the
code
<%= pluralize(@user.errors.count, "error") %>
returns "0 errors", "1 error",
"2 errors", and so on, depending on how many
errors there are, thereby avoiding ungrammatical phrases
such as "1 errors" (a distressingly common
mistake in apps and on the Web).
Note that Listing 7.19 includes the CSS id error_explanation
for use in styling the error messages.
(Recall from Section 5.1.2 that CSS uses the pound
sign # to style ids.)
In addition, after an invalid submission Rails
automatically wraps the fields with errors in divs
with the CSS class field_with_errors.
These labels then allow us to style the error messages
with the SCSS shown in Listing 7.20,
which makes use of Sass’s @extend function
to include the functionality of the Bootstrap class has-error.
.
.
.
/* forms */
.
.
.
#error_explanation {
color: red;
ul {
color: red;
margin: 0 0 30px 0;
}
}
.field_with_errors {
@extend .has-error;
.form-control {
color: $state-danger-text;
}
}
With the code in Listing 7.18 and Listing 7.19 and the SCSS from Listing 7.20, helpful error messages now appear when submitting invalid signup information, as seen in Figure 7.18. Because the messages are generated by the model validations, they will automatically change if you ever change your mind about, say, the format of email addresses, or the minimum length of passwords.
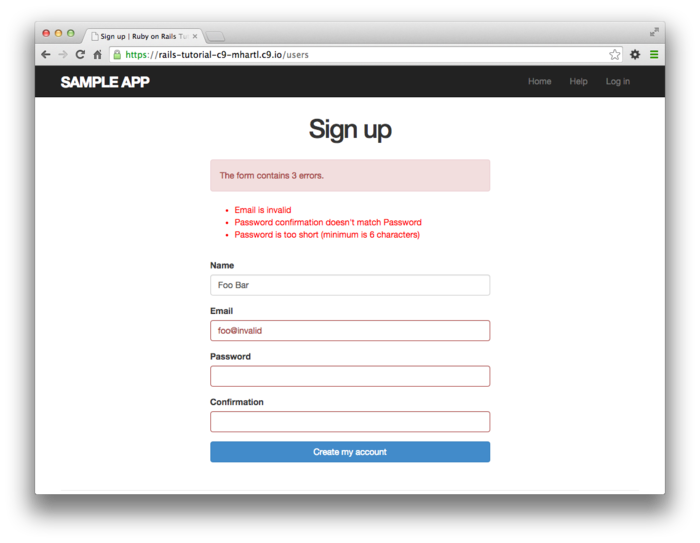
7.3.4 A test for invalid submission
In the days before powerful web frameworks with full testing capabilities, developers had to test forms by hand. For example, to test a signup page manually, we would have to visit the page in a browser and then submit alternately invalid and valid data, verifying in each case that the application’s behavior was correct. Moreover, we would have to remember to repeat the process any time the application changed. This process was painful and error-prone.
Happily, with Rails we can write tests to automate the testing of forms. In this section, we’ll write one such test to verify the correct behavior upon invalid form submission; in Section 7.4.4, we’ll write a corresponding test for valid submission.
To get started, we first generate an integration test
file for signing up users, which we’ll call users_signup
(adopting the controller convention of a plural resource
name):
$ rails generate integration_test users_signup
invoke test_unit
create test/integration/users_signup_test.rb
(We’ll use this same file in Section 7.4.4 to test a valid signup.)
The main purpose of our test is to verify that clicking
the signup button results in not creating a new
user when the submitted information is invalid.
(Writing a test for the error messages is left as an
exercise (Section 7.7).)
The way to do this is to check the count of
users, and under the hood our tests will use the count
method available on every Active Record class, including User:
$ rails console
>> User.count
=> 0
Here User.count is 0 because
we reset the database at the beginning of Section 7.2. As in Section 5.3.4,
we’ll use assert_select to test HTML
elements of the relevant pages, taking care to check only
elements unlikely to change in the future.
We’ll start by visiting the signup path using get:
get signup_path
In order to test the form submission, we need to issue a
POST request to the users_path
(Table 7.1), which we can do with the
post function:
assert_no_difference 'User.count' do
post users_path, user: { name: "",
email: "user@invalid",
password: "foo",
password_confirmation: "bar" }
end
Here we’ve included the params[:user] hash
expected by User.new in the create
action (Listing 7.24).
By wrapping the post in the assert_no_difference
method with the string argument ’User.count’,
we arrange for a comparison between User.count
before and after the contents of the assert_no_difference
block. This is
equivalent to recording the user count, posting the data,
and verifying that the count is the same:
before_count = User.count
post users_path, ...
after_count = User.count
assert_equal before_count, after_count
Although the two are equivalent, using assert_no_difference
is cleaner and is more idiomatically correct Ruby.
It’s worth noting that the get and post
steps above are technically unrelated, and it’s actually
not necessary to get the signup path before posting to the
users path. I
prefer to include both steps, though, both for conceptual
clarity and to double-check that the signup form renders
without error.
Putting the above ideas together leads to the test in Listing 7.21.
We’ve also included a call to assert_template
to check that a failed submission re-renders the new
action. Adding
lines to check for the appearance of error messages is
left as an exercise (Section 7.7).
require 'test_helper'
class UsersSignupTest < ActionDispatch::IntegrationTest
test "invalid signup information" do
get signup_path
assert_no_difference 'User.count' do
post users_path, user: { name: "",
email: "user@invalid",
password: "foo",
password_confirmation: "bar" }
end
assert_template 'users/new'
end
end
Because we wrote the application code before the integration test, the test suite should be green:
$ bundle exec rake test
7.4 Successful signups
Having handled invalid form submissions, now it’s time to complete the signup form by actually saving a new user (if valid) to the database. First, we try to save the user; if the save succeeds, the user’s information gets written to the database automatically, and we then redirect the browser to show the user’s profile (together with a friendly greeting), as mocked up in Figure 7.19. If it fails, we simply fall back on the behavior developed in Section 7.3.
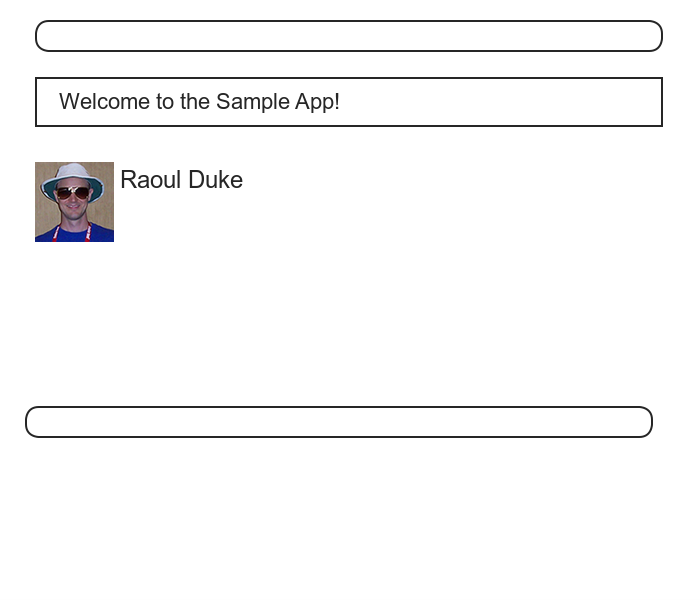
7.4.1 The finished signup form
To complete a working signup form, we need to fill in the
commented-out section in Listing 7.17
with the appropriate behavior.
Currently, the form fails on valid submission.
As indicated in Figure 7.20, this is because the
default behavior for a Rails action is to render the
corresponding view, and there isn’t a view template
corresponding to the create action.
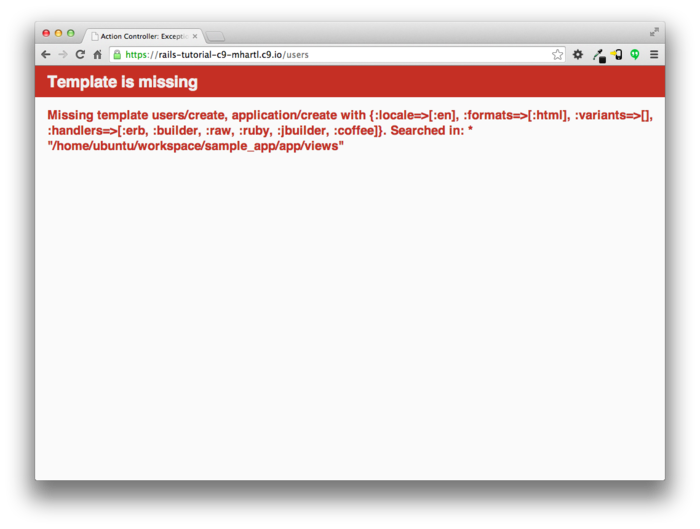
Rather than render a page on successful user creation,
we’ll instead redirect to a different page. We’ll follow the
common convention of redirecting to the newly created
user’s profile, although the root path would also work. The application code,
which introduces the redirect_to method,
appears in Listing 7.23.
create
action with a save and a redirect.
app/controllers/users_controller.rb
class UsersController < ApplicationController
.
.
.
def create
@user = User.new(user_params)
if @user.save
redirect_to @user
else
render 'new'
end
end
private
def user_params
params.require(:user).permit(:name, :email, :password,
:password_confirmation)
end
end
Note that we’ve written
redirect_to @user
where we could have used the equivalent
redirect_to user_url(@user)
This is because Rails automatically infers from redirect_to
@user that we want to redirect to user_url(@user).
7.4.2 The flash
With the code in Listing 7.23, our signup form is actually working, but before submitting a valid registration in a browser we’re going to add a bit of polish common in web applications: a message that appears on the subsequent page (in this case, welcoming our new user to the application) and then disappears upon visiting a second page or on page reload.
The Rails way to display a temporary message is to use a
special method called the flash, which we can
treat like a hash.
Rails adopts the convention of a :success
key for a message indicating a successful result (Listing 7.24).
class UsersController < ApplicationController
.
.
.
def create
@user = User.new(user_params)
if @user.save
flash[:success] = "Welcome to the Sample App!"
redirect_to @user
else
render 'new'
end
end
private
def user_params
params.require(:user).permit(:name, :email, :password,
:password_confirmation)
end
end
By assigning a message to the flash, we are
now in a position to display the message on the first page
after the redirect.
Our method is to iterate through the flash
and insert all relevant messages into the site layout. You may recall the
console example in Section 4.3.3, where we saw how to
iterate through a hash using the strategically named flash
variable:
$ rails console
>> flash = { success: "It worked!", danger: "It failed." }
=> {:success=>"It worked!", danger: "It failed."}
>> flash.each do |key, value|
?> puts "#{key}"
?> puts "#{value}"
>> end
success
It worked!
danger
It failed.
By following this pattern, we can arrange to display the contents of the flash site-wide using code like this:
<% flash.each do |message_type, message| %>
<div class="alert alert-<%= message_type %>"><%= message %></div>
<% end %>
(This code is a particularly ugly combination of HTML and ERb; making it prettier is left as an exercise (Section 7.7).) Here the embedded Ruby
alert-<%= message_type %>
makes a CSS class corresponding to the type of message,
so that for a :success message the class is
alert-success
(The key :success is a symbol, but embedded
Ruby automatically converts it to the string "success"
before inserting it into the template.)
Using a different class for each key allows us to apply
different styles to different kinds of messages.
For example, in Section 8.1.4
we’ll use flash[:danger] to indicate a
failed login attempt.10
(In fact, we’ve already used alert-danger
once, to style the error message div in Listing 7.19.) Bootstrap CSS
supports styling for four such flash classes (success,
info, warning, and danger),
and we’ll find occasion to use all of them in the course
of developing the sample application.
Because the message is also inserted into the template, the full HTML result for
flash[:success] = "Welcome to the Sample App!"
appears as follows:
<div class="alert alert-success">Welcome to the Sample App!</div>
Putting the embedded Ruby discussed above into the site layout leads to the code in Listing 7.25.
flash
variable to the site layout.
app/views/layouts/application.html.erb
<!DOCTYPE html>
<html>
.
.
.
<body>
<%= render 'layouts/header' %>
<div class="container">
<% flash.each do |message_type, message| %>
<div class="alert alert-<%= message_type %>"><%= message %></div>
<% end %>
<%= yield %>
<%= render 'layouts/footer' %>
<%= debug(params) if Rails.env.development? %>
</div>
.
.
.
</body>
</html>
7.4.3 The first signup
We can see the result of all this work by signing up our
first user under the name “Rails Tutorial” and email
address “example@railstutorial.org” (Figure 7.21). The resulting page (Figure 7.22) shows a friendly message
upon successful signup, including nice green styling for
the success class, which comes included with
the Bootstrap CSS framework from Section 5.1.2. (If instead you get
an error message indicating that the email address has
already been taken, be sure to run the db:migrate:reset
Rake task as indicated in Section 7.2 and restart the development
webserver.) Then,
upon reloading the user show page, the flash message
disappears as promised (Figure 7.23).

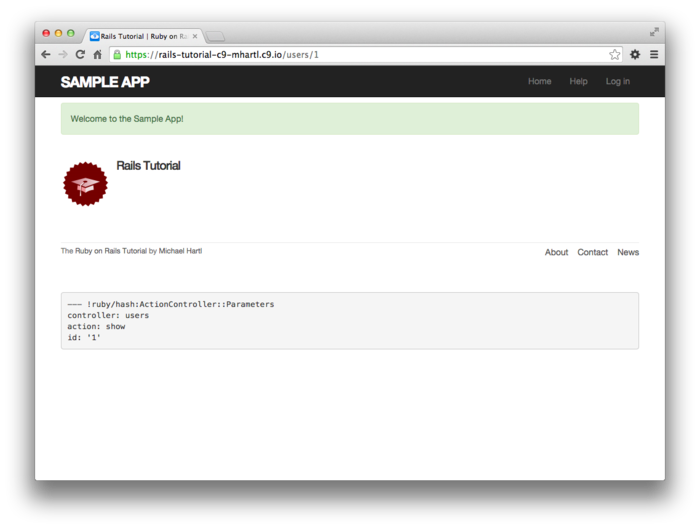

We can now check our database just to double-check that the new user was actually created:
$ rails console
>> User.find_by(email: "example@railstutorial.org")
=> #<User id: 1, name: "Rails Tutorial", email: "example@railstutorial.org",
created_at: "2014-08-29 19:53:17", updated_at: "2014-08-29 19:53:17",
password_digest: "$2a$10$zthScEx9x6EkuLa4NolGye6O0Zgrkp1B6LQ12pTHlNB...">
7.4.4 A test for valid submission
Before moving on, we’ll write a test for valid submission to verify our application’s behavior and catch regressions. As with the test for invalid submission in Section 7.3.4, our main purpose is to verify the contents of the database. In this case, we want to submit valid information and then confirm that a user was created. In analogy with Listing 7.21, which used
assert_no_difference 'User.count' do
post users_path, ...
end
here we’ll use the corresponding assert_difference
method:
assert_difference 'User.count', 1 do
post_via_redirect users_path, ...
end
As with assert_no_difference, the first
argument is the string ’User.count’, which
arranges for a comparison between User.count
before and after the contents of the assert_difference
block. The second
(optional) argument specifies the size of the difference
(in this case, 1).
Incorporating assert_difference into the
file from Listing 7.21 yields the test shown in Listing 7.26.
Note that we’ve used the post_via_redirect
variant to post to the users path.
This simply arranges to follow the redirect after
submission, resulting in a rendering of the ’users/show’
template. (It’s
probably a good idea to write a test for the flash as
well, which is left as an exercise (Section 7.7).)
require 'test_helper'
class UsersSignupTest < ActionDispatch::IntegrationTest
.
.
.
test "valid signup information" do
get signup_path
assert_difference 'User.count', 1 do
post_via_redirect users_path, user: { name: "Example User",
email: "user@example.com",
password: "password",
password_confirmation: "password" }
end
assert_template 'users/show'
end
end
Note that Listing 7.26 also verifies that the
user show template renders following successful signup. For this test to
work, it’s necessary for the Users routes (Listing 7.3),
the Users show action (Listing 7.5),
and the show.html.erb view (Listing 7.8)
to work correctly.
As a result, the one line
assert_template 'users/show'
is a sensitive test for almost everything related to a user’s profile page. This sort of end-to-end coverage of important application features illustrates one reason why integration tests are so useful.
7.5 Professional-grade deployment
Now that we have a working signup page, it’s time to deploy our application and get it working in production. Although we started deploying our application in Chapter 3, this is the first time it will actually do something, so we’ll take this opportunity to make the deployment professional-grade. In particular, we’ll add an important feature to the production application to make signup secure, and we’ll replace the default web server with one suitable for real-world use.
As preparation for the deployment, you should merge your
changes into the master branch at this point:
$ git add -A
$ git commit -m "Finish user signup"
$ git checkout master
$ git merge sign-up
7.5.1 SSL in production
When submitting the signup form developed in this chapter, the name, email address, and password get sent over the network, and hence are vulnerable to intercept. This is a potentially serious security flaw in our application, and the way to fix it is to use Secure Sockets Layer (SSL)11 to encrypt all relevant information before it leaves the local browser. Although we could use SSL on just the signup page, it’s actually easier to implement it site-wide, which has the additional benefits of securing user login (Chapter 8) and making our application immune to a critical session hijacking vulnerability discussed in Section 8.4.
Enabling SSL is as easy as uncommenting a single line in
production.rb, the configuration file for
production applications.
As shown in Listing 7.27, all we need to do is set
the config variable to force the use of SSL
in production.
Rails.application.configure do
.
.
.
# Force all access to the app over SSL, use Strict-Transport-Security,
# and use secure cookies.
config.force_ssl = true
.
.
.
end
At this stage, we need to set up SSL on the remote
server. Setting up
a production site to use SSL involves purchasing and
configuring an SSL certificate for your domain. That’s a lot of work,
though, and luckily we won’t need it here: for an
application running on a Heroku domain (such as the sample
application), we can piggyback on Heroku’s SSL
certificate. As a
result, when we deploy the application in Section 7.5.2,
SSL will automatically be enabled.
(If you want to run SSL on a custom domain, such as www.example.com,
refer to Heroku’s page on SSL.)
7.5.2 Production webserver
Having added SSL, we now need to configure our application to use a webserver suitable for production applications. By default, Heroku uses a pure-Ruby webserver called WEBrick, which is easy to set up and run but isn’t good at handling significant traffic. As a result, WEBrick isn’t suitable for production use, so we’ll replace WEBrick with Puma, an HTTP server that is capable of handling a large number of incoming requests.
To add the new webserver, we simply follow the Heroku Puma documentation.
The first step is to include the puma
gem in our Gemfile, as shown in Listing 7.28. Because we don’t need
the Puma gem locally, Listing 7.28 puts it in the :production
group.
Gemfile.
source 'https://rubygems.org'
.
.
.
group :production do
gem 'pg', '0.17.1'
gem 'rails_12factor', '0.0.2'
gem 'puma', '2.11.1'
end
Because we configured Bundler not to install production
gems (Section 3.1), Listing 7.28
won’t add any gems to the development environment, but we
still need to run Bundler to update Gemfile.lock:
$ bundle install
The next step is to create a file called config/puma.rb
and fill it with the contents of Listing 7.29. The code in Listing 7.29
comes straight from the Heroku documentation,12
and there is no need to understand it.
workers Integer(ENV['WEB_CONCURRENCY'] || 2)
threads_count = Integer(ENV['MAX_THREADS'] || 5)
threads threads_count, threads_count
preload_app!
rackup DefaultRackup
port ENV['PORT'] || 3000
environment ENV['RACK_ENV'] || 'development'
on_worker_boot do
# Worker specific setup for Rails 4.1+
# See: https://devcenter.heroku.com/articles/
# deploying-rails-applications-with-the-puma-web-server#on-worker-boot
ActiveRecord::Base.establish_connection
end
Finally, we need to make a so-called Procfile
to tell Heroku to run a Puma process in production, as
shown in Listing 7.30.
The Procfile should be created in your
application’s root directory (i.e., in the same location
as the Gemfile).
Procfile
for Puma. ./Procfile
web: bundle exec puma -C config/puma.rb
With the production webserver configuration completed, we’re ready to commit and deploy:13
$ bundle exec rake test
$ git add -A
$ git commit -m "Use SSL and the Puma webserver in production"
$ git push
$ git push heroku
$ heroku run rake db:migrate
The signup form is now live, and the result of a successful signup is shown in Figure 7.24. Note the presence of https:// and a lock icon in the address bar of Figure 7.24, which indicate that SSL is working.
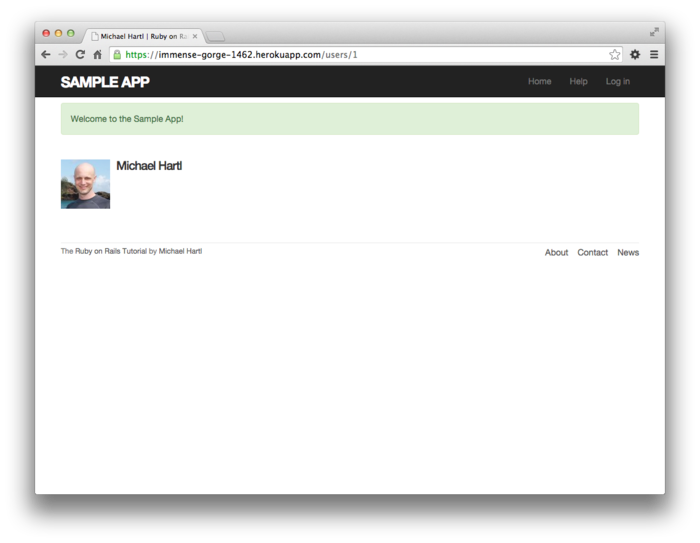
7.5.3 Ruby version number
When deploying to Heroku, you may get a warning message like this one:
###### WARNING:
You have not declared a Ruby version in your Gemfile.
To set your Ruby version add this line to your Gemfile:
ruby '2.1.5'
Experience shows that, at the level of this tutorial, the
costs associated with including such an explicit Ruby
version number outweigh the (negligible) benefits, so you
should ignore this warning for now.
The main issue is that keeping your sample app and system
in sync with the latest Ruby version can be a huge
inconvenience,14 and yet it
almost never makes a difference which exact Ruby version
number you use.
Nevertheless, you should bear in mind that, should you
ever end up running a mission-critical app on Heroku,
specifying an exact Ruby version in the Gemfile
is recommended to ensure maximum compatibility between
development and production environments.
7.6 Висновок
Being able to sign up users is a major milestone for our application. Although the sample app has yet to accomplish anything useful, we have laid an essential foundation for all future development. In Chapter 8, we will complete our authentication machinery by allowing users to log in and out of the application. In Chapter 9, we will allow all users to update their account information, and we will allow site administrators to delete users, thereby completing the full suite of Users resource REST actions from Table 7.1.
7.6.1 Що ми вивчили в цій главі
- Rails displays useful debug information via the
debugmethod. - Sass mixins allow a group of CSS rules to be bundled and reused in multiple places.
- Rails comes with three standard environments:
development,test, andproduction. - We can interact with users as a resource through a standard set of REST URLs.
- Gravatars provide a convenient way of displaying images to represent users.
- The
form_forhelper is used to make forms for interacting with Active Record objects. - Signup failure renders the new user page and displays error messages automatically determined by Active Record.
- Rails provides the
flashas a standard way to display temporary messages. - Signup success creates a user in the database and redirects to the user show page, and displays a welcome message.
- We can use integration tests to verify form submission behavior and catch regressions.
- We can configure our production application to use SSL for secure communications and Puma for high performance.
7.7 Вправи
Note: The Solutions Manual for Вправи, with solutions to every exercise in the Ruby on Rails Tutorial book, is included for free with every purchase at www.railstutorial.org.
For a suggestion on how to avoid conflicts between Вправи and the main tutorial, see the note on exercise topic branches in Section 3.6.
- Verify that the code in Listing 7.31
allows the
gravatar_forhelper defined in Section 7.1.4 to take an optionalsizeparameter, allowing code likegravatar_for user, size: 50in the view. (We’ll put this improved helper to use in Section 9.3.1.) - Write a test for the error messages implemented in Listing 7.18. How detailed you want to make your tests is up to you; a suggested template appears in Listing 7.32.
- Write a test for the flash implemented in Section 7.4.2. How detailed you want
to make your tests is up to you; a suggested
ultra-minimalist template appears in Listing 7.33,
which you should complete by replacing
FILL_INwith the appropriate code. (Even testing for the right key, much less the text, is likely to be brittle, so I prefer only to test that the flash isn’tnil.) - As noted in Section 7.4.2, the flash HTML in Listing 7.25
is ugly. Verify by
running the test suite that the cleaner code in Listing 7.34,
which uses the Rails
content_taghelper, also works.
gravatar_for
helper.
app/helpers/users_helper.rb
module UsersHelper
# Returns the Gravatar for the given user.
def gravatar_for(user, options = { size: 80 })
gravatar_id = Digest::MD5::hexdigest(user.email.downcase)
size = options[:size]
gravatar_url = "https://secure.gravatar.com/avatar/#{gravatar_id}?s=#{size}"
image_tag(gravatar_url, alt: user.name, class: "gravatar")
end
end
require 'test_helper'
class UsersSignupTest < ActionDispatch::IntegrationTest
test "invalid signup information" do
get signup_path
assert_no_difference 'User.count' do
post users_path, user: { name: "",
email: "user@invalid",
password: "foo",
password_confirmation: "bar" }
end
assert_template 'users/new'
assert_select 'div#<CSS id for error explanation>'
assert_select 'div.<CSS class for field with error>'
end
.
.
.
end
require 'test_helper'
.
.
.
test "valid signup information" do
get signup_path
assert_difference 'User.count', 1 do
post_via_redirect users_path, user: { name: "Example User",
email: "user@example.com",
password: "password",
password_confirmation: "password" }
end
assert_template 'users/show'
assert_not flash.FILL_IN
end
end
flash ERb in
the site layout using content_tag.
app/views/layouts/application.html.erb
<!DOCTYPE html>
<html>
.
.
.
<% flash.each do |message_type, message| %>
<%= content_tag(:div, message, class: "alert alert-#{message_type}") %>
<% end %>
.
.
.
</html>
- Mockingbird doesn’t support custom images like the profile photo in Figure 7.1; I put that in by hand using GIMP. ↑
- The hippopotamus here is from http://www.flickr.com/photos/43803060@N00/24308857/. ↑
- You can define your own custom environments as well; see the RailsCast on adding an environment for details. ↑
- The Rails
debuginformation is shown as YAML (a recursive acronym standing for “YAML Ain’t Markup Language”), which is a friendly data format designed to be both machine- and human-readable. ↑ - This means that the routing
works, but the corresponding pages don’t necessarily work
at this point. For
example, /users/1/edit gets routed properly to the
editaction of the Users controller, but since theeditaction doesn’t exist yet actually hitting that URL will return an error. ↑ - In Hinduism, an avatar is the manifestation of a deity in human or animal form. By extension, the term avatar is commonly used to mean some kind of personal representation, especially in a virtual environment. ↑
- Listing 7.11 includes the
.gravatar_editclass, which we’ll put to work in Chapter 9. ↑ - See the Stack Overflow entry on the Rails authenticity token if you’re interested in the details of how this works. ↑
- I figured this out by looking up
pluralizein the Rails API. ↑ - Actually, we’ll use the closely
related
flash.now, but we’ll defer that subtlety until we need it. ↑ - Technically, SSL is now TLS, for Transport Layer Security, but everyone I know still says “SSL”. ↑
- Listing 7.29 changes the formatting slightly so that the code fits in the standard 80 columns. ↑
- We haven’t changed the data
model in this chapter, so running the migration at Heroku
shouldn’t be necessary, but only if you followed the steps
in Section 6.4.
Because several readers reported having trouble, I’ve
added
heroku run rake db:migrateas a final step just to be safe. ↑ - For example, after spending several hours unsuccessfully trying to install Ruby 2.1.4 on my local machine, I discovered that Ruby 2.1.5 had been released the day before. Attempts to install 2.1.5 also failed. ↑
Chapter 8 Log in, log out
Now that new users can sign up for our site (Chapter 7), it’s time to give them the ability to log in and log out. We’ll be implementing all three of the most common models for login/logout behavior on the web: “forgetting” users on browser close (Section 8.1 and Section 8.2), automatically remembering users (Section 8.4), and optionally remembering users based on the value of a “remember me” checkbox (Section 8.4.5).1
The authentication system we develop in this chapter will allow us to customize the site and implement an authorization model based on login status and identity of the current user. For example, in this chapter we’ll update the site header with login/logout links and a profile link. In Chapter 9, we’ll impose a security model in which only logged-in users can visit the user index page, only the correct user can access the page for editing their information, and only administrative users can delete other users from the database. Finally, in Chapter 11, we’ll use the identity of a logged-in user to create microposts associated with that user, and in Chapter 12 we’ll allow the current user to follow other users of the application (thereby receiving a feed of their microposts).
8.1 Sessions
HTTP is a stateless protocol, treating each request as an independent transaction that is unable to use information from any previous requests. This means there is no way within the hypertext transfer protocol to remember a user’s identity from page to page; instead, web applications requiring user login must use a session, which is a semi-permanent connection between two computers (such as a client computer running a web browser and a server running Rails).
The most common techniques for implementing sessions in
Rails involve using cookies, which are small
pieces of text placed on the user’s browser.
Because cookies persist from one page to the next, they can
store information (such as a user id) that can be used by
the application to retrieve the logged-in user from the
database. In this
section and Section 8.2, we’ll use the Rails method
called session to make temporary sessions that
expire automatically on browser close,2
and then in Section 8.4 we’ll add longer-lived
sessions using another Rails method called cookies.
It’s convenient to model sessions as a RESTful resource: visiting the login page will render a form for new sessions, logging in will create a session, and logging out will destroy it. Unlike the Users resource, which uses a database back-end (via the User model) to persist data, the Sessions resource will use cookies, and much of the work involved in login comes from building this cookie-based authentication machinery. In this section and the next, we’ll prepare for this work by constructing a Sessions controller, a login form, and the relevant controller actions. We’ll then complete user login in Section 8.2 by adding the necessary session-manipulation code.
As in previous chapters, we’ll do our work on a topic branch and merge in the changes at the end:
$ git checkout master
$ git checkout -b log-in-log-out
8.1.1 Sessions controller
The elements of logging in and out correspond to
particular REST actions of the Sessions controller: the
login form is handled by the new action
(covered in this section), actually logging in is handled
by sending a POST request to the
create action (Section 8.2), and logging out is
handled by sending a DELETE
request to the destroy action (Section 8.3). (Recall the
association of HTTP verbs with REST actions from Table 7.1.)
To get started, we’ll generate a Sessions controller with
a new action:
$ rails generate controller Sessions new
(Including new actually generates views
as well, which is why we don’t include actions like create
and delete that don’t correspond to views.) Following the model
from Section 7.2 for the signup page, our
plan is to create a login form for creating new sessions,
as mocked up in Figure 8.1.
Unlike the Users resource, which used the special resources
method to obtain a full suite of RESTful routes
automatically (Listing 7.3), the Sessions resource
will use only named routes, handling GET
and POST requests with the login
route and DELETE request with the
logout route.
The result appears in Listing 8.1 (which also deletes the
unneeded routes generated by rails generate
controller).
Rails.application.routes.draw do
root 'static_pages#home'
get 'help' => 'static_pages#help'
get 'about' => 'static_pages#about'
get 'contact' => 'static_pages#contact'
get 'signup' => 'users#new'
get 'login' => 'sessions#new'
post 'login' => 'sessions#create'
delete 'logout' => 'sessions#destroy'
resources :users
end
The routes defined in Listing 8.1 correspond to URLs and actions similar to those for users (Table 7.1), as shown in Table 8.1.
| HTTP request | URL | Named route | Action | Purpose |
| GET | /login | login_path |
new |
page for a new session (login) |
| POST | /login | login_path |
create |
create a new session (login) |
| DELETE | /logout | logout_path |
destroy |
delete a session (log out) |
Since we’ve now added several custom named routes, it’s
useful to look at the complete list of the routes for our
application, which we can generate using rake
routes:
$ bundle exec rake routes
Prefix Verb URI Pattern Controller#Action
root GET / static_pages#home
help GET /help(.:format) static_pages#help
about GET /about(.:format) static_pages#about
contact GET /contact(.:format) static_pages#contact
signup GET /signup(.:format) users#new
login GET /login(.:format) sessions#new
POST /login(.:format) sessions#create
logout DELETE /logout(.:format) sessions#destroy
users GET /users(.:format) users#index
POST /users(.:format) users#create
new_user GET /users/new(.:format) users#new
edit_user GET /users/:id/edit(.:format) users#edit
user GET /users/:id(.:format) users#show
PATCH /users/:id(.:format) users#update
PUT /users/:id(.:format) users#update
DELETE /users/:id(.:format) users#destroy
It’s not necessary to understand the results in detail, but viewing the routes in this manner gives us a high-level overview of the actions supported by our application.
8.1.2 Login form
Having defined the relevant controller and route, now we’ll fill in the view for new sessions, i.e., the login form. Comparing Figure 8.1 with Figure 7.11, we see that the login form is similar in appearance to the signup form, except with two fields (email and password) in place of four.
As seen in Figure 8.2, when the login information is invalid we want to re-render the login page and display an error message. In Section 7.3.3, we used an error-messages partial to display error messages, but we saw in that section that those messages are provided automatically by Active Record. This won’t work for session creation errors because the session isn’t an Active Record object, so we’ll render the error as a flash message instead.
Recall from Listing 7.13 that the signup form uses
the form_for helper, taking as an argument
the user instance variable @user:
<%= form_for(@user) do |f| %>
.
.
.
<% end %>
The main difference between the session form and the
signup form is that we have no Session model, and hence no
analogue for the @user variable.
This means that, in constructing the new session form, we
have to give form_for slightly more
information; in particular, whereas
form_for(@user)
allows Rails to infer that the action of
the form should be to POST to the
URL /users, in the case of sessions we need to indicate
the name of the resource and the corresponding
URL:3
form_for(:session, url: login_path)
With the proper form_for in hand, it’s easy
to make a login form to match the mockup in Figure 8.1
using the signup form (Listing 7.13) as a model, as shown in Listing 8.2.
<% provide(:title, "Log in") %>
<h1>Log in</h1>
<div class="row">
<div class="col-md-6 col-md-offset-3">
<%= form_for(:session, url: login_path) do |f| %>
<%= f.label :email %>
<%= f.email_field :email, class: 'form-control' %>
<%= f.label :password %>
<%= f.password_field :password, class: 'form-control' %>
<%= f.submit "Log in", class: "btn btn-primary" %>
<% end %>
<p>New user? <%= link_to "Sign up now!", signup_path %></p>
</div>
</div>
Note that we’ve added a link to the signup page for convenience. With the code in Listing 8.2, the login form appears as in Figure 8.3. (Because the “Log in” navigation link hasn’t yet been filled in, you’ll have to type the /login URL directly into your address bar. We’ll fix this blemish in Section 8.2.3.)
The generated form HTML appears in Listing 8.3.
<form accept-charset="UTF-8" action="/login" method="post">
<input name="utf8" type="hidden" value="✓" />
<input name="authenticity_token" type="hidden"
value="NNb6+J/j46LcrgYUC60wQ2titMuJQ5lLqyAbnbAUkdo=" />
<label for="session_email">Email</label>
<input class="form-control" id="session_email"
name="session[email]" type="text" />
<label for="session_password">Password</label>
<input id="session_password" name="session[password]"
type="password" />
<input class="btn btn-primary" name="commit" type="submit"
value="Log in" />
</form>
Comparing Listing 8.3 with Listing 7.15,
you might be able to guess that submitting this form will
result in a params hash where params[:session][:email]
and params[:session][:password] correspond
to the email and password fields.
8.1.3 Finding and authenticating a user
As in the case of creating users (signup), the first step in creating sessions (login) is to handle invalid input. We’ll start by reviewing what happens when a form gets submitted, and then arrange for helpful error messages to appear in the case of login failure (as mocked up in Figure 8.2.) Then we’ll lay the foundation for successful login (Section 8.2) by evaluating each login submission based on the validity of its email/password combination.
Let’s start by defining a minimalist create
action for the Sessions controller, along with empty new
and destroy actions (Listing 8.4). The create
action in Listing 8.4 does nothing but render the
new view, but it’s enough to get us started. Submitting the /sessions/new form then yields the
result shown in Figure 8.4.
create action.
app/controllers/sessions_controller.rb
class SessionsController < ApplicationController
def new
end
def create
render 'new'
end
def destroy
end
end
create
as in Listing 8.4. Carefully inspecting the debug information in Figure 8.4
shows that, as hinted at the end of Section 8.1.2,
the submission results in a params hash
containing the email and password under the key session,
which (omitting some irrelevant details used internally by
Rails) appears as follows:
---
session:
email: 'user@example.com'
password: 'foobar'
commit: Log in
action: create
controller: sessions
As with the case of user signup (Figure 7.15),
these parameters form a nested hash like the one
we saw in Listing 4.10.
In particular, params contains a nested hash
of the form
{ session: { password: "foobar", email: "user@example.com" } }
This means that
params[:session]
is itself a hash:
{ password: "foobar", email: "user@example.com" }
As a result,
params[:session][:email]
is the submitted email address and
params[:session][:password]
is the submitted password.
In other words, inside the create action
the params hash has all the information
needed to authenticate users by email and password.
Not coincidentally, we already have exactly the methods we
need: the User.find_by method provided by
Active Record (Section 6.1.4) and the authenticate
method provided by has_secure_password (Section 6.3.4). Recalling that authenticate
returns false for an invalid authentication
(Section 6.3.4), our strategy for user
login can be summarized as shown in Listing 8.5.
class SessionsController < ApplicationController
def new
end
def create
user = User.find_by(email: params[:session][:email].downcase)
if user && user.authenticate(params[:session][:password])
# Log the user in and redirect to the user's show page.
else
# Create an error message.
render 'new'
end
end
def destroy
end
end
The first highlighted line in Listing 8.5
pulls the user out of the database using the submitted
email address.
(Recall from Section 6.2.5 that email addresses are
saved as all lower-case, so here we use the downcase
method to ensure a match when the submitted address is
valid.) The next
line can be a bit confusing but is fairly common in
idiomatic Rails programming:
user && user.authenticate(params[:session][:password])
This uses && (logical and)
to determine if the resulting user is valid.
Taking into account that any object other than nil
and false itself is true in a
boolean context (Section 4.2.3),
the possibilities appear as in Table 8.2. We see from Table 8.2
that the if statement is true
only if a user with the given email both exists in the
database and has the given password, exactly as required.
| User | Password | a && b |
| nonexistent | anything | (nil &&
[anything]) == false |
| valid user | wrong password | (true && false)
== false |
| valid user | right password | (true && true)
== true |
user
&& user.authenticate(…). 8.1.4 Rendering with a flash message
Recall from Section 7.3.3 that we displayed signup errors using the User model error messages. These errors are associated with a particular Active Record object, but this strategy won’t work here because the session isn’t an Active Record model. Instead, we’ll put a message in the flash to be displayed upon failed login. A first, slightly incorrect, attempt appears in Listing 8.6.
class SessionsController < ApplicationController
def new
end
def create
user = User.find_by(email: params[:session][:email].downcase)
if user && user.authenticate(params[:session][:password])
# Log the user in and redirect to the user's show page.
else
flash[:danger] = 'Invalid email/password combination' # Not quite right!
render 'new'
end
end
def destroy
end
end
Because of the flash message display in the site layout (Listing 7.25), the flash[:danger]
message automatically gets displayed; because of the
Bootstrap CSS, it automatically gets nice styling (Figure 8.5).
Unfortunately, as noted in the text and in the comment in
Listing 8.6, this code isn’t quite
right. The page
looks fine, though, so what’s the problem?
The issue is that the contents of the flash persist for
one request, but—unlike a redirect, which we
used in Listing 7.24—re-rendering a template
with render doesn’t count as a request. The result is that
the flash message persists one request longer than we
want. For example,
if we submit invalid login information and then click on
the Home page, the flash gets displayed a second time (Figure 8.6).
Fixing this blemish is the task of Section 8.1.5.

8.1.5 A flash test
The incorrect flash behavior is a minor bug in our application. According to the testing guidelines from Box 3.3, this is exactly the sort of situation where we should write a test to catch the error so that it doesn’t recur. We’ll thus write a short integration test for the login form submission before proceeding. In addition to documenting the bug and preventing a regression, this will also give us a good foundation for further integration tests of login and logout.
We start by generating an integration test for our application’s login behavior:
$ rails generate integration_test users_login
invoke test_unit
create test/integration/users_login_test.rb
Next, we need a test to capture the sequence shown in Figure 8.5 and Figure 8.6. The basic steps appear as follows:
- Visit the login path.
- Verify that the new sessions form renders properly.
- Post to the sessions path with an invalid
paramshash. - Verify that the new sessions form gets re-rendered and that a flash message appears.
- Visit another page (such as the Home page).
- Verify that the flash message doesn’t appear on the new page.
A test implementing the above steps appears in Listing 8.7.
require 'test_helper'
class UsersLoginTest < ActionDispatch::IntegrationTest
test "login with invalid information" do
get login_path
assert_template 'sessions/new'
post login_path, session: { email: "", password: "" }
assert_template 'sessions/new'
assert_not flash.empty?
get root_path
assert flash.empty?
end
end
After adding the test in Listing 8.7, the login test should be red:
$ bundle exec rake test TEST=test/integration/users_login_test.rb
This shows how to run one (and only one) test file using
the argument TEST and the full path to the
file.
The way to get the failing test in Listing 8.7
to pass is to replace flash with the special
variant flash.now, which is specifically
designed for displaying flash messages on rendered pages. Unlike the contents
of flash, the contents of flash.now
disappear as soon as there is an additional request, which
is exactly the behavior we’ve tested in Listing 8.7. With this
substitution, the corrected application code appears as in
Listing 8.9.
class SessionsController < ApplicationController
def new
end
def create
user = User.find_by(email: params[:session][:email].downcase)
if user && user.authenticate(params[:session][:password])
# Log the user in and redirect to the user's show page.
else
flash.now[:danger] = 'Invalid email/password combination'
render 'new'
end
end
def destroy
end
end
We can then verify that both the login integration test and the full test suite are green:
$ bundle exec rake test TEST=test/integration/users_login_test.rb
$ bundle exec rake test
8.2 Logging in
Now that our login form can handle invalid submissions, the next step is to handle valid submissions correctly by actually logging a user in. In this section, we’ll log the user in with a temporary session cookie that expires automatically upon browser close. In Section 8.4, we’ll add sessions that persist even after closing the browser.
Implementing sessions will involve defining a large number of related functions for use across multiple controllers and views. You may recall from Section 4.2.5 that Ruby provides a module facility for packaging such functions in one place. Conveniently, a Sessions helper module was generated automatically when generating the Sessions controller (Section 8.1.1). Moreover, such helpers are automatically included in Rails views; by including the module into the base class of all controllers (the Application controller), we arrange to make them available in our controllers as well (Listing 8.11).
class ApplicationController < ActionController::Base
protect_from_forgery with: :exception
include SessionsHelper
end
With this configuration complete, we’re now ready to write the code to log users in.
8.2.1 The log_in method
Logging a user in is simple with the help of the session
method defined by Rails.
(This method is separate and distinct from the Sessions
controller generated in Section 8.1.1.) We can treat session
as if it were a hash, and assign to it as follows:
session[:user_id] = user.id
This places a temporary cookie on the user’s browser
containing an encrypted version of the user’s id, which
allows us to retrieve the id on subsequent pages using session[:user_id]. In contrast to the
persistent cookie created by the cookies
method (Section 8.4), the temporary cookie
created by the session method expires
immediately when the browser is closed.
Because we’ll want to use the same login technique in a
couple of different places, we’ll define a method called log_in
in the Sessions helper, as shown in Listing 8.12.
log_in
function. app/helpers/sessions_helper.rb
module SessionsHelper
# Logs in the given user.
def log_in(user)
session[:user_id] = user.id
end
end
Because temporary cookies created using the session
method are automatically encrypted, the code in Listing 8.12
is secure, and there is no way for an attacker to use the
session information to log in as the user.
This applies only to temporary sessions initiated with the
session method, though, and is not
the case for persistent sessions created using the cookies
method. Permanent
cookies are vulnerable to a session hijacking
attack, so in Section 8.4 we’ll have to be much more
careful about the information we place on the user’s
browser.
With the log_in method defined in Listing 8.12,
we’re now ready to complete the session create
action by logging the user in and redirecting to the
user’s profile page.
The result appears in Listing 8.13.4
class SessionsController < ApplicationController
def new
end
def create
user = User.find_by(email: params[:session][:email].downcase)
if user && user.authenticate(params[:session][:password])
log_in user
redirect_to user
else
flash.now[:danger] = 'Invalid email/password combination'
render 'new'
end
end
def destroy
end
end
Note the compact redirect
redirect_to user
which we saw before in Section 7.4.1. Rails automatically converts this to the route for the user’s profile page:
user_url(user)
With the create action defined in Listing 8.13,
the login form defined in Listing 8.2 should now be working. It doesn’t have any
effects on the application display, though, so short of
inspecting the browser session directly there’s no way to
tell that you’re logged in.
As a first step toward enabling more visible changes, in Section 8.2.2 we’ll retrieve the
current user from the database using the id in the
session. In Section 8.2.3,
we’ll change the links on the application layout,
including a URL to the current user’s profile.
8.2.2 Current user
Having placed the user’s id securely in the temporary
session, we are now in a position to retrieve it on
subsequent pages, which we’ll do by defining a current_user
method to find the user in the database corresponding to
the session id.
The purpose of current_user is to allow
constructions such as
<%= current_user.name %>
and
redirect_to current_user
To find the current user, one possibility is to use the find
method, as on the user profile page (Listing 7.5):
User.find(session[:user_id])
But recall from Section 6.1.4 that find
raises an exception if the user id doesn’t exist.
This behavior is appropriate on the user profile page
because it will only happen if the id is invalid, but in
the present case session[:user_id] will
often be nil (i.e., for non-logged-in
users). To handle
this possibility, we’ll use the same find_by
method used to find by email address in the create
method, with id in place of email:
User.find_by(id: session[:user_id])
Rather than raising an exception, this method returns nil
(indicating no such user) if the id is invalid.
We could now define the current_user method
as follows:
def current_user
User.find_by(id: session[:user_id])
end
This would work fine, but it would hit the database
multiple times if, e.g., current_user
appeared multiple times on a page.
Instead, we’ll follow a common Ruby convention by storing
the result of User.find_by in an instance
variable, which hits the database the first time but
returns the instance variable immediately on subsequent
invocations:5
if @current_user.nil?
@current_user = User.find_by(id: session[:user_id])
else
@current_user
end
Recalling the or operator || seen in Section 4.2.3, we can rewrite this as follows:
@current_user = @current_user || User.find_by(id: session[:user_id])
Because a User object is true in a boolean context, the
call to find_by only gets executed if @current_user
hasn’t yet been assigned.
Although the preceding code would work, it’s not
idiomatically correct Ruby; instead, the proper way to
write the assignment to @current_user is
like this:
@current_user ||= User.find_by(id: session[:user_id])
This uses the potentially confusing but frequently used ||=
(“or equals”) operator (Box 8.1).
The ||= (“or equals”) assignment operator is a common Ruby idiom and is thus important for aspiring Rails developers to recognize. Although at first it may seem mysterious, or equals is easy to understand by analogy.
We start by noting the common pattern of incrementing a variable:
x = x + 1
Many languages provide a syntactic shortcut for this operation; in Ruby (and in C, C++, Perl, Python, Java, etc.), it can also appear as follows:
x += 1
Analogous constructs exist for other operators as well:
$ rails console >> x = 1 => 1 >> x += 1 => 2 >> x *= 3 => 6 >> x -= 8 => -2 >> x /= 2 => -1
In each case, the pattern is that x = x O y and x O= y are equivalent for any operator O.
Another common Ruby pattern is assigning to a variable if it’s nil but otherwise leaving it alone. Recalling the or operator || seen in Section 4.2.3, we can write this as follows:
>> @foo => nil >> @foo = @foo || "bar" => "bar" >> @foo = @foo || "baz" => "bar"
Since nil is false in a boolean context, the first assignment to @foo is nil || "bar", which evaluates to "bar". Similarly, the second assignment is @foo || "baz", i.e., "bar" || "baz", which also evaluates to "bar". This is because anything other than nil or false is true in a boolean context, and the series of || expressions terminates after the first true expression is evaluated. (This practice of evaluating || expressions from left to right and stopping on the first true value is known as short-circuit evaluation. The same principle applies to && statements, except in this case evaluation stops on the first false value.)
Comparing the console sessions for the various operators, we see that @foo = @foo || "bar" follows the x = x O y pattern with || in the place of O:
x = x + 1 -> x += 1 x = x * 3 -> x *= 3 x = x - 8 -> x -= 8 x = x / 2 -> x /= 2 @foo = @foo || "bar" -> @foo ||= "bar"
Thus we see that @foo = @foo || "bar" and @foo ||= "bar" are equivalent. In the context of the current user, this suggests the following construction:
@current_user ||= User.find_by(id: session[:user_id])
Voilà !
Applying the results of the above discussion yields the
succinct current_user method shown in Listing 8.14.
module SessionsHelper
# Logs in the given user.
def log_in(user)
session[:user_id] = user.id
end
# Returns the current logged-in user (if any).
def current_user
@current_user ||= User.find_by(id: session[:user_id])
end
end
With the working current_user method in Listing 8.14, we’re now in a position
to make changes to our application based on user login
status.
8.2.3 Changing the layout links
The first practical application of logging in involves changing the layout links based on login status. In particular, as seen in the Figure 8.7 mockup,6 we’ll add links for logging out, for user settings, for listing all users, and for the current user’s profile page. Note in Figure 8.7 that the logout and profile links appear in a dropdown “Account” menu; we’ll see in Listing 8.16 how to make such a menu with Bootstrap.
At this point, in real life I would consider writing an integration test to capture the behavior described above. As noted in Box 3.3, as you become more familiar with the testing tools in Rails you may find yourself more inclined to write tests first. In this case, though, such a test involves several new ideas, so for now it’s best deferred to its own section (Section 8.2.4).
The way to change the links in the site layout involves using an if-else statement inside embedded Ruby to show one set of links if the user is logged in and another set of links otherwise:
<% if logged_in? %>
# Links for logged-in users
<% else %>
# Links for non-logged-in-users
<% end %>
This kind of code requires the existence of a logged_in?
boolean method, which we’ll now define.
A user is logged in if there is a current user in the
session, i.e., if current_user is not nil. Checking for this
requires the use of the “not” operator (Section 4.2.3),
written using an exclamation point ! and usually read as
“bang”. The
resulting logged_in? method appears in Listing 8.15.
logged_in?
helper method.
app/helpers/sessions_helper.rb
module SessionsHelper
# Logs in the given user.
def log_in(user)
session[:user_id] = user.id
end
# Returns the current logged-in user (if any).
def current_user
@current_user ||= User.find_by(id: session[:user_id])
end
# Returns true if the user is logged in, false otherwise.
def logged_in?
!current_user.nil?
end
end
With addition in Listing 8.15, we’re now ready to change the layout links if a user is logged in. There are four new links, two of which are stubbed out (to be completed in Chapter 9):
<%= link_to "Users", '#' %>
<%= link_to "Settings", '#' %>
The logout link, meanwhile, uses the logout path defined in Listing 8.1:
<%= link_to "Log out", logout_path, method: :delete %>
Notice that the logout link passes a hash argument indicating that it should submit with an HTTP DELETE request.7 We’ll also add a profile link as follows:
<%= link_to "Profile", current_user %>
Here we could write
<%= link_to "Profile", user_path(current_user) %>
but as usual Rails allows us to link directly to the user
by automatically converting current_user
into user_path(current_user) in this
context. Finally,
when users aren’t logged in, we’ll use the login
path defined in Listing 8.1 to make a link to the login
form:
<%= link_to "Log in", login_path %>
Putting everything together gives the updated header partial shown in Listing 8.16.
<header class="navbar navbar-fixed-top navbar-inverse">
<div class="container">
<%= link_to "sample app", root_path, id: "logo" %>
<nav>
<ul class="nav navbar-nav navbar-right">
<li><%= link_to "Home", root_path %></li>
<li><%= link_to "Help", help_path %></li>
<% if logged_in? %>
<li><%= link_to "Users", '#' %></li>
<li class="dropdown">
<a href="#" class="dropdown-toggle" data-toggle="dropdown">
Account <b class="caret"></b>
</a>
<ul class="dropdown-menu">
<li><%= link_to "Profile", current_user %></li>
<li><%= link_to "Settings", '#' %></li>
<li class="divider"></li>
<li>
<%= link_to "Log out", logout_path, method: "delete" %>
</li>
</ul>
</li>
<% else %>
<li><%= link_to "Log in", login_path %></li>
<% end %>
</ul>
</nav>
</div>
</header>
As part of including the new links into the layout, Listing 8.16
takes advantage of Bootstrap’s ability to make dropdown
menus.8
Note in particular the inclusion of the special Bootstrap
CSS classes such as dropdown, dropdown-menu,
etc. To activate
the dropdown menu, we need to include Bootstrap’s custom
JavaScript library in the Rails asset pipeline’s application.js
file, as shown in Listing 8.17.
application.js.
app/assets/javascripts/application.js
//= require jquery
//= require jquery_ujs
//= require bootstrap
//= require turbolinks
//= require_tree .
At this point, you should visit the login path and log in as a valid user, which effectively tests the code in the previous three sections.9 With the code in Listing 8.16 and Listing 8.17, you should see the dropdown menu and links for logged-in users, as shown in Figure 8.8. If you quit your browser completely, you should also be able to verify that the application forgets your login status, requiring you to log in again to see the changes described above.
8.2.4 Testing layout changes
Having verified by hand that the application is behaving properly upon successful login, before moving on we’ll write an integration test to capture that behavior and catch regressions. We’ll build on the test from Listing 8.7 and write a series of steps to verify the following sequence of actions:
- Visit the login path.
- Post valid information to the sessions path.
- Verify that the login link disappears.
- Verify that a logout link appears
- Verify that a profile link appears.
In order to see these changes, our test needs to log in as a previously registered user, which means that such a user must already exist in the database. The default Rails way to do this is to use fixtures, which are a way of organizing data to be loaded into the test database. We discovered in Section 6.2.5 that we needed to delete the default fixtures so that our email uniqueness tests would pass (Listing 6.30). Now we’re ready to start filling in that empty file with custom fixtures of our own.
In the present case, we need only one user, whose
information should consist of a valid name and email
address. Because
we’ll need to log the user in, we also have to include a
valid password to compare with the password submitted to
the Sessions controller’s create action. Referring to the data
model in Figure 6.8, we see that this means
creating a password_digest attribute for the
user fixture, which we’ll accomplish by defining a digest
method of our own.
As discussed in Section 6.3.1, the password digest is
created using bcrypt (via has_secure_password),
so we’ll need to create the fixture password using the
same method. By
inspecting the secure password source code, we find
that this method is
BCrypt::Password.create(string, cost: cost)
where string is the string to be hashed and
cost is the cost parameter that
determines the computational cost to calculate the hash. Using a high cost
makes it computationally intractable to use the hash to
determine the original password, which is an important
security precaution in a production environment, but in
tests we want the digest method to be as
fast as possible.
The secure password source code has a line for this as
well:
cost = ActiveModel::SecurePassword.min_cost ? BCrypt::Engine::MIN_COST :
BCrypt::Engine.cost
This rather obscure code, which you don’t need to
understand in detail, arranges for precisely the behavior
described above: it uses the minimum cost parameter in
tests and a normal (high) cost parameter in production. (We’ll learn more
about the strange ?-: notation
in Section 8.4.5.)
There are several places we could put the resulting digest
method, but we’ll have an opportunity in Section 8.4.1
to reuse digest in the User model.
This suggests placing the method in user.rb. Because we won’t
necessarily have access to a user object when calculating
the digest (as will be the case in the fixtures file),
we’ll attach the digest method to the User
class itself, which (as we saw briefly in Section 4.4.1)
makes it a class method.
The result appears in Listing 8.18.
class User < ActiveRecord::Base
before_save { self.email = email.downcase }
validates :name, presence: true, length: { maximum: 50 }
VALID_EMAIL_REGEX = /\A[\w+\-.]+@[a-z\d\-.]+\.[a-z]+\z/i
validates :email, presence: true, length: { maximum: 255 },
format: { with: VALID_EMAIL_REGEX },
uniqueness: { case_sensitive: false }
has_secure_password
validates :password, length: { minimum: 6 }
# Returns the hash digest of the given string.
def User.digest(string)
cost = ActiveModel::SecurePassword.min_cost ? BCrypt::Engine::MIN_COST :
BCrypt::Engine.cost
BCrypt::Password.create(string, cost: cost)
end
end
With the digest method from Listing 8.18,
we are now ready to create a user fixture for a valid
user, as shown in Listing 8.19.
michael:
name: Michael Example
email: michael@example.com
password_digest: <%= User.digest('password') %>
Note in particular that fixtures support embedded Ruby, which allows us to use
<%= User.digest('password') %>
to create the valid password digest for the test user.
Although we’ve defined the password_digest
attribute required by has_secure_password,
sometimes it’s convenient to refer to the plain (virtual)
password as well.
Unfortunately, this is impossible to arrange with
fixtures, and adding a password attribute to
Listing 8.19 causes Rails to complain
that there is no such column in the database (which is
true). We’ll make
do by adopting the convention that all fixture users have
the same password (’password’).
Having created a fixture with a valid user, we can retrieve it inside a test as follows:
user = users(:michael)
Here users corresponds to the fixture
filename users.yml, while the symbol :michael
references user with the key shown in Listing 8.19.
With the fixture user as above, we can now write a test for the layout links by converting the sequence enumerated at the beginning of this section into code, as shown in Listing 8.20.
require 'test_helper'
class UsersLoginTest < ActionDispatch::IntegrationTest
def setup
@user = users(:michael)
end
.
.
.
test "login with valid information" do
get login_path
post login_path, session: { email: @user.email, password: 'password' }
assert_redirected_to @user
follow_redirect!
assert_template 'users/show'
assert_select "a[href=?]", login_path, count: 0
assert_select "a[href=?]", logout_path
assert_select "a[href=?]", user_path(@user)
end
end
Here we’ve used
assert_redirected_to @user
to check the right redirect target and
follow_redirect!
to actually visit the target page. Listing 8.20 also verifies that the login link disappears by verifying that there are zero login path links on the page:
assert_select "a[href=?]", login_path, count: 0
By including the extra count: 0 option, we
tell assert_select that we expect there to
be zero links matching the given pattern.
(Compare to count: 2 in Listing 5.25,
which checks for exactly two matching links.)
Because the application code was already working, this test should be green:
$ bundle exec rake test TEST=test/integration/users_login_test.rb \
> TESTOPTS="--name test_login_with_valid_information"
This shows how to run a specific test within a test file by passing the option
TESTOPTS="--name test_login_with_valid_information"
containing the name of the test. (A test’s name is just the word “test” and the words in the test description joined using underscores.)
8.2.5 Login upon signup
Although our authentication system is now working, newly
registered users might be confused, as they are not logged
in by default.
Because it would be strange to force users to log in
immediately after signing up, we’ll log in new users
automatically as part of the signup process.
To arrange this behavior, all we need to do is add a call
to log_in in the Users controller create
action, as shown in Listing 8.22.10
class UsersController < ApplicationController
def show
@user = User.find(params[:id])
end
def new
@user = User.new
end
def create
@user = User.new(user_params)
if @user.save
log_in @user
flash[:success] = "Welcome to the Sample App!"
redirect_to @user
else
render 'new'
end
end
private
def user_params
params.require(:user).permit(:name, :email, :password,
:password_confirmation)
end
end
To test the behavior from Listing 8.22,
we can add a line to the test from Listing 7.26
to check that the user is logged in.
It’s helpful in this context to define a is_logged_in?
helper method to parallel the logged_in?
helper defined in Listing 8.15, which returns true
if there’s a user id in the (test) session and false
otherwise (Listing 8.23).
(Because helper methods aren’t available in tests, we
can’t use the current_user as in Listing 8.15,
but the session method is available, so we
use that instead.)
Here we use is_logged_in? instead of logged_in?
so that the test helper and Sessions helper methods have
different names, which prevents them from being mistaken
for each other.11
ENV['RAILS_ENV'] ||= 'test'
.
.
.
class ActiveSupport::TestCase
fixtures :all
# Returns true if a test user is logged in.
def is_logged_in?
!session[:user_id].nil?
end
end
With the code in Listing 8.23, we can assert that the user is logged in after signup using the line shown in Listing 8.24.
require 'test_helper'
class UsersSignupTest < ActionDispatch::IntegrationTest
.
.
.
test "valid signup information" do
get signup_path
assert_difference 'User.count', 1 do
post_via_redirect users_path, user: { name: "Example User",
email: "user@example.com",
password: "password",
password_confirmation: "password" }
end
assert_template 'users/show'
assert is_logged_in?
end
end
At this point, the test suite should still be green:
$ bundle exec rake test
8.3 Logging out
As discussed in Section 8.1, our authentication model is to keep users logged in until they log out explicitly. In this section, we’ll add this necessary logout capability. Because the “Log out” link has already been defined (Listing 8.16), all we need is to write a valid controller action to destroy user sessions.
So far, the Sessions controller actions have followed the
RESTful convention of using new for a login
page and create to complete the login.
We’ll continue this theme by using a destroy
action to delete sessions, i.e., to log out.
Unlike the login functionality, which we use in both Listing 8.13
and Listing 8.22, we’ll only be logging out
in one place, so we’ll put the relevant code directly in the
destroy action.
As we’ll see in Section 8.4.6, this design (with a little
refactoring) will also make the authentication machinery
easier to test.
Logging out involves undoing the effects of the log_in
method from Listing 8.12, which involves deleting the
user id from the session.12
To do this, we use the delete method as
follows:
session.delete(:user_id)
We’ll also set the current user to nil,
although in the present case this won’t matter because of an
immediate redirect to the root URL.13 As with log_in
and associated methods, we’ll put the resulting log_out
method in the Sessions helper module, as shown in Listing 8.26.
log_out
method.
app/helpers/sessions_helper.rb
module SessionsHelper
# Logs in the given user.
def log_in(user)
session[:user_id] = user.id
end
.
.
.
# Logs out the current user.
def log_out
session.delete(:user_id)
@current_user = nil
end
end
We can put the log_out method to use in the
Sessions controller’s destroy action, as shown
in Listing 8.27.
class SessionsController < ApplicationController
def new
end
def create
user = User.find_by(email: params[:session][:email].downcase)
if user && user.authenticate(params[:session][:password])
log_in user
redirect_to user
else
flash.now[:danger] = 'Invalid email/password combination'
render 'new'
end
end
def destroy
log_out
redirect_to root_url
end
end
To test the logout machinery, we can add some steps to the
user login test from Listing 8.20. After logging in, we
use delete to issue a DELETE
request to the logout path (Table 8.1)
and verify that the user is logged out and redirected to the
root URL. We also check that the login link reappears and
that the logout and profile links disappear.
The new steps appear in Listing 8.28.
require 'test_helper'
class UsersLoginTest < ActionDispatch::IntegrationTest
.
.
.
test "login with valid information followed by logout" do
get login_path
post login_path, session: { email: @user.email, password: 'password' }
assert is_logged_in?
assert_redirected_to @user
follow_redirect!
assert_template 'users/show'
assert_select "a[href=?]", login_path, count: 0
assert_select "a[href=?]", logout_path
assert_select "a[href=?]", user_path(@user)
delete logout_path
assert_not is_logged_in?
assert_redirected_to root_url
follow_redirect!
assert_select "a[href=?]", login_path
assert_select "a[href=?]", logout_path, count: 0
assert_select "a[href=?]", user_path(@user), count: 0
end
end
(Now that we have is_logged_in? available in
tests, we’ve also thrown in a bonus assert
is_logged_in? immediately after posting valid
information to the sessions path.)
With the session destroy action thus defined
and tested, the initial signup/login/logout triumvirate is
complete, and the test suite should be green:
$ bundle exec rake test
8.4 Remember me
The login system we finished in Section 8.2 is self-contained and fully functional, but most websites have the additional capability of remembering users’ sessions even after they close their browsers. In this section, we’ll start by remembering user logins by default, expiring their sessions only when they explicitly log out. In Section 8.4.5, we’ll enable a common alternative model, a “remember me” checkbox that allows users to opt out of being remembered. Both of these models are professional-grade, with the first used by sites such as GitHub and Bitbucket, and the second used by sites such as Facebook and Twitter.
8.4.1 Remember token and digest
In Section 8.2, we used the Rails session
method to store the user’s id, but this information
disappears when the user closes their browser.
In this section, we’ll take the first step toward
persistent sessions by generating a remember token
appropriate for creating permanent cookies using the cookies
method, together with a secure remember digest
for authenticating those tokens.
As noted in Section 8.2.1, information stored using
session is automatically secure, but this is
not the case with information stored using cookies. In particular,
persistent cookies are vulnerable to session hijacking, in which an
attacker uses a stolen remember token to log in as a
particular user.
There are four main ways to steal cookies: (1) using a packet
sniffer to detect cookies being passed over insecure
networks,14 (2)
compromising a database containing remember tokens, (3)
using cross-site scripting (XSS), and (4)
gaining physical access to a machine with a logged-in
user. We prevented
the first problem in Section 7.5
by using Secure Sockets Layer (SSL)
site-wide, which protects network data from packet
sniffers. We’ll
prevent the second problem by storing a hash digest of the
remember token instead of the token itself, in much the
same way that we stored password digests instead of raw
passwords in Section 6.3.
Rails automatically prevents the third problem by escaping
any content inserted into view templates.
Finally, although there’s no iron-clad way to stop
attackers who have physical access to a logged-in
computer, we’ll minimize the fourth problem by changing
tokens every time a user logs out and by taking care to cryptographically
sign any potentially sensitive information we place
on the browser.
With these design and security considerations in mind, our plan for creating persistent sessions appears as follows:
- Create a random string of digits for use as a remember token.
- Place the token in the browser cookies with an expiration date far in the future.
- Save the hash digest of the token to the database.
- Place an encrypted version of the user’s id in the browser cookies.
- When presented with a cookie containing a persistent user id, find the user in the database using the given id, and verify that the remember token cookie matches the associated hash digest from the database.
Note how similar the final step is to logging a user in,
where we retrieve the user by email address and then
verify (using the authenticate method) that
the submitted password matches the password digest (Listing 8.5). As a result, our
implementation will parallel aspects of has_secure_password.
We’ll start by adding the required remember_digest
attribute to the User model, as shown in Figure 8.9.
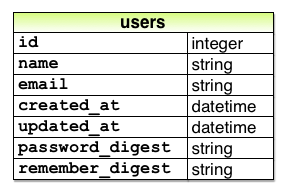
remember_digest
attribute. To add the data model from Figure 8.9 to our application, we’ll generate a migration:
$ rails generate migration add_remember_digest_to_users remember_digest:string
(Compare to the password digest migration in Section 6.3.1.) As in previous
migrations, we’ve used a migration name that ends in _to_users
to tell Rails that the migration is designed to alter the
users table in the database.
Because we also included the attribute (remember_digest)
and type (string), Rails generates a default
migration for us, as shown in Listing 8.30.
class AddRememberDigestToUsers < ActiveRecord::Migration
def change
add_column :users, :remember_digest, :string
end
end
Because we don’t expect to retrieve users by remember
digest, there’s no need to put an index on the remember_digest
column, and we can use the default migration as generated
above:
$ bundle exec rake db:migrate
Now we have to decide what to use as a remember token. There are many mostly
equivalent possibilities—essentially, any long random
string will do.
The urlsafe_base64 method from the SecureRandom
module in the Ruby standard library fits the bill:15
it returns a random string of length 22 composed of the
characters A–Z, a–z, 0–9, “-”, and “_” (for a total of 64
possibilities, thus “base64”).
A typical base64 string appears as follows:
$ rails console
>> SecureRandom.urlsafe_base64
=> "q5lt38hQDc_959PVoo6b7A"
Just as it’s perfectly fine if two users have the same
password,16 there’s no need
for remember tokens to be unique, but it’s more secure if
they are.17
In the case of the base64 string above, each of the 22
characters has 64 possibilities, so the probability of two
remember tokens colliding is a negligibly small urlsafe_base64),
we’ll be able to use the same token generator to make
account activation and password reset links in Chapter 10.
Remembering users involves creating a remember token and
saving the digest of the token to the database.
We’ve already defined a digest method for
use in the test fixtures (Listing 8.18), and we can use the
results of the discussion above to create a new_token
method to create a new token.
As with digest, the new token method doesn’t
need a user object, so we’ll make it a class method.18 The result is the
User model shown in Listing 8.31.
class User < ActiveRecord::Base
before_save { self.email = email.downcase }
validates :name, presence: true, length: { maximum: 50 }
VALID_EMAIL_REGEX = /\A[\w+\-.]+@[a-z\d\-.]+\.[a-z]+\z/i
validates :email, presence: true, length: { maximum: 255 },
format: { with: VALID_EMAIL_REGEX },
uniqueness: { case_sensitive: false }
has_secure_password
validates :password, length: { minimum: 6 }
# Returns the hash digest of the given string.
def User.digest(string)
cost = ActiveModel::SecurePassword.min_cost ? BCrypt::Engine::MIN_COST :
BCrypt::Engine.cost
BCrypt::Password.create(string, cost: cost)
end
# Returns a random token.
def User.new_token
SecureRandom.urlsafe_base64
end
end
Our plan for the implementation is to make a user.remember
method that associates a remember token with the user and
saves the corresponding remember digest to the database. Because of the
migration in Listing 8.30,
the User model already has a remember_digest
attribute, but it doesn’t yet have a remember_token
attribute. We need
a way to make a token available via user.remember_token
(for storage in the cookies) without storing it
in the database.
We solved a similar issue with secure passwords in Section 6.3,
which paired a virtual password attribute
with a secure password_digest attribute in
the database. In
that case, the virtual password attribute
was created automatically by has_secure_password,
but we’ll have to write the code for a remember_token
ourselves. The way
to do this is to use attr_accessor to create
an accessible attribute, which we saw before in Section 4.4.5:
class User < ActiveRecord::Base
attr_accessor :remember_token
.
.
.
def remember
self.remember_token = ...
update_attribute(:remember_digest, ...)
end
end
Note the form of the assignment in the first line of the
remember method.
Because of the way Ruby handles assignments inside
objects, without self the assignment would
create a local variable called remember_token,
which isn’t what we want.
Using self ensures that assignment sets the
user’s remember_token attribute.
(Now you know why the before_save callback
from Listing 6.31 uses self.email
instead of just email.)
Meanwhile, the second line of remember uses
the update_attribute method to update the
remember digest.
(As noted in Section 6.1.5, this method bypasses the
validations, which is necessary in this case because we
don’t have access to the user’s password or confirmation.)
With these considerations in mind, we can create a valid
token and associated digest by first making a new remember
token using User.new_token, and then
updating the remember digest with the result of applying User.digest. This procedure gives
the remember method shown in Listing 8.32.
remember
method to the User model.
green app/models/user.rb
class User < ActiveRecord::Base
attr_accessor :remember_token
before_save { self.email = email.downcase }
validates :name, presence: true, length: { maximum: 50 }
VALID_EMAIL_REGEX = /\A[\w+\-.]+@[a-z\d\-.]+\.[a-z]+\z/i
validates :email, presence: true, length: { maximum: 255 },
format: { with: VALID_EMAIL_REGEX },
uniqueness: { case_sensitive: false }
has_secure_password
validates :password, length: { minimum: 6 }
# Returns the hash digest of the given string.
def User.digest(string)
cost = ActiveModel::SecurePassword.min_cost ? BCrypt::Engine::MIN_COST :
BCrypt::Engine.cost
BCrypt::Password.create(string, cost: cost)
end
# Returns a random token.
def User.new_token
SecureRandom.urlsafe_base64
end
# Remembers a user in the database for use in persistent sessions.
def remember
self.remember_token = User.new_token
update_attribute(:remember_digest, User.digest(remember_token))
end
end
8.4.2 Login with remembering
Having created a working user.remember
method, we’re now in a position to create a persistent
session by storing a user’s (encrypted) id and remember
token as permanent cookies on the browser.
The way to do this is with the cookies
method, which (as with session) we can treat
as a hash. A
cookie consists of two pieces of information, a value
and an optional expires date.
For example, we could make a persistent session by
creating a cookie with value equal to the remember token
that expires 20 years from now:
cookies[:remember_token] = { value: remember_token,
expires: 20.years.from_now.utc }
(This uses one of the convenient Rails time helpers, as
discussed in Box 8.2.)
This pattern of setting a cookie that expires 20 years in
the future is so common that Rails has a special permanent
method to implement it, so that we can simply write
cookies.permanent[:remember_token] = remember_token
This causes Rails to set the expiration to 20.years.from_now
automatically.
You may recall from Section 4.4.2 that Ruby lets you add methods to any class, even built-in ones. In that section, we added a palindrome? method to the String class (and discovered as a result that "deified" is a palindrome), and we also saw how Rails adds a blank? method to class Object (so that "".blank?, " ".blank?, and nil.blank? are all true). The cookies.permanent method, which creates “permanent” cookies with an expiration 20.years.from_now, gives yet another example of this practice through one of Rails’ time helpers, which are methods added to Fixnum (the base class for integers):
$ rails console >> 1.year.from_now => Sun, 09 Aug 2015 16:48:17 UTC +00:00 >> 10.weeks.ago => Sat, 31 May 2014 16:48:45 UTC +00:00
Rails adds other helpers, too:
>> 1.kilobyte => 1024 >> 5.megabytes => 5242880
These are useful for upload validations, making it easy to restrict, say, image uploads to 5.megabytes.
Although it should be used with caution, the flexibility to add methods to built-in classes allows for extraordinarily natural additions to plain Ruby. Indeed, much of the elegance of Rails ultimately derives from the malleability of the underlying Ruby language.
To store the user’s id in the cookies, we could follow
the pattern used with the session method (Listing 8.12) using something like
cookies[:user_id] = user.id
Because it places the id as plain text, this method exposes the form of the application’s cookies and makes it easier for an attacker to compromise user accounts. To avoid this problem, we’ll use a signed cookie, which securely encrypts the cookie before placing it on the browser:
cookies.signed[:user_id] = user.id
Because we want the user id to be paired with the
permanent remember token, we should make it permanent as
well, which we can do by chaining the signed
and permanent methods:
cookies.permanent.signed[:user_id] = user.id
After the cookies are set, on subsequent page views we can retrieve the user with code like
User.find_by(id: cookies.signed[:user_id])
where cookies.signed[:user_id]
automatically decrypts the user id cookie.
We can then use bcrypt to verify that cookies[:remember_token]
matches the remember_digest generated in Listing 8.32.
(In case you’re wondering why we don’t just use the signed
user id, without the remember token, this would allow an
attacker with possession of the encrypted id to log in as
the user in perpetuity.
In the present design, an attacker with both cookies can
log in as the user only until the user logs out.)
The final piece of the puzzle is to verify that a given remember token matches the user’s remember digest, and in this context there are a couple of equivalent ways to use bcrypt to verify a match. If you look at the secure password source code, you’ll find a comparison like this:19
BCrypt::Password.new(password_digest) == unencrypted_password
In our case, the analogous code would look like this:
BCrypt::Password.new(remember_digest) == remember_token
If you think about it, this code is really strange: it
appears to be comparing a bcrypt password digest directly
with a token, which would imply decrypting the
digest in order to compare using ==.
But the whole point of using bcrypt is for hashing to be
irreversible, so this can’t be right.
Indeed, digging into the source code of the bcrypt gem
verifies that the comparison operator == is
being redefined, and under the hood the
comparison above is equivalent to the following:
BCrypt::Password.new(remember_digest).is_password?(remember_token)
Instead of ==, this uses the boolean method
is_password? to perform the comparison. Because its meaning
is a little clearer, we’ll prefer this second comparison
form in the application code.
The above discussion suggests putting the digest–token
comparison into an authenticated? method in
the User model, which plays a similar role to the authenticate
method provided by has_secure_password for
authenticating a user (Listing 8.13).
The implementation appears in Listing 8.33.
authenticated?
method to the User model.
app/models/user.rb
class User < ActiveRecord::Base
attr_accessor :remember_token
before_save { self.email = email.downcase }
validates :name, presence: true, length: { maximum: 50 }
VALID_EMAIL_REGEX = /\A[\w+\-.]+@[a-z\d\-.]+\.[a-z]+\z/i
validates :email, presence: true, length: { maximum: 255 },
format: { with: VALID_EMAIL_REGEX },
uniqueness: { case_sensitive: false }
has_secure_password
validates :password, length: { minimum: 6 }
# Returns the hash digest of the given string.
def User.digest(string)
cost = ActiveModel::SecurePassword.min_cost ? BCrypt::Engine::MIN_COST :
BCrypt::Engine.cost
BCrypt::Password.create(string, cost: cost)
end
# Returns a random token.
def User.new_token
SecureRandom.urlsafe_base64
end
# Remembers a user in the database for use in persistent sessions.
def remember
self.remember_token = User.new_token
update_attribute(:remember_digest, User.digest(remember_token))
end
# Returns true if the given token matches the digest.
def authenticated?(remember_token)
BCrypt::Password.new(remember_digest).is_password?(remember_token)
end
end
Although the authenticated? method in Listing 8.33
is tied specifically to the remember token, it will turn
out to be useful in other contexts as well, and we’ll
generalize it in Chapter 10.
We’re now in a position to remember a logged-in user,
which we’ll do by adding a remember helper
to go along with log_in, as shown in Listing 8.34.
class SessionsController < ApplicationController
def new
end
def create
user = User.find_by(email: params[:session][:email].downcase)
if user && user.authenticate(params[:session][:password])
log_in user
remember user
redirect_to user
else
flash.now[:danger] = 'Invalid email/password combination'
render 'new'
end
end
def destroy
log_out
redirect_to root_url
end
end
As with log_in, Listing 8.34
defers the real work to the Sessions helper, where we
define a remember method that calls user.remember,
thereby generating a remember token and saving its digest
to the database.
It then uses cookies to create permanent
cookies for the user id and remember token as described
above. The result
appears in Listing 8.35.
module SessionsHelper
# Logs in the given user.
def log_in(user)
session[:user_id] = user.id
end
# Remembers a user in a persistent session.
def remember(user)
user.remember
cookies.permanent.signed[:user_id] = user.id
cookies.permanent[:remember_token] = user.remember_token
end
# Returns the current logged-in user (if any).
def current_user
@current_user ||= User.find_by(id: session[:user_id])
end
# Returns true if the user is logged in, false otherwise.
def logged_in?
!current_user.nil?
end
# Logs out the current user.
def log_out
session.delete(:user_id)
@current_user = nil
end
end
With the code in Listing 8.35, a user logging in will be
remembered in the sense that their browser will get a
valid remember token, but it doesn’t yet do us any good
because the current_user method defined in Listing 8.14 knows only about the
temporary session:
@current_user ||= User.find_by(id: session[:user_id])
In the case of persistent sessions, we want to retrieve
the user from the temporary session if session[:user_id]
exists, but otherwise we should look for cookies[:user_id]
to retrieve (and log in) the user corresponding to the
persistent session.
We can accomplish this as follows:
if session[:user_id]
@current_user ||= User.find_by(id: session[:user_id])
elsif cookies.signed[:user_id]
user = User.find_by(id: cookies.signed[:user_id])
if user && user.authenticated?(cookies[:remember_token])
log_in user
@current_user = user
end
end
(This follows the same user &&
user.authenticated pattern we saw in Listing 8.5.) The code above will
work, but note the repeated use of both session
and cookies.
We can eliminate this duplication as follows:
if (user_id = session[:user_id])
@current_user ||= User.find_by(id: user_id)
elsif (user_id = cookies.signed[:user_id])
user = User.find_by(id: user_id)
if user && user.authenticated?(cookies[:remember_token])
log_in user
@current_user = user
end
end
This uses the common but potentially confusing construction
if (user_id = session[:user_id])
Despite appearances, this is not a comparison
(which would use double-equals ==), but
rather is an assignment.
If you were to read it in words, you wouldn’t say “If user
id equals session of user id…”, but rather something like
“If session of user id exists (while setting user id to
session of user id)…”.20
Defining the current_user helper as
discussed above leads to the implementation shown in Listing 8.36.
current_user
for persistent sessions.
red app/helpers/sessions_helper.rb
module SessionsHelper
# Logs in the given user.
def log_in(user)
session[:user_id] = user.id
end
# Remembers a user in a persistent session.
def remember(user)
user.remember
cookies.permanent.signed[:user_id] = user.id
cookies.permanent[:remember_token] = user.remember_token
end
# Returns the user corresponding to the remember token cookie.
def current_user
if (user_id = session[:user_id])
@current_user ||= User.find_by(id: user_id)
elsif (user_id = cookies.signed[:user_id])
user = User.find_by(id: user_id)
if user && user.authenticated?(cookies[:remember_token])
log_in user
@current_user = user
end
end
end
# Returns true if the user is logged in, false otherwise.
def logged_in?
!current_user.nil?
end
# Logs out the current user.
def log_out
session.delete(:user_id)
@current_user = nil
end
end
With the code as in Listing 8.36, newly logged in users are correctly remembered, as you can verify by logging in, closing the browser, and checking that you’re still logged in when you restart the sample application and revisit the sample application. If you want, you can even inspect the browser cookies to see the result directly (Figure 8.10).21
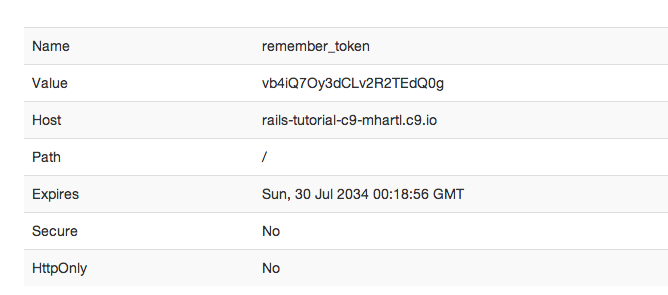
There’s only one problem with our application as it stands: short of clearing their browser cookies (or waiting 20 years), there’s no way for users to log out. This is exactly the sort of thing our test suite should catch, and indeed it should currently be red:
$ bundle exec rake test
8.4.3 Forgetting users
To allow users to log out, we’ll define methods to forget
users in analogy with the ones to remember them.
The resulting user.forget method just undoes
user.remember by updating the remember digest
with nil, as shown in Listing 8.38.
forget
method to the User model.
app/models/user.rb
class User < ActiveRecord::Base
attr_accessor :remember_token
before_save { self.email = email.downcase }
validates :name, presence: true, length: { maximum: 50 }
VALID_EMAIL_REGEX = /\A[\w+\-.]+@[a-z\d\-.]+\.[a-z]+\z/i
validates :email, presence: true, length: { maximum: 255 },
format: { with: VALID_EMAIL_REGEX },
uniqueness: { case_sensitive: false }
has_secure_password
validates :password, length: { minimum: 6 }
# Returns the hash digest of the given string.
def User.digest(string)
cost = ActiveModel::SecurePassword.min_cost ? BCrypt::Engine::MIN_COST :
BCrypt::Engine.cost
BCrypt::Password.create(string, cost: cost)
end
# Returns a random token.
def User.new_token
SecureRandom.urlsafe_base64
end
# Remembers a user in the database for use in persistent sessions.
def remember
self.remember_token = User.new_token
update_attribute(:remember_digest, User.digest(remember_token))
end
# Returns true if the given token matches the digest.
def authenticated?(remember_token)
BCrypt::Password.new(remember_digest).is_password?(remember_token)
end
# Forgets a user.
def forget
update_attribute(:remember_digest, nil)
end
end
With the code in Listing 8.38, we’re now ready to forget
a permanent session by adding a forget
helper and calling it from the log_out
helper (Listing 8.39).
As seen in Listing 8.39, the forget
helper calls user.forget and then deletes
the user_id and remember_token
cookies.
module SessionsHelper
# Logs in the given user.
def log_in(user)
session[:user_id] = user.id
end
.
.
.
# Forgets a persistent session.
def forget(user)
user.forget
cookies.delete(:user_id)
cookies.delete(:remember_token)
end
# Logs out the current user.
def log_out
forget(current_user)
session.delete(:user_id)
@current_user = nil
end
end
8.4.4 Two subtle bugs
There are two closely related subtleties left to address. The first subtlety is
that, even though the “Log out” link appears only when
logged-in, a user could potentially have multiple browser
windows open to the site.
If the user then logged out in one window, clicking the
“Log out” link in a second window would result in an error
due to the use of current_user in Listing 8.39.22 We can avoid this by
logging out only if the user is logged in.
The second subtlety is that a user could be logged in
(and remembered) in multiple browsers, such as Chrome and
Firefox, which causes a problem if the user logs out in
one browser but not the other.23 For example, suppose
that the user logs out in Firefox, thereby setting the
remember digest to nil (via user.forget
in Listing 8.38).
The application will still work in Firefox; because the log_out
method in Listing 8.39 deletes the user’s id,
both highlighted conditionals are false:
# Returns the user corresponding to the remember token cookie.
def current_user
if (user_id = session[:user_id])
@current_user ||= User.find_by(id: user_id)
elsif (user_id = cookies.signed[:user_id])
user = User.find_by(id: user_id)
if user && user.authenticated?(cookies[:remember_token])
log_in user
@current_user = user
end
end
end
As a result, evaluation falls off the end of the current_user
method, thereby returning nil as required.
In contrast, inside Chrome the user_id
cookie hasn’t been deleted, so user_id will
be true in a boolean context and the
corresponding user will be found in the database:
# Returns the user corresponding to the remember token cookie.
def current_user
if (user_id = session[:user_id])
@current_user ||= User.find_by(id: user_id)
elsif (user_id = cookies.signed[:user_id])
user = User.find_by(id: user_id)
if user && user.authenticated?(cookies[:remember_token])
log_in user
@current_user = user
end
end
end
Consequently, the inner if conditional will
be evaluated:
user && user.authenticated?(cookies[:remember_token])
In particular, because user isn’t nil,
the second expression will be evaluated, which
raises an error.
This is because the user’s remember digest was deleted as
part of logging out (Listing 8.38) in Firefox, so when we
access the application in Chrome we end up calling
BCrypt::Password.new(remember_digest).is_password?(remember_token)
with a nil remember digest, thereby raising
an exception inside the bcrypt library.
To fix this, we want authenticated? to
return false instead.
These are exactly the sorts of subtleties that benefit from test-driven development, so we’ll write tests to catch the two errors before correcting them. We first get the integration test from Listing 8.28 to red, as shown in Listing 8.40.
require 'test_helper'
class UsersLoginTest < ActionDispatch::IntegrationTest
.
.
.
test "login with valid information followed by logout" do
get login_path
post login_path, session: { email: @user.email, password: 'password' }
assert is_logged_in?
assert_redirected_to @user
follow_redirect!
assert_template 'users/show'
assert_select "a[href=?]", login_path, count: 0
assert_select "a[href=?]", logout_path
assert_select "a[href=?]", user_path(@user)
delete logout_path
assert_not is_logged_in?
assert_redirected_to root_url
# Simulate a user clicking logout in a second window.
delete logout_path
follow_redirect!
assert_select "a[href=?]", login_path
assert_select "a[href=?]", logout_path, count: 0
assert_select "a[href=?]", user_path(@user), count: 0
end
end
The second call to delete logout_path in Listing 8.40 should raise an error due
to the missing current_user, leading to a red test suite:
$ bundle exec rake test
The application code simply involves calling log_out
only if logged_in? is true, as shown in Listing 8.42.
class SessionsController < ApplicationController
.
.
.
def destroy
log_out if logged_in?
redirect_to root_url
end
end
The second case, involving a scenario with two different
browsers, is harder to simulate with an integration test,
but it’s easy to check in the User model test directly. All we need is to
start with a user that has no remember digest (which is
true for the @user variable defined in the setup
method) and then call authenticated?, as
shown in Listing 8.43. (Note that we’ve just
left the remember token blank; it doesn’t matter what its
value is, because the error occurs before it ever gets
used.)
authenticated?
with a nonexistent digest.
red test/models/user_test.rb
require 'test_helper'
class UserTest < ActiveSupport::TestCase
def setup
@user = User.new(name: "Example User", email: "user@example.com",
password: "foobar", password_confirmation: "foobar")
end
.
.
.
test "authenticated? should return false for a user with nil digest" do
assert_not @user.authenticated?('')
end
end
Because BCrypt::Password.new(nil) raises an
error, the test suite should now be red:
$ bundle exec rake test
To fix the error and get to green, all we need to do is return
false if the remember digest is nil,
as shown in Listing 8.45.
authenticated?
to handle a nonexistent digest.
green app/models/user.rb
class User < ActiveRecord::Base
.
.
.
# Returns true if the given token matches the digest.
def authenticated?(remember_token)
return false if remember_digest.nil?
BCrypt::Password.new(remember_digest).is_password?(remember_token)
end
end
This uses the return keyword to return
immediately if the remember digest is nil,
which is a common way to emphasize that the rest of the
method gets ignored in that case.
The equivalent code
if remember_digest.nil?
false
else
BCrypt::Password.new(remember_digest).is_password?(remember_token)
end
would also work fine, but I prefer the explicitness of the version in Listing 8.45 (which also happens to be slightly shorter).
With the code in Listing 8.45, our full test suite should be green, and both subtleties should now be addressed:
$ bundle exec rake test
8.4.5 “Remember me” checkbox
With the code in Section 8.4.3, our application has a complete, professional-grade authentication system. As a final step, we’ll see how to make staying logged in optional using a “remember me” checkbox. A mockup of the login form with such a checkbox appears in Figure 8.11.
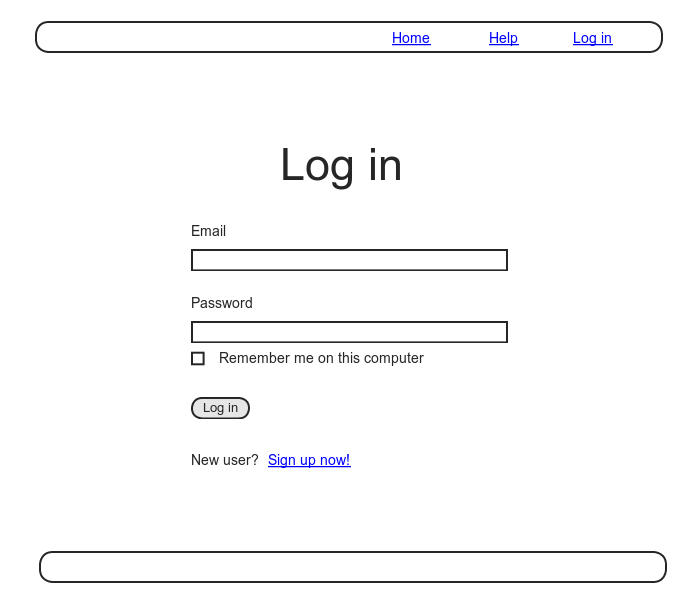
To write the implementation, we start by adding a checkbox to the login form from Listing 8.2. As with labels, text fields, password fields, and submit buttons, checkboxes can be created with a Rails helper method. In order to get the styling right, though, we have to nest the checkbox inside the label, as follows:
<%= f.label :remember_me, class: "checkbox inline" do %>
<%= f.check_box :remember_me %>
<span>Remember me on this computer</span>
<% end %>
Putting this into the login form gives the code shown in Listing 8.47.
<% provide(:title, "Log in") %>
<h1>Log in</h1>
<div class="row">
<div class="col-md-6 col-md-offset-3">
<%= form_for(:session, url: login_path) do |f| %>
<%= f.label :email %>
<%= f.email_field :email, class: 'form-control' %>
<%= f.label :password %>
<%= f.password_field :password, class: 'form-control' %>
<%= f.label :remember_me, class: "checkbox inline" do %>
<%= f.check_box :remember_me %>
<span>Remember me on this computer</span>
<% end %>
<%= f.submit "Log in", class: "btn btn-primary" %>
<% end %>
<p>New user? <%= link_to "Sign up now!", signup_path %></p>
</div>
</div>
In Listing 8.47, we’ve included the CSS
classes checkbox and inline,
which Bootstrap uses to put the checkbox and the text
(“Remember me on this computer”) in the same line.
In order to complete the styling, we need just a few more
CSS rules, as shown in Listing 8.48.
The resulting login form appears in Figure 8.12.
.
.
.
/* forms */
.
.
.
.checkbox {
margin-top: -10px;
margin-bottom: 10px;
span {
margin-left: 20px;
font-weight: normal;
}
}
#session_remember_me {
width: auto;
margin-left: 0;
}
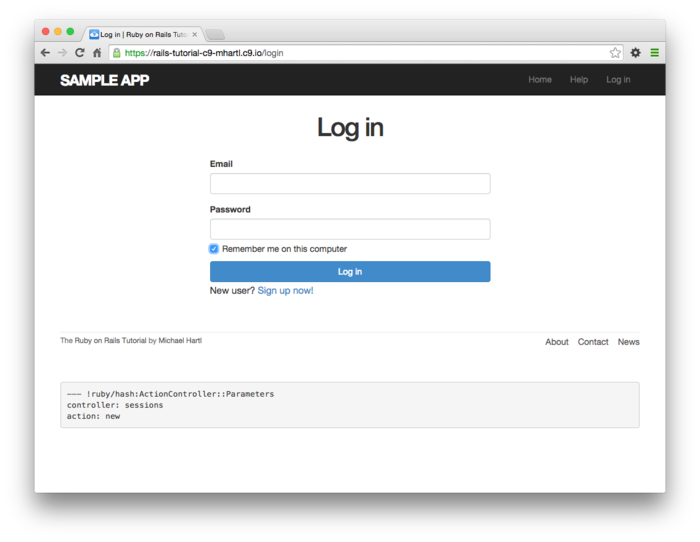
Having edited the login form, we’re now ready to remember
users if they check the checkbox and forget them
otherwise.
Incredibly, because of all our work in the previous
sections, the implementation can be reduced to one line. We start by noting
that the params hash for submitted login
forms now includes a value based on the checkbox (as you
can verify by submitting the form in Listing 8.47
with invalid information and inspecting the values in the
debug section of the page).
In particular, the value of
params[:session][:remember_me]
is ’1’ if the box is checked and ’0’
if it isn’t.
By testing the relevant value of the params
hash, we can now remember or forget the user based on the
value of the submission:
if params[:session][:remember_me] == '1'
remember(user)
else
forget(user)
end
As explained in Box 8.3, this sort of if-then
branching structure can be converted to one line using the
ternary operator as follows:24
params[:session][:remember_me] == '1' ? remember(user) : forget(user)
Adding this to the Sessions controller’s create
method leads to the incredibly compact code shown in Listing 8.49. (Now you’re in a
position to understand the code in Listing 8.18,
which uses the ternary operator to define the bcrypt cost
variable.)
class SessionsController < ApplicationController
def new
end
def create
user = User.find_by(email: params[:session][:email].downcase)
if user && user.authenticate(params[:session][:password])
log_in user
params[:session][:remember_me] == '1' ? remember(user) : forget(user)
redirect_to user
else
flash.now[:danger] = 'Invalid email/password combination'
render 'new'
end
end
def destroy
log_out if logged_in?
redirect_to root_url
end
end
With the implementation in Listing 8.49, our login system is complete, as you can verify by checking or unchecking the box in your browser.
There’s an old joke that there are 10 kinds of people in the world: those who understand binary and those who don’t (10, of course, being 2 in binary). In this spirit, we can say that there are 10 kinds of people in the world: those who like the ternary operator, those who don’t, and those who don’t yet know about it. (If you happen to be in the third category, soon you won’t be any longer.)
When you do a lot of programming, you quickly learn that one of the most common bits of control flow goes something like this:
if boolean?
do_one_thing
else
do_something_else
end
Ruby, like many other languages (including C/C++, Perl, PHP, and Java), allows you to replace this with a much more compact expression using the ternary operator (so called because it consists of three parts):
boolean? ? do_one_thing : do_something_else
You can also use the ternary operator to replace assignment, so that
if boolean?
var = foo
else
var = bar
end
becomes
var = boolean? ? foo : bar
Finally, it’s often convenient to use the ternary operator in a function’s return value:
def foo
do_stuff
boolean? ? "bar" : "baz"
end
Since Ruby implicitly returns the value of the last expression in a function, here the foo method returns "bar" or "baz" depending on whether boolean? is true or false.
8.4.6 Remember tests
Although our “remember me” functionality is now working, it’s important to write some tests to verify its behavior. One reason is to catch implementation errors, as discussed momentarily. Even more important, though, is that the core user persistence code is in fact completely untested at present. Fixing these issues will require some trickery, but the result will be a far more powerful test suite.
Testing the “remember me” box
When I originally implemented the checkbox handling in Listing 8.49, instead of the correct
params[:session][:remember_me] == '1' ? remember(user) : forget(user)
I actually used
params[:session][:remember_me] ? remember(user) : forget(user)
In this context, params[:session][:remember_me]
is either ’0’ or ’1’, both
of which are true in a boolean context, so
the resulting expression is always true, and
the application acts as if the checkbox is always
checked. This is
exactly the kind of error a test can catch.
Because remembering users requires that they be logged
in, our first step is to define a helper to log users in
inside tests. In
Listing 8.20, we logged a user in
using the post method and a valid session
hash, but it’s cumbersome to do this every time.
To avoid needless repetition, we’ll write a helper
method called log_in_as to log in for us.
Our method for logging a user in depends on the type of
test. Inside
integration tests, we can post to the sessions path as
in Listing 8.20, but in other tests
(such as controller and model tests) this won’t work,
and we need to manipulate the session
method directly.
As a result, log_in_as should detect the
kind of test being used and adjust accordingly.
We can tell the difference between integration tests and
other kinds of tests using Ruby’s convenient defined?
method, which returns true if its argument is defined
and false otherwise.
In the present case, the post_via_redirect
method (seen before in Listing 7.26)
is available only in integration tests, so the code
defined?(post_via_redirect) ...
will return true inside an integration
test and false otherwise.
This suggests defining an integration_test?
boolean method and writing an if-then statement
schematically as follows:
if integration_test?
# Log in by posting to the sessions path
else
# Log in using the session
end
Filling in the comments with code leads to the log_in_as
helper method shown in Listing 8.50. (This is a fairly
advanced method, so you are doing well if you can read
it with full comprehension.)
log_in_as
helper. test/test_helper.rb
ENV['RAILS_ENV'] ||= 'test'
.
.
.
class ActiveSupport::TestCase
fixtures :all
# Returns true if a test user is logged in.
def is_logged_in?
!session[:user_id].nil?
end
# Logs in a test user.
def log_in_as(user, options = {})
password = options[:password] || 'password'
remember_me = options[:remember_me] || '1'
if integration_test?
post login_path, session: { email: user.email,
password: password,
remember_me: remember_me }
else
session[:user_id] = user.id
end
end
private
# Returns true inside an integration test.
def integration_test?
defined?(post_via_redirect)
end
end
Note that, for maximum flexibility, the log_in_as
method in Listing 8.50 accepts an options
hash (as in Listing 7.31), with default options
for the password and for the “remember me” checkbox set
to ’password’ and ’1’,
respectively. In
particular, because hashes return nil for
nonexistent keys, code like
remember_me = options[:remember_me] || '1'
evaluates to the given option if present and to the default otherwise (an application of the short-circuit evaluation described in Box 8.1).
To verify the behavior of the “remember me” checkbox, we’ll write two tests, one each for submitting with and without the checkbox checked. This is easy using the login helper defined in Listing 8.50, with the two cases appearing as
log_in_as(@user, remember_me: '1')
and
log_in_as(@user, remember_me: '0')
(Because ’1’ is the default value of remember_me,
we could omit the corresponding option in the first case
above, but I’ve included it to make the parallel
structure more apparent.)
After logging in, we can check if the user has been
remembered by looking for the remember_token
key in the cookies.
Ideally, we would check that the cookie’s value is equal
to the user’s remember token, but as currently designed
there’s no way for the test to get access to it: the user
variable in the controller has a remember token
attribute, but (because remember_token is
virtual) the @user variable in the test
doesn’t. Fixing
this minor blemish is left as an exercise (Section 8.6),
but for now we can just test to see if the relevant
cookie is nil or not.
There’s one more subtlety, which is that for some
reason inside tests the cookies method
doesn’t work with symbols as keys, so that
cookies[:remember_token]
is always nil.
Luckily, cookies does work with
string keys, so that
cookies['remember_token']
has the value we need.
The resulting tests appear in Listing 8.51. (Recall from Listing 8.20
that users(:michael) references the
fixture user from Listing 8.19.)
require 'test_helper'
class UsersLoginTest < ActionDispatch::IntegrationTest
def setup
@user = users(:michael)
end
.
.
.
test "login with remembering" do
log_in_as(@user, remember_me: '1')
assert_not_nil cookies['remember_token']
end
test "login without remembering" do
log_in_as(@user, remember_me: '0')
assert_nil cookies['remember_token']
end
end
Assuming you didn’t make the same implementation mistake I did, the tests should be green:
$ bundle exec rake test
Testing the remember branch
In Section 8.4.2, we verified by hand
that the persistent session implemented in the preceding
sections is working, but in fact the relevant branch in
the current_user method is currently
completely untested.
My favorite way to handle this kind of situation is to
raise an exception in the suspected untested block of
code: if the code isn’t covered, the tests will still
pass; if it is covered, the resulting error will
identify the relevant test.
The result in the present case appears in Listing 8.53.
module SessionsHelper
.
.
.
# Returns the user corresponding to the remember token cookie.
def current_user
if (user_id = session[:user_id])
@current_user ||= User.find_by(id: user_id)
elsif (user_id = cookies.signed[:user_id])
raise # The tests still pass, so this branch is currently untested.
user = User.find_by(id: user_id)
if user && user.authenticated?(cookies[:remember_token])
log_in user
@current_user = user
end
end
end
.
.
.
end
At this point, the tests are green:
$ bundle exec rake test
This is a problem, of course, because the code in Listing 8.53
is broken.
Moreover, persistent sessions are cumbersome to check by
hand, so if we ever want to refactor the current_user
method (as we will in Chapter 10)
it’s important to test it.
Because the log_in_as helper method
defined in Listing 8.50 automatically sets session[:user_id],
testing the “remember” branch of the current_user
method is difficult in an integration test.
Luckily, we can bypass this restriction by testing the current_user
method directly in a Sessions helper test, whose file we
have to create:
$ touch test/helpers/sessions_helper_test.rb
The test sequence is simple:
- Define a
uservariable using the fixtures. - Call the
remembermethod to remember the given user. - Verify that
current_useris equal to the given user.
Because the remember method doesn’t set session[:user_id],
this procedure will test the desired “remember” branch. The result appears
in Listing 8.55.
require 'test_helper'
class SessionsHelperTest < ActionView::TestCase
def setup
@user = users(:michael)
remember(@user)
end
test "current_user returns right user when session is nil" do
assert_equal @user, current_user
assert is_logged_in?
end
test "current_user returns nil when remember digest is wrong" do
@user.update_attribute(:remember_digest, User.digest(User.new_token))
assert_nil current_user
end
end
Note that we’ve added a second test, which checks that
the current user is nil if the user’s
remember digest doesn’t correspond correctly to the
remember token, thereby testing the authenticated?
expression in the nested if statement:
if user && user.authenticated?(cookies[:remember_token])
The test in Listing 8.55 is red as required:
$ bundle exec rake test TEST=test/helpers/sessions_helper_test.rb
We can get the tests in Listing 8.55
to pass by removing the raise and
restoring the original current_user
method, as shown in Listing 8.57.
(You can also verify by removing the authenticated?
expression in Listing 8.57 that the second test in
Listing 8.55 fails, which confirms
that it tests the right thing.)
module SessionsHelper
.
.
.
# Returns the user corresponding to the remember token cookie.
def current_user
if (user_id = session[:user_id])
@current_user ||= User.find_by(id: user_id)
elsif (user_id = cookies.signed[:user_id])
user = User.find_by(id: user_id)
if user && user.authenticated?(cookies[:remember_token])
log_in user
@current_user = user
end
end
end
.
.
.
end
At this point, the test suite should be green:
$ bundle exec rake test
Now that the “remember” branch of current_user
is tested, we can be confident of catching regressions
without having to check by hand.
8.5 Висновок
We’ve covered a lot of ground in the last two chapters, transforming our promising but unformed application into a site capable of the full suite of signup and login behaviors. All that is needed to complete the authentication functionality is to restrict access to pages based on login status and user identity. We’ll accomplish this task en route to giving users the ability to edit their information, which is the main goal of Chapter 9.
Before moving on, merge your changes back into the master branch:
$ bundle exec rake test
$ git add -A
$ git commit -m "Finish log in/log out"
$ git checkout master
$ git merge log-in-log-out
Then push up the remote repository and the production server:
$ bundle exec rake test
$ git push
$ git push heroku
$ heroku run rake db:migrate
Note that the application will briefly be in an invalid state after pushing but before the migration is finished. On a production site with significant traffic, it is a good idea to turn maintenance mode on before making the changes:
$ heroku maintenance:on
$ git push heroku
$ heroku run rake db:migrate
$ heroku maintenance:off
This arranges to show a standard error page during the deployment and migration. (We won’t bother with this step again, but it’s good to see it at least once.) For more information, see the Heroku documentation on error pages.
8.5.1 Що ми вивчили в цій главі
- Rails can maintain state from one page to the next using both temporary and persistent cookies.
- The login form is designed to create a new session to log a user in.
- The
flash.nowmethod is used for flash messages on rendered pages. - Test-driven development is useful when debugging by reproducing the bug in a test.
- Using the
sessionmethod, we can securely place a user id on the browser to create a temporary session. - We can change features such as links on the layouts based on login status.
- Integration tests can verify correct routes, database updates, and proper changes to the layout.
- We associate to each user a remember token and a corresponding remember digest for use in persistent sessions.
- Using the
cookiesmethod, we create a persistent session by placing a permanent remember token cookie on the browser. - Login status is determined by the presence of a current user based on the temporary session’s user id or the permanent session’s unique remember token.
- The application signs users out by deleting the session’s user id and removing the permanent cookie from the browser.
- The ternary operator is a compact way to write simple if-then statements.
8.6 Вправи
Note: The Solutions Manual for Вправи, with solutions to every exercise in the Ruby on Rails Tutorial book, is included for free with every purchase at www.railstutorial.org.
For a suggestion on how to avoid conflicts between Вправи and the main tutorial, see the note on exercise topic branches in Section 3.6.
- In Listing 8.32, we defined the new token
and digest class methods by explicitly prefixing them with
User. This works fine and, because they are actually called usingUser.new_tokenandUser.digest, it is probably the clearest way to define them. But there are two perhaps more idiomatically correct ways to define class methods, one slightly confusing and one extremely confusing. By running the test suite, verify that the implementations in Listing 8.59 (slightly confusing) and Listing 8.60 (extremely confusing) are correct. (Note that, in the context of Listing 8.59 and Listing 8.60,selfis theUserclass, whereas the other uses ofselfin the User model refer to a user object instance. This is part of what makes them confusing.) - As indicated in Section 8.4.6, as the application is
currently designed there’s no way to access the virtual
remember_tokenattribute in the integration test in Listing 8.51. It is possible, though, using a special test method calledassigns. Inside a test, you can access instance variables defined in the controller by usingassignswith the corresponding symbol. For example, if thecreateaction defines an@uservariable, we can access it in the test usingassigns(:user). Right now, the Sessions controllercreateaction defines a normal (non-instance) variable calleduser, but if we change it to an instance variable we can test thatcookiescorrectly contains the user’s remember token. By filling in the missing elements in Listing 8.61 and Listing 8.62 (indicated with question marks?andFILL_IN), complete this improved test of the “remember me” checkbox.
self.
green app/models/user.rb
class User < ActiveRecord::Base
.
.
.
# Returns the hash digest of the given string.
def self.digest(string)
cost = ActiveModel::SecurePassword.min_cost ? BCrypt::Engine::MIN_COST :
BCrypt::Engine.cost
BCrypt::Password.create(string, cost: cost)
end
# Returns a random token.
def self.new_token
SecureRandom.urlsafe_base64
end
.
.
.
end
class << self. green
app/models/user.rb
class User < ActiveRecord::Base
.
.
.
class << self
# Returns the hash digest of the given string.
def digest(string)
cost = ActiveModel::SecurePassword.min_cost ? BCrypt::Engine::MIN_COST :
BCrypt::Engine.cost
BCrypt::Password.create(string, cost: cost)
end
# Returns a random token.
def new_token
SecureRandom.urlsafe_base64
end
end
.
.
.
create action.
app/controllers/sessions_controller.rb
class SessionsController < ApplicationController
def new
end
def create
?user = User.find_by(email: params[:session][:email].downcase)
if ?user && ?user.authenticate(params[:session][:password])
log_in ?user
params[:session][:remember_me] == '1' ? remember(?user) : forget(?user)
redirect_to ?user
else
flash.now[:danger] = 'Invalid email/password combination'
render 'new'
end
end
def destroy
log_out if logged_in?
redirect_to root_url
end
end
require 'test_helper'
class UsersLoginTest < ActionDispatch::IntegrationTest
def setup
@user = users(:michael)
end
.
.
.
test "login with remembering" do
log_in_as(@user, remember_me: '1')
assert_equal assigns(:user).FILL_IN, FILL_IN
end
test "login without remembering" do
log_in_as(@user, remember_me: '0')
assert_nil cookies['remember_token']
end
.
.
.
end
- Another common model is to expire the session after a certain amount of time. This is especially appropriate on sites containing sensitive information, such as banking and financial trading accounts. ↑
- Some browsers offer an option to restore such sessions via a “continue where you left off” feature, but of course Rails has no control over this behavior. ↑
- A second option is to use
form_tagin place ofform_for, which might be even more idiomatically correct Rails, but it has less in common with the signup form, and at this stage I want to emphasize the parallel structure. ↑ - The
log_inmethod is available in the Sessions controller because of the module inclusion in Listing 8.11. ↑ - This practice of remembering variable assignments from one method invocation to the next is known as memoization. (Note that this is a technical term; in particular, it’s not a misspelling of “memorization”.) ↑
- Image from http://www.flickr.com/photos/hermanusbackpackers/3343254977/. ↑
- Web browsers can’t actually issue DELETE requests; Rails fakes it with JavaScript. ↑
- See the Bootstrap components page for more information. ↑
- If you’re using the cloud IDE, I recommend using a different browser to test the login behavior so that you don’t have to close down the browser running the IDE. ↑
- As with the Sessions controller,
the
log_inmethod is available in the Users controller because of the module inclusion in Listing 8.11. ↑ - For example, I once had a test
suite that was green
even after accidentally deleting the main
log_inmethod in the Sessions helper. The reason is that the tests were happily using a test helper with the same name, thereby passing even though the application was completely broken. As withis_logged_in?, we’ll avoid this issue by defining the test helperlog_in_asin Listing 8.50. ↑ - Some browsers offer a “remember where I left off” feature, which restores the session automatically, so be sure to disable any such feature before trying to log out. ↑
- Setting
@current_usertonilwould only matter if@current_userwere created before thedestroyaction (which it isn’t) and if we didn’t issue an immediate redirect (which we do). This is an unlikely combination of events, and with the application as presently constructed it isn’t necessary, but because it’s security-related I include it for completeness. ↑ - Session hijacking was widely publicized by the Firesheep application, which showed that remember tokens at many high-profile sites were visible when connected to public Wi-Fi networks. ↑
- This choice is based on the RailsCast on remember me. ↑
- Indeed, it had better be OK, because with bcrypt’s salted hashes there’s no way for us to tell if two users’ passwords match. ↑
- With unique remember tokens, an attacker always needs both the user id and the remember token cookies to hijack the session. ↑
- As a general rule, if a method doesn’t need an instance of an object, it should be a class method. Indeed, this decision will prove important in Section 10.1.2. ↑
- As noted in Section 6.3.1, “unencrypted password” is a misnomer, as the secure password is hashed, not encrypted. ↑
- I generally use the convention of putting such assignments in parentheses, which is a visual reminder that it’s not a comparison. ↑
- Google “<your browser name> inspect cookies” to learn how to inspect the cookies on your system. ↑
- Thanks to reader Paulo Célio Júnior for pointing this out. ↑
- Thanks to reader Niels de Ron for pointing this out. ↑
- Before we wrote
remember userwithout parentheses, but when used with the ternary operator omitting them results in a syntax error. ↑
Chapter 9 Updating, showing, and deleting users
In this chapter, we will complete the REST actions for the
Users resource (Table 7.1) by adding edit,
update, index, and destroy
actions. We’ll start
by giving users the ability to update their profiles, which
will also provide a natural opportunity to enforce an
authorization model (made possible by the authentication
code in Chapter 8).
Then we’ll make a listing of all users (also requiring
authentication), which will motivate the introduction of
sample data and pagination.
Finally, we’ll add the ability to destroy users, wiping them
clear from the database.
Since we can’t allow just any user to have such dangerous
powers, we’ll take care to create a privileged class of
administrative users authorized to delete other users.
9.1 Updating users
The pattern for editing user information closely parallels
that for creating new users (Chapter 7).
Instead of a new action rendering a view for
new users, we have an edit action rendering a
view to edit users; instead of create
responding to a POST request, we
have an update action responding to a PATCH
request (Box 3.2).
The biggest difference is that, while anyone can sign up,
only the current user should be able to update their
information. The
authentication machinery from Chapter 8
will allow us to use a before filter to ensure
that this is the case.
To get started, let’s start work on an updating-users
topic branch:
$ git checkout master
$ git checkout -b updating-users
9.1.1 Edit form
We start with the edit form, whose mockup appears in Figure 9.1.1 To turn the mockup in
Figure 9.1 into a working page, we
need to fill in both the Users controller edit
action and the user edit view.
We start with the edit action, which
requires pulling the relevant user out of the database. Note from Table 7.1
that the proper URL for a user’s edit page is
/users/1/edit (assuming the user’s id is 1). Recall that the id of
the user is available in the params[:id]
variable, which means that we can find the user with the
code in Listing 9.1.
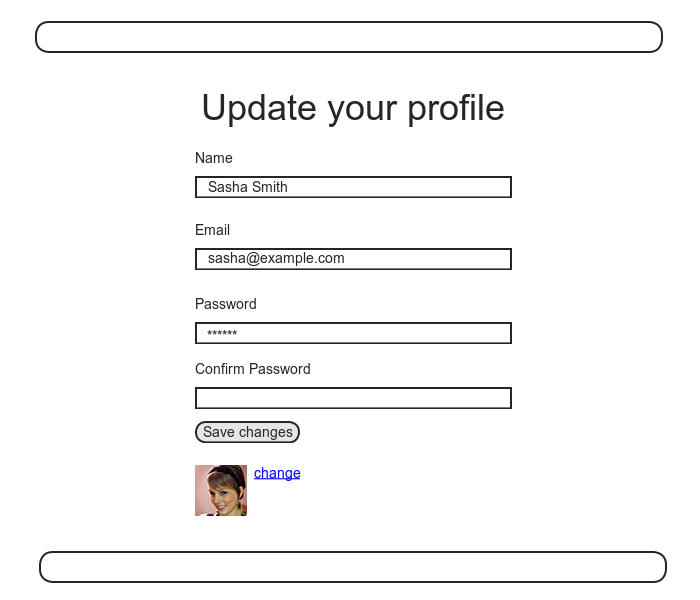
edit
action. app/controllers/users_controller.rb
class UsersController < ApplicationController
def show
@user = User.find(params[:id])
end
def new
@user = User.new
end
def create
@user = User.new(user_params)
if @user.save
log_in @user
flash[:success] = "Welcome to the Sample App!"
redirect_to @user
else
render 'new'
end
end
def edit
@user = User.find(params[:id])
end
private
def user_params
params.require(:user).permit(:name, :email, :password,
:password_confirmation)
end
end
The corresponding user edit view (which you will have to create by hand) is shown in Listing 9.2. Note how closely this resembles the new user view from Listing 7.13; the large overlap suggests factoring the repeated code into a partial, which is left as an exercise (Section 9.6).
<% provide(:title, "Edit user") %>
<h1>Update your profile</h1>
<div class="row">
<div class="col-md-6 col-md-offset-3">
<%= form_for(@user) do |f| %>
<%= render 'shared/error_messages' %>
<%= f.label :name %>
<%= f.text_field :name, class: 'form-control' %>
<%= f.label :email %>
<%= f.email_field :email, class: 'form-control' %>
<%= f.label :password %>
<%= f.password_field :password, class: 'form-control' %>
<%= f.label :password_confirmation, "Confirmation" %>
<%= f.password_field :password_confirmation, class: 'form-control' %>
<%= f.submit "Save changes", class: "btn btn-primary" %>
<% end %>
<div class="gravatar_edit">
<%= gravatar_for @user %>
<a href="http://gravatar.com/emails" target=_blank>change</a>
</div>
</div>
</div>
Here we have reused the shared error_messages
partial introduced in Section 7.3.3. By the way, the use
of target=_blank in the Gravatar link is a
neat trick to get the browser to open the page in a new
window or tab, which is convenient behavior when linking
to a third-party site.
With the @user instance variable from Listing 9.1,
the edit page should render properly, as shown in Figure 9.2. The “Name” and
“Email” fields in Figure 9.2 also shows how Rails
automatically pre-fills the Name and Email fields using
the attributes of the existing @user
variable.
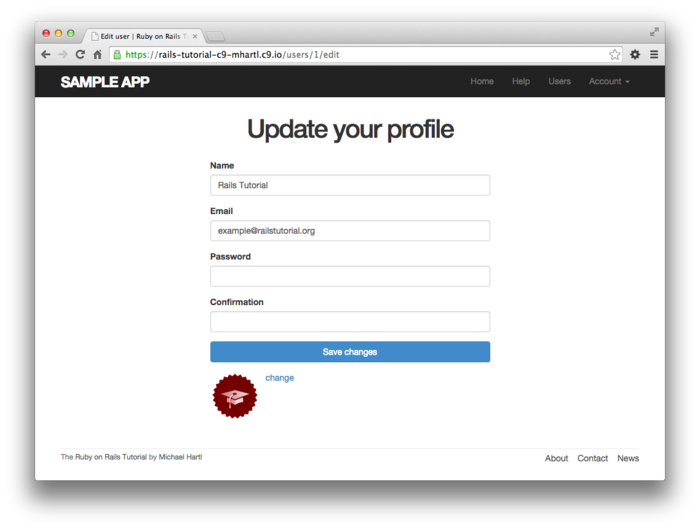
Looking at the HTML source for Figure 9.2, we see a form tag as expected, as in Listing 9.3 (slight details may differ).
<form accept-charset="UTF-8" action="/users/1" class="edit_user"
id="edit_user_1" method="post">
<input name="_method" type="hidden" value="patch" />
.
.
.
</form>
Note here the hidden input field
<input name="_method" type="hidden" value="patch" />
Since web browsers can’t natively send PATCH
requests (as required by the REST conventions from Table 7.1),
Rails fakes it with a POST
request and a hidden input field.2
There’s another subtlety to address here: the code form_for(@user)
in Listing 9.2 is exactly the
same as the code in Listing 7.13—so how does Rails know to
use a POST request for new users
and a PATCH for editing users? The answer is that it
is possible to tell whether a user is new or already
exists in the database via Active Record’s new_record?
boolean method:
$ rails console
>> User.new.new_record?
=> true
>> User.first.new_record?
=> false
When constructing a form using form_for(@user),
Rails uses POST if @user.new_record?
is true and PATCH
if it is false.
As a final touch, we’ll fill in the URL of the settings
link in the site navigation.
This is easy using the named route edit_user_path
from Table 7.1, together with the handy current_user
helper method defined in Listing 8.36:
<%= link_to "Settings", edit_user_path(current_user) %>
The full application code appears in Listing 9.4).
<header class="navbar navbar-fixed-top navbar-inverse">
<div class="container">
<%= link_to "sample app", root_path, id: "logo" %>
<nav>
<ul class="nav navbar-nav navbar-right">
<li><%= link_to "Home", root_path %></li>
<li><%= link_to "Help", help_path %></li>
<% if logged_in? %>
<li><%= link_to "Users", '#' %></li>
<li class="dropdown">
<a href="#" class="dropdown-toggle" data-toggle="dropdown">
Account <b class="caret"></b>
</a>
<ul class="dropdown-menu">
<li><%= link_to "Profile", current_user %></li>
<li><%= link_to "Settings", edit_user_path(current_user) %></li>
<li class="divider"></li>
<li>
<%= link_to "Log out", logout_path, method: "delete" %>
</li>
</ul>
</li>
<% else %>
<li><%= link_to "Log in", login_path %></li>
<% end %>
</ul>
</nav>
</div>
</header>
9.1.2 Unsuccessful edits
In this section we’ll handle unsuccessful edits,
following similar ideas to unsuccessful signups (Section 7.3). We start by creating
an update action, which uses update_attributes
(Section 6.1.5) to update the user based
on the submitted params hash, as shown in Listing 9.5.
With invalid information, the update attempt returns false,
so the else branch renders the edit page. We’ve seen this
pattern before; the structure closely parallels the first
version of the create action (Listing 7.16).
update
action. app/controllers/users_controller.rb
class UsersController < ApplicationController
def show
@user = User.find(params[:id])
end
def new
@user = User.new
end
def create
@user = User.new(user_params)
if @user.save
log_in @user
flash[:success] = "Welcome to the Sample App!"
redirect_to @user
else
render 'new'
end
end
def edit
@user = User.find(params[:id])
end
def update
@user = User.find(params[:id])
if @user.update_attributes(user_params)
# Handle a successful update.
else
render 'edit'
end
end
private
def user_params
params.require(:user).permit(:name, :email, :password,
:password_confirmation)
end
end
Note the use of user_params in the call to
update_attributes, which uses strong
parameters to prevent mass assignment vulnerability (as
described in Section 7.3.2).
Because of the existing User model validations and the error-messages partial in Listing 9.2, submission of invalid information results in helpful error messages (Figure 9.3).

9.1.3 Testing unsuccessful edits
We left Section 9.1.2 with a working edit form. Following the testing guidelines from Box 3.3, we’ll now write an integration test to catch any regressions. Our first step is to generate an integration test as usual:
$ rails generate integration_test users_edit
invoke test_unit
create test/integration/users_edit_test.rb
Then we’ll write a simple test of an unsuccessful edit,
as shown in Listing 9.6.
The test in Listing 9.6 checks for the correct
behavior by verifying that the edit template is rendered
after getting the edit page and re-rendered upon
submission of invalid information.
Note the use of the patch method to issue a
PATCH request, which follows the
same pattern as get, post, and
delete.
require 'test_helper'
class UsersEditTest < ActionDispatch::IntegrationTest
def setup
@user = users(:michael)
end
test "unsuccessful edit" do
get edit_user_path(@user)
assert_template 'users/edit'
patch user_path(@user), user: { name: "",
email: "foo@invalid",
password: "foo",
password_confirmation: "bar" }
assert_template 'users/edit'
end
end
At this point, the test suite should still be green:
$ bundle exec rake test
9.1.4 Successful edits (with TDD)
Now it’s time to get the edit form to work. Editing the profile images is already functional since we’ve outsourced image upload to the Gravatar website; we can edit Gravatars by clicking on the “change” link from Figure 9.2, as shown in Figure 9.4. Let’s get the rest of the user edit functionality working as well.
As you get more comfortable with testing, you might find that it’s useful to write integration tests before writing the application code instead of after. In this context, such tests are sometimes known as acceptance tests, since they determine when a particular feature should be accepted as complete. To see how this works, we’ll complete the user edit feature using test-driven development.
We’ll test for the correct behavior of updating users by
writing a test similar to the one shown in Listing 9.6,
only this time we’ll submit valid information.
Then we’ll check for a nonempty flash message and a
successful redirect to the profile page, while also
verifying that the user’s information correctly changed in
the database. The
result appears in Listing 9.8.
Note that the password and confirmation in Listing 9.8
are blank, which is convenient for users who don’t want to
update their passwords every time they update their names
or email addresses.
Note also the use of @user.reload (first
seen in Section 6.1.5) to reload the user’s
values from the database and confirm that they were
successfully updated.
(This is the kind of detail you could easily forget
initially, which is why acceptance testing (and TDD
generally) require a certain level of experience to be
effective.)
require 'test_helper'
class UsersEditTest < ActionDispatch::IntegrationTest
def setup
@user = users(:michael)
end
.
.
.
test "successful edit" do
get edit_user_path(@user)
assert_template 'users/edit'
name = "Foo Bar"
email = "foo@bar.com"
patch user_path(@user), user: { name: name,
email: email,
password: "",
password_confirmation: "" }
assert_not flash.empty?
assert_redirected_to @user
@user.reload
assert_equal @user.name, name
assert_equal @user.email, email
end
end
The update action needed to get the tests
in Listing 9.8 to pass is similar to the
final form of the create action (Listing 8.22),
as seen in Listing 9.9.
update
action. red
app/controllers/users_controller.rb
class UsersController < ApplicationController
.
.
.
def update
@user = User.find(params[:id])
if @user.update_attributes(user_params)
flash[:success] = "Profile updated"
redirect_to @user
else
render 'edit'
end
end
.
.
.
end
As indicated in the caption to Listing 9.9,
the test suite is still red,
which is the result of the password length validation (Listing 6.39) failing due to the blank
password and confirmation in Listing 9.8. To get the tests to green,
we need to make an exception to the minimum length
validation if the password is blank.
We can do this by passing the allow_blank: true
option to validates, as seen in Listing 9.10.
class User < ActiveRecord::Base
before_save { self.email = email.downcase }
validates :name, presence: true, length: { maximum: 50 }
VALID_EMAIL_REGEX = /\A[\w+\-.]+@[a-z\d\-.]+\.[a-z]+\z/i
validates :email, presence: true, length: { maximum: 255 }
format: { with: VALID_EMAIL_REGEX },
uniqueness: { case_sensitive: false }
has_secure_password
validates :password, length: { minimum: 6 }, allow_blank: true
.
.
.
end
In case you’re worried that Listing 9.10
might allow new users to sign up with blank passwords,
recall from Section 6.3 that has_secure_password
enforces presence validations upon object creation.
With the code in this section, the user edit page should be working (Figure 9.5), as you can double-check by re-running the test suite, which should now be green:
$ bundle exec rake test
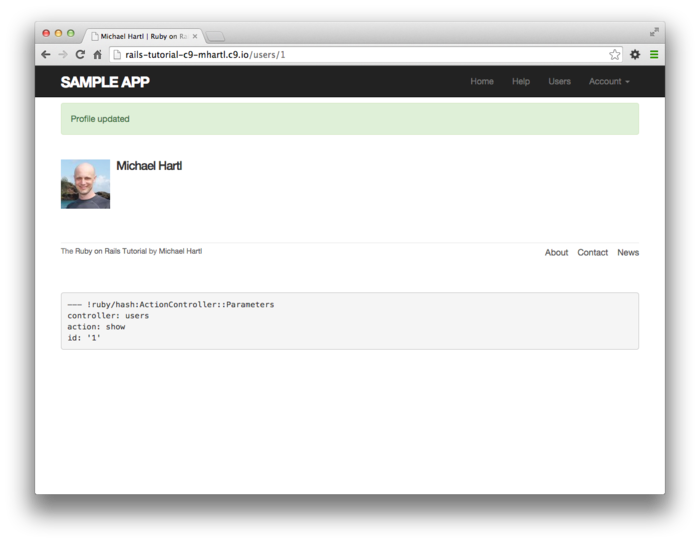
9.2 Authorization
In the context of web applications, authentication allows us to identify users of our site, and authorization lets us control what they can do. One nice effect of building the authentication machinery in Chapter 8 is that we are now in a position to implement authorization as well.
Although the edit and update actions from Section 9.1 are functionally complete, they suffer from a ridiculous security flaw: they allow anyone (even non-logged-in users) to access either action, and any logged-in user can update the information for any other user. In this section, we’ll implement a security model that requires users to be logged in and prevents them from updating any information other than their own.
In Section 9.2.1, we’ll handle the case of non-logged-in users who try to access a protected page to which they might normally have access. Because this could easily happen in the normal course of using the application, such users will be forwarded to the login page with a helpful message, as mocked up in Figure 9.6. On the other hand, users who try to access a page for which they would never be authorized (such as a logged-in user trying to access a different user’s edit page) will be redirected to the root URL (Section 9.2.2).
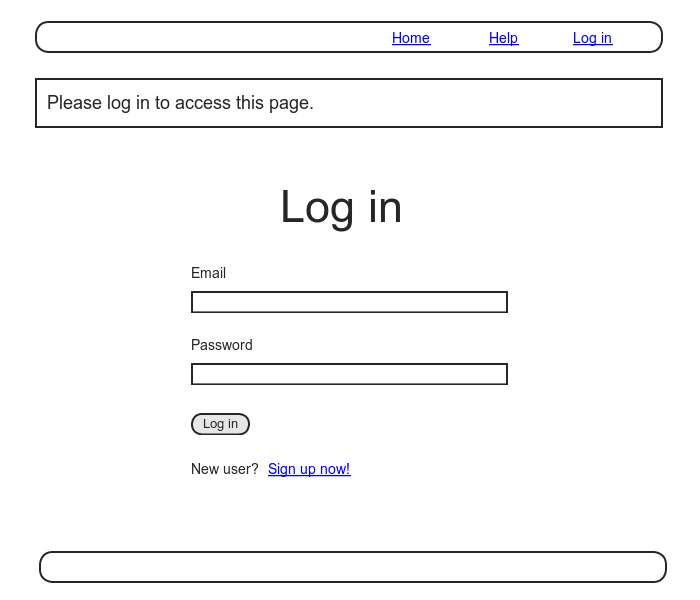
9.2.1 Requiring logged-in users
To implement the forwarding behavior shown in Figure 9.6,
we’ll use a before filter in the Users
controller. Before
filters use the before_action command to
arrange for a particular method to be called before the
given actions.3
To require users to be logged in, we define a logged_in_user
method and invoke it using before_action
:logged_in_user, as shown in Listing 9.12.
logged_in_user
before filter.
red app/controllers/users_controller.rb
class UsersController < ApplicationController
before_action :logged_in_user, only: [:edit, :update]
.
.
.
private
def user_params
params.require(:user).permit(:name, :email, :password,
:password_confirmation)
end
# Before filters
# Confirms a logged-in user.
def logged_in_user
unless logged_in?
flash[:danger] = "Please log in."
redirect_to login_url
end
end
end
By default, before filters apply to every
action in a controller, so here we restrict the filter to
act only on the :edit and :update
actions by passing the appropriate :only
options hash.
We can see the result of the before filter in Listing 9.12 by logging out and attempting to access the user edit page /users/1/edit, as seen in Figure 9.7.
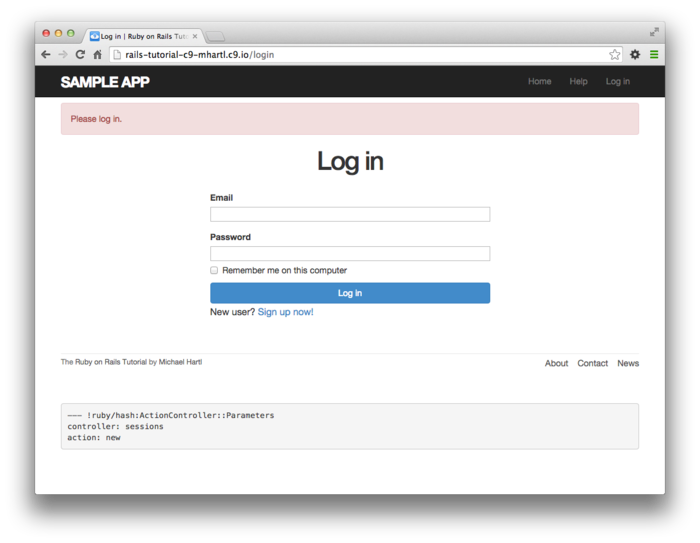
As indicated in the caption of Listing 9.12, our test suite is currently red:
$ bundle exec rake test
The reason is that the edit and update actions now require a logged-in user, but no user is logged in inside the corresponding tests.
We’ll fix our test suite by logging the user in before
hitting the edit or update actions.
This is easy using the log_in_as helper
developed in Section 8.4.6 (Listing 8.50),
as shown in Listing 9.14.
require 'test_helper'
class UsersEditTest < ActionDispatch::IntegrationTest
def setup
@user = users(:michael)
end
test "unsuccessful edit" do
log_in_as(@user)
get edit_user_path(@user)
.
.
.
end
test "successful edit" do
log_in_as(@user)
get edit_user_path(@user)
.
.
.
end
end
(We could eliminate some duplication by putting the test
login in the setup method of Listing 9.14,
but in Section 9.2.3 we’ll change one of the
tests to visit the edit page before logging in,
which isn’t possible if the login step happens during the
test setup.)
At this point, our test suite should be green:
$ bundle exec rake test
Even though our test suite is now passing, we’re not finished with the before filter, because the suite is still green even if we remove our security model, as you can verify by commenting it out (Listing 9.16). This is a Bad Thing—of all the regressions we’d like our test suite to catch, a massive security hole is probably #1, so the code in Listing 9.16 should definitely be red. Let’s write tests to arrange that.
class UsersController < ApplicationController
# before_action :logged_in_user, only: [:edit, :update]
.
.
.
end
Because the before filter operates on a per-action basis,
we’ll put the corresponding tests in the Users controller
test. The plan is
to hit the edit and update
action with the right kinds of requests and verify that
the flash is set and that the user is redirected to the
login path. From Table 7.1, we see that the proper
requests are GET and PATCH,
respectively, which means using the get and
patch methods inside the tests.
The results appear in Listing 9.17.
edit
and update are protected.
red test/controllers/users_controller_test.rb
require 'test_helper'
class UsersControllerTest < ActionController::TestCase
def setup
@user = users(:michael)
end
test "should get new" do
get :new
assert_response :success
end
test "should redirect edit when not logged in" do
get :edit, id: @user
assert_not flash.empty?
assert_redirected_to login_url
end
test "should redirect update when not logged in" do
patch :update, id: @user, user: { name: @user.name, email: @user.email }
assert_not flash.empty?
assert_redirected_to login_url
end
end
Note the arguments to get and patch
involve code like
get :edit, id: @user
and
patch :update, id: @user, user: { name: @user.name, email: @user.email }
This uses the Rails convention of id: @user,
which (as in controller redirects) automatically uses @user.id. In the second case,
we need to supply an additional user hash in
order for the routes to work properly.
(If you look at the generated Users controller tests from
the toy app in Chapter 2, you’ll see the code above.)
The test suite should now be red, as required. To get it to green, just uncomment the before filter (Listing 9.18).
class UsersController < ApplicationController
before_action :logged_in_user, only: [:edit, :update]
.
.
.
end
With that, our test suite should be green:
$ bundle exec rake test
Any accidental exposure of the edit methods to unauthorized users will now be caught immediately by our test suite.
9.2.2 Requiring the right user
Of course, requiring users to log in isn’t quite enough; users should only be allowed to edit their own information. As we saw in Section 9.2.1, it’s easy to have a test suite that misses an essential security flaw, so we’ll proceed using test-driven development to be sure our code implements the security model correctly. To do this, we’ll add tests to the Users controller test to complement the ones shown in Listing 9.17.
In order to make sure users can’t edit other users’ information, we need to be able to log in as a second user. This means adding a second user to our users fixture file, as shown in Listing 9.20.
michael:
name: Michael Example
email: michael@example.com
password_digest: <%= User.digest('password') %>
archer:
name: Sterling Archer
email: duchess@example.gov
password_digest: <%= User.digest('password') %>
By using the log_in_as method defined in Listing 8.50, we can test the edit
and update actions as in Listing 9.21. Note that we expect
to redirect users to the root path instead of the login
path because a user trying to edit a different user would
already be logged in.
require 'test_helper'
class UsersControllerTest < ActionController::TestCase
def setup
@user = users(:michael)
@other_user = users(:archer)
end
test "should get new" do
get :new
assert_response :success
end
test "should redirect edit when not logged in" do
get :edit, id: @user
assert_not flash.empty?
assert_redirected_to login_url
end
test "should redirect update when not logged in" do
patch :update, id: @user, user: { name: @user.name, email: @user.email }
assert_not flash.empty?
assert_redirected_to login_url
end
test "should redirect edit when logged in as wrong user" do
log_in_as(@other_user)
get :edit, id: @user
assert flash.empty?
assert_redirected_to root_url
end
test "should redirect update when logged in as wrong user" do
log_in_as(@other_user)
patch :update, id: @user, user: { name: @user.name, email: @user.email }
assert flash.empty?
assert_redirected_to root_url
end
end
To redirect users trying to edit another user’s profile,
we’ll add a second method called correct_user,
together with a before filter to call it (Listing 9.22). Note that the correct_user
before filter defines the @user variable, so
Listing 9.22 also shows that we can
eliminate the @user assignments in the edit
and update actions.
correct_user
before filter to protect the edit/update pages.
green app/controllers/users_controller.rb
class UsersController < ApplicationController
before_action :logged_in_user, only: [:edit, :update]
before_action :correct_user, only: [:edit, :update]
.
.
.
def edit
end
def update
if @user.update_attributes(user_params)
flash[:success] = "Profile updated"
redirect_to @user
else
render 'edit'
end
end
.
.
.
private
def user_params
params.require(:user).permit(:name, :email, :password,
:password_confirmation)
end
# Before filters
# Confirms a logged-in user.
def logged_in_user
unless logged_in?
flash[:danger] = "Please log in."
redirect_to login_url
end
end
# Confirms the correct user.
def correct_user
@user = User.find(params[:id])
redirect_to(root_url) unless @user == current_user
end
end
At this point, our test suite should be green:
$ bundle exec rake test
As a final refactoring, we’ll adopt a common convention
and define a current_user? boolean method
for use in the correct_user before filter,
which we define in the Sessions helper (Listing 9.24). We’ll use this method
to replace code like
unless @user == current_user
with the (slightly) more expressive
unless current_user?(@user)
current_user?
method. app/helpers/sessions_helper.rb
module SessionsHelper
# Logs in the given user.
def log_in(user)
session[:user_id] = user.id
end
# Remembers a user in a persistent session.
def remember(user)
user.remember
cookies.permanent.signed[:user_id] = user.id
cookies.permanent[:remember_token] = user.remember_token
end
# Returns true if the given user is the current user.
def current_user?(user)
user == current_user
end
.
.
.
end
Replacing the direct comparison with the boolean method gives the code shown in Listing 9.25.
correct_user
before filter.
green app/controllers/users_controller.rb
class UsersController < ApplicationController
before_action :logged_in_user, only: [:edit, :update]
before_action :correct_user, only: [:edit, :update]
.
.
.
def edit
end
def update
if @user.update_attributes(user_params)
flash[:success] = "Profile updated"
redirect_to @user
else
render 'edit'
end
end
.
.
.
private
def user_params
params.require(:user).permit(:name, :email, :password,
:password_confirmation)
end
# Before filters
# Confirms a logged-in user.
def logged_in_user
unless logged_in?
flash[:danger] = "Please log in."
redirect_to login_url
end
end
# Confirms the correct user.
def correct_user
@user = User.find(params[:id])
redirect_to(root_url) unless current_user?(@user)
end
end
9.2.3 Friendly forwarding
Our site authorization is complete as written, but there is one minor blemish: when users try to access a protected page, they are currently redirected to their profile pages regardless of where they were trying to go. In other words, if a non-logged-in user tries to visit the edit page, after logging in the user will be redirected to /users/1 instead of /users/1/edit. It would be much friendlier to redirect them to their intended destination instead.
The application code will turn out to be relatively complicated, but we can write a ridiculously simple test for friendly forwarding just by reversing the order of logging in and visiting the edit page in Listing 9.14. As seen in Listing 9.26, the resulting test tries to visit the edit page, then logs in, and then checks that the user is redirected to the edit page instead of the default profile page. (Listing 9.26 also removes the test for rendering the edit template since that’s no longer the expected behavior.)
require 'test_helper'
class UsersEditTest < ActionDispatch::IntegrationTest
def setup
@user = users(:michael)
end
.
.
.
test "successful edit with friendly forwarding" do
get edit_user_path(@user)
log_in_as(@user)
assert_redirected_to edit_user_path(@user)
name = "Foo Bar"
email = "foo@bar.com"
patch user_path(@user), user: { name: name,
email: email,
password: "foobar",
password_confirmation: "foobar" }
assert_not flash.empty?
assert_redirected_to @user
@user.reload
assert_equal @user.name, name
assert_equal @user.email, email
end
end
Now that we have a failing test, we’re ready to implement
friendly forwarding.4
In order to forward users to their intended destination,
we need to store the location of the requested page
somewhere, and then redirect to that location instead of
to the default. We
accomplish this with a pair of methods, store_location
and redirect_back_or, both defined in the
Sessions helper (Listing 9.27).
module SessionsHelper
.
.
.
# Redirects to stored location (or to the default).
def redirect_back_or(default)
redirect_to(session[:forwarding_url] || default)
session.delete(:forwarding_url)
end
# Stores the URL trying to be accessed.
def store_location
session[:forwarding_url] = request.url if request.get?
end
end
Here the storage mechanism for the forwarding URL is the
same session facility we used in Section 8.2.1
to log the user in.
Listing 9.27 also uses the request
object (via request.url) to get the URL of
the requested page.
The store_location method in Listing 9.27
puts the requested URL in the session
variable under the key :forwarding_url, but
only for a GET request.
This prevents storing the forwarding URL if a user, say,
submits a form when not logged in (which is an edge case
but could happen if, e.g., a user deleted the session
cookies by hand before submitting the form).
In such a case, the resulting redirect would issue a GET
request to a URL expecting POST, PATCH,
or DELETE, thereby causing an error.
Including if request.get? prevents this from
happening.5
To make use of store_location, we need to
add it to the logged_in_user before filter,
as shown in Listing 9.28.
store_location
to the logged-in user before filter.
app/controllers/users_controller.rb
class UsersController < ApplicationController
before_action :logged_in_user, only: [:edit, :update]
before_action :correct_user, only: [:edit, :update]
.
.
.
def edit
end
.
.
.
private
def user_params
params.require(:user).permit(:name, :email, :password,
:password_confirmation)
end
# Before filters
# Confirms a logged-in user.
def logged_in_user
unless logged_in?
store_location
flash[:danger] = "Please log in."
redirect_to login_url
end
end
# Confirms the correct user.
def correct_user
@user = User.find(params[:id])
redirect_to(root_url) unless current_user?(@user)
end
end
To implement the forwarding itself, we use the redirect_back_or
method to redirect to the requested URL if it exists, or
some default URL otherwise, which we add to the Sessions
controller create action to redirect after
successful login (Listing 9.29). The redirect_back_or
method uses the or operator || through
session[:forwarding_url] || default
This evaluates to session[:forwarding_url]
unless it’s nil, in which case it evaluates
to the given default URL. Note that Listing 9.27
is careful to remove the forwarding URL; otherwise,
subsequent login attempts would forward to the protected
page until the user closed their browser.
(Testing for this is left as an exercise (Section 9.6).) Also note that the
session deletion occurs even though the line with the
redirect appears first; redirects don’t happen until an
explicit return or the end of the method, so
any code appearing after the redirect is still executed.
create
action with friendly forwarding.
app/controllers/sessions_controller.rb
class SessionsController < ApplicationController
.
.
.
def create
user = User.find_by(email: params[:session][:email].downcase)
if user && user.authenticate(params[:session][:password])
log_in user
params[:session][:remember_me] == '1' ? remember(user) : forget(user)
redirect_back_or user
else
flash.now[:danger] = 'Invalid email/password combination'
render 'new'
end
end
.
.
.
end
With that, the friendly forwarding integration test in Listing 9.26 should pass, and the basic user authentication and page protection implementation is complete. As usual, it’s a good idea to verify that the test suite is green before proceeding:
$ bundle exec rake test
9.3 Showing all users
In this section, we’ll add the penultimate user action, the index
action, which is designed to display all the users
instead of just one.
Along the way, we’ll learn how to seed the database with
sample users and how to paginate the user output
so that the index page can scale up to display a potentially
large number of users.
A mockup of the result—users, pagination links, and a
“Users” navigation link—appears in Figure 9.8.6 In Section 9.4,
we’ll add an administrative interface to the users index so
that users can also be destroyed.
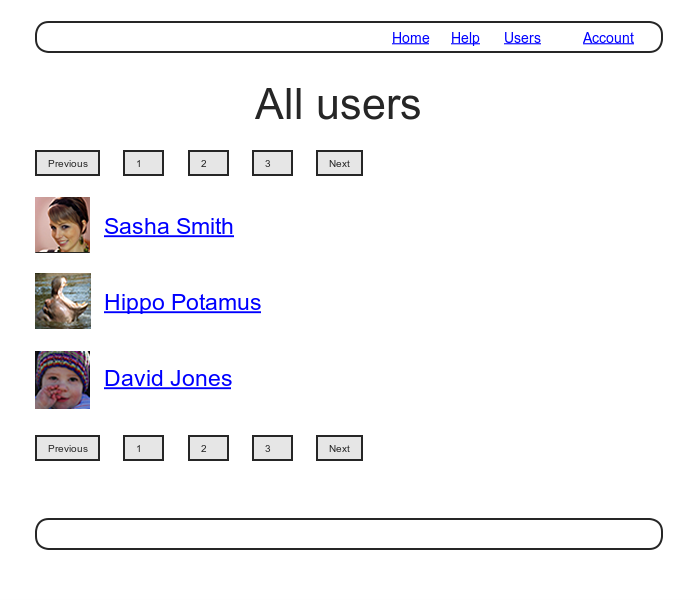
9.3.1 Users index
To get started with the users index, we’ll first
implement a security model.
Although we’ll keep individual user show
pages visible to all site visitors, the user index
will be restricted to logged-in users so that there’s a
limit to how much unregistered users can see by default.7
To protect the index page from unauthorized
access, we’ll first add a short test to verify that the index
action is redirected properly (Listing 9.31).
index
action redirect.
red test/controllers/users_controller_test.rb
require 'test_helper'
class UsersControllerTest < ActionController::TestCase
def setup
@user = users(:michael)
@other_user = users(:archer)
end
test "should redirect index when not logged in" do
get :index
assert_redirected_to login_url
end
.
.
.
end
Then we just need to add an index action
and include it in the list of actions protected by the logged_in_user
before filter (Listing 9.32).
index action.
green app/controllers/users_controller.rb
class UsersController < ApplicationController
before_action :logged_in_user, only: [:index, :edit, :update]
before_action :correct_user, only: [:edit, :update]
def index
end
def show
@user = User.find(params[:id])
end
.
.
.
end
To display the users themselves, we need to make a
variable containing all the site’s users and then render
each one by iterating through them in the index view. As you may recall
from the corresponding action in the toy app (Listing 2.5),
we can use User.all to pull all the users
out of the database, assigning them to an @users
instance variable for use in the view, as seen in Listing 9.33. (If displaying all
the users at once seems like a bad idea, you’re right, and
we’ll remove this blemish in Section 9.3.3.)
index
action. app/controllers/users_controller.rb
class UsersController < ApplicationController
before_action :logged_in_user, only: [:index, :edit, :update]
.
.
.
def index
@users =
                        User.all
end
.
.
.
end
To make the actual index page, we’ll make a view (whose
file you’ll have to create) that iterates through the
users and wraps each one in an li tag. We do this with the each
method, displaying each user’s Gravatar and name, while
wrapping the whole thing in a ul tag (Listing 9.34).
<% provide(:title, 'All users') %>
<h1>All users</h1>
<ul class="users">
<% @users.each do |user| %>
<li>
<%= gravatar_for user, size: 50 %>
<%= link_to user.name, user %>
</li>
<% end %>
</ul>
The code in Listing 9.34 uses the result of Listing 7.31 from Section 7.7, which allows us to pass an option to the Gravatar helper specifying a size other than the default. If you didn’t do that exercise, update your Users helper file with the contents of Listing 7.31 before proceeding.
Let’s also add a little CSS (or, rather, SCSS) for style (Listing 9.35).
.
.
.
/* Users index */
.users {
list-style: none;
margin: 0;
li {
overflow: auto;
padding: 10px 0;
border-bottom: 1px solid $gray-lighter;
}
}
Finally, we’ll add the URL to the users link in the
site’s navigation header using users_path,
thereby using the last of the unused named routes in Table 7.1. The result appears in
Listing 9.36.
<header class="navbar navbar-fixed-top navbar-inverse">
<div class="container">
<%= link_to "sample app", root_path, id: "logo" %>
<nav>
<ul class="nav navbar-nav navbar-right">
<li><%= link_to "Home", root_path %></li>
<li><%= link_to "Help", help_path %></li>
<% if logged_in? %>
<li><%= link_to "Users", users_path %></li>
<li class="dropdown">
<a href="#" class="dropdown-toggle" data-toggle="dropdown">
Account <b class="caret"></b>
</a>
<ul class="dropdown-menu">
<li><%= link_to "Profile", current_user %></li>
<li><%= link_to "Settings", edit_user_path(current_user) %></li>
<li class="divider"></li>
<li>
<%= link_to "Log out", logout_path, method: "delete" %>
</li>
</ul>
</li>
<% else %>
<li><%= link_to "Log in", login_path %></li>
<% end %>
</ul>
</nav>
</div>
</header>
With that, the users index is fully functional, with all tests green:
$ bundle exec rake test
On the other hand, as seen in Figure 9.9, it is a bit…lonely. Let’s remedy this sad situation.
9.3.2 Sample users
In this section, we’ll give our lonely sample user some company. Of course, to create enough users to make a decent users index, we could use our web browser to visit the signup page and make the new users one by one, but a far better solution is to use Ruby (and Rake) to make the users for us.
First, we’ll add the Faker gem to the Gemfile,
which will allow us to make sample users with
semi-realistic names and email addresses (Listing 9.38).
Gemfile.
source 'https://rubygems.org'
gem 'rails', '4.2.0'
gem 'bcrypt', '3.1.7'
gem 'faker', '1.4.2'
.
.
.
Then install as usual:
$ bundle install
Next, we’ll add a Rake task to seed the database with
sample users, for which Rails uses the standard location db/seeds.rb. The result appears in
Listing 9.39.
(The code in Listing 9.39 is a bit advanced, so
don’t worry too much about the details.)
User.create!(name: "Example User",
email: "example@railstutorial.org",
password: "foobar",
password_confirmation: "foobar")
99.times do |n|
name = Faker::Name.name
email = "example-#{n+1}@railstutorial.org"
password = "password"
User.create!(name: name,
email: email,
password: password,
password_confirmation: password)
end
The code in Listing 9.39 creates an example user
with name and email address replicating our previous one,
and then makes 99 more.
The create! method is just like the create
method, except it raises an exception (Section 6.1.4)
for an invalid user rather than returning false. This behavior makes
debugging easier by avoiding silent errors.
With the code as in Listing 9.39, we can reset the database
and then invoke the Rake task using db:seed:8
$ bundle exec rake db:migrate:reset
$ bundle exec rake db:seed
Seeding the database can be slow, and on some systems could take up to a few minutes.
After running the db:seed Rake task, our
application has 100 sample users.
As seen in Figure 9.10, I’ve taken the liberty of
associating the first few sample addresses with Gravatars
so that they’re not all the default Gravatar image.
(You may have to restart the webserver at this point.)
9.3.3 Pagination
Our original user doesn’t suffer from loneliness any more, but now we have the opposite problem: our user has too many companions, and they all appear on the same page. Right now there are a hundred, which is already a reasonably large number, and on a real site it could be thousands. The solution is to paginate the users, so that (for example) only 30 show up on a page at any one time.
There are several pagination methods in Rails; we’ll use
one of the simplest and most robust, called will_paginate.
To use it, we need to include both the will_paginate
gem and bootstrap-will_paginate,
which configures will_paginate to use Bootstrap’s
pagination styles.
The updated Gemfile appears in Listing 9.40.
Gemfile. source 'https://rubygems.org'
gem 'rails', '4.2.0'
gem 'bcrypt', '3.1.7'
gem 'faker', '1.4.2'
gem 'will_paginate', '3.0.7'
gem 'bootstrap-will_paginate', '0.0.10'
.
.
.
Then run bundle install:
$ bundle install
You should also restart the web server to ensure that the new gems are loaded properly.
To get pagination working, we need to add some code to
the index view telling Rails to paginate the users, and we
need to replace User.all in the index
action with an object that knows about pagination.
We’ll start by adding the special will_paginate
method in the view (Listing 9.41);
we’ll see in a moment why the code appears both above and
below the user list.
<% provide(:title, 'All users') %>
<h1>All users</h1>
<%= will_paginate %>
<ul class="users">
<% @users.each do |user| %>
<li>
<%= gravatar_for user, size: 50 %>
<%= link_to user.name, user %>
</li>
<% end %>
</ul>
<%= will_paginate %>
The will_paginate method is a little
magical; inside a users view, it
automatically looks for an @users object,
and then displays pagination links to access other pages. The view in Listing 9.41
doesn’t work yet, though, because currently @users
contains the results of User.all (Listing 9.33),
whereas will_paginate requires that we
paginate the results explicitly using the paginate
method:
$ rails
                                console
>> User.paginate(page: 1)
User Load (1.5ms) SELECT "users".* FROM "users" LIMIT 30 OFFSET 0
(1.7ms) SELECT COUNT(*) FROM "users"
=> #<ActiveRecord::Relation [#<User id: 1,...
Note that paginate takes a hash argument
with key :page and value equal to the page
requested. User.paginate
pulls the users out of the database one chunk at a time
(30 by default), based on the :page
parameter. So, for
example, page 1 is users 1–30, page 2 is users
31–60, etc. If page
is nil, paginate simply
returns the first page.
Using the paginate method, we can paginate
the users in the sample application by using paginate
in place of all in the index
action (Listing 9.42).
Here the page parameter comes from params[:page],
which is generated automatically by will_paginate.
index
action. app/controllers/users_controller.rb
class UsersController < ApplicationController
before_action :logged_in_user, only: [:index, :edit, :update]
.
.
.
def index
@users = User.paginate(page: params[:page])
end
.
.
.
end
The users index page should now be working, appearing as
in Figure 9.11.
(On some systems, you may have to restart the Rails server
at this point.)
Because we included will_paginate both above
and below the user list, the pagination links appear in
both places.
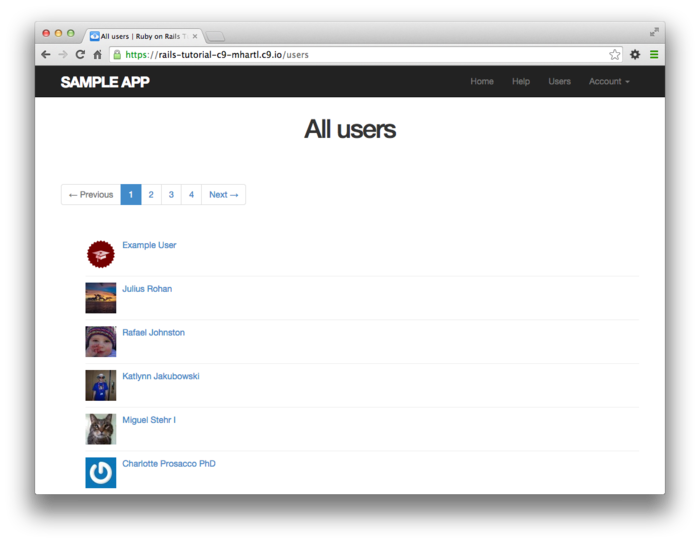
If you now click on either the 2 link or Next link, you’ll get the second page of results, as shown in Figure 9.12.
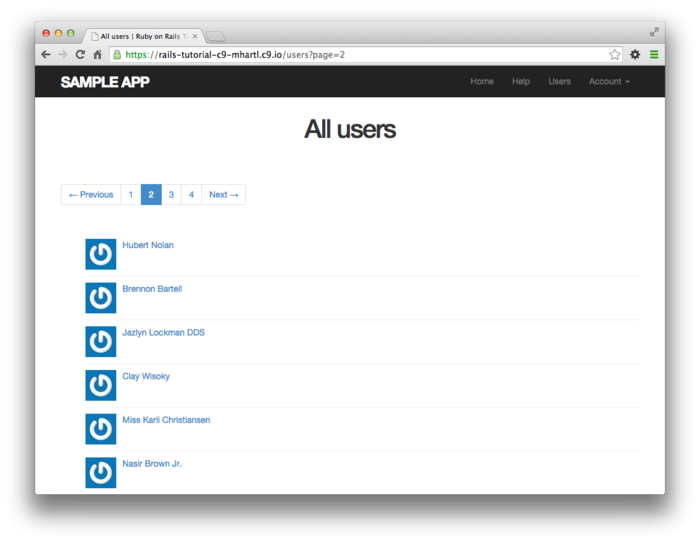
9.3.4 Users index test
Now that our users index page is working, we’ll write a lightweight test for it, including a minimal test for the pagination from Section 9.3.3. The idea is to log in, visit the index path, verify the first page of users is present, and then confirm that pagination is present on the page. For these last two steps to work, we need to have enough users in the test database to invoke pagination, i.e., more than 30.
We created a second user in the fixtures in Listing 9.20,
but 30 or so more users is a lot to create by hand.
Luckily, as we’ve seen with the user fixture’s password_digest
attribute, fixture files support embedded Ruby, which
means we can create 30 additional users as shown in Listing 9.43. (Listing 9.43
also creates a couple of other named users for future
reference.)
michael:
name: Michael Example
email: michael@example.com
password_digest: <%= User.digest('password') %>
archer:
name: Sterling Archer
email: duchess@example.gov
password_digest: <%= User.digest('password') %>
lana:
name: Lana Kane
email: hands@example.gov
password_digest: <%= User.digest('password') %>
mallory:
name: Mallory Archer
email: boss@example.gov
password_digest: <%= User.digest('password') %>
<% 30.times do |n| %>
user_<%= n %>:
name: <%= "User #{n}" %>
email: <%= "user-#{n}@example.com" %>
password_digest: <%= User.digest('password') %>
<% end %>
With the fixtures defined in Listing 9.43, we’re ready to write a test of the users index. First we generate the relevant test:
$ rails generate integration_test users_index
invoke test_unit
create test/integration/users_index_test.rb
The test itself involves checking for a div
with the required pagination class and
verifying that the first page of users is present.
The result appears in Listing 9.44.
require 'test_helper'
class UsersIndexTest < ActionDispatch::IntegrationTest
def setup
@user = users(:michael)
end
test "index including pagination" do
log_in_as(@user)
get users_path
assert_template 'users/index'
assert_select 'div.pagination'
User.paginate(page: 1).each do |user|
assert_select 'a[href=?]', user_path(user), text: user.name
end
end
end
The result should be a green test suite:
$ bundle exec rake test
9.3.5 Partial refactoring
The paginated users index is now complete, but there’s one improvement I can’t resist including: Rails has some incredibly slick tools for making compact views, and in this section we’ll refactor the index page to use them. Because our code is well-tested, we can refactor with confidence, assured that we are unlikely to break our site’s functionality.
The first step in our refactoring is to replace the
user li from Listing 9.41
with a render call (Listing 9.46).
<% provide(:title, 'All users') %>
<h1>All users</h1>
<%= will_paginate %>
<ul class="users">
<% @users.each do |user| %>
<%= render user %>
<% end %>
</ul>
<%= will_paginate %>
Here we call render not on a string with
the name of a partial, but rather on a user
variable of class User;9
in this context, Rails automatically looks for a partial
called _user.html.erb, which we must create
(Listing 9.47).
<li>
<%= gravatar_for user, size: 50 %>
<%= link_to user.name, user %>
</li>
This is a definite improvement, but we can do even
better: we can call render directly
on the @users variable (Listing 9.48).
<% provide(:title, 'All users') %>
<h1>All users</h1>
<%= will_paginate %>
<ul class="users">
<%= render @users %>
</ul>
<%= will_paginate %>
Here Rails infers that @users is a list of
User objects; moreover, when called with a
collection of users, Rails automatically iterates through
them and renders each one with the _user.html.erb
partial. The
result is the impressively compact code in Listing 9.48.
As with any refactoring, you should verify that the test suite is still green after changing the application code:
$ bundle exec rake test
9.4 Deleting users
Now that the users index is complete, there’s only one
canonical REST action left: destroy.
In this section, we’ll add links to delete users, as mocked
up in Figure 9.13, and define the destroy
action necessary to accomplish the deletion.
But first, we’ll create the class of administrative users,
or admins, authorized to do so.
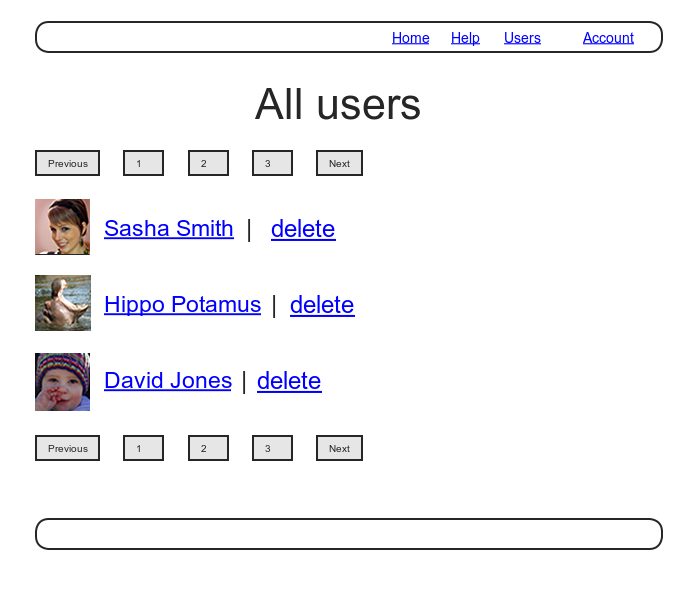
9.4.1 Administrative users
We will identify privileged administrative users with a
boolean admin attribute in the User model,
which will lead automatically to an admin?
boolean method to test for admin status.
The resulting data model appears in Figure 9.14.
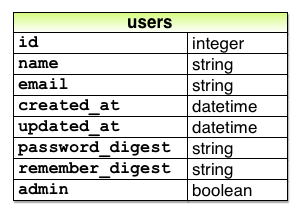
admin
boolean attribute. As usual, we add the admin attribute with a
migration, indicating the boolean type on
the command line:
$ rails generate migration add_admin_to_users admin:boolean
The migration adds the admin column to the
users table, as shown in Listing 9.50. Note that we’ve added
the argument default: false to add_column
in Listing 9.50, which means that users
will not be administrators by default.
(Without the default: false argument, admin
will be nil by default, which is still false,
so this step is not strictly necessary.
It is more explicit, though, and communicates our
intentions more clearly both to Rails and to readers of
our code.)
admin attribute to users.
db/migrate/[timestamp]_add_admin_to_users.rb
class AddAdminToUsers < ActiveRecord::Migration
def change
add_column :users, :admin, :boolean, default: false
end
end
Next, we migrate as usual:
$ bundle exec rake db:migrate
As expected, Rails figures out the boolean nature of the
admin attribute and automatically adds the
question-mark method admin?:
$ rails console --sandbox
>> user = User.first
>> user.admin?
=> false
>> user.toggle!(:admin)
=> true
>> user.admin?
=> true
Here we’ve used the toggle! method to flip
the admin attribute from false
to true.
As a final step, let’s update our seed data to make the first user an admin by default (Listing 9.51).
User.create!(name: "Example User",
email: "example@railstutorial.org",
password: "foobar",
password_confirmation: "foobar",
admin: true)
99.times do |n|
name = Faker::Name.name
email = "example-#{n+1}@railstutorial.org"
password = "password"
User.create!(name: name,
email: email,
password: password,
password_confirmation: password)
end
Then reset the database:
$ bundle exec rake db:migrate:reset
$ bundle exec rake db:seed
Revisiting strong parameters
You might have noticed that Listing 9.51
makes the user an admin by including admin: true
in the initialization hash.
This underscores the danger of exposing our objects to
the wild Web: if we simply passed an initialization hash
in from an arbitrary web request, a malicious user could
send a PATCH request as
follows:10
patch /users/17?admin=1
This request would make user 17 an admin, which would be a potentially serious security breach.
Because of this danger, it is essential that we only
update attributes that are safe to edit through the web. As noted in Section 7.3.2,
this is accomplished using strong parameters
by calling require and permit
on the params hash:
def user_params
params.require(:user).permit(:name, :email, :password,
:password_confirmation)
end
Note in particular that admin is not
in the list of permitted attributes.
This is what prevents arbitrary users from granting
themselves administrative access to our application. Because of its
importance, it’s a good idea to write a test for any
attribute that isn’t editable, and writing such a test
for the admin attribute is left as an
exercise (Section 9.6).
9.4.2 The destroy action
The final step needed to complete the Users resource is
to add delete links and a destroy action. We’ll start by adding
a delete link for each user on the users index page,
restricting access to administrative users.
The resulting "delete" links will be
displayed only if the current user is an admin (Listing 9.52).
<li>
<%= gravatar_for user, size: 50 %>
<%= link_to user.name, user %>
<% if current_user.admin? && !current_user?(user) %>
| <%= link_to "delete", user, method: :delete,
data: { confirm: "You sure?" } %>
<% end %>
</li>
Note the method: :delete argument, which
arranges for the link to issue the necessary DELETE
request. We’ve
also wrapped each link inside an if
statement so that only admins can see them.
The result for our admin user appears in Figure 9.15.
Web browsers can’t send DELETE requests natively, so Rails fakes them with JavaScript. This means that the delete links won’t work if the user has JavaScript disabled. If you must support non-JavaScript-enabled browsers you can fake a DELETE request using a form and a POST request, which works even without JavaScript.11
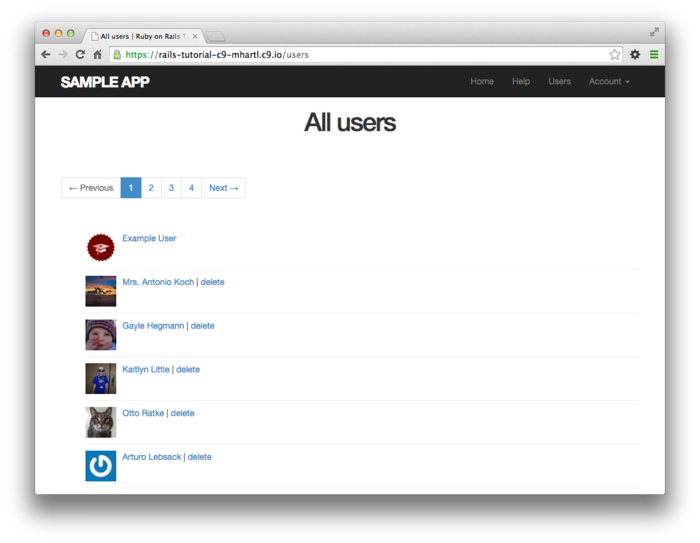
To get the delete links to work, we need to add a destroy
action (Table 7.1), which finds the
corresponding user and destroys it with the Active Record
destroy method, finally redirecting to the
users index, as seen in Listing 9.53.
Because users have to be logged in to delete users, Listing 9.53
also adds :destroy to the logged_in_user
before filter.
destroy
action. app/controllers/users_controller.rb
class UsersController < ApplicationController
before_action :logged_in_user, only: [:index, :edit, :update, :destroy]
before_action :correct_user, only: [:edit, :update]
.
.
.
def destroy
User.find(params[:id]).destroy
flash[:success] = "User deleted"
redirect_to users_url
end
.
.
.
end
Note that the destroy action uses method
chaining to combine the find and destroy
into one line:
User.find(params[:id]).destroy
As constructed, only admins can destroy users through the
web since only they can see the delete links, but there’s
still a terrible security hole: any sufficiently
sophisticated attacker could simply issue a DELETE
request directly from the command line to delete any user
on the site. To
secure the site properly, we also need access control on
the destroy action, so that only
admins can delete users.
As in Section 9.2.1 and Section 9.2.2,
we’ll enforce access control using a before filter, this
time to restrict access to the destroy
action to admins.
The resulting admin_user before filter
appears in Listing 9.54.
destroy action to admins.
app/controllers/users_controller.rb
class UsersController < ApplicationController
before_action :logged_in_user, only: [:index, :edit, :update, :destroy]
before_action :correct_user, only: [:edit, :update]
before_action :admin_user, only: :destroy
.
.
.
private
.
.
.
# Confirms an admin user.
def admin_user
redirect_to(root_url) unless current_user.admin?
end
end
9.4.3 User destroy tests
With something as dangerous as destroying users, it’s important to have good tests for the expected behavior. We start by arranging for one of our fixture users to be an admin, as shown in Listing 9.55.
michael:
name: Michael Example
email: michael@example.com
password_digest: <%= User.digest('password') %>
admin: true
archer:
name: Sterling Archer
email: duchess@example.gov
password_digest: <%= User.digest('password') %>
lana:
name: Lana Kane
email: hands@example.gov
password_digest: <%= User.digest('password') %>
mallory:
name: Mallory Archer
email: boss@example.gov
password_digest: <%= User.digest('password') %>
<% 30.times do |n| %>
user_<%= n %>:
name: <%= "User #{n}" %>
email: <%= "user-#{n}@example.com" %>
password_digest: <%= User.digest('password') %>
<% end %>
Following the practice from Section 9.2.1,
we’ll put action-level tests of access control in the
Users controller test file.
As with the logout test in Listing 8.28,
we’ll use delete to issue a DELETE
request directly to the destroy action. We need to check two
cases: first, users who aren’t logged in should be
redirected to the login page; second, users who are logged
in but who aren’t admins should be redirected to the Home
page. The result
appears in Listing 9.56.
require 'test_helper'
class UsersControllerTest < ActionController::TestCase
def setup
@user = users(:michael)
@other_user = users(:archer)
end
.
.
.
test "should redirect destroy when not logged in" do
assert_no_difference 'User.count' do
delete :destroy, id: @user
end
assert_redirected_to login_url
end
test "should redirect destroy when logged in as a non-admin" do
log_in_as(@other_user)
assert_no_difference 'User.count' do
delete :destroy, id: @user
end
assert_redirected_to root_url
end
end
Note that Listing 9.56 also makes sure that the
user count doesn’t change using the assert_no_difference
method (seen before in Listing 7.21).
The tests in Listing 9.56 verify the behavior in the case of an unauthorized (non-admin) user, but we also want to check that an admin can use a delete link to successfully destroy a user. Since the delete links appear on the users index, we’ll add these tests to the users index test from Listing 9.44. The only really tricky part is verifying that a user gets deleted when an admin clicks on a delete link, which we’ll accomplish as follows:
assert_difference 'User.count', -1 do
delete user_path(@other_user)
end
This uses the assert_difference method
first seen in Listing 7.26
when creating a user, this time verifying that a user is destroyed
by checking that User.count changes by delete request to the
corresponding user path.
Putting everything together gives the pagination and delete test in Listing 9.57, which includes tests for both admins and non-admins.
require 'test_helper'
class UsersIndexTest < ActionDispatch::IntegrationTest
def setup
@admin = users(:michael)
@non_admin = users(:archer)
end
test "index as admin including pagination and delete links" do
log_in_as(@admin)
get users_path
assert_template 'users/index'
assert_select 'div.pagination'
first_page_of_users = User.paginate(page: 1)
first_page_of_users.each do |user|
assert_select 'a[href=?]', user_path(user), text: user.name
unless user == @admin
assert_select 'a[href=?]', user_path(user), text: 'delete',
method: :delete
end
end
assert_difference 'User.count', -1 do
delete user_path(@non_admin)
end
end
test "index as non-admin" do
log_in_as(@non_admin)
get users_path
assert_select 'a', text: 'delete', count: 0
end
end
Note that Listing 9.57 checks for the right delete links, including skipping the test if the user happens to be the admin (which lacks a delete link due to Listing 9.52).
At this point, our deletion code is well-tested, and the test suite should be green:
$ bundle exec rake test
9.5 Висновок
We’ve come a long way since introducing the Users controller way back in Section 5.4. Those users couldn’t even sign up; now users can sign up, log in, log out, view their profiles, edit their settings, and see an index of all users—and some can even destroy other users.
As it presently stands, the sample application forms a solid foundation for any website requiring users with authentication and authorization. In Chapter 10, we’ll add two additional refinements: an account activation link for newly registered users (verifying a valid email address in the process) and password resets to help users who forget their passwords.
Before moving on, be sure to merge all the changes into the master branch:
$ git add -A
$ git commit -m "Finish user edit, update, index, and destroy actions"
$ git checkout master
$ git merge updating-users
$ git push
You can also deploy the application and even populate the
production database with sample users (using the pg:reset
task to reset the production database):
$ bundle exec rake test
$ git push heroku
$ heroku pg:reset DATABASE
$ heroku run rake db:migrate
$ heroku run rake db:seed
$ heroku restart
Of course, on a real site you probably wouldn’t want to seed it with sample data, but I include it here for purposes of illustration (Figure 9.16). Incidentally, the order of the sample users in Figure 9.16 may vary, and on my system doesn’t match the local version from Figure 9.11; this is because we haven’t specified a default ordering for users when retrieved from the database, so the current order is database-dependent. This doesn’t matter much for users, but it will for microposts, and we’ll address this issue further in Section 11.1.4.
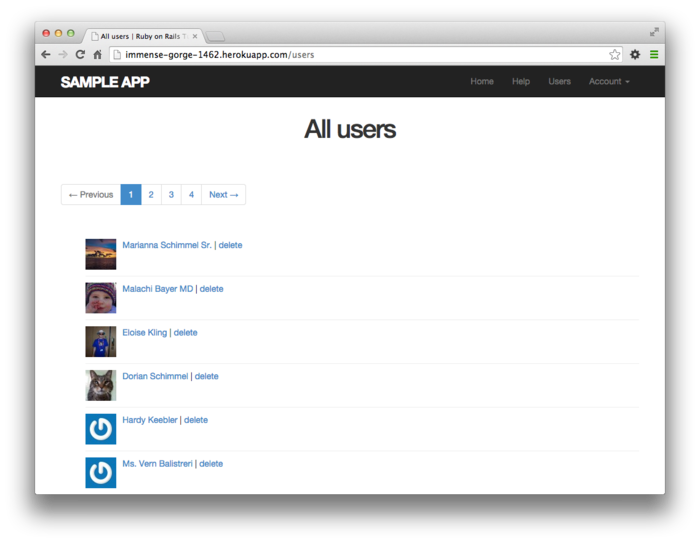
9.5.1 Що ми вивчили в цій главі
- Users can be updated using an edit form, which sends a
PATCH request to the
updateaction. - Safe updating through the web is enforced using strong parameters.
- Before filters give a standard way to run methods before particular controller actions.
- We implement an authorization using before filters.
- Authorization tests use both low-level commands to submit particular HTTP requests directly to controller actions and high-level integration tests.
- Friendly forwarding redirects users where they wanted to go after logging in.
- The users index page shows all users, one page at a time.
- Rails uses the standard file
db/seeds.rbto seed the database with sample data usingrake db:seed. - Running
render @usersautomatically calls the_user.html.erbpartial on each user in the collection. - A boolean attribute
adminon users automatically gives auser.admin?boolean method. - Admins can delete users through the web by clicking on
delete links that issue DELETE
requests to the Users controller
destroyaction. - We can create a large number of test users using embedded Ruby inside fixtures.
9.6 Вправи
Note: The Solutions Manual for Вправи, with solutions to every exercise in the Ruby on Rails Tutorial book, is included for free with every purchase at www.railstutorial.org.
For a suggestion on how to avoid conflicts between Вправи and the main tutorial, see the note on exercise topic branches in Section 3.6.
- Write a test to make sure that friendly forwarding only
forwards to the given URL the first time.
On subsequent login attempts, the forwarding URL should
revert to the default (i.e., the profile page).
Hint: Add to the test in Listing 9.26
by checking for the right value of
session[:forwarding_url]. - Write an integration test for all the layout links,
including the proper behavior for logged-in and
non-logged-in users.
Hint: Add to the test in Listing 5.25
using the
log_in_ashelper. - By issuing a PATCH request
directly to the
updatemethod as shown in Listing 9.59, verify that theadminattribute isn’t editable through the web. To be sure your test is covering the right thing, your first step should be to addadminto the list of permitted parameters inuser_paramsso that the initial test is red. - Remove the duplicated form code by refactoring the
new.html.erbandedit.html.erbviews to use the partial in Listing 9.60. Note that you will have to pass the form variablefexplicitly as a local variable, as shown in Listing 9.61.
admin
attribute is forbidden.
test/controllers/users_controller_test.rb
require 'test_helper'
class UsersControllerTest < ActionController::TestCase
def setup
@user = users(:michael)
@other_user = users(:archer)
end
.
.
.
test "should redirect update when logged in as wrong user" do
log_in_as(@other_user)
patch :update, id: @user, user: { name: @user.name, email: @user.email }
assert_redirected_to root_url
end
test "should not allow the admin attribute to be edited via the web" do
log_in_as(@other_user)
assert_not @other_user.admin?
patch :update, id: @other_user, user: { password: FILL_IN,
password_confirmation: FILL_IN,
admin: FILL_IN }
assert_not @other_user.FILL_IN.admin?
end
.
.
.
end
new
and edit form fields.
app/views/users/_fields.html.erb
<%= render 'shared/error_messages' %>
<%= f.label :name %>
<%= f.text_field :name, class: 'form-control' %>
<%= f.label :email %>
<%= f.email_field :email, class: 'form-control' %>
<%= f.label :password %>
<%= f.password_field :password, class: 'form-control' %>
<%= f.label :password_confirmation, "Confirmation" %>
<%= f.password_field :password_confirmation, class: 'form-control' %>
<% provide(:title, 'Sign up') %>
<h1>Sign up</h1>
<div class="row">
<div class="col-md-6 col-md-offset-3">
<%= form_for(@user) do |f| %>
<%= render 'fields', f: f %>
<%= f.submit "Create my account", class: "btn btn-primary" %>
<% end %>
</div>
</div>
- Image from http://www.flickr.com/photos/sashawolff/4598355045/. ↑
- Don’t worry about how this works; the details are of interest to developers of the Rails framework itself, and by design are not important for Rails application developers. ↑
- The command for before filters
used to be called
before_filter, but the Rails core team decided to rename it to emphasize that the filter takes place before particular controller actions. ↑ - The code in this section is adapted from the Clearance gem by thoughtbot. ↑
- Thanks to reader Yoel Adler for pointing out this subtle issue, and for discovering the solution. ↑
- Baby photo from http://www.flickr.com/photos/glasgows/338937124/. ↑
- This is the same authorization model used by Twitter. ↑
- In principle, these two tasks can
be combined in
rake db:reset, but as of this writing this command doesn’t work with the latest version of Rails. ↑ - The name
useris immaterial—we could have written@users.each do |foobar|and then usedrender foobar. The key is the class of the object—in this case,User. ↑ - Command-line tools such as curl can issue PATCH requests of this form. ↑
- See the RailsCast on “Destroy Without JavaScript” for details. ↑
Chapter 10 Account activation and password reset
In Chapter 9, we finished making a basic Users resource (filling in all the standard REST actions from Table 7.1), together with a flexible authentication and authorization system. In this chapter, we’ll put the finishing touches on this system by adding two closely related features: account activation (which verifies a new user’s email address) and password reset (for users who forget their passwords). Each of these two features will involve creating a new resource, thereby giving us a chance to see further examples of controllers, routing, and database migrations. In the process, we’ll also have a chance to learn how to send email in Rails, both in development and in production. Finally, the two features complement each other nicely: password resets involve sending a reset link to a user’s email address, the validity of which is confirmed by the initial account activation.1
10.1 Account activation
At present, newly registered users immediately have full access to their accounts (Chapter 7). In this section, we’ll implement an account activation step to verify that the user controls the email address they used to sign up. This will involve associating an activation token and digest with a user, sending the user an email with a link including the token, and activating the user upon clicking the link.
Our strategy for handling account activation parallels user login (Section 8.2) and especially remembering users (Section 8.4). The basic sequence appears as follows:
- Start users in an “unactivated” state.
- When a user signs up, generate an activation token and corresponding activation digest.
- Save the activation digest to the database, and then send an email to the user with a link containing the activation token and user’s email address.2
- When the user clicks the link, find the user by email address, and then authenticate the token by comparing with the activation digest.
- If the user is authenticated, change the status from “unactivated” to “activated”.
Because of the similarity with passwords and remember
tokens, we will be able to reuse many of the same ideas for
account activation (as well as password reset), including
the User.digest and User.new_token
methods and a modified version of the user.authenticated?
method. Table 10.1
illustrates the analogy (including the password reset from Section 10.2).
We’ll define the generalized version of the authenticated?
method from Table 10.1 in Section 10.1.3.
| find by | string | digest | authentication |
email |
password |
password_digest |
authenticate(password) |
id |
remember_token |
remember_digest |
authenticated?(:remember,
token) |
email |
activation_token |
activation_digest |
authenticated?(:activation,
token) |
email |
reset_token |
reset_digest |
authenticated?(:reset,
token) |
As usual, we’ll make a topic branch for the new feature. As we’ll see in Section 10.3, account activation and password reset include some common email configuration, which we’ll want to apply to both features before merging to master. As a result, it’s convenient to use a common topic branch:
$ git checkout master
$ git checkout -b account-activation-password-reset
10.1.1 Account activations resource
As with sessions (Section 8.1),
we’ll model account activations as a resource even though
they won’t be associated with an Active Record model. Instead, we’ll
include the relevant data (including the activation token
and activation status) in the User model.
Nevertheless, we’ll interact with account activations via
a standard REST URL; because the activation link will be
modifying the user’s activation status, we’ll plan to use
the edit action.3 This requires an
Account Activations controller, which we can generate as
follows:4
$ rails generate controller AccountActivations
The activation email will involve a URL of the form
edit_account_activation_url(activation_token, ...)
which means we’ll need a named route for the edit
action. We can
arrange this with the resources line shown
in Listing 10.1.
Rails.application.routes.draw do
root 'static_pages#home'
get 'help' => 'static_pages#help'
get 'about' => 'static_pages#about'
get 'contact' => 'static_pages#contact'
get 'signup' => 'users#new'
get 'login' => 'sessions#new'
post 'login' => 'sessions#create'
delete 'logout' => 'sessions#destroy'
resources :users
resources :account_activations, only: [:edit]
end
Next, we need a unique activation token to activate users. Security is less of a concern with account activations than it is with passwords, remember tokens, or (as we’ll see in Section 10.2) password resets—all of which could give full control of an account if obtained by an attacker—but there are still some scenarios in which an unhashed activation token could compromise an account.5 Thus, following the example of the remember token in Section 8.4, we’ll pair a publicly exposed virtual token with a hash digest in the database. This way we can access the activation token using
user.activation_token
and authenticate the user with code like
user.authenticated?(:activation, token)
(This will require a modification of the authenticated?
method defined in Listing 8.33.)
We’ll also add a boolean attribute activated,
which will allow us to test if a user is activated using
the same kind of auto-generated boolean method we saw in Section 9.4.1:
if user.activated? ...
Finally, although we won’t use it in this tutorial, we’ll record the time and date of the activation in case we want it for future reference. The full data model appears in Figure 10.1.

The migration to add the data model from Figure 10.1 adds all three attributes at the command line:
$ rails generate migration add_activation_to_users \
> activation_digest:string activated:boolean activated_at:datetime
As with the admin attribute (Listing 9.50),
we’ll add a default boolean value of false
to the activated attribute, as shown in in Listing 10.2.
class AddActivationToUsers < ActiveRecord::Migration
def change
add_column :users, :activation_digest, :string
add_column :users, :activated, :boolean, default: false
add_column :users, :activated_at, :datetime
end
end
We then apply the migration as usual:
$ bundle exec rake db:migrate
Because every newly signed-up user will require
activation, we should assign an activation token and
digest to each user object before it’s created.
We saw a similar idea in Section 6.2.5,
where we needed to convert an email address to lower-case
before saving a user to the database.
In that case, we used a before_save callback
combined with the downcase method (Listing 6.31). A before_save
callback is automatically called before the object is
saved, which includes both object creation and updates,
but in the case of the activation digest we only want the
callback to fire when the user is created.
This requires a before_create callback,
which we’ll define as follows:
before_create :create_activation_digest
This code, called a method reference, arranges
for Rails to look for a method called create_activation_digest
and run it before creating the user.
(In Listing 6.31, we passed before_save
an explicit block, but the method reference technique is
generally preferred.)
Because the create_activation_digest method
itself is only used internally by the User model, there’s
no need to expose it to outside users; as we saw in Section 7.3.2,
the Ruby way to accomplish this is to use the private
keyword:
private
def create_activation_digest
# Create the token and digest.
end
All methods defined in a class after private
are automatically hidden, as seen in this console session:
$ rails console
>> User.first.create_activation_digest
NoMethodError: private method `create_activation_digest' called for #<User>
The purpose of the before_create callback
is to assign the token and corresponding digest, which we
can accomplish as follows:
self.activation_token = User.new_token
self.activation_digest = User.digest(activation_token)
This code simply reuses the token and digest methods used
for the remember token, as we can see by comparing with
the remember method from Listing 8.32:
# Remembers a user in the database for use in persistent sessions.
def remember
self.remember_token = User.new_token
update_attribute(:remember_digest, User.digest(remember_token))
end
The main difference is the use of update_attribute
in the latter case.
The reason for the difference is that remember tokens and
digests are created for users that already exist in the
database, whereas the before_create callback
happens before the user has been created.
As a result of the callback, when a new user is defined
with User.new (as in user signup, Listing 7.17),
it will automatically get both activation_token
and activation_digest attributes; because
the latter is associated with a column in the database (Figure 10.1), it will be written
automatically when the user is saved.
Putting together the discussion above yields the User
model shown in Listing 10.3. As required by the
virtual nature of the activation token, we’ve added a
second attr_accessor to our model.
Note that we’ve taken the opportunity to use a method
reference for email downcasing as well.
class User < ActiveRecord::Base
attr_accessor :remember_token, :activation_token
before_save :downcase_email
before_create :create_activation_digest
validates :name, presence: true, length: { maximum: 50 }
.
.
.
private
# Converts email to all lower-case.
def downcase_email
self.email = email.downcase
end
# Creates and assigns the activation token and digest.
def create_activation_digest
self.activation_token = User.new_token
self.activation_digest = User.digest(activation_token)
end
end
Before moving on, we should also update our seed data and
fixtures so that our sample and test users are initially
activated, as shown in Listing 10.4
and Listing 10.5.
(The Time.zone.now method is a built-in
Rails helper that returns the current timestamp, taking
into account the time zone on the server.)
User.create!(name: "Example User",
email: "example@railstutorial.org",
password: "foobar",
password_confirmation: "foobar",
admin: true,
activated: true,
activated_at: Time.zone.now)
99.times do |n|
name = Faker::Name.name
email = "example-#{n+1}@railstutorial.org"
password = "password"
User.create!(name: name,
email: email,
password: password,
password_confirmation: password,
activated: true,
activated_at: Time.zone.now)
end
michael:
name: Michael Example
email: michael@example.com
password_digest: <%= User.digest('password') %>
admin: true
activated: true
activated_at: <%= Time.zone.now %>
archer:
name: Sterling Archer
email: duchess@example.gov
password_digest: <%= User.digest('password') %>
activated: true
activated_at: <%= Time.zone.now %>
lana:
name: Lana Kane
email: hands@example.gov
password_digest: <%= User.digest('password') %>
activated: true
activated_at: <%= Time.zone.now %>
mallory:
name: Mallory Archer
email: boss@example.gov
password_digest: <%= User.digest('password') %>
activated: true
activated_at: <%= Time.zone.now %>
<% 30.times do |n| %>
user_<%= n %>:
name: <%= "User #{n}" %>
email: <%= "user-#{n}@example.com" %>
password_digest: <%= User.digest('password') %>
activated: true
activated_at: <%= Time.zone.now %>
<% end %>
To apply the changes in Listing 10.4, reset the database to reseed the data as usual:
$ bundle exec rake db:migrate:reset
$ bundle exec rake db:seed
10.1.2 Account activation mailer method
With the data modeling complete, we’re now ready to add
the code needed to send an account activation email. The method is to add
a User mailer using the Action Mailer library,
which we’ll use in the Users controller create
action to send an email with an activation link.
Mailers are structured much like controller actions, with
email templates defined as views.
Our task in this section is to define the mailers and
views with links containing the activation token and email
address associated with the account to be activated.
As with models and controllers, we can generate a mailer
using rails generate:
$ rails generate mailer UserMailer account_activation password_reset
Here we’ve generated the necessary account_activation
method as well as the password_reset method
we’ll need in Section 10.2.
As part of generating the mailer, Rails also generates two view templates for each mailer, one for plain-text email and one for HTML email. For the account activation mailer method, they appear as in Listing 10.6 and Listing 10.7.
UserMailer#account_activation
<%= @greeting %>, find me in app/views/user_mailer/account_activation.text.erb
<h1>UserMailer#account_activation</h1>
<p>
<%= @greeting %>, find me in app/views/user_mailer/account_activation.html.erb
</p>
Let’s take a look at the generated mailers to get a sense
of how they work (Listing 10.8
and Listing 10.9).
We see in Listing 10.8 that there is a default from
address common to all mailers in the application, and each
method in Listing 10.9 has a recipient’s address
as well. (Listing 10.8
also uses a mailer layout corresponding to the email
format; although it won’t ever matter in this tutorial,
the resulting HTML and plain-text mailer layouts can be
found in app/views/layouts.)
The generated code also includes an instance variable (@greeting),
which is available in the mailer views in much the same
way that instance variables in controllers are available
in ordinary views.
class ApplicationMailer < ActionMailer::Base
default from: "from@example.com"
layout 'mailer'
end
class UserMailer < ApplicationMailer
# Subject can be set in your I18n file at config/locales/en.yml
# with the following lookup:
#
# en.user_mailer.account_activation.subject
#
def account_activation
@greeting = "Hi"
mail to: "to@example.org"
end
# Subject can be set in your I18n file at config/locales/en.yml
# with the following lookup:
#
# en.user_mailer.password_reset.subject
#
def password_reset
@greeting = "Hi"
mail to: "to@example.org"
end
end
To make a working activation email, we’ll create an
instance variable containing the user (for use in the
view) and then mail the result to user.email. As seen in Listing 10.11,
the mail method also takes a subject
key, whose value is used as the email’s subject line.
from address.
app/mailers/application_mailer.rb
class ApplicationMailer < ActionMailer::Base
default from: "noreply@example.com"
layout 'mailer'
end
class UserMailer < ApplicationMailer
def account_activation(user)
@user = user
mail to: user.email, subject: "Account activation"
end
def password_reset
@greeting = "Hi"
mail to: "to@example.org"
end
end
As with ordinary views, we can use embedded Ruby to customize the template views, in this case greeting the user by name and including a link to a custom activation link. Our plan is to find the user by email address and then authenticate the activation token, so the link needs to include both the email and the token. Because we’re modeling activations using an Account Activations resource, the token itself can appear as the argument of the named route defined in Listing 10.1:
edit_account_activation_url(@user.activation_token, ...)
Recalling that
edit_user_url(user)
produces a URL of the form
http://www.example.com/users/1/edit
the corresponding account activation link’s base URL will look like this:
http://www.example.com/account_activations/q5lt38hQDc_959PVoo6b7A/edit
Here q5lt38hQDc_959PVoo6b7A is a URL-safe
base64 string generated by the new_token
method (Listing 8.31), and it plays the same
role as the user id in /users/1/edit.
In particular, in the Activations controller edit
action, the token will be available in the params
hash as params[:id].
In order to include the email as well, we need to use a query parameter, which in a URL appears as a key-value pair located after a question mark:6
account_activations/q5lt38hQDc_959PVoo6b7A/edit?email=foo%40example.com
Notice that the ‘@’ in the email address appears as %40,
i.e., it’s “escaped out” to guarantee a valid URL.
The way to set a query parameter in Rails is to include a
hash in the named route:
edit_account_activation_url(@user.activation_token, email: @user.email)
When using named routes in this way to define query
parameters, Rails automatically escapes out any special
characters. The
resulting email address will also be unescaped
automatically in the controller, and will be available via
params[:email].
With the @user instance variable as defined
in Listing 10.11, we can create the
necessary links using the named edit route and embedded
Ruby, as shown in Listing 10.12
and Listing 10.13.
Note that the HTML template in Listing 10.13
uses the link_to method to construct a valid
link.
Hi <%= @user.name %>,
Welcome to the Sample App! Click on the link below to activate your account:
<%= edit_account_activation_url(@user.activation_token, email: @user.email) %>
<h1>Sample App</h1>
<p>Hi <%= @user.name %>,</p>
<p>
Welcome to the Sample App! Click on the link below to activate your account:
</p>
<%= link_to "Activate", edit_account_activation_url(@user.activation_token,
email: @user.email) %>
To see the results of the templates defined in Listing 10.12 and Listing 10.13, we can use email previews, which are special URLs exposed by Rails to let us see what our email messages look like. First, we need to add some configuration to our application’s development environment, as shown in Listing 10.14.
Rails.application.configure do
.
.
.
config.action_mailer.raise_delivery_errors = true
config.action_mailer.delivery_method = :test
host = 'example.com'
config.action_mailer.default_url_options = { host: host }
.
.
.
end
Listing 10.14 uses a host name of ’example.com’,
but you should use the actual host of your development
environment. For
example, on my system either of the following works
(depending on whether I’m using the cloud IDE or the local
server):
host = 'rails-tutorial-c9-mhartl.c9.io' # Cloud IDE
or
host = 'localhost:3000' # Local server
After restarting the development server to activate the configuration in Listing 10.14, we next need to update the User mailer preview file, which was automatically generated in Section 10.1.2, as shown in Listing 10.15.
# Preview all emails at http://localhost:3000/rails/mailers/user_mailer
class UserMailerPreview < ActionMailer::Preview
# Preview this email at
# http://localhost:3000/rails/mailers/user_mailer/account_activation
def account_activation
UserMailer.account_activation
end
# Preview this email at
# http://localhost:3000/rails/mailers/user_mailer/password_reset
def password_reset
UserMailer.password_reset
end
end
Because the account_activation method
defined in Listing 10.11 requires a valid user
object as an argument, the code in Listing 10.15
won’t work as written.
To fix it, we define a user variable equal
to the first user in the development database, and then
pass it as an argument to UserMailer.account_activation
(Listing 10.16).
Note that Listing 10.16 also assigns a value to user.activation_token,
which is necessary because the account activation
templates in Listing 10.12
and Listing 10.13 need an account
activation token.
(Because activation_token is a virtual
attribute (Section 10.1.1), the user from the
database doesn’t have one.)
# Preview all emails at http://localhost:3000/rails/mailers/user_mailer
class UserMailerPreview < ActionMailer::Preview
# Preview this email at
# http://localhost:3000/rails/mailers/user_mailer/account_activation
def account_activation
user = User.first
user.activation_token = User.new_token
UserMailer.account_activation(user)
end
# Preview this email at
# http://localhost:3000/rails/mailers/user_mailer/password_reset
def password_reset
UserMailer.password_reset
end
end
With the preview code as in Listing 10.16,
we can visit the suggested URLs to preview the account
activation emails.
(If you are using the cloud IDE, you should replace localhost:3000
with the corresponding base URL.) The resulting HTML and
text emails appear as in Figure 10.2
and Figure 10.3.
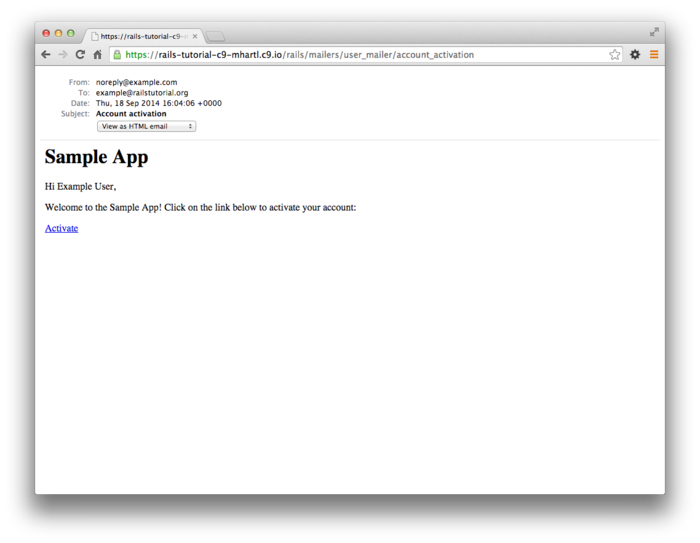
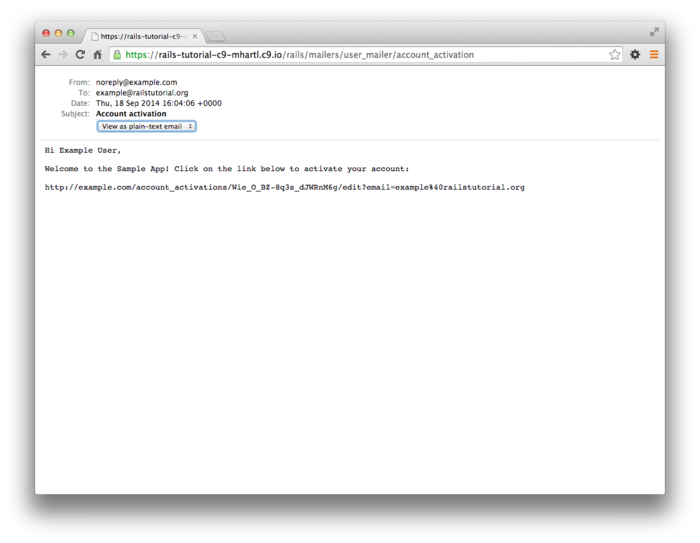
As a final step, we’ll write a couple of tests to double-check the results shown in the email previews. This isn’t as hard as it sounds, because Rails has generated useful example tests for us (Listing 10.17).
require 'test_helper'
class UserMailerTest < ActionMailer::TestCase
test "account_activation" do
mail = UserMailer.account_activation
assert_equal "Account activation", mail.subject
assert_equal ["to@example.org"], mail.to
assert_equal ["from@example.com"], mail.from
assert_match "Hi", mail.body.encoded
end
test "password_reset" do
mail = UserMailer.password_reset
assert_equal "Password reset", mail.subject
assert_equal ["to@example.org"], mail.to
assert_equal ["from@example.com"], mail.from
assert_match "Hi", mail.body.encoded
end
end
The tests in Listing 10.17
use the powerful assert_match method, which
can be used either with a string or a regular expression:
assert_match 'foo', 'foobar' # true
assert_match 'baz', 'foobar' # false
assert_match /\w+/, 'foobar' # true
assert_match /\w+/, '$#!*+@' # false
The test in Listing 10.18
uses assert_match to check that the name,
activation token, and escaped email appear in the email’s
body. For the last
of these, note the use of
CGI::escape(user.email)
to escape the test user’s email.7
require 'test_helper'
class UserMailerTest < ActionMailer::TestCase
test "account_activation" do
user = users(:michael)
user.activation_token = User.new_token
mail = UserMailer.account_activation(user)
assert_equal "Account activation", mail.subject
assert_equal [user.email], mail.to
assert_equal ["noreply@example.com"], mail.from
assert_match user.name, mail.body.encoded
assert_match user.activation_token, mail.body.encoded
assert_match CGI::escape(user.email), mail.body.encoded
end
end
Note that Listing 10.18 takes care to add an activation token to the fixture user, which would otherwise be blank.
To get the test to pass, we have to configure our test file with the proper domain host, as shown in Listing 10.19.
Rails.application.configure do
.
.
.
config.action_mailer.delivery_method = :test
config.action_mailer.default_url_options = { host: 'example.com' }
.
.
.
end
With the code as above, the mailer test should be green:
$ bundle exec rake test:mailers
To use the mailer in our application, we just need to add
a couple of lines to the create action used
to sign users up, as shown in Listing 10.21. Note that Listing 10.21
has changed the redirect behavior upon signing up.
Before, we redirected to the user’s profile page (Section 7.4),
but that doesn’t make sense now that we’re requiring
account activation.
Instead, we now redirect to the root URL.
class UsersController < ApplicationController
.
.
.
def create
@user = User.new(user_params)
if @user.save
UserMailer.account_activation(@user).deliver_now
flash[:info] = "Please check your email to activate your account."
redirect_to root_url
else
render 'new'
end
end
.
.
.
end
Because Listing 10.21 redirects to the root URL instead of to the profile page and doesn’t log the user in as before, the test suite is currently red, even though the application is working as designed. We’ll fix this by temporarily commenting out the failing lines, as shown in Listing 10.22. We’ll uncomment those lines and write passing tests for account activation in Section 10.1.4.
require 'test_helper'
class UsersSignupTest < ActionDispatch::IntegrationTest
test "invalid signup information" do
get signup_path
assert_no_difference 'User.count' do
post users_path, user: { name: "",
email: "user@invalid",
password: "foo",
password_confirmation: "bar" }
end
assert_template 'users/new'
assert_select 'div#error_explanation'
assert_select 'div.field_with_errors'
end
test "valid signup information" do
get signup_path
assert_difference 'User.count', 1 do
post_via_redirect users_path, user: { name: "Example User",
email: "user@example.com",
password: "password",
password_confirmation: "password" }
end
# assert_template 'users/show'
# assert is_logged_in?
end
end
If you now try signing up as a new user, you should be redirected as shown in Figure 10.4, and an email like the one shown in Listing 10.23 should be generated. Note that you will not receive an actual email in a development environment, but it will show up in your server logs. (You may have to scroll up a bit to see it.) Section 10.3 discusses how to send email for real in a production environment.
Sent mail to michael@michaelhartl.com (931.6ms)
Date: Wed, 03 Sep 2014 19:47:18 +0000
From: noreply@example.com
To: michael@michaelhartl.com
Message-ID: <540770474e16_61d3fd1914f4cd0300a0@mhartl-rails-tutorial-953753.mail>
Subject: Account activation
Mime-Version: 1.0
Content-Type: multipart/alternative;
boundary="--==_mimepart_5407704656b50_61d3fd1914f4cd02996a";
charset=UTF-8
Content-Transfer-Encoding: 7bit
----==_mimepart_5407704656b50_61d3fd1914f4cd02996a
Content-Type: text/plain;
charset=UTF-8
Content-Transfer-Encoding: 7bit
Hi Michael Hartl,
Welcome to the Sample App! Click on the link below to activate your account:
http://rails-tutorial-c9-mhartl.c9.io/account_activations/
fFb_F94mgQtmlSvRFGsITw/edit?email=michael%40michaelhartl.com
----==_mimepart_5407704656b50_61d3fd1914f4cd02996a
Content-Type: text/html;
charset=UTF-8
Content-Transfer-Encoding: 7bit
<h1>Sample App</h1>
<p>Hi Michael Hartl,</p>
<p>
Welcome to the Sample App! Click on the link below to activate your account:
</p>
<a href="http://rails-tutorial-c9-mhartl.c9.io/account_activations/
fFb_F94mgQtmlSvRFGsITw/edit?email=michael%40michaelhartl.com">Activate</a>
----==_mimepart_5407704656b50_61d3fd1914f4cd02996a--

10.1.3 Activating the account
Now that we have a correctly generated email as in Listing 10.23,
we need to write an edit action in the
Account Activations controller to activate the user. Recall from the
discussion in Section 10.1.2 that the activation
token and email are available as params[:id]
and params[:email], respectively.
Following the model of passwords (Listing 8.5)
and remember tokens (Listing 8.36),
we plan to find and authenticate the user with code
something like this:
user = User.find_by(email: params[:email])
if user && user.authenticated?(:activation, params[:id])
(As we’ll see momentarily, there will be one extra boolean in the expression above. See if you can guess what it will be.)
The above code uses the authenticated?
method to test if the account activation digest matches
the given token, but at present this won’t work because
that method is specialized to the remember token (Listing 8.33):
# Returns true if the given token matches the digest.
def authenticated?(remember_token)
return false if remember_digest.nil?
BCrypt::Password.new(remember_digest).is_password?(remember_token)
end
Here remember_digest is an attribute on the
User model, and inside the model we can rewrite it as
follows:
self.remember_digest
Somehow, we want to be able to make this variable, so we can call
self.activation_token
instead by passing in the appropriate parameter to authenticated?.
The solution involves our first example of metaprogramming,
which is essentially a program that writes a program. (Metaprogramming is
one of Ruby’s strongest suits, and many of the “magic”
features of Rails are due to its use of Ruby
metaprogramming.)
The key in this case is the powerful send
method, which lets us call a method with a name of our
choice by “sending a message” to a given object.
For example, in this console session we use send
on a native Ruby object to find the length of an array:
$ rails console
>> a = [1, 2, 3]
>> a.length
=> 3
>> a.send(:length)
=> 3
>> a.send('length')
=> 3
Here we see that passing the symbol :length
or string ’length’ to send is
equivalent to calling the length method on
the given object.
As a second example, we’ll access the activation_digest
attribute of the first user in the database:
>> user = User.first
>> user.activation_digest
=> "$2a$10$4e6TFzEJAVNyjLv8Q5u22ensMt28qEkx0roaZvtRcp6UZKRM6N9Ae"
>> user.send(:activation_digest)
=> "$2a$10$4e6TFzEJAVNyjLv8Q5u22ensMt28qEkx0roaZvtRcp6UZKRM6N9Ae"
>> user.send('activation_digest')
=> "$2a$10$4e6TFzEJAVNyjLv8Q5u22ensMt28qEkx0roaZvtRcp6UZKRM6N9Ae"
>> attribute = :activation
>> user.send("#{attribute}_digest")
=> "$2a$10$4e6TFzEJAVNyjLv8Q5u22ensMt28qEkx0roaZvtRcp6UZKRM6N9Ae"
Note in the last example that we’ve defined an attribute
variable equal to the symbol :activation and
used string interpolation to build up the proper argument
to send.
This would work also with the string ’activation’,
but using a symbol is more conventional, and in either
case
"#{attribute}_digest"
becomes
"activation_digest"
once the string is interpolated. (We saw how symbols are interpolated as strings in Section 7.4.2.)
Based on this discussion of send, we can
rewrite the current authenticated? method as
follows:
def authenticated?(remember_token)
digest = self.send('remember_digest')
return false if digest.nil?
BCrypt::Password.new(digest).is_password?(remember_token)
end
With this template in place, we can generalize the method by adding a function argument with the name of the digest, and then use string interpolation as above:
def authenticated?(attribute, token)
digest = self.send("#{attribute}_digest")
return false if digest.nil?
BCrypt::Password.new(digest).is_password?(token)
end
(Here we have renamed the second argument token
to emphasize that it’s now generic.)
Because we’re inside the user model, we can also omit self,
yielding the most idiomatically correct version:
def authenticated?(attribute, token)
digest = send("#{attribute}_digest")
return false if digest.nil?
BCrypt::Password.new(digest).is_password?(token)
end
We can now reproduce the previous behavior of authenticated?
by invoking it like this:
user.authenticated?(:remember, remember_token)
Applying this discussion to the User model yields the
generalized authenticated? method shown in Listing 10.24.
authenticated?
method. red
app/models/user.rb
class User < ActiveRecord::Base
.
.
.
# Returns true if the given token matches the digest.
def authenticated?(attribute, token)
digest = send("#{attribute}_digest")
return false if digest.nil?
BCrypt::Password.new(digest).is_password?(token)
end
.
.
.
end
The caption to Listing 10.24 indicates a red test suite:
$ bundle exec rake test
The reason for the failure is because the current_user
method (Listing 8.36) and the test for nil
digests (Listing 8.43)
both use the old version of authenticated?,
which expects one argument instead of two.
To fix this, we simply update the two cases to use the
generalized method, as shown in Listing 10.26
and Listing 10.27.
authenticated?
method in current_user.
app/helpers/sessions_helper.rb
module SessionsHelper
.
.
.
# Returns the current logged-in user (if any).
def current_user
if (user_id = session[:user_id])
@current_user ||= User.find_by(id: user_id)
elsif (user_id = cookies.signed[:user_id])
user = User.find_by(id: user_id)
if user && user.authenticated?(:remember, cookies[:remember_token])
log_in user
@current_user = user
end
end
end
.
.
.
end
authenticated?
method in the User test.
green test/models/user_test.rb
require 'test_helper'
class UserTest < ActiveSupport::TestCase
def setup
@user = User.new(name: "Example User", email: "user@example.com",
password: "foobar", password_confirmation: "foobar")
end
.
.
.
test "authenticated? should return false for a user with nil digest" do
assert_not @user.authenticated?(:remember, '')
end
end
At this point, the tests should be green:
$ bundle exec rake test
Refactoring the code as above is incredibly more error-prone without a solid test suite, which is why we went to such trouble to write good tests in Section 8.4.2 and Section 8.4.6.
With the authenticated? method as in Listing 10.24,
we’re now ready to write an edit action that
authenticates the user corresponding to the email address
in the params hash.
Our test for validity will look like this:
if user && !user.activated? && user.authenticated?(:activation, params[:id])
Note the presence of !user.activated?,
which is the extra boolean alluded to above.
This prevents our code from activating users who have
already been activated, which is important because we’ll
be logging in users upon confirmation, and we don’t want
to allow attackers who manage to obtain the activation
link to log in as the user.
If the user is authenticated according to the booleans
above, we need to activate the user and update the activated_at
timestamp:
user.update_attribute(:activated, true)
user.update_attribute(:activated_at, Time.zone.now)
This leads to the edit action shown in Listing 10.29.
Note also that Listing 10.29
handles the case of an invalid activation token; this
should rarely happen, but it’s easy enough to redirect in
this case to the root URL.
edit action
to activate accounts.
app/controllers/account_activations_controller.rb
class AccountActivationsController < ApplicationController
def edit
user = User.find_by(email: params[:email])
if user && !user.activated? && user.authenticated?(:activation, params[:id])
user.update_attribute(:activated, true)
user.update_attribute(:activated_at, Time.zone.now)
log_in user
flash[:success] = "Account activated!"
redirect_to user
else
flash[:danger] = "Invalid activation link"
redirect_to root_url
end
end
end
With the code in Listing 10.29, you should now be able to paste in the URL from Listing 10.23 to activate the relevant user. For example, on my system I visited the URL
http://rails-tutorial-c9-mhartl.c9.io/account_activations/
fFb_F94mgQtmlSvRFGsITw/edit?email=michael%40michaelhartl.com
and got the result shown in Figure 10.5.
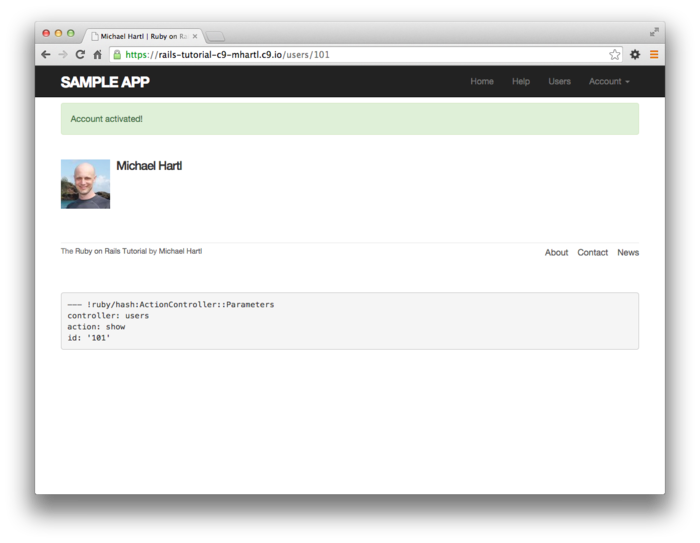
Of course, currently user activation doesn’t actually do
anything, because we haven’t changed how users log in. In order to have
account activation mean something, we need to allow users
to log in only if they are activated.
As shown in Listing 10.30,
the way to do this is to log the user in as usual if user.activated?
is true; otherwise, we redirect to the root URL with a warning
message (Figure 10.6).
class SessionsController < ApplicationController
def new
end
def create
user = User.find_by(email: params[:session][:email].downcase)
if user && user.authenticate(params[:session][:password])
if user.activated?
log_in user
params[:session][:remember_me] == '1' ? remember(user) : forget(user)
redirect_back_or user
else
message = "Account not activated. "
message += "Check your email for the activation link."
flash[:warning] = message
redirect_to root_url
end
else
flash.now[:danger] = 'Invalid email/password combination'
render 'new'
end
end
def destroy
log_out if logged_in?
redirect_to root_url
end
end
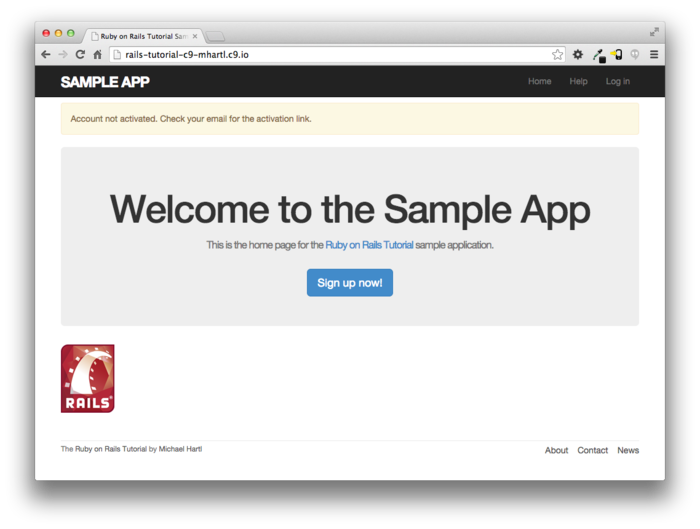
With that, apart from one refinement, the basic functionality of user activation is done. (That refinement is preventing unactivated users from being displayed, which is left as an exercise (Section 10.5).) In Section 10.1.4, we’ll complete the process by adding some tests and then doing a little refactoring.
10.1.4 Activation test and refactoring
In this section, we’ll add an integration test for account activation. Because we already have a test for signing up with valid information, we’ll add the steps to the test developed in Section 7.4.4 (Listing 7.26). There are quite a few steps, but they are mostly straightforward; see if you can follow along in Listing 10.31.
require 'test_helper'
class UsersSignupTest < ActionDispatch::IntegrationTest
def setup
ActionMailer::Base.deliveries.clear
end
test "invalid signup information" do
get signup_path
assert_no_difference 'User.count' do
post users_path, user: { name: "",
email: "user@invalid",
password: "foo",
password_confirmation: "bar" }
end
assert_template 'users/new'
assert_select 'div#error_explanation'
assert_select 'div.field_with_errors'
end
test "valid signup information with account activation" do
get signup_path
assert_difference 'User.count', 1 do
post users_path, user: { name: "Example User",
email: "user@example.com",
password: "password",
password_confirmation: "password" }
end
assert_equal 1, ActionMailer::Base.deliveries.size
user = assigns(:user)
assert_not user.activated?
# Try to log in before activation.
log_in_as(user)
assert_not is_logged_in?
# Invalid activation token
get edit_account_activation_path("invalid token")
assert_not is_logged_in?
# Valid token, wrong email
get edit_account_activation_path(user.activation_token, email: 'wrong')
assert_not is_logged_in?
# Valid activation token
get edit_account_activation_path(user.activation_token, email: user.email)
assert user.reload.activated?
follow_redirect!
assert_template 'users/show'
assert is_logged_in?
end
end
There’s a lot of code in Listing 10.31, but the only completely novel line is
assert_equal 1, ActionMailer::Base.deliveries.size
This code verifies that exactly 1 message was delivered. Because the deliveries
array is global, we have to reset it in the setup
method to prevent our code from breaking if any other
tests deliver email (as will be the case in Section 10.2.5). Listing 10.31
also uses the assigns method for the first
time in the main tutorial; as explained in the Chapter 8
exercise (Section 8.6), assigns
lets us access instance variables in the corresponding
action. For
example, the Users controller’s create
action defines an @user variable (Listing 10.21),
so we can access it in the test using assigns(:user). Finally, note that Listing 10.31 restores the lines we
commented out in Listing 10.22.
At this point, the test suite should be green:
$ bundle exec rake test
With the test in Listing 10.31,
we’re ready to refactor a little by moving some of the
user manipulation out of the controller and into the
model. In
particular, we’ll make an activate method to
update the user’s activation attributes and a send_activation_email
to send the activation email.
The extra methods appear in Listing 10.33,
and the refactored application code appears in Listing 10.34
and Listing 10.35.
class User < ActiveRecord::Base
.
.
.
# Activates an account.
def activate
update_attribute(:activated, true)
update_attribute(:activated_at, Time.zone.now)
end
# Sends activation email.
def send_activation_email
UserMailer.account_activation(self).deliver_now
end
private
.
.
.
end
class UsersController < ApplicationController
.
.
.
def create
@user = User.new(user_params)
if @user.save
@user.send_activation_email
flash[:info] = "Please check your email to activate your account."
redirect_to root_url
else
render 'new'
end
end
.
.
.
end
class AccountActivationsController < ApplicationController
def edit
user = User.find_by(email: params[:email])
if user && !user.activated? && user.authenticated?(:activation, params[:id])
user.activate
log_in user
flash[:success] = "Account activated!"
redirect_to user
else
flash[:danger] = "Invalid activation link"
redirect_to root_url
end
end
end
Note that Listing 10.33 eliminates the use of user.,
which would break inside the User model because there is
no such variable:
-user.update_attribute(:activated, true)
-user.update_attribute(:activated_at, Time.zone.now)
+update_attribute(:activated, true)
+update_attribute(:activated_at, Time.zone.now)
(We could have switched from user to self,
but recall from Section 6.2.5 that self
is optional inside the model.)
It also changes @user to self
in the call to the User mailer:
-UserMailer.account_activation(@user).deliver_now
+UserMailer.account_activation(self).deliver_now
These are exactly the kinds of details that are easy to miss during even a simple refactoring but will be caught by a good test suite. Speaking of which, the test suite should still be green:
$ bundle exec rake test
Account activation is now completed, which is a milestone worthy of a commit:
$ git add -A
$ git commit -m "Add account activations"
10.2 Password reset
Having completed account activation (and thereby verified the user’s email address), we’re now in a good position to handle the common case of users forgetting their passwords. As we’ll see, many of the steps are similar, and we will have several opportunities to apply the lessons learned in Section 10.1. The beginning is different, though; unlike account activation, implementing password resets requires both a change to one of our views and two new forms (to handle email and new password submission).
Before writing any code, let’s mock up the expected sequence for resetting passwords. We’ll start by adding a “forgot password” link to the sample application’s login form (Figure 10.7). The “forgot password” link will go to a page with a form that takes in an email address and sends an email containing a password reset link (Figure 10.8). The reset link will go to a form for resetting the user’s password (with confirmation) (Figure 10.9).
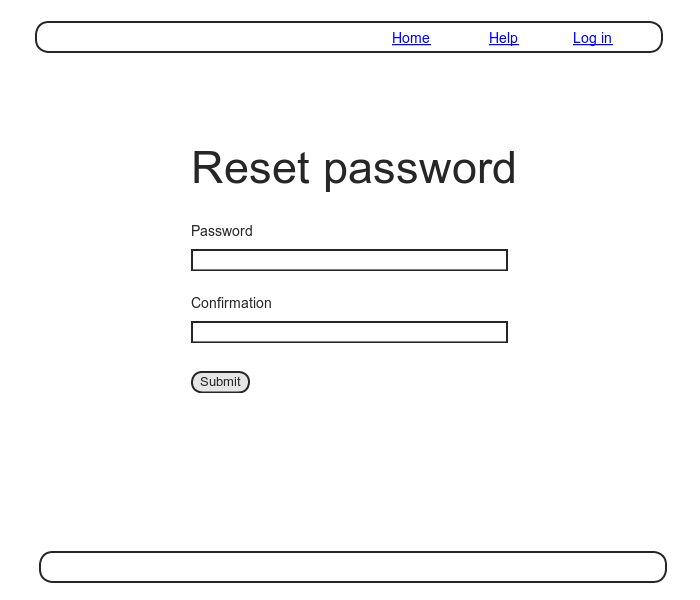
In analogy with account activations, our general plan is to make a Password Resets resource, with each password reset consisting of a reset token and corresponding reset digest. The primary sequence goes like this:
- When a user requests a password reset, find the user by the submitted email address.
- If the email address exists in the database, generate a reset token and corresponding reset digest.
- Save the reset digest to the database, and then send an email to the user with a link containing the reset token and user’s email address.
- When the user clicks the link, find the user by email address, and then authenticate the token by comparing to the reset digest.
- If authenticated, present the user with the form for changing the password.
10.2.1 Password resets resource
As with account activations (Section 10.1.1), our first step is to generate a controller for our new resource:
$ rails generate controller PasswordResets new edit --no-test-framework
Note that we’ve included a flag to skip generating tests. This is because we don’t need the controller tests (preferring instead to use the integration test in Section 10.1.4), so it’s convenient to omit them.
Because we’ll need forms both for creating new password
resets (Figure 10.8) and for updating them by
changing the password in the User model (Figure 10.9),
we need routes for new, create,
edit, and update.
We can arrange this with the resources line
shown in Listing 10.37.
Rails.application.routes.draw do
root 'static_pages#home'
get 'help' => 'static_pages#help'
get 'about' => 'static_pages#about'
get 'contact' => 'static_pages#contact'
get 'signup' => 'users#new'
get 'login' => 'sessions#new'
post 'login' => 'sessions#create'
delete 'logout' => 'sessions#destroy'
resources :users
resources :account_activations, only: [:edit]
resources :password_resets, only: [:new, :create, :edit, :update]
end
The code in Listing 10.37 arranges for the RESTful routes shown in Table 10.2. In particular, the first route in Table 10.2 gives a link to the “forgot password” form via
new_password_reset_path
as seen in Listing 10.38 and Figure 10.10.
| HTTP request | URL | Action | Named route |
| GET | /password_resets/new | new |
new_password_reset_path |
| POST | /password_resets | create |
password_resets_path |
| GET | /password_resets/<token>/edit | edit |
edit_password_reset_path(token) |
| PATCH | /password_resets/<token> | update |
password_reset_path(token) |
<% provide(:title, "Log in") %>
<h1>Log in</h1>
<div class="row">
<div class="col-md-6 col-md-offset-3">
<%= form_for(:session, url: login_path) do |f| %>
<%= f.label :email %>
<%= f.email_field :email, class: 'form-control' %>
<%= f.label :password %>
<%= link_to "(forgot password)", new_password_reset_path %>
<%= f.password_field :password, class: 'form-control' %>
<%= f.label :remember_me, class: "checkbox inline" do %>
<%= f.check_box :remember_me %>
<span>Remember me on this computer</span>
<% end %>
<%= f.submit "Log in", class: "btn btn-primary" %>
<% end %>
<p>New user? <%= link_to "Sign up now!", signup_path %></p>
</div>
</div>
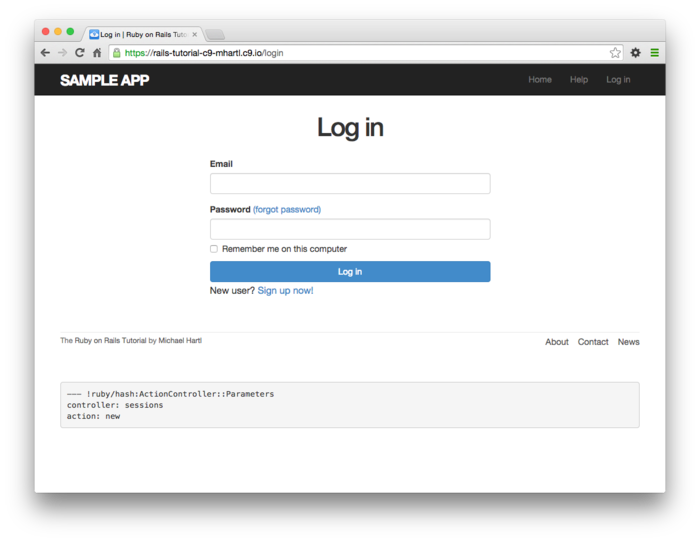
The data model for password resets is similar to the one
used for account activation (Figure 10.1). Following the pattern
set by remember tokens (Section 8.4) and account activation
tokens (Section 10.1), password resets will
pair a virtual reset token for use in the reset email with
a corresponding reset digest for retrieving the user. If we instead stored
an unhashed token, an attacker with access to the database
could send a reset request to the user’s email address and
then use the token and email to visit the corresponding
password reset link, thereby gaining control of the
account. Using a
digest for password resets is thus essential.
As an additional security precaution, we’ll also plan to expire
the reset link after a couple of hours, which requires
recording the time when the reset gets sent.
The resulting reset_digest and reset_sent_at
attributes appear in Figure 10.11.
The migration to add the attributes from Figure 10.11 appears as follows:
$ rails generate migration add_reset_to_users reset_digest:string \
> reset_sent_at:datetime
We then migrate as usual:
$ bundle exec rake db:migrate
10.2.2 Password resets controller and form
To make the view for new password resets, we’ll work in analogy with the previous form for making a new non–Active Record resource, namely, the login form (Listing 8.2) for creating a new session, shown again in Listing 10.39 for reference.
<% provide(:title, "Log in") %>
<h1>Log in</h1>
<div class="row">
<div class="col-md-6 col-md-offset-3">
<%= form_for(:session, url: login_path) do |f| %>
<%= f.label :email %>
<%= f.email_field :email, class: 'form-control' %>
<%= f.label :password %>
<%= f.password_field :password, class: 'form-control' %>
<%= f.label :remember_me, class: "checkbox inline" do %>
<%= f.check_box :remember_me %>
<span>Remember me on this computer</span>
<% end %>
<%= f.submit "Log in", class: "btn btn-primary" %>
<% end %>
<p>New user? <%= link_to "Sign up now!", signup_path %></p>
</div>
</div>
The new password resets form has a lot in common with Listing 10.39; the most important
differences are the use of a different resource and URL in
the call to form_for and the omission of the
password attribute.
The result appears in Listing 10.40
and Figure 10.12.
<% provide(:title, "Forgot password") %>
<h1>Forgot password</h1>
<div class="row">
<div class="col-md-6 col-md-offset-3">
<%= form_for(:password_reset, url: password_resets_path) do |f| %>
<%= f.label :email %>
<%= f.email_field :email, class: 'form-control' %>
<%= f.submit "Submit", class: "btn btn-primary" %>
<% end %>
</div>
</div>
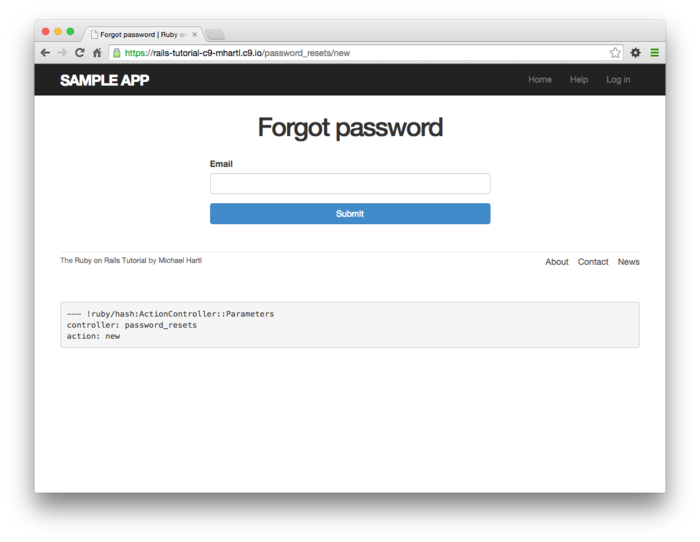
Upon submitting the form in Figure 10.12,
we need to find the user by email address and update its
attributes with the password reset token and sent-at
timestamp. We then
redirect to the root URL with an informative flash
message. As with
login (Listing 8.9), in the case of an invalid
submission we re-render the new page with a
flash.now message.
The results appear in Listing 10.41.
create action
for password resets.
app/controllers/password_resets_controller.rb
class PasswordResetsController < ApplicationController
def new
end
def create
@user = User.find_by(email: params[:password_reset][:email].downcase)
if @user
@user.create_reset_digest
@user.send_password_reset_email
flash[:info] = "Email sent with password reset instructions"
redirect_to root_url
else
flash.now[:danger] = "Email address not found"
render 'new'
end
end
def edit
end
end
The code in the User model parallels the create_activation_digest
method used in the before_create callback (Listing 10.3), as seen in Listing 10.42.
class User < ActiveRecord::Base
attr_accessor :remember_token, :activation_token, :reset_token
before_save :downcase_email
before_create :create_activation_digest
.
.
.
# Activates an account.
def activate
update_attribute(:activated, true)
update_attribute(:activated_at, Time.zone.now)
end
# Sends activation email.
def send_activation_email
UserMailer.account_activation(self).deliver_now
end
# Sets the password reset attributes.
def create_reset_digest
self.reset_token = User.new_token
update_attribute(:reset_digest, User.digest(reset_token))
update_attribute(:reset_sent_at, Time.zone.now)
end
# Sends password reset email.
def send_password_reset_email
UserMailer.password_reset(self).deliver_now
end
private
# Converts email to all lower-case.
def downcase_email
self.email = email.downcase
end
# Creates and assigns the activation token and digest.
def create_activation_digest
self.activation_token = User.new_token
self.activation_digest = User.digest(activation_token)
end
end
As shown in Figure 10.13, at this point the application’s behavior for invalid email addresses is already working. To get the application working upon submission of a valid email address as well, we need to define a password reset mailer method.
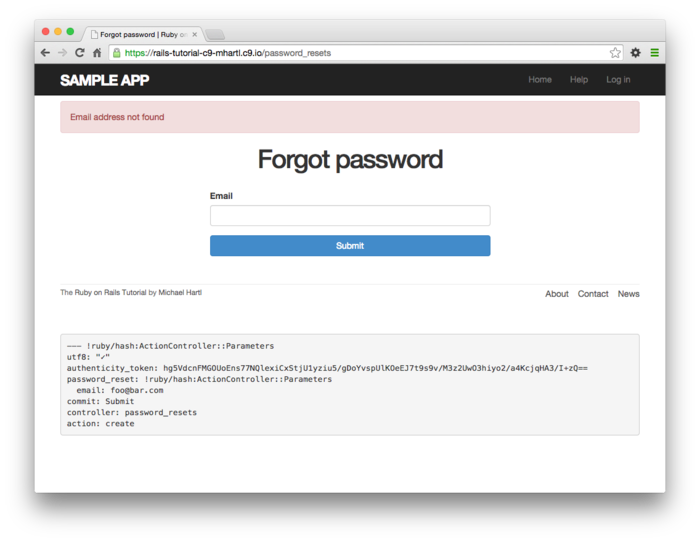
10.2.3 Password reset mailer method
The code to send the password reset email appears in Listing 10.42 as follows:
UserMailer.password_reset(self).deliver_now
The password reset mailer method needed to get this
working is nearly identical to the mailer for account
activation developed in Section 10.1.2. We first create a password_reset
method in the user mailer (Listing 10.43),
and then define view templates for plain-text email (Listing 10.44)
and HTML email (Listing 10.45).
class UserMailer < ApplicationMailer
def account_activation(user)
@user = user
mail to: user.email, subject: "Account activation"
end
def password_reset(user)
@user = user
mail to: user.email, subject: "Password reset"
end
end
To reset your password click the link below:
<%= edit_password_reset_url(@user.reset_token, email: @user.email) %>
This link will expire in two hours.
If you did not request your password to be reset, please ignore this email and
your password will stay as it is.
<h1>Password reset</h1>
<p>To reset your password click the link below:</p>
<%= link_to "Reset password", edit_password_reset_url(@user.reset_token,
email: @user.email) %>
<p>This link will expire in two hours.</p>
<p>
If you did not request your password to be reset, please ignore this email and
your password will stay as it is.
</p>
As with account activation emails (Section 10.1.2), we can preview password reset emails using the Rails email previewer. The code is exactly analogous to Listing 10.16, as shown in Listing 10.46.
# Preview all emails at http://localhost:3000/rails/mailers/user_mailer
class UserMailerPreview < ActionMailer::Preview
# Preview this email at
# http://localhost:3000/rails/mailers/user_mailer/account_activation
def account_activation
user = User.first
user.activation_token = User.new_token
UserMailer.account_activation(user)
end
# Preview this email at
# http://localhost:3000/rails/mailers/user_mailer/password_reset
def password_reset
user = User.first
user.reset_token = User.new_token
UserMailer.password_reset(user)
end
end
With the code in Listing 10.46, the HTML and text email previews appear as in Figure 10.14 and Figure 10.15.
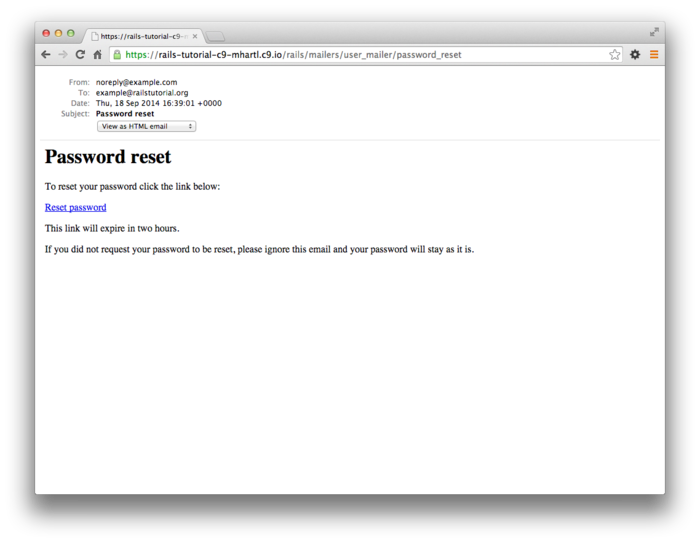
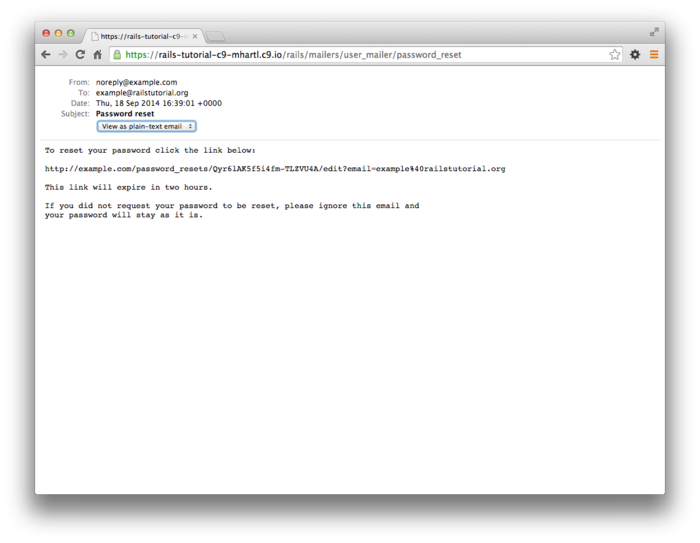
In analogy with the account activation mailer method test
(Listing 10.18), we’ll write a short
test of the password reset mailer method, as shown in Listing 10.47.
Note that we need to create a password reset token for use
in the views; unlike the activation token, which is
created for every user by a before_create
callback (Listing 10.3), the password reset token
is created only when a user successfully submits the
“forgot password” form.
This will occur naturally in an integration test (Listing 10.54),
but in the present context we need to create one by hand.
require 'test_helper'
class UserMailerTest < ActionMailer::TestCase
test "account_activation" do
user = users(:michael)
user.activation_token = User.new_token
mail = UserMailer.account_activation(user)
assert_equal "Account activation", mail.subject
assert_equal [user.email], mail.to
assert_equal ["noreply@example.com"], mail.from
assert_match user.name, mail.body.encoded
assert_match user.activation_token, mail.body.encoded
assert_match CGI::escape(user.email), mail.body.encoded
end
test "password_reset" do
user = users(:michael)
user.reset_token = User.new_token
mail = UserMailer.password_reset(user)
assert_equal "Password reset", mail.subject
assert_equal [user.email], mail.to
assert_equal ["noreply@example.com"], mail.from
assert_match user.reset_token, mail.body.encoded
assert_match CGI::escape(user.email), mail.body.encoded
end
end
At this point, the test suite should be green:
$ bundle exec rake test
With the code in Listing 10.43, Listing 10.44, and Listing 10.45, submission of a valid email address appears as shown in Figure 10.16. The corresponding email appears in the server log and should look something like Listing 10.49.
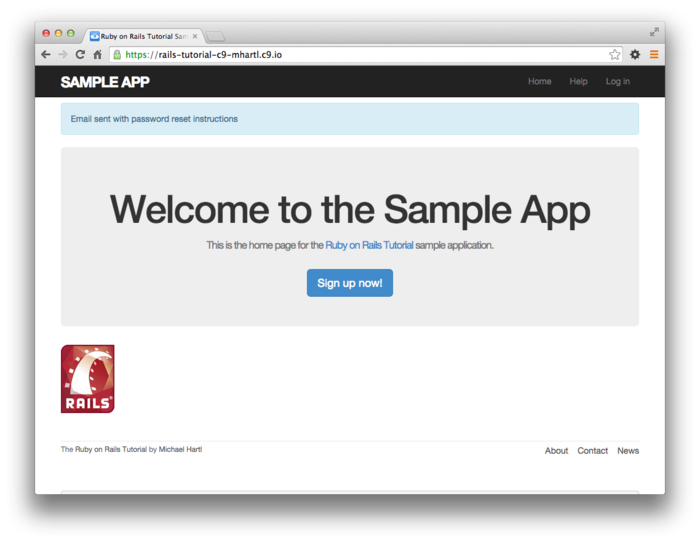
Sent mail to michael@michaelhartl.com (66.8ms)
Date: Thu, 04 Sep 2014 01:04:59 +0000
From: noreply@example.com
To: michael@michaelhartl.com
Message-ID: <5407babbee139_8722b257d04576a@mhartl-rails-tutorial-953753.mail>
Subject: Password reset
Mime-Version: 1.0
Content-Type: multipart/alternative;
boundary="--==_mimepart_5407babbe3505_8722b257d045617";
charset=UTF-8
Content-Transfer-Encoding: 7bit
----==_mimepart_5407babbe3505_8722b257d045617
Content-Type: text/plain;
charset=UTF-8
Content-Transfer-Encoding: 7bit
To reset your password click the link below:
http://rails-tutorial-c9-mhartl.c9.io/password_resets/3BdBrXeQZSWqFIDRN8cxHA/
edit?email=michael%40michaelhartl.com
This link will expire in two hours.
If you did not request your password to be reset, please ignore this email and
your password will stay as it is.
----==_mimepart_5407babbe3505_8722b257d045617
Content-Type: text/html;
charset=UTF-8
Content-Transfer-Encoding: 7bit
<h1>Password reset</h1>
<p>To reset your password click the link below:</p>
<a href="http://rails-tutorial-c9-mhartl.c9.io/
password_resets/3BdBrXeQZSWqFIDRN8cxHA/
edit?email=michael%40michaelhartl.com">Reset password</a>
<p>This link will expire in two hours.</p>
<p>
If you did not request your password to be reset, please ignore this email and
your password will stay as it is.
</p>
----==_mimepart_5407babbe3505_8722b257d045617--
10.2.4 Resetting the password
To get links of the form
http://example.com/password_resets/3BdBrXeQZSWqFIDRN8cxHA/edit?email=foo%40bar.com
to work, we need a form for resetting passwords.
The task is similar to updating users via the user edit
view (Listing 9.2), but in this case with
only password and confirmation fields.
There’s an additional complication, though: we expect to
find the user by email address, which means we need its
value in both the edit and update
actions. The email
will automatically be available in the edit
action because of its presence in the link above, but
after we submit the form its value will be lost.
The solution is to use a hidden field to place
(but not display) the email on the page, and then submit
it along with the rest of the form’s information.
The result appears in Listing 10.50.
<% provide(:title, 'Reset password') %>
<h1>Reset password</h1>
<div class="row">
<div class="col-md-6 col-md-offset-3">
<%= form_for(@user, url: password_reset_path(params[:id])) do |f| %>
<%= render 'shared/error_messages' %>
<%= hidden_field_tag :email, @user.email %>
<%= f.label :password %>
<%= f.password_field :password, class: 'form-control' %>
<%= f.label :password_confirmation, "Confirmation" %>
<%= f.password_field :password_confirmation, class: 'form-control' %>
<%= f.submit "Update password", class: "btn btn-primary" %>
<% end %>
</div>
</div>
Note that Listing 10.50 uses the form tag helper
hidden_field_tag :email, @user.email
instead of
f.hidden_field :email, @user.email
because the reset link puts the email in params[:email],
whereas the latter would put it in params[:user][:email].
To get the form to render, we need to define an @user
variable in the Password Resets controller’s edit
action. As with
account activation (Listing 10.29),
this involves finding the user corresponding to the email
address in params[:email].
We then need to verify that the user is valid, i.e., that
it exists, is activated, and is authenticated according to
the reset token from params[:id] (using the
generalized authenticated? method defined in
Listing 10.24).
Because the existence of a valid @user is
needed in both the edit and update
actions, we’ll put the code to find and validate it in a
couple of before filters, as shown in Listing 10.51.
edit action
for password reset.
app/controllers/password_resets_controller.rb
class PasswordResetsController < ApplicationController
before_action :get_user, only: [:edit, :update]
before_action :valid_user, only: [:edit, :update]
.
.
.
def edit
end
private
def get_user
@user = User.find_by(email: params[:email])
end
# Confirms a valid user.
def valid_user
unless (@user && @user.activated? &&
@user.authenticated?(:reset, params[:id]))
redirect_to root_url
end
end
end
In Listing 10.51, compare the use of
authenticated?(:reset, params[:id])
to
authenticated?(:remember, cookies[:remember_token])
in Listing 10.26 and
authenticated?(:activation, params[:id])
in Listing 10.29. Together, these three uses complete the authentication methods shown in Table 10.1.
With the code as above, following the link from Listing 10.49 should render a password reset form. The result appears in Figure 10.17.
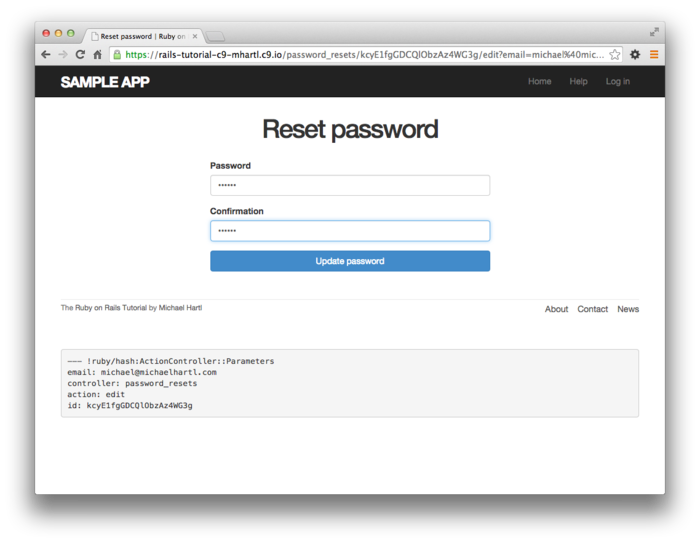
To define the update action corresponding
to the edit action in Listing 10.51,
we need to consider four cases: an expired password reset,
a successful update, a failed update (due to an invalid
password), and a failed update (which initially looks
“successful”) due to a blank password and confirmation. The first case
applies to both the edit and update
actions, and so logically belongs in a before filter (Listing 10.52). The next two cases
correspond to the two branches in the main if
statement shown in Listing 10.52. Because the edit form
is modifying an Active Record model object (i.e., a user),
we can rely on the shared partial from Listing 10.50
to render error messages.
The only exception is the case where the password is
blank, which is currently allowed by our User model (Listing 9.10)
and so needs to be caught explicitly and handled with a
flash message.8
update
action for password reset.
app/controllers/password_resets_controller.rb
class PasswordResetsController < ApplicationController
before_action :get_user, only: [:edit, :update]
before_action :valid_user, only: [:edit, :update]
before_action :check_expiration, only: [:edit, :update]
def new
end
def create
@user = User.find_by(email: params[:password_reset][:email].downcase)
if @user
@user.create_reset_digest
@user.send_password_reset_email
flash[:info] = "Email sent with password reset instructions"
redirect_to root_url
else
flash.now[:danger] = "Email address not found"
render 'new'
end
end
def edit
end
def update
if password_blank?
flash.now[:danger] = "Password can't be blank"
render 'edit'
elsif @user.update_attributes(user_params)
log_in @user
flash[:success] = "Password has been reset."
redirect_to @user
else
render 'edit'
end
end
private
def user_params
params.require(:user).permit(:password, :password_confirmation)
end
# Returns true if password is blank.
def password_blank?
params[:user][:password].blank?
end
# Before filters
def get_user
@user = User.find_by(email: params[:email])
end
# Confirms a valid user.
def valid_user
unless (@user && @user.activated? &&
@user.authenticated?(:reset, params[:id]))
redirect_to root_url
end
end
# Checks expiration of reset token.
def check_expiration
if @user.password_reset_expired?
flash[:danger] = "Password reset has expired."
redirect_to new_password_reset_url
end
end
end
The implementation in Listing 10.52 delegates the boolean test for password reset expiration to the User model via the code
@user.password_reset_expired?
To get this to work, we need to define the password_reset_expired?
method. As
indicated in the email templates from Section 10.2.3,
we’ll consider a password reset to be expired if it was
sent more than two hours ago, which we can express in Ruby
as follows:
reset_sent_at < 2.hours.ago
This can be confusing if you read < as
“less than”, because then it sounds like “Password reset
sent less than two hours ago,” which is the opposite of
what we want. In
this context, it’s better to read < as
“earlier than”, which gives something like “Password reset
sent earlier than two hours ago.”
That is what we want, and it leads to the password_reset_expired?
method in Listing 10.53. (For a formal
demonstration that the comparison is correct, see the
proof in Section 10.6.)
class User < ActiveRecord::Base
.
.
.
# Returns true if a password reset has expired.
def password_reset_expired?
reset_sent_at < 2.hours.ago
end
private
.
.
.
end
With the code in Listing 10.53,
the update action in Listing 10.52
should be working.
The results for invalid and valid submissions are shown in
Figure 10.18 and Figure 10.19,
respectively.
(Lacking the patience to wait two hours, we’ll cover the
third branch in a test, which is left as an exercise (Section 10.5).)
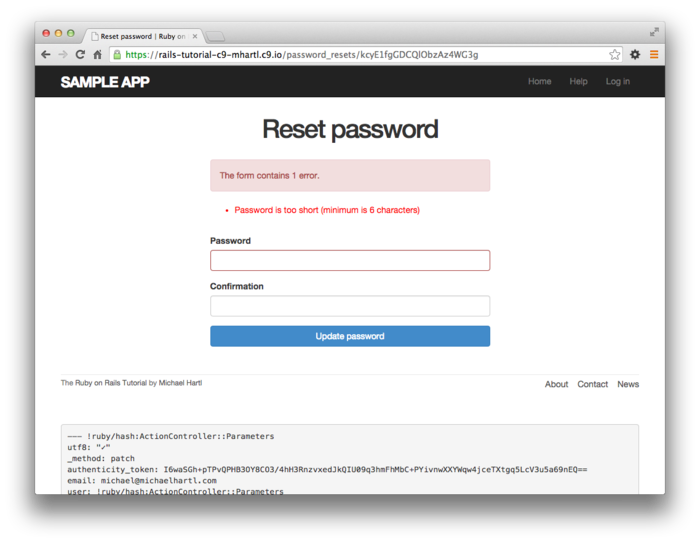
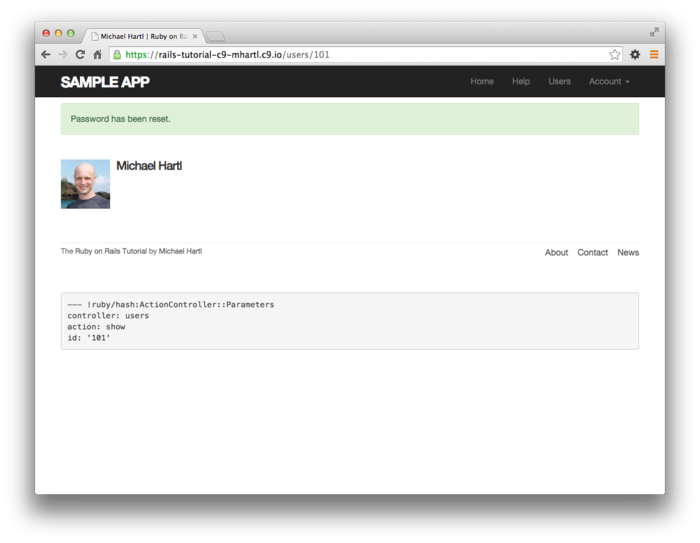
10.2.5 Password reset test
In this section, we’ll write an integration test covering two of the three branches in Listing 10.52, invalid and valid submission. (As noted above, testing the third branch is left as an exercise.) We’ll get started by generating a test file for password resets:
$ rails generate integration_test password_resets
invoke test_unit
create test/integration/password_resets_test.rb
The steps to test password resets broadly parallel the test for account activation from Listing 10.31, though there is a difference at the outset: we first visit the “forgot password” form and submit invalid and then valid email addresses, the latter of which creates a password reset token and sends the reset email. We then visit the link from the email and again submit invalid and valid information, verifying the correct behavior in each case. The resulting test, shown in Listing 10.54, is an excellent exercise in reading code.
require 'test_helper'
class PasswordResetsTest < ActionDispatch::IntegrationTest
def setup
ActionMailer::Base.deliveries.clear
@user = users(:michael)
end
test "password resets" do
get new_password_reset_path
assert_template 'password_resets/new'
# Invalid email
post password_resets_path, password_reset: { email: "" }
assert_not flash.empty?
assert_template 'password_resets/new'
# Valid email
post password_resets_path, password_reset: { email: @user.email }
assert_not_equal @user.reset_digest, @user.reload.reset_digest
assert_equal 1, ActionMailer::Base.deliveries.size
assert_not flash.empty?
assert_redirected_to root_url
# Password reset form
user = assigns(:user)
# Wrong email
get edit_password_reset_path(user.reset_token, email: "")
assert_redirected_to root_url
# Inactive user
user.toggle!(:activated)
get edit_password_reset_path(user.reset_token, email: user.email)
assert_redirected_to root_url
user.toggle!(:activated)
# Right email, wrong token
get edit_password_reset_path('wrong token', email: user.email)
assert_redirected_to root_url
# Right email, right token
get edit_password_reset_path(user.reset_token, email: user.email)
assert_template 'password_resets/edit'
assert_select "input[name=email][type=hidden][value=?]", user.email
# Invalid password & confirmation
patch password_reset_path(user.reset_token),
email: user.email,
user: { password: "foobaz",
password_confirmation: "barquux" }
assert_select 'div#error_explanation'
# Blank password
patch password_reset_path(user.reset_token),
email: user.email,
user: { password: " ",
password_confirmation: "foobar" }
assert_not flash.empty?
assert_template 'password_resets/edit'
# Valid password & confirmation
patch password_reset_path(user.reset_token),
email: user.email,
user: { password: "foobaz",
password_confirmation: "foobaz" }
assert is_logged_in?
assert_not flash.empty?
assert_redirected_to user
end
end
Most of the ideas in Listing 10.54
have appeared previously in this tutorial; the only really
novel element is the test of the input tag:
assert_select "input[name=email][type=hidden][value=?]", user.email
This makes sure that there is an input tag
with the right name, (hidden) type, and email address:
<input id="email" name="email" type="hidden" value="michael@example.com" />
With the code as in Listing 10.54, our test suite should be green:
$ bundle exec rake test
10.3 Email in production
As a capstone to our work on account activation and password reminders, in this section we’ll configure our application so that it can actually send email in production. We’ll first get set up with a free service to send email, and then configure and deploy our application.
To send email in production, we’ll use SendGrid, which is available as an add-on at Heroku for verified accounts. (This requires adding credit card information to your Heroku account, but there is no charge when verifying an account.) For our purposes, the “starter” tier (which is limited to 200 emails a day but costs nothing) is the best fit. We can add it to our app as follows:
$ heroku addons:add sendgrid:starter
To configure our application to use SendGrid, we need to
fill out the SMTP settings for our production
environment. As
shown in Listing 10.56, you will also have to
define a host variable with the address of
your production website.
Rails.application.configure do
.
.
.
config.action_mailer.raise_delivery_errors = true
config.action_mailer.delivery_method = :smtp
host = '<your heroku app>.herokuapp.com'
config.action_mailer.default_url_options = { host: host }
ActionMailer::Base.smtp_settings = {
:address => 'smtp.sendgrid.net',
:port => '587',
:authentication => :plain,
:user_name => ENV['SENDGRID_USERNAME'],
:password => ENV['SENDGRID_PASSWORD'],
:domain => 'heroku.com',
:enable_starttls_auto => true
}
.
.
.
end
The email configuration in Listing 10.56
includes the user_name and password
of the SendGrid account, but note that they are accessed via
the ENV environment variable instead of being
hard-coded. This is
a best practice for production applications, which for
security reasons should never expose sensitive information
such as raw passwords in source code.
In the present case, these variables are configured
automatically via the SendGrid add-on, but we’ll see an
example in Section 11.4.4 where we’ll have to define
them ourselves. In
case you’re curious, you can view the environment variables
used in Listing 10.56 as follows:
$ heroku config:get SENDGRID_USERNAME
$ heroku config:get SENDGRID_PASSWORD
At this point, you should merge the topic branch into master:
$ bundle exec rake test
$ git add -A
$ git commit -m "Add password resets & email configuration"
$ git checkout master
$ git merge account-activation-password-reset
Then push up to the remote repository and deploy to Heroku:
$ bundle exec rake test
$ git push
$ git push heroku
$ heroku run rake db:migrate
Once the Heroku deploy has finished, try signing up for the sample application in production using an email address you control. You should get an activation email as implemented in Section 10.1.1 (Figure 10.20). If you then forget (or pretend to forget) your password, you can reset it as developed in Section 10.2 (Figure 10.21).
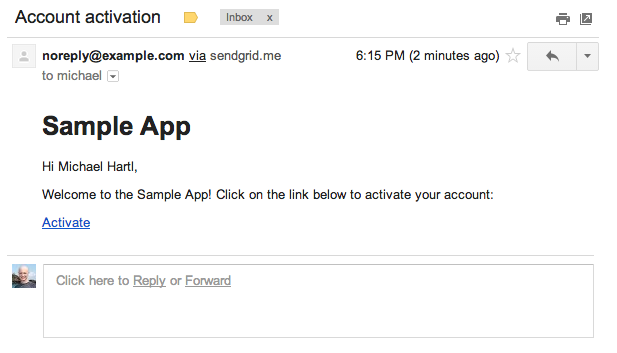
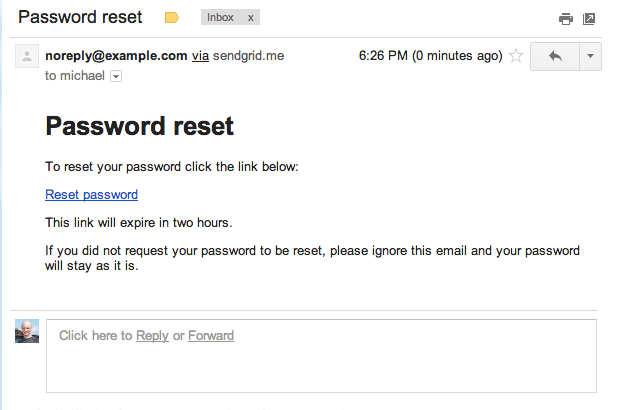
10.4 Висновок
With the added account activation and password resets, our
sample application’s sign up, log in, and log out machinery
is complete and professional-grade.
The rest of the Ruby on Rails Tutorial builds on
this foundation to make a site with Twitter-like microposts
(Chapter 11) and a status feed of posts
from followed users (Chapter 12).
In the process, we’ll learn about some of the most powerful
features of Rails, including image upload, custom database
queries, and advanced data modeling with has_many
and has_many :through.
10.4.1 Що ми вивчили в цій главі
- Like sessions, account activations can be modeled as a resource despite not being Active Record objects.
- Rails can generate Active Mailer actions and views to send email.
- Action Mailer supports both plain-text and HTML mail.
- As with ordinary actions and views, instance variables defined in mailer actions are available in mailer views.
- Like sessions and account activations, password resets can be modeled as a resource despite not being Active Record objects.
- Account activations and password resets use a generated token to create a unique URL for activating users or resetting passwords, respectively.
- Both mailer tests and integration tests are useful for verifying the behavior of the User mailer.
- We can send email in production using SendGrid.
10.5 Вправи
Note: The Solutions Manual for Вправи, with solutions to every exercise in the Ruby on Rails Tutorial book, is included for free with every purchase at www.railstutorial.org.
For a suggestion on how to avoid conflicts between Вправи and the main tutorial, see the note on exercise topic branches in Section 3.6.
- Write an integration test for the expired password reset
branch in Listing 10.52 by filling in the
template shown in Listing 10.57. (This code introduces
response.body, which returns the full HTML body of the page.) There are many ways to test for the result of an expiration, but the method suggested by Listing 10.57 is to (case-insensitively) check that the response body includes the word “expired”. - Right now all users are displayed on the user
index page at /users and are visible via the URL
/users/:id, but it makes sense to show users only if they
are activated.
Arrange for this behavior by filling in the template shown
in Listing 10.58.9 (This uses the Active
Record
wheremethod, which we’ll learn more about in Section 11.3.3.) Extra credit: Write integration tests for both /users and /users/:id. - In Listing 10.42, both the
activateandcreate_reset_digestmethods make two calls toupdate_attribute, each of which requires a separate database transaction. By filling in the template shown in Listing 10.59, replace each pair ofupdate_attributecalls with a single call toupdate_columns, which hits the database only once. After making the changes, verify that the test suite is still green.
require 'test_helper'
class PasswordResetsTest < ActionDispatch::IntegrationTest
def setup
ActionMailer::Base.deliveries.clear
@user = users(:michael)
end
.
.
.
test "expired token" do
get new_password_reset_path
post password_resets_path, password_reset: { email: @user.email }
@user = assigns(:user)
@user.update_attribute(:reset_sent_at, 3.hours.ago)
patch password_reset_path(@user.reset_token),
email: @user.email,
user: { password: "foobar",
password_confirmation: "foobar" }
assert_response :redirect
follow_redirect!
assert_match /FILL_IN/i, response.body
end
end
class UsersController < ApplicationController
.
.
.
def index
@users = User.where(activated: FILL_IN).paginate(page: params[:page])
end
def show
@user = User.find(params[:id])
redirect_to root_url and return unless FILL_IN
end
.
.
.
end
update_columns.
app/models/user.rb
class User < ActiveRecord::Base
attr_accessor :remember_token, :activation_token, :reset_token
before_save :downcase_email
before_create :create_activation_digest
.
.
.
# Activates an account.
def activate
update_columns(activated: FILL_IN, activated_at: FILL_IN)
end
# Sends activation email.
def send_activation_email
UserMailer.account_activation(self).deliver_now
end
# Sets the password reset attributes.
def create_reset_digest
self.reset_token = User.new_token
update_columns(reset_digest: FILL_IN,
reset_sent_at: FILL_IN)
end
# Sends password reset email.
def send_password_reset_email
UserMailer.password_reset(self).deliver_now
end
private
# Converts email to all lower-case.
def downcase_email
self.email = email.downcase
end
# Creates and assigns the activation token and digest.
def create_activation_digest
self.activation_token = User.new_token
self.activation_digest = User.digest(activation_token)
end
end
10.6 Proof of expiration comparison
In this section, we’ll prove that the comparison for
password expiration in Section 10.2.4
is correct. We start
by defining two time intervals.
Let
If we write the time now as
and
Plugging Eq. (10.2) and Eq. (10.3) into (10.1) then gives
which upon multiplying through by
Converting (10.4) to code with the value password_reset_expired? method shown
in Listing 10.53:
def password_reset_expired?
reset_sent_at < 2.hours.ago
end
As noted in Section 10.2.4, if we read <
as “earlier than” instead of “less than”, this code makes
sense as the English sentence “The password reset was sent
earlier than two hours ago.”
- Technically, a user could update their account with an erroneous email address using the account settings update feature from Section 9.1, but the current implementation gets us most of the benefit of email verification without too much work. ↑
- We could use the user’s id instead, since it’s already exposed in the URLs of our application, but using email addresses is more future-proof in case we want to obfuscate user ids for any reason (such as to prevent competitors from knowing how many users our application has, for example). ↑
- It might even make more sense to
use an
updateaction, but the activation link needs to be sent in an email and hence should involve a regular browser click, which issues a GET request instead of the PATCH request required by theupdateaction. ↑ - Because we’ll be using an
editaction, we could includeediton the command line, but this would also generate both an edit view and a test, neither of which we’ll turn out to need. ↑ - For example, an attacker with access to the database could immediately activate newly created accounts, thereby logging in as the user, and could then change the password to gain control. ↑
- URLs can contain multiple query
parameters, consisting of multiple key-value pairs
separated by the ampersand character
&, as in/edit?name=Foo%20Bar&email=foo%40example.com. ↑ - The way to learn how to do
something like this is by Googling “ruby rails escape url”. You will find two main possibilities,
URI::encode(str)andCGI::escape(str). Trying them both reveals that the latter works. (Actually, there’s a third possibility as well: theERB::Utillibrary supplies a url_encode method that has the same effect.) ↑ - We need only handle the case where the password is blank because if the confirmation is blank, the confirmation validation (which is skipped if the password is blank) will catch the problem and supply a relevant error message. ↑
- Note that Listing 10.58
uses
andin place of&&. The two are nearly identical, but the latter operator has a higher precedence, which binds too tightly toroot_urlin this case. We could fix the problem by puttingroot_urlin parentheses, but the idiomatically correct way to do it is to useandinstead. ↑
Chapter 11 User microposts
In the course of developing the core sample application,
we’ve now encountered four resources—users, sessions,
account activations, and password resets—but only the first
of these is backed by an Active Record model with a table in
the database. The
time has finally come to add a second such resource: user microposts,
which are short messages associated with a particular user.1 We first saw microposts
in larval form in Chapter 2, and in this chapter we will
make a full-strength version of the sketch from Section 2.3
by constructing the Micropost data model, associating it
with the User model using the has_many and belongs_to
methods, and then making the forms and partials needed to
manipulate and display the results (including, in Section 11.4,
uploaded images). In
Chapter 12, we’ll complete our tiny
Twitter clone by adding the notion of following
users in order to receive a feed of their
microposts.
11.1 A Micropost model
We begin the Microposts resource by creating a Micropost model, which captures the essential characteristics of microposts. What follows builds on the work from Section 2.3; as with the model in that section, our new Micropost model will include data validations and an association with the User model. Unlike that model, the present Micropost model will be fully tested, and will also have a default ordering and automatic destruction if its parent user is destroyed.
If you’re using Git for version control, I suggest making a topic branch at this time:
$ git checkout master
$ git checkout -b user-microposts
11.1.1 The basic model
The Micropost model needs only two attributes: a content
attribute to hold the micropost’s content and a user_id
to associate a micropost with a particular user.
The result is a Micropost model with the structure shown
in Figure 11.1.
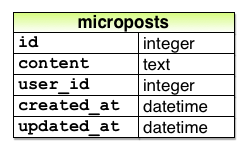
It’s worth noting that the model in Figure 11.1
uses the text data type for micropost
content (instead of string), which is
capable of storing an arbitrary amount of text.
Even though the content will be restricted to fewer than
140 characters (Section 11.1.2) and hence would fit
inside the 255-character string type, using
text better expresses the nature of
microposts, which are more naturally thought of as blocks
of text. Indeed,
in Section 11.3.2 we’ll use a text area
instead of a text field for submitting microposts.
In addition, using text gives us greater
flexibility should we wish to increase the length limit at
a future date (as part of internationalization, for
example). Finally,
using the text type results in no performance difference in
production,2
As with the case of the User model (Listing 6.1),
we generate the Micropost model using generate
model:
$ rails generate model Micropost content:text user:references
The generate command produces a migration
to create a microposts table in the database
(Listing 11.1); compare it to the
analogous migration for the users table from
Listing 6.2.
The biggest difference is the use of references,
which automatically adds a user_id column
(along with an index and a foreign key reference)3
for use in the user/micropost association.
As with the User model, the Micropost model migration
automatically includes the t.timestamps
line, which (as mentioned in Section 6.1.1)
adds the magic created_at and updated_at
columns shown in Figure 11.1.
(We’ll put the created_at column to work in
Section 11.1.4 and Section 11.2.1.)
class CreateMicroposts < ActiveRecord::Migration
def change
create_table :microposts do |t|
t.text :content
t.references :user, index: true
t.timestamps null: false
end
add_foreign_key :microposts, :users
add_index :microposts, [:user_id, :created_at]
end
end
Because we expect to retrieve all the microposts
associated with a given user id in reverse order of
creation, Listing 11.1 adds an index (Box 6.2)
on the user_id and created_at
columns:
add_index :microposts, [:user_id, :created_at]
By including both the user_id and created_at
columns as an array, we arrange for Rails to create a multiple
key index, which means that Active Record uses both
keys at the same time.
With the migration in Listing 11.1, we can update the database as usual:
$ bundle exec rake db:migrate
11.1.2 Micropost validations
Now that we’ve created the basic model, we’ll add some
validations to enforce the desired design constraints. One of the necessary
aspects of the Micropost model is the presence of a user
id to indicate which user made the micropost.
The idiomatically correct way to do this is to use Active
Record associations, which we’ll implement in Section 11.1.3, but for now we’ll work
with the Micropost model directly.
The initial micropost tests parallel those for the User
model (Listing 6.7).
In the setup step, we create a new micropost
while associating it with a valid user from the fixtures,
and then check that the result is valid.
Because every micropost should have a user id, we’ll add a
test for a user_id presence validation. Putting these
elements together yields the test in Listing 11.2.
require 'test_helper'
class MicropostTest < ActiveSupport::TestCase
def setup
@user = users(:michael)
# This code is not idiomatically correct.
@micropost = Micropost.new(content: "Lorem ipsum", user_id: @user.id)
end
test "should be valid" do
assert @micropost.valid?
end
test "user id should be present" do
@micropost.user_id = nil
assert_not @micropost.valid?
end
end
As indicated by the comment in the setup
method, the code to create the micropost is not
idiomatically correct, which we’ll fix in Section 11.1.3.
The validity test is already green, but the user id presence test should be red because there are not currently any validations on the Micropost model:
$ bundle exec rake test:models
To fix this, we just need to add the user id presence
validation shown in Listing 11.4. (Note the belongs_to
line in Listing 11.4, which is generated
automatically by the migration in Listing 11.1. Section 11.1.3
discusses the effects of this line in more depth.)
user_id.
green app/models/micropost.rb
class Micropost < ActiveRecord::Base
belongs_to :user
validates :user_id, presence: true
end
The model tests should now be green:
$ bundle exec rake test:models
Next, we’ll add validations for the micropost’s content
attribute (following the example from Section 2.3.2). As with the user_id,
the content attribute must be present, and
it is further constrained to be no longer than 140
characters, making it an honest micropost. We’ll first write
some simple tests, which generally follow the examples
from the User model validation tests in Section 6.2,
as shown in Listing 11.6.
require 'test_helper'
class MicropostTest < ActiveSupport::TestCase
def setup
@user = users(:michael)
@micropost = Micropost.new(content: "Lorem ipsum", user_id: @user.id)
end
test "should be valid" do
assert @micropost.valid?
end
test "user id should be present" do
@micropost.user_id = nil
assert_not @micropost.valid?
end
test "content should be present " do
@micropost.content = " "
assert_not @micropost.valid?
end
test "content should be at most 140 characters" do
@micropost.content = "a" * 141
assert_not @micropost.valid?
end
end
As in Section 6.2, the code in Listing 11.6 uses string multiplication to test the micropost length validation:
$ rails console
>> "a" * 10
=> "aaaaaaaaaa"
>> "a" * 141
=> "aaaaaaaaaaaaaaaaaaaaaaaaaaaaaaaaaaaaaaaaaaaaaaaaaaaaaaaaaaaaaaaaaaaaaaa
aaaaaaaaaaaaaaaaaaaaaaaaaaaaaaaaaaaaaaaaaaaaaaaaaaaaaaaaaaaaaaaaaaaaaa"
The corresponding application code is virtually identical
to the name validation for users (Listing 6.16),
as shown in Listing 11.7.
class Micropost < ActiveRecord::Base
belongs_to :user
validates :user_id, presence: true
validates :content, presence: true, length: { maximum: 140 }
end
At this point, the full test suite should be green:
$ bundle exec rake test
11.1.3 User/Micropost associations
When constructing data models for web applications, it is essential to be able to make associations between individual models. In the present case, each micropost is associated with one user, and each user is associated with (potentially) many microposts—a relationship seen briefly in Section 2.3.3 and shown schematically in Figure 11.2 and Figure 11.3. As part of implementing these associations, we’ll write tests for the Micropost model and add a couple of tests to the User model.
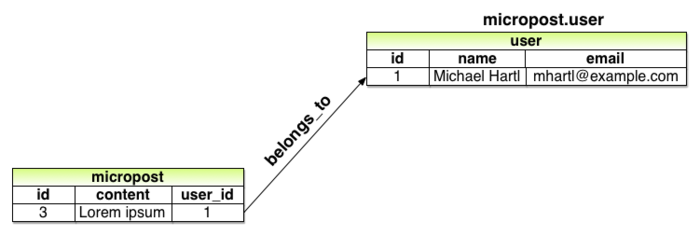
belongs_to
relationship between a micropost and its associated
user. 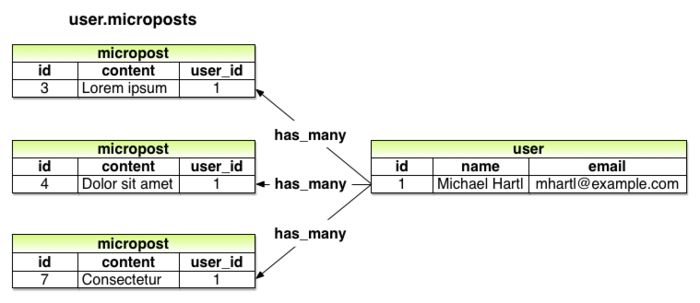
has_many
relationship between a user and its microposts. Using the belongs_to/has_many
association defined in this section, Rails constructs the
methods shown in Table 11.1.
Note from Table 11.1 that instead of
Micropost.create
Micropost.create!
Micropost.new
we have
user.microposts.create
user.microposts.create!
user.microposts.build
These latter methods constitute the idiomatically correct
way to make a micropost, namely, through its
association with a user.
When a new micropost is made in this way, its user_id
is automatically set to the right value.
In particular, we can replace the code
@user = users(:michael)
# This code is not idiomatically correct.
@micropost = Micropost.new(content: "Lorem ipsum", user_id: @user.id)
from Listing 11.2 with this:
@user = users(:michael)
@micropost = @user.microposts.build(content: "Lorem ipsum")
(As with new, build returns
an object in memory but doesn’t modify the database.) Once we define the
proper associations, the resulting @micropost
variable will automatically have a user_id
attribute equal to its associated user’s id.
| Method | Purpose |
micropost.user |
Returns the User object associated with the micropost |
user.microposts |
Returns a collection of the user’s microposts |
user.microposts.create(arg) |
Creates a micropost
associated with user |
user.microposts.create!(arg) |
Creates a micropost
associated with user (exception on
failure) |
user.microposts.build(arg) |
Returns a new Micropost
object associated with user |
user.microposts.find_by(id:
1) |
Finds the micropost with
id 1 and user_id
equal to user.id |
To get code like @user.microposts.build to
work, we need to update the User and Micropost models with
code to associate them.
The first of these was included automatically by the
migration in Listing 11.1 via belongs_to
:user, as shown in Listing 11.9. The second half of
the association, has_many :microposts, needs
to be added by hand, as shown in (Listing 11.10).
belongs_to
a user. green app/models/micropost.rb
class Micropost < ActiveRecord::Base
belongs_to :user
validates :user_id, presence: true
validates :content, presence: true, length: { maximum: 140 }
end
has_many
microposts. green app/models/user.rb
class User < ActiveRecord::Base
has_many :microposts
.
.
.
end
With the association thus made, we can update the setup
method in Listing 11.2 with the idiomatically
correct way to build a new micropost, as shown in Listing 11.11.
require 'test_helper'
class MicropostTest < ActiveSupport::TestCase
def setup
@user = users(:michael)
@micropost = @user.microposts.build(content: "Lorem ipsum")
end
test "should be valid" do
assert @micropost.valid?
end
test "user id should be present" do
@micropost.user_id = nil
assert_not @micropost.valid?
end
.
.
.
end
Of course, after this minor refactoring the test suite should still be green:
$ bundle exec rake test
11.1.4 Micropost refinements
In this section, we’ll add a couple of refinements to the user/micropost association. In particular, we’ll arrange for a user’s microposts to be retrieved in a specific order, and we’ll also make microposts dependent on users so that they will be automatically destroyed if their associated user is destroyed.
Default scope
By default, the user.microposts method
makes no guarantees about the order of the posts, but
(following the convention of blogs and Twitter) we want
the microposts to come out in reverse order of when they
were created so that the most recent post is first.4 We’ll arrange for
this to happen using a default scope.
This is exactly the sort of feature that could easily
lead to a spurious passing test (i.e., a test that would
pass even if the application code were wrong), so we’ll
proceed using test-driven development to be sure we’re
testing the right thing.
In particular, let’s write a test to verify that the
first micropost in the database is the same as a fixture
micropost we’ll call most_recent, as shown
in Listing 11.13.
require 'test_helper'
class MicropostTest < ActiveSupport::TestCase
.
.
.
test "order should be most recent first" do
assert_equal Micropost.first, microposts(:most_recent)
end
end
Listing 11.13 relies on having some micropost fixtures, which we define as shown in Listing 11.14.
orange:
content: "I just ate an orange!"
created_at: <%= 10.minutes.ago %>
tau_manifesto:
content: "Check out the @tauday site by @mhartl: http://tauday.com"
created_at: <%= 3.years.ago %>
cat_video:
content: "Sad cats are sad: http://youtu.be/PKffm2uI4dk"
created_at: <%= 2.hours.ago %>
most_recent:
content: "Writing a short test"
created_at: <%= Time.zone.now %>
Note that we have explicitly set the created_at
column using embedded Ruby.
Because it’s a “magic” column automatically updated by
Rails, setting it by hand isn’t ordinarily possible, but
it is possible in fixtures.
In practice this might not be necessary, and in fact on
many systems the fixtures are created in order.
In this case, the final fixture in the file is created
last (and hence is most recent), but it would be foolish
to rely on this behavior, which is brittle and probably
system-dependent.
With the code in Listing 11.13 and Listing 11.14, the test suite should be red:
$ bundle exec rake test TEST=test/models/micropost_test.rb \
> TESTOPTS="--name test_order_should_be_most_recent_first"
We’ll get the test to pass using a Rails method called
default_scope, which among other things can
be used to set the default order in which elements are
retrieved from the database.
To enforce a particular order, we’ll include the order
argument in default_scope, which lets us
order by the created_at column as follows:
order(:created_at)
Unfortunately, this orders the results in ascending order from smallest to biggest, which means that the oldest microposts come out first. To pull them out in reverse order, we can push down one level deeper and include a string with some raw SQL:
order('created_at DESC')
Here DESC is SQL for “descending”, i.e.,
in descending order from newest to oldest.5 In older versions
of Rails, using this raw SQL used to be the only option
to get the desired behavior, but as of Rails 4.0 we
can use a more natural pure-Ruby syntax as well:
order(created_at: :desc)
Adding this in a default scope for the Micropost model gives Listing 11.16.
default_scope.
green app/models/micropost.rb
class Micropost < ActiveRecord::Base
belongs_to :user
default_scope -> { order(created_at: :desc) }
validates :user_id, presence: true
validates :content, presence: true, length: { maximum: 140 }
end
Listing 11.16 introduces the “stabby
lambda” syntax for an object called a Proc
(procedure) or lambda, which is an anonymous
function (a function created without a name). The stabby lambda ->
takes in a block (Section 4.3.2) and returns a Proc,
which can then be evaluated with the call
method. We can
see how it works at the console:
>> -> { puts "foo" }
=> #<Proc:0x007fab938d0108@(irb):1 (lambda)>
>> -> { puts "foo" }.call
foo
=> nil
(This is a somewhat advanced Ruby topic, so don’t worry if it doesn’t make sense right away.)
With the code in Listing 11.16, the tests should be green:
$ bundle exec rake test
Dependent: destroy
Apart from proper ordering, there is a second refinement we’d like to add to microposts. Recall from Section 9.4 that site administrators have the power to destroy users. It stands to reason that, if a user is destroyed, the user’s microposts should be destroyed as well.
We can arrange for this behavior by passing an option
to the has_many association method, as
shown in Listing 11.18.
class User < ActiveRecord::Base
has_many :microposts, dependent: :destroy
.
.
.
end
Here the option dependent: :destroy
arranges for the dependent microposts to be destroyed
when the user itself is destroyed.
This prevents userless microposts from being stranded in
the database when admins choose to remove users from the
system.
We can verify that Listing 11.18 is working with a test for the User model. All we need to do is save the user (so it gets an id) and create an associated micropost. Then we check that destroying the user reduces the micropost count by 1. The result appears in Listing 11.19. (Compare to the integration test for “delete” links in Listing 9.57.)
dependent:
:destroy.
green test/models/user_test.rb
require 'test_helper'
class UserTest < ActiveSupport::TestCase
def setup
@user = User.new(name: "Example User", email: "user@example.com",
password: "foobar", password_confirmation: "foobar")
end
.
.
.
test "associated microposts should be destroyed" do
@user.save
@user.microposts.create!(content: "Lorem ipsum")
assert_difference 'Micropost.count', -1 do
@user.destroy
end
end
end
If the code in Listing 11.18 is working correctly, the test suite should still be green:
$ bundle exec rake test
11.2 Showing microposts
Although we don’t yet have a way to create microposts
through the web—that comes in Section 11.3.2—this
won’t stop us from displaying them (and testing that
display). Following
Twitter’s lead, we’ll plan to display a user’s microposts
not on a separate microposts index page but
rather directly on the user show page itself,
as mocked up in Figure 11.4.
We’ll start with fairly simple ERb templates for adding a
micropost display to the user profile, and then we’ll add
microposts to the seed data from Section 9.3.2
so that we have something to display.
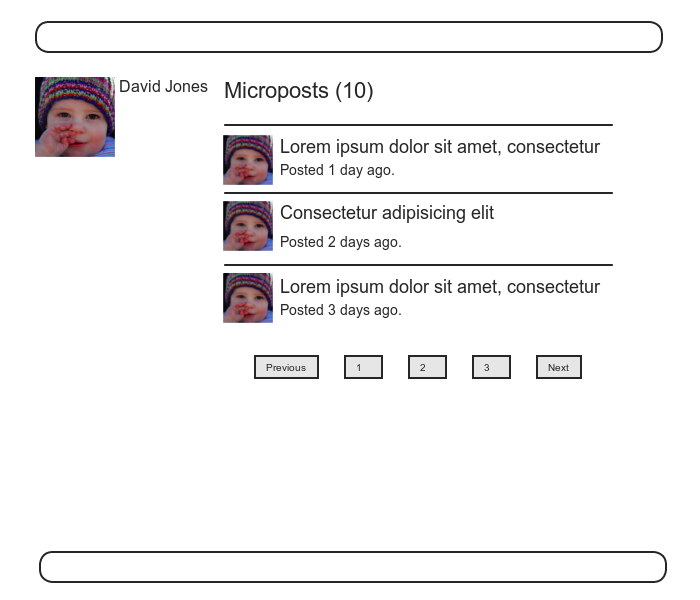
11.2.1 Rendering microposts
Our plan is to display the microposts for each user on
their respective profile page (show.html.erb),
together with a running count of how many microposts
they’ve made. As
we’ll see, many of the ideas are similar to our work in Section 9.3 on showing all users.
Although we won’t need the Microposts controller until Section 11.3, we will need the views directory in just a moment, so let’s generate the controller now:
$ rails generate controller Microposts
Our primary purpose in this section is to render all the microposts for each user. We saw in Section 9.3.5 that the code
<ul class="users">
<%= render @users %>
</ul>
automatically renders each of the users in the @users
variable using the _user.html.erb partial. We’ll define an
analogous _micropost.html.erb partial so
that we can use the same technique on a collection of
microposts as follows:
<ol class="microposts">
<%= render @microposts %>
</ol>
Note that we’ve used the ordered list tag ol
(as opposed to an unordered list ul)
because microposts are listed in a particular order
(reverse-chronological).
The corresponding partial appears in Listing 11.21.
<li id="micropost-<%= micropost.id %>">
<%= link_to gravatar_for(micropost.user, size: 50), micropost.user %>
<span class="user"><%= link_to micropost.user.name, micropost.user %></span>
<span class="content"><%= micropost.content %></span>
<span class="timestamp">
Posted <%= time_ago_in_words(micropost.created_at) %> ago.
</span>
</li>
This uses the awesome time_ago_in_words
helper method, whose meaning is probably clear and whose
effect we will see in Section 11.2.2.
Listing 11.21 also adds a CSS id
for each micropost using
<li id="micropost-<%= micropost.id %>">
This is a generally good practice, as it opens up the possibility of manipulating individual microposts at a future date (using JavaScript, for example).
The next step is to address the difficulty of displaying
a potentially large number of microposts.
We’ll solve this problem the same way we solved it for
users in Section 9.3.3, namely, using
pagination. As
before, we’ll use the will_paginate method:
<%= will_paginate @microposts %>
If you compare this with the analogous line on the user index page, Listing 9.41, you’ll see that before we had just
<%= will_paginate %>
This worked because, in the context of the Users
controller, will_paginate assumes
the existence of an instance variable called @users
(which, as we saw in Section 9.3.3, should be of class ActiveRecord::Relation). In the present case,
since we are still in the Users controller but want to
paginate microposts instead, we’ll pass an
explicit @microposts variable to will_paginate. Of course, this means
that we will have to define such a variable in the user show
action (Listing 11.22).
@microposts
instance variable to the user show
action. app/controllers/users_controller.rb
class UsersController < ApplicationController
.
.
.
def show
@user = User.find(params[:id])
@microposts = @user.microposts.paginate(page: params[:page])
end
.
.
.
end
Notice here how clever paginate is—it even
works through the microposts association,
reaching into the microposts
table and pulling out the desired page of microposts.
Our final task is to display the number of microposts for
each user, which we can do with the count
method:
user.microposts.count
As with paginate, we can use the count
method through the association.
In particular, count does not pull
all the microposts out of the database and then call length
on the resulting array, as this would become inefficient
as the number of microposts grew.
Instead, it performs the calculation directly in the
database, asking the database to count the microposts with
the given user_id (an operation for which
all databases are highly optimized).
(In the unlikely event that finding the count is still a
bottleneck in your application, you can make it even
faster using a counter cache.)
Putting all the elements above together, we are now in a
position to add microposts to the profile page, as shown
in Listing 11.23.
Note the use of if @user.microposts.any? (a
construction we saw before in Listing 7.19),
which makes sure that an empty list won’t be displayed
when the user has no microposts.
show page.
app/views/users/show.html.erb
<% provide(:title, @user.name) %>
<div class="row">
<aside class="col-md-4">
<section class="user_info">
<h1>
<%= gravatar_for @user %>
<%= @user.name %>
</h1>
</section>
</aside>
<div class="col-md-8">
<% if @user.microposts.any? %>
<h3>Microposts (<%= @user.microposts.count %>)</h3>
<ol class="microposts">
<%= render @microposts %>
</ol>
<%= will_paginate @microposts %>
<% end %>
</div>
</div>
At this point, we can get a look at our updated user profile page in Figure 11.5. It’s rather…disappointing. Of course, this is because there are not currently any microposts. It’s time to change that.
11.2.2 Sample microposts
With all the work making templates for user microposts in Section 11.2.1, the ending was rather anticlimactic. We can rectify this sad situation by adding microposts to the seed data from Section 9.3.2.
Adding sample microposts for all the users
actually takes a rather long time, so first we’ll select
just the first six users (i.e., the five users with custom
Gravatars, and one with the default Gravatar) using the take
method:
User.order(:created_at).take(6)
The call to order ensures that we find the
first six users that were created.
For each of the selected users, we’ll make 50 microposts (plenty to overflow the pagination limit of 30). To generate sample content for each micropost, we’ll use the Faker gem’s handy Lorem.sentence method.6 The result is the new seed data method shown in Listing 11.24. (The reason for the order of the loops in Listing 11.24 is to intermix the microposts for use in the status feed (Section 12.3). Looping over the users first gives feeds with big runs of microposts from the same user, which is visually unappealing.)
.
.
.
users = User.order(:created_at).take(6)
50.times do
content = Faker::Lorem.sentence(5)
users.each { |user| user.microposts.create!(content: content) }
end
At this point, we can reseed the development database as usual:
$ bundle exec rake db:migrate:reset
$ bundle exec rake db:seed
You should also quit and restart the Rails development server.
With that, we are in a position to enjoy the fruits of our Section 11.2.1 labors by displaying information for each micropost.7 The preliminary results appear in Figure 11.6.
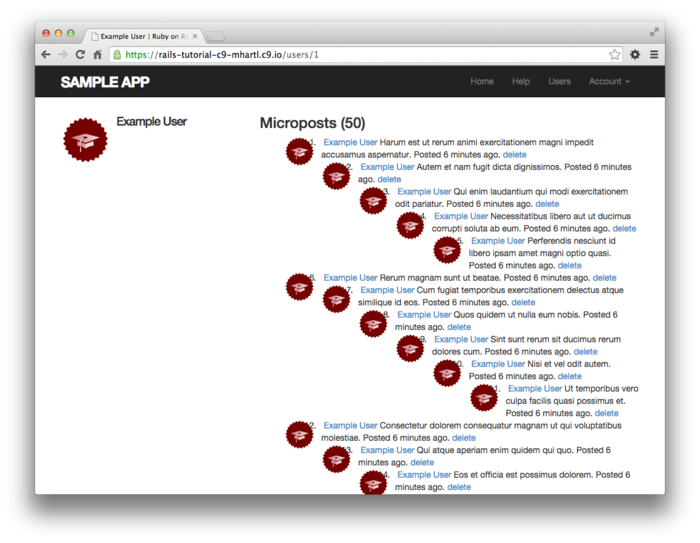
The page shown in Figure 11.6 has no micropost-specific styling, so let’s add some (Listing 11.25) and take a look at the resulting pages.8
.
.
.
/* microposts */
.microposts {
list-style: none;
padding: 0;
li {
padding: 10px 0;
border-top: 1px solid #e8e8e8;
}
.user {
margin-top: 5em;
padding-top: 0;
}
.content {
display: block;
margin-left: 60px;
img {
display: block;
padding: 5px 0;
}
}
.timestamp {
color: $gray-light;
display: block;
margin-left: 60px;
}
.gravatar {
float: left;
margin-right: 10px;
margin-top: 5px;
}
}
aside {
textarea {
height: 100px;
margin-bottom: 5px;
}
}
span.picture {
margin-top: 10px;
input {
border: 0;
}
}
Figure 11.7 shows the user profile
page for the first user, while Figure 11.8
shows the profile for a second user.
Finally, Figure 11.9 shows the second
page of microposts for the first user, along with the
pagination links at the bottom of the display.
In all three cases, observe that each micropost display
indicates the time since it was created (e.g., “Posted 1
minute ago.”); this is the work of the time_ago_in_words
method from Listing 11.21.
If you wait a couple of minutes and reload the pages,
you’ll see how the text gets automatically updated based
on the new time.
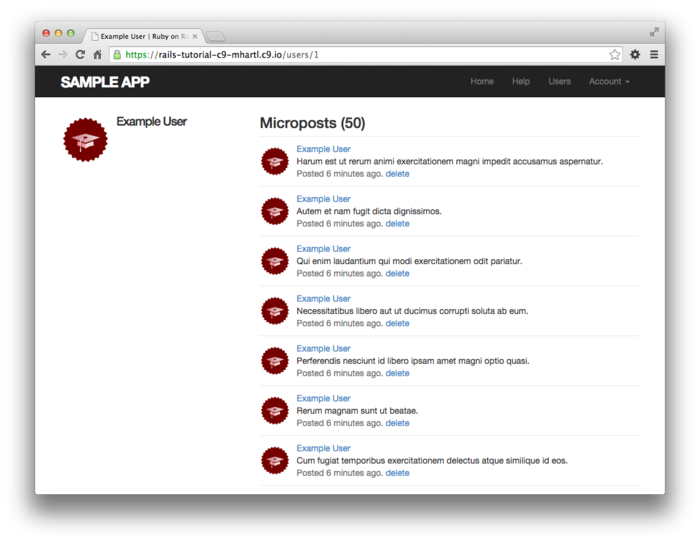
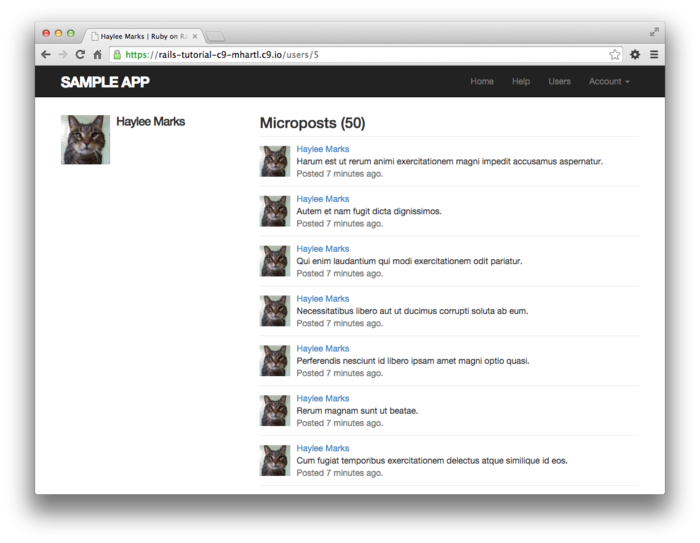
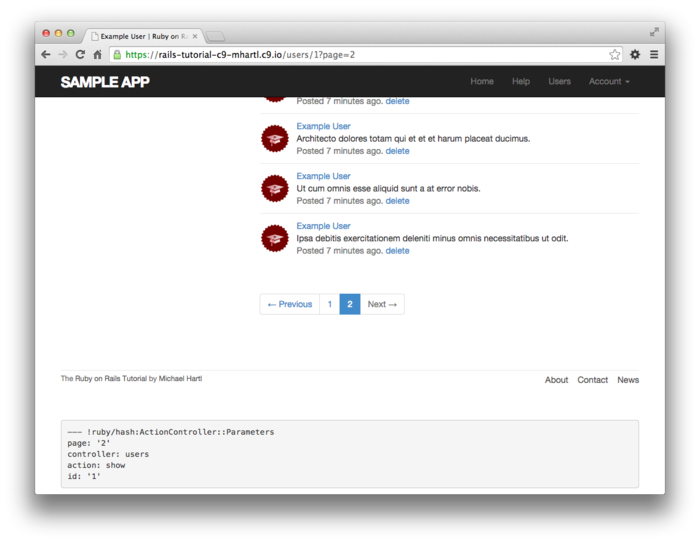
11.2.3 Profile micropost tests
Because newly activated users get redirected to their profile pages, we already have a test that the profile page renders correctly (Listing 10.31). In this section, we’ll write a short integration test for some of the other elements on the profile page, including the work from this section. We’ll start by generating an integration test for the profiles of our site’s users:
$ rails generate integration_test users_profile
invoke test_unit
create test/integration/users_profile_test.rb
To test the micropost display on the profile, we need to associate the fixture microposts with a user. Rails includes a convenient way to build associations in fixtures, like this:
orange:
content: "I just ate an orange!"
created_at: <%= 10.minutes.ago %>
user: michael
By identifying the user as michael,
we tell Rails to associate this micropost with the
corresponding user in the users fixture:
michael:
name: Michael Example
email: michael@example.com
.
.
.
To test micropost pagination, we’ll also generate some additional micropost fixtures using the same embedded Ruby technique we used to make additional users in Listing 9.43:
<% 30.times do |n| %>
micropost_<%= n %>:
content: <%= Faker::Lorem.sentence(5) %>
created_at: <%= 42.days.ago %>
user: michael
<% end %>
Putting all this together gives the updated micropost fixtures in Listing 11.26.
orange:
content: "I just ate an orange!"
created_at: <%= 10.minutes.ago %>
user: michael
tau_manifesto:
content: "Check out the @tauday site by @mhartl: http://tauday.com"
created_at: <%= 3.years.ago %>
user: michael
cat_video:
content: "Sad cats are sad: http://youtu.be/PKffm2uI4dk"
created_at: <%= 2.hours.ago %>
user: michael
most_recent:
content: "Writing a short test"
created_at: <%= Time.zone.now %>
user: michael
<% 30.times do |n| %>
micropost_<%= n %>:
content: <%= Faker::Lorem.sentence(5) %>
created_at: <%= 42.days.ago %>
user: michael
<% end %>
With the test data thus prepared, the test itself is
fairly straightforward: we visit the user profile page and
check for the page title and the user’s name, Gravatar,
micropost count, and paginated microposts.
The result appears in Listing 11.27.
Note the use of the full_title helper from Listing 4.2 to test the page’s title,
which we gain access to by including the Application
Helper module into the test.9
require 'test_helper'
class UsersProfileTest < ActionDispatch::IntegrationTest
include ApplicationHelper
def setup
@user = users(:michael)
end
test "profile display" do
get user_path(@user)
assert_template 'users/show'
assert_select 'title', full_title(@user.name)
assert_select 'h1', text: @user.name
assert_select 'h1>img.gravatar'
assert_match @user.microposts.count.to_s, response.body
assert_select 'div.pagination'
@user.microposts.paginate(page: 1).each do |micropost|
assert_match micropost.content, response.body
end
end
end
The micropost count assertion in Listing 11.27
uses response.body, which we saw briefly in
the Chapter 10
Вправи (Section 10.5).
Despite its name, response.body contains the
full HTML source of the page (and not just the page’s
body). This means
that if all we care about is that the number of microposts
appears somewhere on the page, we can look for a
match as follows:
assert_match @user.microposts.count.to_s, response.body
This is a much less specific assertion than assert_select;
in particular, unlike assert_select, using assert_match
in this context doesn’t require us to indicate which HTML
tag we’re looking for.
Listing 11.27 also introduces the
nesting syntax for assert_select:
assert_select 'h1>img.gravatar'
This checks for an img tag with class gravatar
inside a top-level heading tag (h1).
Because the application code was working, the test suite should be green:
$ bundle exec rake test
11.3 Manipulating microposts
Having finished both the data modeling and display templates for microposts, we now turn our attention to the interface for creating them through the web. In this section, we’ll also see the first hint of a status feed—a notion brought to full fruition in Chapter 12. Finally, as with users, we’ll make it possible to destroy microposts through the web.
There is one break with past convention worth noting: the
interface to the Microposts resource will run principally
through the Profile and Home pages, so we won’t need actions
like new or edit in the
Microposts controller; we’ll need only create
and destroy.
This leads to the routes for the Microposts resource shown
in Listing 11.29.
The code in Listing 11.29 leads in turn to the
RESTful routes shown in Table 11.2,
which is a small subset of the full set of routes seen in Table 2.3.
Of course, this simplicity is a sign of being more
advanced, not less—we’ve come a long way since our reliance
on scaffolding in Chapter 2, and we no longer need most of
its complexity.
Rails.application.routes.draw do
root 'static_pages#home'
get 'help' => 'static_pages#help'
get 'about' => 'static_pages#about'
get 'contact' => 'static_pages#contact'
get 'signup' => 'users#new'
get 'login' => 'sessions#new'
post 'login' => 'sessions#create'
delete 'logout' => 'sessions#destroy'
resources :users
resources :account_activations, only: [:edit]
resources :password_resets, only: [:new, :create, :edit, :update]
resources :microposts, only: [:create, :destroy]
end
| HTTP request | URL | Action | Purpose |
| POST | /microposts | create |
create a new micropost |
| DELETE | /microposts/1 | destroy |
delete micropost with id 1 |
11.3.1 Micropost access control
We begin our development of the Microposts resource with
some access control in the Microposts controller.
In particular, because we access microposts through their
associated users, both the create and destroy
actions must require users to be logged in.
Tests to enforce logged-in status mirror those for the Users controller (Listing 9.17 and Listing 9.56). We simply issue the correct request to each action and confirm that the micropost count is unchanged and the result is redirected to the login URL, as seen in Listing 11.30.
require 'test_helper'
class MicropostsControllerTest < ActionController::TestCase
def setup
@micropost = microposts(:orange)
end
test "should redirect create when not logged in" do
assert_no_difference 'Micropost.count' do
post :create, micropost: { content: "Lorem ipsum" }
end
assert_redirected_to login_url
end
test "should redirect destroy when not logged in" do
assert_no_difference 'Micropost.count' do
delete :destroy, id: @micropost
end
assert_redirected_to login_url
end
end
Writing the application code needed to get the tests in Listing 11.30 to pass requires a little
refactoring first.
Recall from Section 9.2.1 that we enforced the
login requirement using a before filter that called the logged_in_user
method (Listing 9.12).
At the time, we needed that method only in the Users
controller, but now we find that we need it in the
Microposts controller as well, so we’ll move it into the
Application controller, which is the base class of all
controllers (Section 4.4.4).
The result appears in Listing 11.31.
logged_in_user
method into the Application controller.
app/controllers/application_controller.rb
class ApplicationController < ActionController::Base
protect_from_forgery with: :exception
include SessionsHelper
private
# Confirms a logged-in user.
def logged_in_user
unless logged_in?
store_location
flash[:danger] = "Please log in."
redirect_to login_url
end
end
end
To avoid code repetition, you should also remove logged_in_user
from the Users controller at this time.
With the code in Listing 11.31,
the logged_in_user method is now available
in the Microposts controller, which means that we can add
create and destroy actions and
then restrict access to them using a before filter, as
shown in Listing 11.32.
class MicropostsController < ApplicationController
before_action :logged_in_user, only: [:create, :destroy]
def create
end
def destroy
end
end
At this point, the tests should pass:
$ bundle exec rake test
11.3.2 Creating microposts
In Chapter 7, we implemented user signup
by making an HTML form that issued an HTTP POST
request to the create action in the Users
controller. The
implementation of micropost creation is similar; the main
difference is that, rather than using a separate page at
/microposts/new, we will put the form on the Home page
itself (i.e., the root path /), as mocked up in Figure 11.10.
When we last left the Home page, it appeared as in Figure 5.6—that is, it had a “Sign up now!” button in the middle. Since a micropost creation form makes sense only in the context of a particular logged-in user, one goal of this section will be to serve different versions of the Home page depending on a visitor’s login status. We’ll implement this in Listing 11.35 below.
We’ll start with the create action for
microposts, which is similar to its user analogue (Listing 7.23);
the principal difference lies in using the user/micropost
association to build the new micropost, as
seen in Listing 11.34.
Note the use of strong parameters via micropost_params,
which permits only the micropost’s content
attribute to be modified through the web.
create
action. app/controllers/microposts_controller.rb
class MicropostsController < ApplicationController
before_action :logged_in_user, only: [:create, :destroy]
def create
@micropost = current_user.microposts.build(micropost_params)
if @micropost.save
flash[:success] = "Micropost created!"
redirect_to root_url
else
render 'static_pages/home'
end
end
def destroy
end
private
def micropost_params
params.require(:micropost).permit(:content)
end
end
To build a form for creating microposts, we use the code in Listing 11.35, which serves up different HTML based on whether the site visitor is logged in or not.
<% if logged_in? %>
<div class="row">
<aside class="col-md-4">
<section class="user_info">
<%= render 'shared/user_info' %>
</section>
<section class="micropost_form">
<%= render 'shared/micropost_form' %>
</section>
</aside>
</div>
<% else %>
<div class="center jumbotron">
<h1>Welcome to the Sample App</h1>
<h2>
This is the home page for the
<a href="http://www.railstutorial.org/">Ruby on Rails Tutorial</a>
sample application.
</h2>
<%= link_to "Sign up now!", signup_path, class: "btn btn-lg btn-primary" %>
</div>
<%= link_to image_tag("rails.png", alt: "Rails logo"),
'http://rubyonrails.org/' %>
<% end %>
(Having so much code in each branch of the if-else
conditional is a bit messy, and cleaning it up using
partials is left as an exercise (Section 11.6).)
To get the page defined in Listing 11.35 working, we need to create and fill in a couple of partials. The first is the new Home page sidebar, as shown in Listing 11.36.
<%= link_to gravatar_for(current_user, size: 50), current_user %>
<h1><%= current_user.name %></h1>
<span><%= link_to "view my profile", current_user %></span>
<span><%= pluralize(current_user.microposts.count, "micropost") %></span>
Note that, as in the profile sidebar (Listing 11.23),
the user info in Listing 11.36 displays the total number
of microposts for the user.
There’s a slight difference in the display, though; in the
profile sidebar, “Microposts” is a label, and showing
“Microposts (1)” makes sense.
In the present case, though, saying “1 microposts” is
ungrammatical, so we arrange to display “1 micropost” and
“2 microposts” using the pluralize method we
saw in Section 7.3.3.
We next define the form for creating microposts (Listing 11.37), which is similar to the signup form in Listing 7.13.
<%= form_for(@micropost) do |f| %>
<%= render 'shared/error_messages', object: f.object %>
<div class="field">
<%= f.text_area :content, placeholder: "Compose new micropost..." %>
</div>
<%= f.submit "Post", class: "btn btn-primary" %>
<% end %>
We need to make two changes before the form in Listing 11.37
will work. First,
we need to define @micropost, which (as
before) we do through the association:
@micropost = current_user.microposts.build
The result appears in Listing 11.38.
home action.
app/controllers/static_pages_controller.rb
class StaticPagesController < ApplicationController
def home
@micropost = current_user.microposts.build if logged_in?
end
def help
end
def about
end
def contact
end
end
Of course, current_user exists only if the
user is logged in, so the @micropost
variable should only be defined in this case.
The second change needed to get Listing 11.37 to work is to redefine the error-messages partial so the following code from Listing 11.37 works:
<%= render 'shared/error_messages', object: f.object %>
You may recall from Listing 7.18 that the error-messages
partial references the @user variable
explicitly, but in the present case we have an @micropost
variable instead.
To unify these cases, we can pass the form variable f
to the partial and access the associated object through f.object,
so that in
form_for(@user) do |f|
f.object is @user, and in
form_for(@micropost) do |f|
f.object is @micropost, etc.
To pass the object to the partial, we use a hash with
value equal to the object and key equal to the desired
name of the variable in the partial, which is what the
second line in Listing 11.37 accomplishes.
In other words, object: f.object creates a
variable called object in the error_messages
partial, and we can use it to construct a customized error
message, as shown in Listing 11.39.
<% if object.errors.any? %>
<div id="error_explanation">
<div class="alert alert-danger">
The form contains <%= pluralize(object.errors.count, "error") %>.
</div>
<ul>
<% object.errors.full_messages.each do |msg| %>
<li><%= msg %></li>
<% end %>
</ul>
</div>
<% end %>
At this point, you should verify that the test suite is red:
$ bundle exec rake test
This is a hint that we need to update the other occurrences of the error-messages partial, which we used when signing up users (Listing 7.18), resetting passwords (Listing 10.50), and editing users (Listing 9.2). The updated versions are shown in Listing 11.41, Listing 11.43, and Listing 11.42.
<% provide(:title, 'Sign up') %>
<h1>Sign up</h1>
<div class="row">
<div class="col-md-6 col-md-offset-3">
<%= form_for(@user) do |f| %>
<%= render 'shared/error_messages', object: f.object %>
<%= f.label :name %>
<%= f.text_field :name, class: 'form-control' %>
<%= f.label :email %>
<%= f.email_field :email, class: 'form-control' %>
<%= f.label :password %>
<%= f.password_field :password, class: 'form-control' %>
<%= f.label :password_confirmation, "Confirmation" %>
<%= f.password_field :password_confirmation, class: 'form-control' %>
<%= f.submit "Create my account", class: "btn btn-primary" %>
<% end %>
</div>
</div>
<% provide(:title, "Edit user") %>
<h1>Update your profile</h1>
<div class="row">
<div class="col-md-6 col-md-offset-3">
<%= form_for(@user) do |f| %>
<%= render 'shared/error_messages', object: f.object %>
<%= f.label :name %>
<%= f.text_field :name, class: 'form-control' %>
<%= f.label :email %>
<%= f.email_field :email, class: 'form-control' %>
<%= f.label :password %>
<%= f.password_field :password, class: 'form-control' %>
<%= f.label :password_confirmation, "Confirmation" %>
<%= f.password_field :password_confirmation, class: 'form-control' %>
<%= f.submit "Save changes", class: "btn btn-primary" %>
<% end %>
<div class="gravatar_edit">
<%= gravatar_for @user %>
<a href="http://gravatar.com/emails">change</a>
</div>
</div>
</div>
<% provide(:title, 'Reset password') %>
<h1>Password reset</h1>
<div class="row">
<div class="col-md-6 col-md-offset-3">
<%= form_for(@user, url: password_reset_path(params[:id])) do |f| %>
<%= render 'shared/error_messages', object: f.object %>
<%= hidden_field_tag :email, @user.email %>
<%= f.label :password %>
<%= f.password_field :password, class: 'form-control' %>
<%= f.label :password_confirmation, "Confirmation" %>
<%= f.password_field :password_confirmation, class: 'form-control' %>
<%= f.submit "Update password", class: "btn btn-primary" %>
<% end %>
</div>
</div>
At this point, all the tests should be green:
$ bundle exec rake test
Additionally, all the HTML in this section should render properly, showing the form as in Figure 11.11, and a form with a submission error as in Figure 11.12.
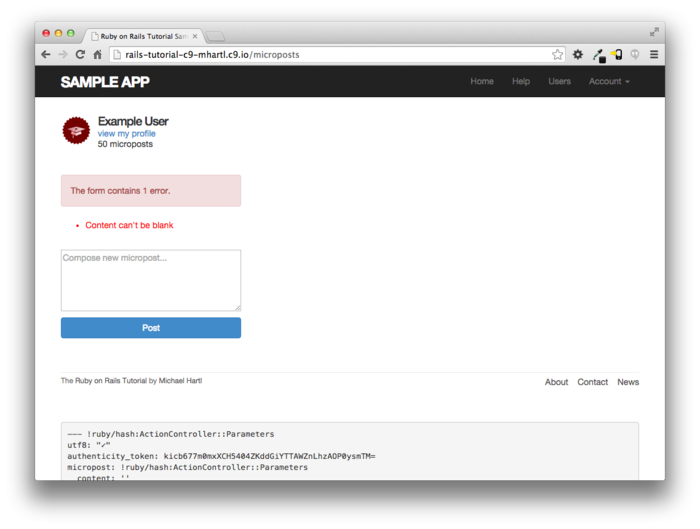
11.3.3 A proto-feed
Although the micropost form is actually now working, users can’t immediately see the results of a successful submission because the current Home page doesn’t display any microposts. If you like, you can verify that the form shown in Figure 11.11 is working by submitting a valid entry and then navigating to the profile page to see the post, but that’s rather cumbersome. It would be far better to have a feed of microposts that includes the user’s own posts, as mocked up in Figure 11.13. (In Chapter 12, we’ll generalize this feed to include the microposts of users being followed by the current user.)
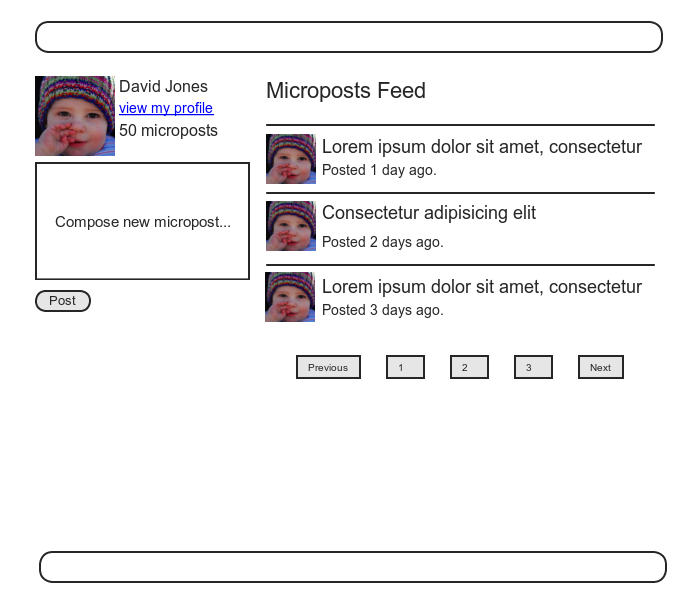
Since each user should have a feed, we are led naturally
to a feed method in the User model, which
will initially just select all the microposts belonging to
the current user.
We’ll accomplish this using the where method
on the Micropost model (seen briefly before
in Section 10.5), as shown in Listing 11.44.10
class User < ActiveRecord::Base
.
.
.
# Defines a proto-feed.
# See "Following users" for the full implementation.
def feed
Micropost.where("user_id = ?", id)
end
private
.
.
.
end
The question mark in
Micropost.where("user_id = ?", id)
ensures that id is properly escaped
before being included in the underlying SQL query, thereby
avoiding a serious security hole called SQL injection.
The id attribute here is just an integer
(i.e., self.id, the unique ID of the user),
so there is no danger of SQL injection in this case, but always
escaping variables injected into SQL statements is a good
habit to cultivate.
Alert readers might note at this point that the code in Listing 11.44 is essentially equivalent to writing
def feed
microposts
end
We’ve used the code in Listing 11.44 instead because it generalizes much more naturally to the full status feed needed in Chapter 12.
To use the feed in the sample application, we add an @feed_items
instance variable for the current user’s (paginated) feed,
as in Listing 11.45, and then add a status
feed partial (Listing 11.46) to the Home page (Listing 11.47).
home action.
app/controllers/static_pages_controller.rb
class StaticPagesController < ApplicationController
def home
if logged_in?
@micropost = current_user.microposts.build
@feed_items = current_user.feed.paginate(page: params[:page])
end
end
def help
end
def about
end
def contact
end
end
<% if @feed_items.any? %>
<ol class="microposts">
<%= render @feed_items %>
</ol>
<%= will_paginate @feed_items %>
<% end %>
The status feed partial defers the rendering to the micropost partial defined in Listing 11.21:
<%= render @feed_items %>
Here Rails knows to call the micropost partial because
each element of @feed_items has class Micropost. This causes Rails to
look for a partial with the corresponding name in the
views directory of the given resource:
app/views/microposts/_micropost.html.erb
We can add the feed to the Home page by rendering the feed partial as usual (Listing 11.47). The result is a display of the feed on the Home page, as required (Figure 11.14).
<% if logged_in? %>
<div class="row">
<aside class="col-md-4">
<section class="user_info">
<%= render 'shared/user_info' %>
</section>
<section class="micropost_form">
<%= render 'shared/micropost_form' %>
</section>
</aside>
<div class="col-md-8">
<h3>Micropost Feed</h3>
<%= render 'shared/feed' %>
</div>
</div>
<% else %>
.
.
.
<% end %>
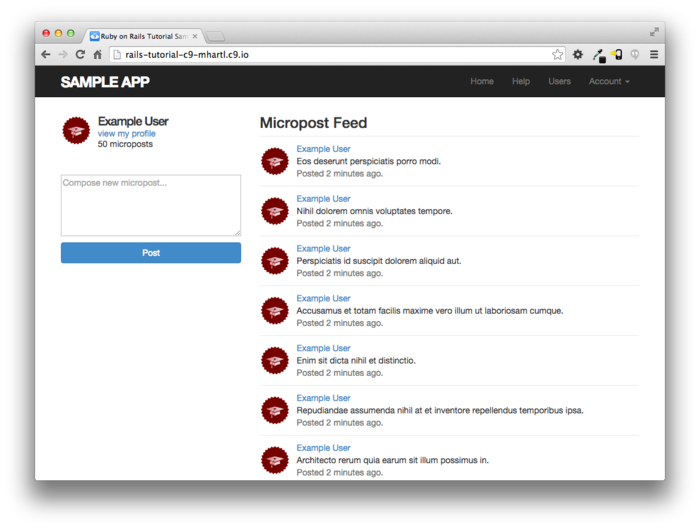
At this point, creating a new micropost works as
expected, as seen in Figure 11.15.
There is one subtlety, though: on failed
micropost submission, the Home page expects an @feed_items
instance variable, so failed submissions currently break. The easiest solution
is to suppress the feed entirely by assigning it an empty
array, as shown in Listing 11.48. (Unfortunately,
returning a paginated feed doesn’t work in this case. Implement it and
click on a pagination link to see why.)
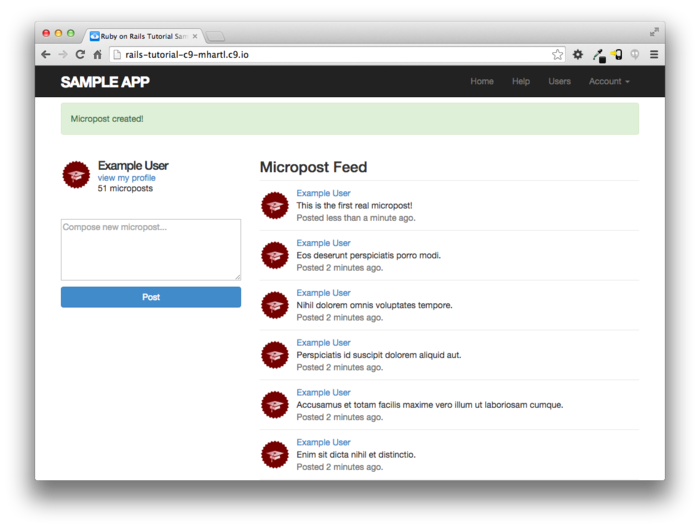
@feed_items
instance variable to the create action.
app/controllers/microposts_controller.rb
class MicropostsController < ApplicationController
before_action :logged_in_user, only: [:create, :destroy]
def create
@micropost = current_user.microposts.build(micropost_params)
if @micropost.save
flash[:success] = "Micropost created!"
redirect_to root_url
else
@feed_items = []
render 'static_pages/home'
end
end
def destroy
end
private
def micropost_params
params.require(:micropost).permit(:content)
end
end
11.3.4 Destroying microposts
The last piece of functionality to add to the Microposts resource is the ability to destroy posts. As with user deletion (Section 9.4.2), we accomplish this with “delete” links, as mocked up in Figure 11.16. Unlike that case, which restricted user destruction to admin users, the delete links will work only for microposts created by the current user.
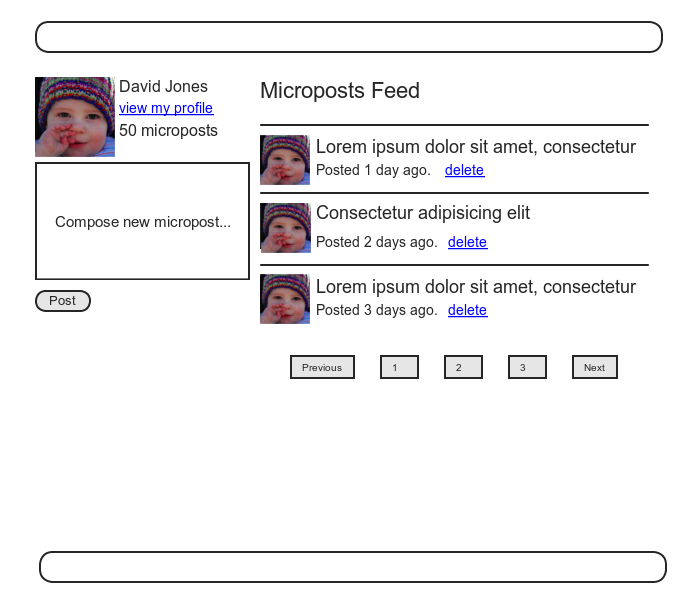
Our first step is to add a delete link to the micropost partial as in Listing 11.21. The result appears in Listing 11.49.
<li id="<%= micropost.id %>">
<%= link_to gravatar_for(micropost.user, size: 50), micropost.user %>
<span class="user"><%= link_to micropost.user.name, micropost.user %></span>
<span class="content"><%= micropost.content %></span>
<span class="timestamp">
Posted <%= time_ago_in_words(micropost.created_at) %> ago.
<% if current_user?(micropost.user) %>
<%= link_to "delete", micropost, method: :delete,
data: { confirm: "You sure?" } %>
<% end %>
</span>
</li>
The next step is to define a destroy action
in the Microposts controller, which is analogous to the
user case in Listing 9.54. The main difference
is that, rather than using an @user variable
with an admin_user before filter, we’ll find
the micropost through the association, which will
automatically fail if a user tries to delete another
user’s micropost.
We’ll put the resulting find inside a correct_user
before filter, which checks that the current user actually
has a micropost with the given id.
The result appears in Listing 11.50.
destroy
action. app/controllers/microposts_controller.rb
class MicropostsController < ApplicationController
before_action :logged_in_user, only: [:create, :destroy]
before_action :correct_user, only: :destroy
.
.
.
def destroy
@micropost.destroy
flash[:success] = "Micropost deleted"
redirect_to request.referrer || root_url
end
private
def micropost_params
params.require(:micropost).permit(:content)
end
def correct_user
@micropost = current_user.microposts.find_by(id: params[:id])
redirect_to root_url if @micropost.nil?
end
end
Note that the destroy method in Listing 11.50
redirects to the URL
request.referrer || root_url
This uses the request.referrer method,11
which is closely related to the request.url
variable used in friendly forwarding (Section 9.2.3),
and is just the previous URL (in this case, the Home
page).12
This is convenient because microposts appear on both the
Home page and on the user’s profile page, so by using request.referrer
we arrange to redirect back to the page issuing the delete
request in both cases.
If the referring URL is nil (as is the case
inside some tests), Listing 11.50
sets the root_url as the default using the ||
operator. (Compare
to the default options defined in Listing 8.50.)
With the code as above, the result of destroying the second-most recent post appears in Figure 11.17.
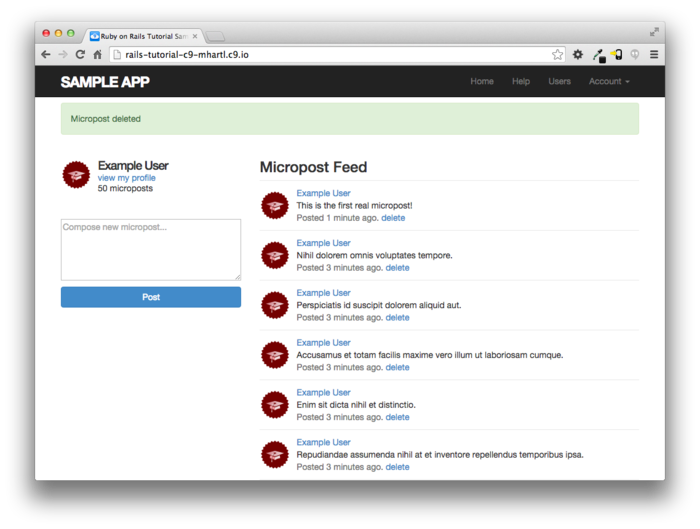
11.3.5 Micropost tests
With the code in Section 11.3.4, the Micropost model and interface are complete. All that’s left is writing a short Microposts controller test to check authorization and a micropost integration test to tie it all together.
We’ll start by adding a few microposts with different owners to the micropost fixtures, as shown in Listing 11.51. (We’ll be using only one for now, but we’ve put in the others for future reference.)
.
.
.
ants:
content: "Oh, is that what you want? Because that's how you get ants!"
created_at: <%= 2.years.ago %>
user: archer
zone:
content: "Danger zone!"
created_at: <%= 3.days.ago %>
user: archer
tone:
content: "I'm sorry. Your words made sense, but your sarcastic tone did not."
created_at: <%= 10.minutes.ago %>
user: lana
van:
content: "Dude, this van's, like, rolling probable cause."
created_at: <%= 4.hours.ago %>
user: lana
We next write a short test to make sure one user can’t delete the microposts of a different user, and we also check for the proper redirect, as seen in Listing 11.52.
require 'test_helper'
class MicropostsControllerTest < ActionController::TestCase
def setup
@micropost = microposts(:orange)
end
test "should redirect create when not logged in" do
assert_no_difference 'Micropost.count' do
post :create, micropost: { content: "Lorem ipsum" }
end
assert_redirected_to login_url
end
test "should redirect destroy when not logged in" do
assert_no_difference 'Micropost.count' do
delete :destroy, id: @micropost
end
assert_redirected_to login_url
end
test "should redirect destroy for wrong micropost" do
log_in_as(users(:michael))
micropost = microposts(:ants)
assert_no_difference 'Micropost.count' do
delete :destroy, id: micropost
end
assert_redirected_to root_url
end
end
Finally, we’ll write an integration test to log in, check the micropost pagination, make an invalid submission, make a valid submission, delete a post, and then visit a second user’s page to make sure there are no “delete” links. We start by generating a test as usual:
$ rails generate integration_test microposts_interface
invoke test_unit
create test/integration/microposts_interface_test.rb
The test appears in Listing 11.53. See if you can
connect the lines in Listing 11.11
to the steps mentioned above.
(Listing 11.53 uses post
followed by follow_redirect! in place of the
equivalent post_via_redirect in anticipation
of the image upload test in the Вправи (Listing 11.68).)
require 'test_helper'
class MicropostsInterfaceTest < ActionDispatch::IntegrationTest
def setup
@user = users(:michael)
end
test "micropost interface" do
log_in_as(@user)
get root_path
assert_select 'div.pagination'
# Invalid submission
assert_no_difference 'Micropost.count' do
post microposts_path, micropost: { content: "" }
end
assert_select 'div#error_explanation'
# Valid submission
content = "This micropost really ties the room together"
assert_difference 'Micropost.count', 1 do
post microposts_path, micropost: { content: content }
end
assert_redirected_to root_url
follow_redirect!
assert_match content, response.body
# Delete a post.
assert_select 'a', text: 'delete'
first_micropost = @user.microposts.paginate(page: 1).first
assert_difference 'Micropost.count', -1 do
delete micropost_path(first_micropost)
end
# Visit a different user.
get user_path(users(:archer))
assert_select 'a', text: 'delete', count: 0
end
end
Because we wrote working application code first, the test suite should be green:
$ bundle exec rake test
11.4 Micropost images
Now that we’ve added support for all relevant micropost actions, in this section we’ll make it possible for microposts to include images as well as text. We’ll start with a basic version good enough for development use, and then add a series of enhancements to make image upload production-ready.
Adding image upload involves two main visible elements: a form field for uploading an image and the micropost images themselves. A mockup of the resulting “Upload image” button and micropost photo appears in Figure 11.18.13
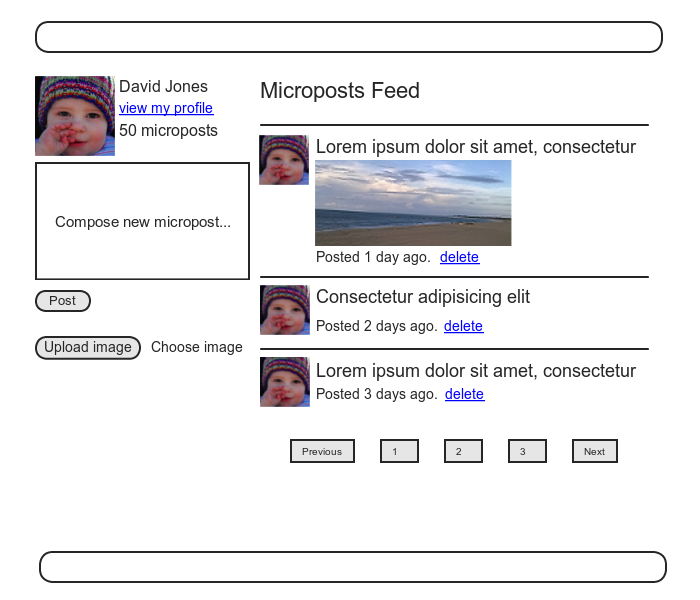
11.4.1 Basic image upload
To handle an uploaded image and associate it with the
Micropost model, we’ll use the CarrierWave image uploader.
To get started, we need to include the carrierwave
gem in the Gemfile (Listing 11.55). For completeness, Listing 11.55 also includes the mini_magick and fog
gems needed for image resizing (Section 11.4.3)
and image upload in production (Section 11.4.4).
Gemfile.
source 'https://rubygems.org'
gem 'rails', '4.2.0'
gem 'bcrypt', '3.1.7'
gem 'faker', '1.4.2'
gem 'carrierwave', '0.10.0'
gem 'mini_magick', '3.8.0'
gem 'fog', '1.23.0'
gem 'will_paginate', '3.0.7'
gem 'bootstrap-will_paginate', '0.0.10'
.
.
.
Then we install as usual:
$ bundle
                                install
CarrierWave adds a Rails generator for creating an image
uploader, which we’ll use to make an uploader for an image
called picture:14
$ rails generate uploader Picture
Images uploaded with CarrierWave should be associated with a corresponding attribute in an Active Record model, which simply contains the name of the image file in a string field. The resulting augmented data model for microposts appears in Figure 11.19.
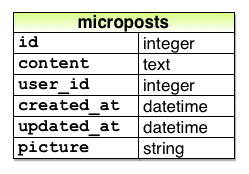
picture
attribute. To add the required picture attribute to
the Micropost model, we generate a migration and migrate
the development database:
$ rails generate migration add_picture_to_microposts picture:string
$ bundle exec rake db:migrate
The way to tell CarrierWave to associate the image with a
model is to use the mount_uploader method,
which takes as arguments a symbol representing the
attribute and the class name of the generated uploader:
mount_uploader :picture, PictureUploader
(Here PictureUploader is defined in the
file picture_uploader.rb, which we’ll start
editing in Section 11.4.2, but for now the
generated default is fine.)
Adding the uploader to the Micropost model gives the code
shown in Listing 11.56.
class Micropost < ActiveRecord::Base
belongs_to :user
default_scope -> { order(created_at: :desc) }
mount_uploader :picture, PictureUploader
validates :user_id, presence: true
validates :content, presence: true, length: { maximum: 140 }
end
On some systems, you may need to restart the Rails server at this point to keep the test suite green. (If you’re using Guard as described in Section 3.7.3, you may need to restart that as well, and it may even be necessary to exit the terminal shell and re-run Guard in a new one.)
To include the uploader on the Home page as in Figure 11.18,
we need to include a file_field tag in the
micropost form, as shown in Listing 11.57.
<%= form_for(@micropost, html: { multipart: true }) do |f| %>
<%= render 'shared/error_messages', object: f.object %>
<div class="field">
<%= f.text_area :content, placeholder: "Compose new micropost..." %>
</div>
<%= f.submit "Post", class: "btn btn-primary" %>
<span class="picture">
<%= f.file_field :picture %>
</span>
<% end %>
Note the inclusion of
html: { multipart: true }
in the arguments to form_for, which is
necessary for file uploads.
Finally, we need to add picture to the list
of attributes permitted to be modified through the web. This involves editing
the micropost_params method, as shown in Listing 11.58.
picture
to the list of permitted attributes.
app/controllers/microposts_controller.rb
class MicropostsController < ApplicationController
before_action :logged_in_user, only: [:create, :destroy]
before_action :correct_user, only: :destroy
.
.
.
private
def micropost_params
params.require(:micropost).permit(:content, :picture)
end
def correct_user
@micropost = current_user.microposts.find_by(id: params[:id])
redirect_to root_url if @micropost.nil?
end
end
Once the image has been uploaded, we can render it using
the image_tag helper in the micropost
partial, as shown in Listing 11.59. Notice the use of the
picture? boolean method to prevent displaying
an image tag when there isn’t an image.
This method is created automatically by CarrierWave based
on the name of the image attribute.
The result of making a successful submission by hand
appears in Figure 11.20.
Writing an automated test for image upload is left as an
exercise (Section 11.6).
<li id="micropost-<%= micropost.id %>">
<%= link_to gravatar_for(micropost.user, size: 50), micropost.user %>
<span class="user"><%= link_to micropost.user.name, micropost.user %></span>
<span class="content">
<%= micropost.content %>
<%= image_tag micropost.picture.url if micropost.picture? %>
</span>
<span class="timestamp">
Posted <%= time_ago_in_words(micropost.created_at) %> ago.
<% if current_user?(micropost.user) %>
<%= link_to "delete", micropost, method: :delete,
data: { confirm: "You sure?" } %>
<% end %>
</span>
</li>

11.4.2 Image validation
The uploader in Section 11.4.1 is a good start, but it has significant limitations. In particular, it doesn’t enforce any constraints on the uploaded file, which can cause problems if users try to upload large files of invalid file types. To remedy this defect, we’ll add validations for the image size and format, both on the server and on the client (i.e., in the browser).
The first image validation, which restricts uploads to valid image types, appears in the CarrierWave uploader itself. The resulting code (which appears as a commented-out suggestion in the generated uploader) verifies that the image filename ends with a valid image extension (PNG, GIF, and both variants of JPEG), as shown in Listing 11.60.
class PictureUploader < CarrierWave::Uploader::Base
storage :file
# Override the directory where uploaded files will be stored.
# This is a sensible default for uploaders that are meant to be mounted:
def store_dir
"uploads/#{model.class.to_s.underscore}/#{mounted_as}/#{model.id}"
end
# Add a white list of extensions which are allowed to be uploaded.
def extension_white_list
%w(jpg jpeg gif png)
end
end
The second validation, which controls the size of the
image, appears in the Micropost model itself.
In contrast to previous model validations, file size
validation doesn’t correspond to a built-in Rails
validator. As a
result, validating images requires defining a custom
validation, which we’ll call picture_size
and define as shown in Listing 11.61. Note the use of validate
(as opposed to validates) to call a custom
validation.
class Micropost < ActiveRecord::Base
belongs_to :user
default_scope -> { order(created_at: :desc) }
mount_uploader :picture, PictureUploader
validates :user_id, presence: true
validates :content, presence: true, length: { maximum: 140 }
validate :picture_size
private
# Validates the size of an uploaded picture.
def picture_size
if picture.size > 5.megabytes
errors.add(:picture, "should be less than 5MB")
end
end
end
This custom validation arranges to call the method
corresponding to the given symbol (:picture_size). In picture_size
itself, we add a custom error message to the errors
collection (seen before briefly in Section 6.2.2),
in this case a limit of 5 megabytes (using a syntax
seen before in Box 8.2).
To go along with the validations in Listing 11.60
and Listing 11.61, we’ll add two
client-side checks on the uploaded image.
We’ll first mirror the format validation by using the accept
parameter in the file_field input tag:
<%= f.file_field :picture, accept: 'image/jpeg,image/gif,image/png' %>
The valid formats consist of the MIME types accepted by the validation in Listing 11.60.
Next, we’ll include a little JavaScript (or, more specifically, jQuery) to issue an alert if a user tries to upload an image that’s too big (which prevents accidental time-consuming uploads and lightens the load on the server):
$('#micropost_picture').bind('change', function() {
size_in_megabytes = this.files[0].size/1024/1024;
if (size_in_megabytes > 5) {
alert('Maximum file size is 5MB. Please choose a smaller file.');
}
});
Although jQuery isn’t the focus of this book, you might
be able to figure out that the code above monitors the
page element containing the CSS id micropost_picture
(as indicated by the hash mark #), which
is the id of the micropost form in Listing 11.57. (The way to figure
this out is to Ctrl-click and use your browser’s web
inspector.) When
the element with that CSS id changes, the jQuery
function fires and issues the alert method
if the file is too big.15
The result of adding these additional checks appears in Listing 11.62.
<%= form_for(@micropost, html: { multipart: true }) do |f| %>
<%= render 'shared/error_messages', object: f.object %>
<div class="field">
<%= f.text_area :content, placeholder: "Compose new micropost..." %>
</div>
<%= f.submit "Post", class: "btn btn-primary" %>
<span class="picture">
<%= f.file_field :picture, accept: 'image/jpeg,image/gif,image/png' %>
</span>
<% end %>
<script type="text/javascript">
$('#micropost_picture').bind('change', function() {
size_in_megabytes = this.files[0].size/1024/1024;
if (size_in_megabytes > 5) {
alert('Maximum file size is 5MB. Please choose a smaller file.');
}
});
</script>
It’s important to understand that code like that shown in
Listing 11.62 can’t actually prevent a
user from trying to upload a file that’s too big.
Even if our code prevents them from submitting it through
the web, they could always edit the JavaScript with a web
inspector or issue a direct POST
request using, e.g., curl.
To prevent users from uploading arbitrarily large files,
it is thus essential to include a server-side validation,
as in Listing 11.61.
11.4.3 Image resizing
The image size validations in Section 11.4.2 are a good start, but they still allow the uploading of images large enough to break our site’s layout, sometimes with frightening results (Figure 11.21). Thus, while it’s convenient to allow users to select fairly large images from their local disk, it’s also a good idea to resize the images before displaying them.16
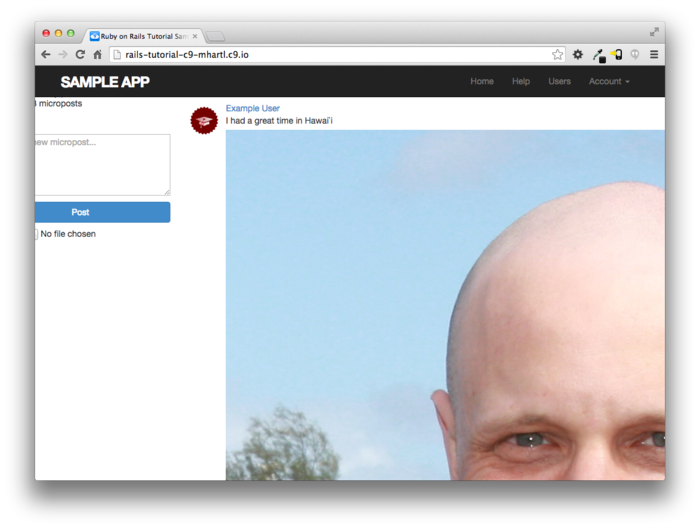
We’ll be resizing images using the image manipulation program ImageMagick, which we need to install on the development environment. (As we’ll see in Section 11.4.4, when using Heroku for deployment ImageMagick comes pre-installed in production.) On the cloud IDE, we can do this as follows:17
$ sudo apt-get update
$ sudo apt-get install imagemagick --fix-missing
Next, we need to include CarrierWave’s MiniMagick interface for
ImageMagick, together with a resizing command.
For the resizing command, there are several possibilities
listed in the MiniMagick documentation, but the
one we want is resize_to_limit: [400, 400],
which resizes large images so that they aren’t any bigger
than 400px in either dimension, while simultaneously
leaving smaller images alone.
(The other main possibilities listed in the CarrierWave documentation on MiniMagick
stretch images if they’re too small, which isn’t
what we want in this case.)
With the code as shown in Listing 11.63,
large images are now resized nicely (Figure 11.22).
class PictureUploader < CarrierWave::Uploader::Base
include CarrierWave::MiniMagick
process resize_to_limit: [400, 400]
storage :file
# Override the directory where uploaded files will be stored.
# This is a sensible default for uploaders that are meant to be mounted:
def store_dir
"uploads/#{model.class.to_s.underscore}/#{mounted_as}/#{model.id}"
end
# Add a white list of extensions which are allowed to be uploaded.
def extension_white_list
%w(jpg jpeg gif png)
end
end
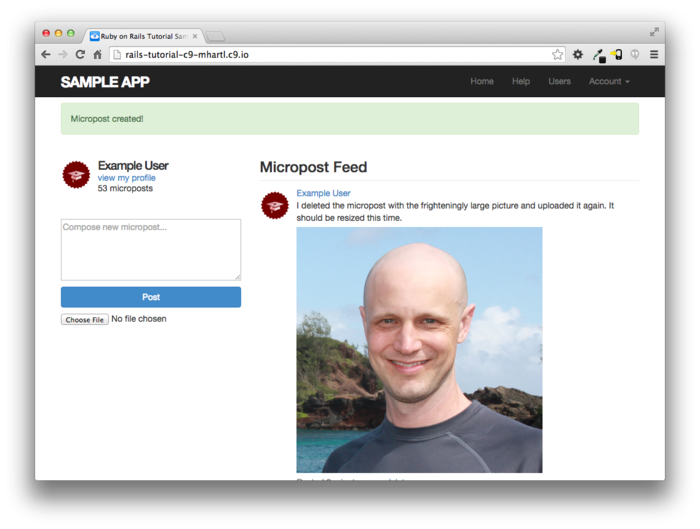
11.4.4 Image upload in production
The image uploader developed in Section 11.4.3
is good enough for development, but (as seen in the storage
:file line in Listing 11.63)
it uses the local filesystem for storing the images, which
isn’t a good practice in production.18 Instead, we’ll use a
cloud storage service to store images separately from our
application.19
To configure our application to use cloud storage in production, we’ll use the fog gem, as shown in Listing 11.64.
class PictureUploader < CarrierWave::Uploader::Base
include CarrierWave::MiniMagick
process resize_to_limit: [400, 400]
if Rails.env.production?
storage :fog
else
storage :file
end
# Override the directory where uploaded files will be stored.
# This is a sensible default for uploaders that are meant to be mounted:
def store_dir
"uploads/#{model.class.to_s.underscore}/#{mounted_as}/#{model.id}"
end
# Add a white list of extensions which are allowed to be uploaded.
def extension_white_list
%w(jpg jpeg gif png)
end
end
Listing 11.64 uses the production?
boolean from Box 7.1 to switch storage method
based on the environment:
if Rails.env.production?
storage :fog
else
storage :file
end
There are many choices for cloud storage, but we’ll use one of the most popular and well-supported, Amazon.com’s Simple Storage Service (S3).20 Here are the essential steps to getting set up:
- Sign up for an Amazon Web Services account.
- Create a user via AWS Identity and Access Management (IAM) and record the access key and secret key.
- Create an S3 bucket (with a name of your choice) using the AWS Console, and then grant read and write permission to the user created in the previous step.
For further details on these steps, consult the S3 documentation21
Once you’ve created and configured your S3 account, you should create and fill the CarrierWave configuration file as shown in Listing 11.65.
if Rails.env.production?
CarrierWave.configure do |config|
config.fog_credentials = {
# Configuration for Amazon S3
:provider => 'AWS',
:aws_access_key_id => ENV['S3_ACCESS_KEY'],
:aws_secret_access_key => ENV['S3_SECRET_KEY']
}
config.fog_directory = ENV['S3_BUCKET']
end
end
As with production email configuration (Listing 10.56),
Listing 11.65 uses Heroku ENV
variables to avoid hard-coding sensitive information. In Section 10.3,
these variables were defined automatically via the
SendGrid add-on, but in this case we need to define them
explicitly, which we can accomplish using heroku
config:set as follows:
$ heroku config:set S3_ACCESS_KEY=<access key>
$ heroku config:set S3_SECRET_KEY=<secret key>
$ heroku config:set S3_BUCKET=<bucket name>
With the configuration above, we are ready to commit our changes and deploy. We start by committing the changes on our topic branch and merging back to master:
$ bundle exec rake test
$ git add -A
$ git commit -m "Add user microposts"
$ git checkout master
$ git merge user-microposts
$ git push
Then we deploy, reset the database, and reseed the sample data:
$ git push heroku
$ heroku pg:reset DATABASE
$ heroku run rake db:migrate
$ heroku run rake db:seed
Because Heroku comes with an installation of ImageMagick, the result is successful image resizing and upload in production, as seen in Figure 11.23.
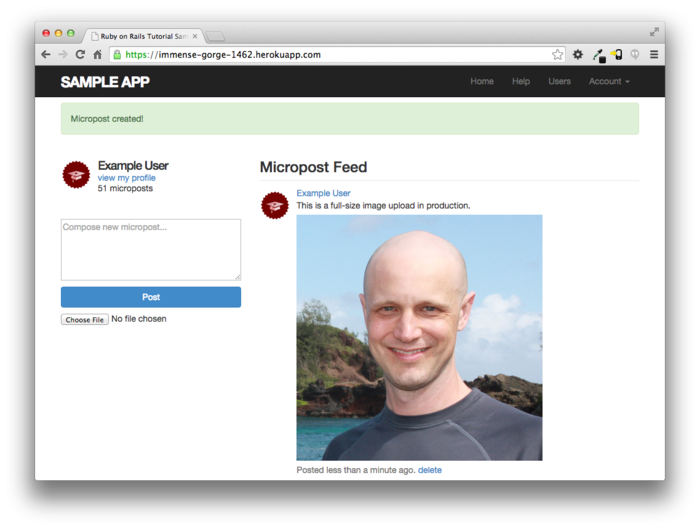
11.5 Висновок
With the addition of the Microposts resource, we are nearly finished with our sample application. All that remains is to add a social layer by letting users follow each other. We’ll learn how to model such user relationships, and see the implications for the microposts feed, in Chapter 12.
If you skipped Section 11.4.4, be sure to commit and merge your changes:
$ bundle exec rake test
$ git add -A
$ git commit -m "Add user microposts"
$ git checkout master
$ git merge user-microposts
$ git push
Then deploy to production:
$ git push heroku
$ heroku pg:reset DATABASE
$ heroku run rake db:migrate
$ heroku run rake db:seed
It’s worth noting that this chapter saw the last of the
necessary gem installations.
For reference, the final Gemfile is shown in Listing 11.66.
Gemfile
for the sample application. source 'https://rubygems.org'
gem 'rails', '4.2.0'
gem 'bcrypt', '3.1.7'
gem 'faker', '1.4.2'
gem 'carrierwave', '0.10.0'
gem 'mini_magick', '3.8.0'
gem 'fog', '1.23.0'
gem 'will_paginate', '3.0.7'
gem 'bootstrap-will_paginate', '0.0.10'
gem 'bootstrap-sass', '3.2.0.0'
gem 'sass-rails', '5.0.1'
gem 'uglifier', '2.5.3'
gem 'coffee-rails', '4.1.0'
gem 'jquery-rails', '4.0.3'
gem 'turbolinks', '2.3.0'
gem 'jbuilder', '2.2.3'
gem 'sdoc', '0.4.0', group: :doc
group :development, :test do
gem 'sqlite3', '1.3.9'
gem 'byebug', '3.4.0'
gem 'web-console', '2.0.0.beta3'
gem 'spring', '1.1.3'
end
group :test do
gem 'minitest-reporters', '1.0.5'
gem 'mini_backtrace', '0.1.3'
gem 'guard-minitest', '2.3.1'
end
group :production do
gem 'pg', '0.17.1'
gem 'rails_12factor', '0.0.2'
gem 'puma', '2.11.1'
end
11.5.1 Що ми вивчили в цій главі
- Microposts, like Users, are modeled as a resource backed by an Active Record model.
- Rails supports multiple-key indices.
- We can model a user having many microposts using the
has_manyandbelongs_tomethods in the User and Micropost models, respectively. - The
has_many/belongs_tocombination gives rise to methods that work through the association. - The code
user.microposts.build(...)returns a new Micropost object automatically associated with the given user. - Rails supports default ordering via
default_scope. - Scopes take anonymous functions as arguments.
- The
dependent: :destroyoption causes objects to be destroyed at the same time as associated objects. - Pagination and object counts can both be performed through associations, leading to automatically efficient code.
- Fixtures support the creation of associations.
- It is possible to pass variables to Rails partials.
- The
wheremethod can be used to perform Active Record selections. - We can enforce secure operations by always creating and destroying dependent objects through their association.
- We can upload and resize images using CarrierWave.
11.6 Вправи
Note: The Solutions Manual for Вправи, with solutions to every exercise in the Ruby on Rails Tutorial book, is included for free with every purchase at www.railstutorial.org.
For a suggestion on how to avoid conflicts between Вправи and the main tutorial, see the note on exercise topic branches in Section 3.6.
- Refactor the Home page to use separate partials for the
two branches of the
if-elsestatement. - Add tests for the sidebar micropost count (including proper pluralization). Listing 11.67 will help get you started.
- Following the template in Listing 11.68,
write a test of the image uploader in Section 11.4. As preparation, you
should add an image to the fixtures directory (using, e.g,
cp app/assets/images/rails.pngtest/fixtures/). (If you’re using Git, I also recommend updating your.gitignorefile as shown in Listing 11.69.) To avoid a confusing error, you will also need to configure CarrierWave to skip image resizing in tests by creating an initializer file as shown in Listing 11.70. The additional assertions in Listing 11.68 check both for a file upload field on the Home page and for a valid image attribute on the micropost resulting from valid submission. Note the use of the specialfixture_file_uploadmethod for uploading files as fixtures inside tests.22 Hint: To check for a validpictureattribute, use theassignsmethod mentioned in Section 10.1.4 to access the micropost in thecreateaction after valid submission.
require 'test_helper'
class MicropostInterfaceTest < ActionDispatch::IntegrationTest
def setup
@user = users(:michael)
end
.
.
.
test "micropost sidebar count" do
log_in_as(@user)
get root_path
assert_match "#{FILL_IN} microposts", response.body
# User with zero microposts
other_user = users(:mallory)
log_in_as(other_user)
get root_path
assert_match "0 microposts", response.body
other_user.microposts.create!(content: "A micropost")
get root_path
assert_match FILL_IN, response.body
end
end
require 'test_helper'
class MicropostInterfaceTest < ActionDispatch::IntegrationTest
def setup
@user = users(:michael)
end
test "micropost interface" do
log_in_as(@user)
get root_path
assert_select 'div.pagination'
assert_select 'input[type=FILL_IN]'
# Invalid submission
post microposts_path, micropost: { content: "" }
assert_select 'div#error_explanation'
# Valid submission
content = "This micropost really ties the room together"
picture = fixture_file_upload('test/fixtures/rails.png', 'image/png')
assert_difference 'Micropost.count', 1 do
post microposts_path, micropost: { content: content, picture: FILL_IN }
end
assert FILL_IN.picture?
follow_redirect!
assert_match content, response.body
# Delete a post.
assert_select 'a', 'delete'
first_micropost = @user.microposts.paginate(page: 1).first
assert_difference 'Micropost.count', -1 do
delete micropost_path(first_micropost)
end
# Visit a different user.
get user_path(users(:archer))
assert_select 'a', { text: 'delete', count: 0 }
end
.
.
.
end
.gitignore file. # See https://help.github.com/articles/ignoring-files for more about ignoring
# files.
#
# If you find yourself ignoring temporary files generated by your text editor
# or operating system, you probably want to add a global ignore instead:
# git config --global core.excludesfile '~/.gitignore_global'
# Ignore bundler config.
/.bundle
# Ignore the default SQLite database.
/db/*.sqlite3
/db/*.sqlite3-journal
# Ignore all logfiles and tempfiles.
/log/*.log
/tmp
# Ignore Spring files.
/spring/*.pid
# Ignore uploaded test images.
/public/uploads
if Rails.env.test?
CarrierWave.configure do |config|
config.enable_processing = false
end
end
- The name is motivated by the common description of Twitter as a microblog; since blogs have posts, microblogs should have microposts. ↑
- http://www.postgresql.org/docs/9.1/static/datatype-character.html ↑
- The foreign key reference is a database-level constraint indicating that the user id in the microposts table refers to the id column in the users table. This detail will never be important in this tutorial, and the foreign key constraint isn’t even supported by all databases. (It’s supported by PostgreSQL, which we use in production, but not by the development SQLite database adapter.) We’ll learn more about foreign keys in Section 12.1.2. ↑
- We briefly encountered a similar issue in Section 9.5 in the context of the users index. ↑
- SQL is case-insensitive, but it
is conventional to write SQL keywords (such as
DESC) in all-caps. ↑ Faker::Lorem.sentencereturns lorem ipsum text; as noted in Chapter 6, lorem ipsum has a fascinating back story. ↑- By design, the Faker gem’s lorem ipsum text is randomized, so the contents of your sample microposts will differ. ↑
- For convenience, Listing 11.25 actually has all the CSS needed for this chapter. ↑
- If you’d like to refactor other
tests to use
full_title(such as those in Listing 3.38), you should include the Application Helper intest_helper.rbinstead. ↑ - See the Rails Guide on the Active Record Query Interface for
more on
whereand related methods. ↑ - This corresponds to HTTP_REFERER, as defined by the specification for HTTP. Note that “referer” is not a typo—the word is actually misspelled in the spec. Rails corrects this error by writing “referrer” instead. ↑
- I didn’t remember offhand how to get this URL inside a Rails application, so I Googled “rails request previous url” and found a Stack Overflow thread with the answer. ↑
- Beach photo from https://www.flickr.com/photos/grungepunk/14026922186 ↑
- Initially, I called the new
attribute
image, but that name was so generic it ended up being confusing. ↑ - To learn how to do things like this, you can do what I did: Google around for things like “javascript maximum file size” until you find something on Stack Overflow. ↑
- It’s possible to constrain the display size with CSS, but this doesn’t change the image size. In particular, large images would still take a while to load. (You’ve probably visited websites where “small” images seemingly take forever to load. This is why.) ↑
- I got this from the official Ubuntu documentation. If you’re not using
the cloud IDE or an equivalent Linux system, do a Google
search for “imagemagick <your platform>”.
On OS X,
brew install imagemagickshould work if you have Homebrew installed. ↑ - Among other things, file storage on Heroku is temporary, so uploaded images will be deleted every time you deploy. ↑
- This is a challenging section and can be skipped without loss of continuity. ↑
- S3 is a paid service, but the storage needed to set up and test the Rails Tutorial sample application costs less than a cent per month. ↑
- http://aws.amazon.com/documentation/s3/ ↑
- Windows users should add a
:binaryparameter:fixture_file_upload(file, type, :binary). ↑
Chapter 12 Following users
In this chapter, we will complete the sample application by adding a social layer that allows users to follow (and unfollow) other users, resulting in each user’s Home page displaying a status feed of the followed users’ microposts. We’ll start by learning how to model relationships between users in Section 12.1, and we’ll build the corresponding web interface in Section 12.2 (including an introduction to Ajax). We’ll end by developing a fully functional status feed in Section 12.3.
This final chapter contains some of the most challenging material in the tutorial, including some Ruby/SQL trickery to make the status feed. Through these examples, you will see how Rails can handle even rather intricate data models, which should serve you well as you go on to develop your own applications with their own specific requirements. To help with the transition from tutorial to independent development, Section 12.4 offers some pointers to more advanced resources.
Because the material in this chapter is particularly challenging, before writing any code we’ll pause for a moment and take a tour of the interface. As in previous chapters, at this early stage we’ll represent pages using mockups.1 The full page flow runs as follows: a user (John Calvin) starts at his profile page (Figure 12.1) and navigates to the Users page (Figure 12.2) to select a user to follow. Calvin navigates to the profile of a second user, Thomas Hobbes (Figure 12.3), clicking on the “Follow” button to follow that user. This changes the “Follow” button to “Unfollow” and increments Hobbes’s “followers” count by one (Figure 12.4). Navigating to his home page, Calvin now sees an incremented “following” count and finds Hobbes’s microposts in his status feed (Figure 12.5). The rest of this chapter is dedicated to making this page flow actually work.
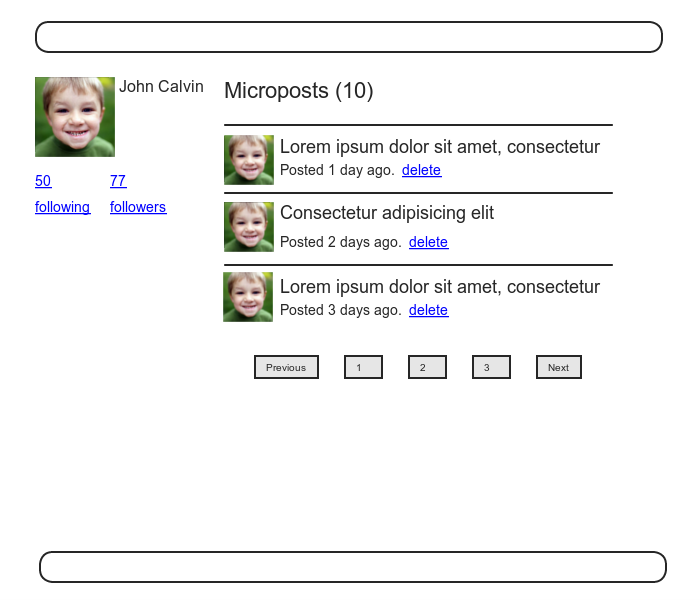
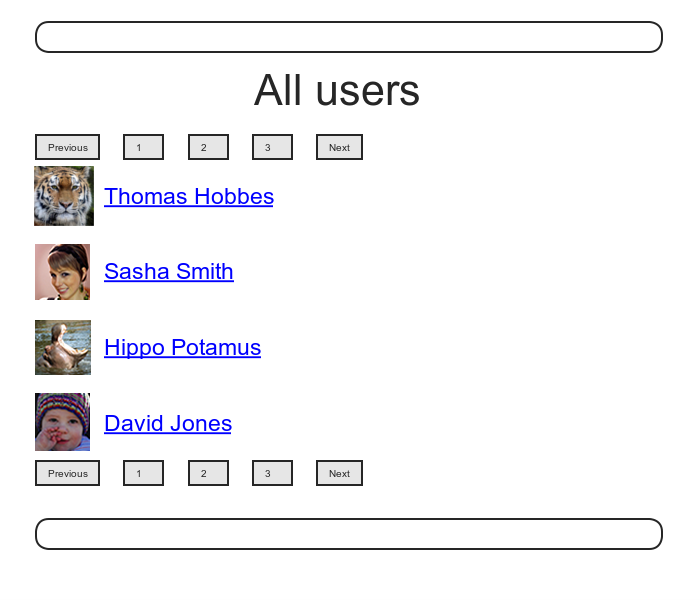

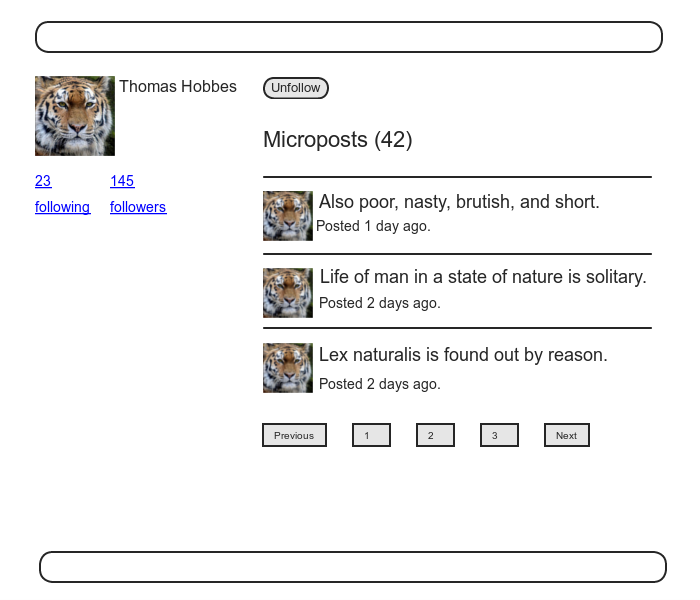
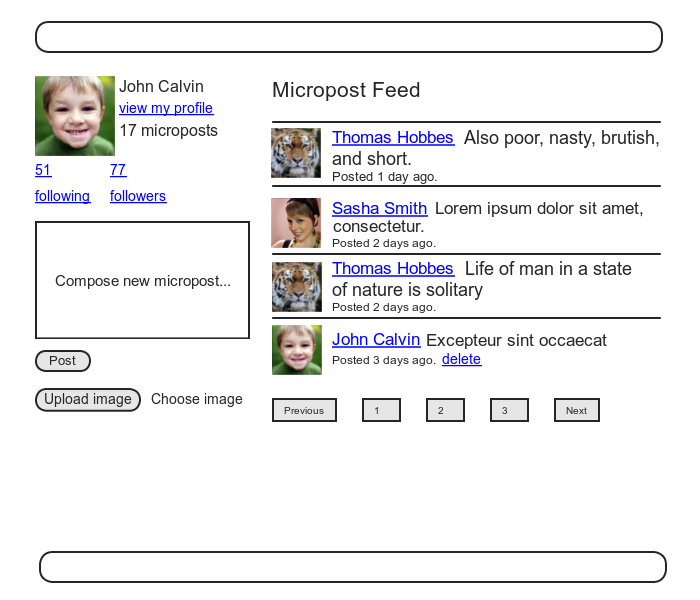
12.1 The Relationship model
Our first step in implementing following users is to
construct a data model, which is not as straightforward as
it seems. Naïvely,
it seems that a has_many relationship would
do: a user has_many followed users and has_many
followers. As we
will see, there is a problem with this approach, and we’ll
learn how to fix it using has_many :through.
As usual, Git users should create a new topic branch:
$ git checkout master
$ git checkout -b following-users
12.1.1 A problem with the data model (and a solution)
As a first step toward constructing a data model for
following users, let’s examine a typical case.
For instance, consider a user who follows a second user:
we could say that, e.g., Calvin is following Hobbes, and
Hobbes is followed by Calvin, so that Calvin is the follower
and Hobbes is followed.
Using Rails’ default pluralization convention, the set of
all users following a given user is that user’s followers,
and hobbes.followers is an array of those
users.
Unfortunately, the reverse doesn’t work: by default, the
set of all followed users would be called the followeds,
which is ungrammatical and clumsy.
We’ll adopt Twitter’s convention and call them following
(as in “50 following, 75 followers”), with a corresponding
calvin.following array.
This discussion suggests modeling the followed users as
in Figure 12.6, with a following
table and a has_many association.
Since user.following should be a collection
of users, each row of the following table
would need to be a user, as identified by the followed_id,
together with the follower_id to establish
the association.2
In addition, since each row is a user, we would need to
include the user’s other attributes, including the name,
email, password, etc.
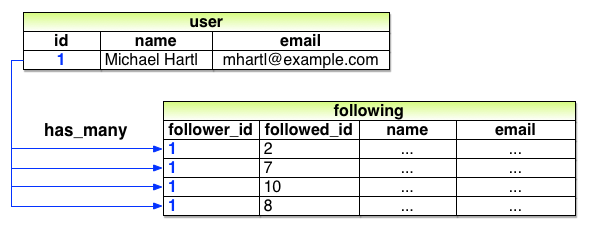
The problem with the data model in Figure 12.6
is that it is terribly redundant: each row contains not
only each followed user’s id, but all their other
information as well—all of which is already in
the users table.
Even worse, to model user followers we would
need a separate, similarly redundant followers
table. Finally,
this data model is a maintainability nightmare: each time
a user changed (say) their name, we would need to update
not just the user’s record in the users
table but also every row containing that user in
both the following and followers
tables.
The problem here is that we are missing an underlying
abstraction. One
way to find the proper model is to consider how we might
implement the act of following in a web
application.
Recall from Section 7.1.2 that the REST
architecture involves resources that are created
and destroyed.
This leads us to ask two questions: When a user follows
another user, what is being created?
When a user unfollows another user, what is
being destroyed?
Upon reflection, we see that in these cases the
application should either create or destroy a relationship
between two users.
A user then has many relationships, and has many following
(or followers) through these
relationships.
There’s an additional detail we need to address regarding our application’s data model: unlike symmetric Facebook-style friendships, which are always reciprocal (at least at the data-model level), Twitter-style following relationships are potentially asymmetric—Calvin can follow Hobbes without Hobbes following Calvin. To distinguish between these two cases, we’ll adopt the terminology of active and passive relationships: if Calvin is following Hobbes but not vice versa, Calvin has an active relationship with Hobbes and Hobbes has a passive relationship with Calvin.3
We’ll focus now on using active relationships to generate
a list of followed users, and consider the passive case in
Section 12.1.5.
Figure 12.6 suggests how to implement
it: since each followed user is uniquely identified by followed_id,
we could convert following to an active_relationships
table, omit the user details, and use followed_id
to retrieve the followed user from the users
table. A diagram
of the data model appears in Figure 12.7.
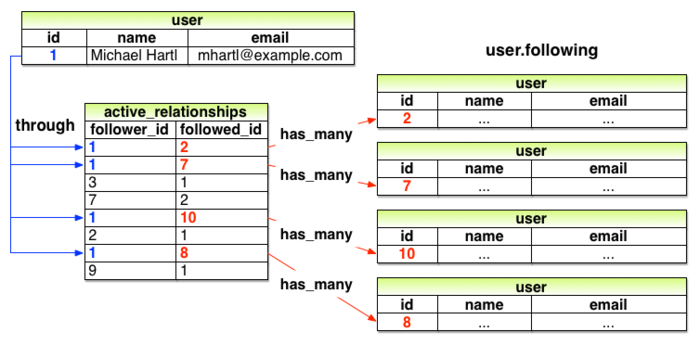
Because we’ll end up using the same database table for both active and passive relationships, we’ll use the generic term relationship for the table name, with a corresponding Relationship model. The result is the Relationship data model shown in Figure 12.8. We’ll see starting in Section 12.1.4 how to use the Relationship model to simulate both Active Relationship and Passive Relationship models.
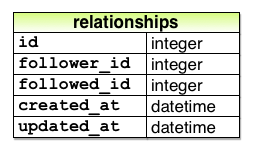
To get started with the implementation, we first generate a migration corresponding to Figure 12.8:
$ rails generate model Relationship follower_id:integer followed_id:integer
Because we will be finding relationships by follower_id
and by followed_id, we should add an index
on each column for efficiency, as shown in Listing 12.1.
relationships
table. db/migrate/[timestamp]_create_relationships.rb
class CreateRelationships < ActiveRecord::Migration
def change
create_table :relationships do |t|
t.integer :follower_id
t.integer :followed_id
t.timestamps null: false
end
add_index :relationships, :follower_id
add_index :relationships, :followed_id
add_index :relationships, [:follower_id, :followed_id], unique: true
end
end
Listing 12.1 also includes a
multiple-key index that enforces uniqueness on (follower_id,
followed_id) pairs, so that a user can’t
follow another user more than once.
(Compare to the email uniqueness index from Listing 6.28
and the multiple-key index in Listing 11.1.) As we’ll see starting
in Section 12.1.4, our user interface
won’t allow this to happen, but adding a unique index
arranges to raise an error if a user tries to create
duplicate relationships anyway (for example, by using a
command-line tool such as curl).
To create the relationships table, we
migrate the database as usual:
$ bundle exec rake db:migrate
12.1.2 User/relationship associations
Before implementing user following and followers, we
first need to establish the association between users and
relationships. A
user has_many relationships, and—since
relationships involve two users—a relationship belongs_to
both a follower and a followed user.
As with microposts in Section 11.1.3, we will create new relationships using the user association, with code such as
user.active_relationships.build(followed_id: ...)
At this point, you might expect application code as in Section 11.1.3, and it’s similar, but there are two key differences.
First, in the case of the user/micropost association we could write
class User < ActiveRecord::Base
has_many :microposts
.
.
.
end
This works because by convention Rails looks for a
Micropost model corresponding to the :microposts
symbols.4
In the present case, though, we want to write
has_many :active_relationships
even though the underlying model is called Relationship. We will thus have to tell Rails the model class name to look for.
Second, before we wrote
class Micropost < ActiveRecord::Base
belongs_to :user
.
.
.
end
in the Micropost model.
This works because the microposts table has
a user_id attribute to identify the user (Section 11.1.1).
An id used in this manner to connect two database tables
is known as a foreign key, and when the foreign
key for a User model object is user_id,
Rails infers the association automatically: by default,
Rails expects a foreign key of the form <class>_id,
where <class> is the lower-case
version of the class name.5 In the present case,
although we are still dealing with users, the user
following another user is now identified with the foreign
key follower_id, so we have to tell that to
Rails.
The result of the above discussion is the user/relationship association shown in Listing 12.2 and Listing 12.3.
has_many association.
app/models/user.rb
class User < ActiveRecord::Base
has_many :microposts, dependent: :destroy
has_many :active_relationships, class_name: "Relationship",
foreign_key: "follower_id",
dependent: :destroy
.
.
.
end
(Since destroying a user should also destroy that user’s
relationships, we’ve added dependent: :destroy
to the association.)
belongs_to
association to the Relationship model.
app/models/relationship.rb
class Relationship < ActiveRecord::Base
belongs_to :follower, class_name: "User"
belongs_to :followed, class_name: "User"
end
The followed association isn’t actually
needed until Section 12.1.5, but the parallel
follower/followed structure is clearer if we implement
them both at the same time.
The relationships in Listing 12.2 and Listing 12.3 give rise to methods analogous to the ones we saw in Table 11.1, as shown in Table 12.1.
| Method | Purpose |
active_relationship.follower |
Returns the follower |
active_relationship.followed |
Returns the followed user |
user.active_relationships.create(followed_id:
user.id) |
Creates an active
relationship associated with user |
user.active_relationships.create!(followed_id:
user.id) |
Creates an active
relationship associated with user
(exception on failure) |
user.active_relationships.build(followed_id:
user.id) |
Returns a new Relationship
object associated with user |
12.1.3 Relationship validations
Before moving on, we’ll add a couple of Relationship model validations for completeness. The tests (Listing 12.4) and application code (Listing 12.5) are straightforward. As with the generated user fixture (Listing 6.29), the generated relationship fixture also violates the uniqueness constraint imposed by the corresponding migration (Listing 12.1). The solution (removing the fixture contents as in Listing 6.30) is also the same (Listing 12.6).
require 'test_helper'
class RelationshipTest < ActiveSupport::TestCase
def setup
@relationship = Relationship.new(follower_id: 1, followed_id: 2)
end
test "should be valid" do
assert @relationship.valid?
end
test "should require a follower_id" do
@relationship.follower_id = nil
assert_not @relationship.valid?
end
test "should require a followed_id" do
@relationship.followed_id = nil
assert_not @relationship.valid?
end
end
class Relationship < ActiveRecord::Base
belongs_to :follower, class_name: "User"
belongs_to :followed, class_name: "User"
validates :follower_id, presence: true
validates :followed_id, presence: true
end
# empty
At this point, the tests should be green:
$ bundle exec rake test
12.1.4 Followed users
We come now to the heart of the Relationship
associations: following and followers. Here we will use has_many
:through for the first time: a user has many
following through relationships, as illustrated
in Figure 12.7.
By default, in a has_many :through
association Rails looks for a foreign key corresponding to
the singular version of the association.
In other words, with code like
has_many :followeds, through: :active_relationships
Rails would see “followeds” and use the singular
“followed”, assembling a collection using the followed_id
in the relationships table.
But, as noted in Section 12.1.1,
user.followeds is rather awkward, so we’ll
write user.following instead.
Naturally, Rails allows us to override the default, in
this case using the source parameter (as
shown in Listing 12.8),
which explicitly tells Rails that the source of the following
array is the set of followed ids.
following
association. app/models/user.rb
class User < ActiveRecord::Base
has_many :microposts, dependent: :destroy
has_many :active_relationships, class_name: "Relationship",
foreign_key: "follower_id",
dependent: :destroy
has_many :following, through: :active_relationships, source: :followed
.
.
.
end
The association defined in Listing 12.8
leads to a powerful combination of Active Record and
array-like behavior.
For example, we can check if the followed users collection
includes another user with the include?
method (Section 4.3.1), or find objects through
the association:
user.following.include?(other_user)
user.following.find(other_user)
Although in many contexts we can effectively treat following
as an array, Rails is smart about how it handles things
under the hood.
For example, code like
following.include?(other_user)
looks like it might have to pull all the followed users
out of the database to apply the include?
method, but in fact for efficiency Rails arranges for the
comparison to happen directly in the database.
(Compare to the code in Section 11.2.1,
where we saw that
user.microposts.count
performs the count directly in the database.)
To manipulate following relationships, we’ll introduce follow
and unfollow utility methods so that we can
write, e.g., user.follow(other_user).
We’ll also add an associated following?
boolean method to test if one user is following another.6
This is exactly the kind of situation where I like to
write some tests first.
The reason is that we are quite far from writing a working
web interface for following users, but it’s hard to
proceed without some sort of client for the code
we’re developing.
In this case, it’s easy to write a short test for the User
model, in which we use following? to make
sure the user isn’t following the other user, use follow
to follow another user, use following? to
verify that the operation succeeded, and finally unfollow
and verify that it worked.
The result appears in Listing 12.9.
require 'test_helper'
class UserTest < ActiveSupport::TestCase
.
.
.
test "should follow and unfollow a user" do
michael = users(:michael)
archer = users(:archer)
assert_not michael.following?(archer)
michael.follow(archer)
assert michael.following?(archer)
michael.unfollow(archer)
assert_not michael.following?(archer)
end
end
By referring to the methods in Table 12.1,
we can write the follow, unfollow,
and following? methods using the association
with following, as shown in Listing 12.10. (Note that we have
omitted the user self variable whenever
possible.)
class User < ActiveRecord::Base
.
.
.
def feed
.
.
.
end
# Follows a user.
def follow(other_user)
active_relationships.create(followed_id: other_user.id)
end
# Unfollows a user.
def unfollow(other_user)
active_relationships.find_by(followed_id: other_user.id).destroy
end
# Returns true if the current user is following the other user.
def following?(other_user)
following.include?(other_user)
end
private
.
.
.
end
With the code in Listing 12.10, the tests should be green:
$ bundle exec rake test
12.1.5 Followers
The final piece of the relationships puzzle is to add a user.followers
method to go with user.following.
You may have noticed from Figure 12.7
that all the information needed to extract an array of
followers is already present in the relationships
table (which we are treating as the active_relationships
table via the code in Listing 12.2). Indeed, the technique
is exactly the same as for followed users, with the roles
of follower_id and followed_id
reversed, and with passive_relationships in
place of active_relationships.
The data model then appears as in Figure 12.9.
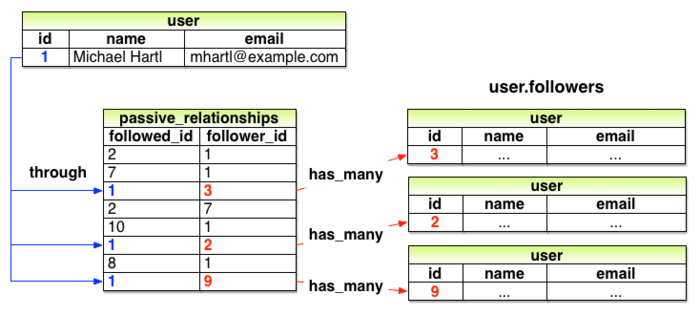
The implementation of the data model in Figure 12.9 parallels Listing 12.8 exactly, as seen in Listing 12.12.
user.followers
using passive relationships.
app/models/user.rb
class User < ActiveRecord::Base
has_many :microposts, dependent: :destroy
has_many :active_relationships, class_name: "Relationship",
foreign_key: "follower_id",
dependent: :destroy
has_many :passive_relationships, class_name: "Relationship",
foreign_key: "followed_id",
dependent: :destroy
has_many :following, through: :active_relationships, source: :followed
has_many :followers, through: :passive_relationships, source: :follower
.
.
.
end
It’s worth noting that we could actually omit the :source
key for followers in Listing 12.12,
using simply
has_many :followers, through: :passive_relationships
This is because, in the case of a :followers
attribute, Rails will singularize “followers” and
automatically look for the foreign key follower_id
in this case. Listing 12.8
keeps the :source key to emphasize the
parallel structure with the has_many :following
association.
We can conveniently test the data model above using the followers.include?
method, as shown in Listing 12.13.
(Listing 12.13 might have used a followed_by?
method to complement the following? method,
but it turns out we won’t need it in our application.)
followers. green
test/models/user_test.rb
require 'test_helper'
class UserTest < ActiveSupport::TestCase
.
.
.
test "should follow and unfollow a user" do
michael = users(:michael)
archer = users(:archer)
assert_not michael.following?(archer)
michael.follow(archer)
assert michael.following?(archer)
assert archer.followers.include?(michael)
michael.unfollow(archer)
assert_not michael.following?(archer)
end
end
Listing 12.13 adds only one line to the test from Listing 12.9, but so many things have to go right to get it to pass that it’s a very sensitive test of the code in Listing 12.12.
At this point, the full test suite should be green:
$ bundle exec rake test
12.2 A web interface for following users
Section 12.1 placed rather heavy demands on our data modeling skills, and it’s fine if it takes a while to soak in. In fact, one of the best ways to understand the associations is to use them in the web interface.
In the introduction to this chapter, we saw a preview of the page flow for user following. In this section, we will implement the basic interface and following/unfollowing functionality shown in those mockups. We will also make separate pages to show the user following and followers arrays. In Section 12.3, we’ll complete our sample application by adding the user’s status feed.
12.2.1 Sample following data
As in previous chapters, we will find it convenient to use the seed data Rake task to fill the database with sample relationships. This will allow us to design the look and feel of the web pages first, deferring the back-end functionality until later in this section.
Code to seed the following relationships appear in Listing 12.14. Here we somewhat arbitrarily arrange for the first user to follow users 3 through 51, and then have users 4 through 41 follow that user back. The resulting relationships will be sufficient for developing the application interface.
# Users
User.create!(name: "Example User",
email: "example@railstutorial.org",
password: "foobar",
password_confirmation: "foobar",
admin: true,
activated: true,
activated_at: Time.zone.now)
99.times do |n|
name = Faker::Name.name
email = "example-#{n+1}@railstutorial.org"
password = "password"
User.create!(name: name,
email: email,
password: password,
password_confirmation: password,
activated: true,
activated_at: Time.zone.now)
end
# Microposts
users = User.order(:created_at).take(6)
50.times do
content = Faker::Lorem.sentence(5)
users.each { |user| user.microposts.create!(content: content) }
end
# Following relationships
users = User.all
user = users.first
following = users[2..50]
followers = users[3..40]
following.each { |followed| user.follow(followed) }
followers.each { |follower| follower.follow(user) }
To execute the code in Listing 12.14, we reseed the database as usual:
$ bundle exec rake db:migrate:reset
$ bundle exec rake db:seed
12.2.2 Stats and a follow form
Now that our sample users have both followed users and followers, we need to update the profile page and Home page to reflect this. We’ll start by making a partial to display the following and follower statistics on the profile and home pages. We’ll next add a follow/unfollow form, and then make dedicated pages for showing “following” (followed users) and “followers”.
As noted in Section 12.1.1, we’ll adopt Twitter’s convention of using “following” as a label for followed users, as in “50 following”. This usage is reflected in the mockup sequence starting in Figure 12.1 and shown in close-up in Figure 12.10.
The stats in Figure 12.10 consist of the number of
users the current user is following and the number of
followers, each of which should be a link to its
respective dedicated display page.
In Chapter 5, we stubbed out such links
with the dummy text ’#’, but that was
before we had much experience with routes.
This time, although we’ll defer the actual pages to Section 12.2.3,
we’ll make the routes now, as seen in Listing 12.15. This code uses the :member
method inside a resources block,
which we haven’t seen before, but see if you can guess
what it does.
following
and followers actions to the Users
controller. config/routes.rb
Rails.application.routes.draw do
root 'static_pages#home'
get 'help' => 'static_pages#help'
get 'about' => 'static_pages#about'
get 'contact' => 'static_pages#contact'
get 'signup' => 'users#new'
get 'login' => 'sessions#new'
post 'login' => 'sessions#create'
delete 'logout' => 'sessions#destroy'
resources :users do
member do
get :following, :followers
end
end
resources :account_activations, only: [:edit]
resources :password_resets, only: [:new, :create, :edit, :update]
resources :microposts, only: [:create, :destroy]
end
You might suspect that the URLs for following and
followers will look like /users/1/following and
/users/1/followers, and that is exactly what the code in Listing 12.15 arranges.
Since both pages will be showing data, the
proper HTTP verb is a GET
request, so we use the get method to arrange
for the URLs to respond appropriately.
Meanwhile, the member method arranges for
the routes to respond to URLs containing the user id. The other
possibility, collection, works without the
id, so that
resources :users do
collection do
get :tigers
end
end
would respond to the URL /users/tigers (presumably to display all the tigers in our application).7
A table of the routes generated by Listing 12.15 appears in Table 12.2. Note the named routes for the followed user and followers pages, which we’ll put to use shortly.
| HTTP request | URL | Action | Named route |
| GET | /users/1/following | following |
following_user_path(1) |
| GET | /users/1/followers | followers |
followers_user_path(1) |
With the routes defined, we are now in a position to define the stats partial, which involves a couple of links inside a div, as shown in Listing 12.16.
<% @user ||= current_user %>
<div class="stats">
<a href="<%= following_user_path(@user) %>">
<strong id="following" class="stat">
<%= @user.following.count %>
</strong>
following
</a>
<a href="<%= followers_user_path(@user) %>">
<strong id="followers" class="stat">
<%= @user.followers.count %>
</strong>
followers
</a>
</div>
Since we will be including the stats on both the user show pages and the home page, the first line of Listing 12.16 picks the right one using
<% @user ||= current_user %>
As discussed in Box 8.1, this does nothing when @user
is not nil (as on a profile page), but when
it is (as on the Home page) it sets @user to
the current user.
Note also that the following/follower counts are
calculated through the associations using
@user.following.count
and
@user.followers.count
Compare these to the microposts count from Listing 11.23, where we wrote
@user.microposts.count
to count the microposts. As in that case, Rails calculates the count directly in the database for efficiency.
One final detail worth noting is the presence of CSS ids on some elements, as in
<strong id="following" class="stat">
...
</strong>
This is for the benefit of the Ajax implementation in Section 12.2.5, which accesses elements on the page using their unique ids.
With the partial in hand, including the stats on the Home page is easy, as shown in Listing 12.17.
<% if logged_in? %>
<div class="row">
<aside class="col-md-4">
<section class="user_info">
<%= render 'shared/user_info' %>
</section>
<section class="stats">
<%= render 'shared/stats' %>
</section>
<section class="micropost_form">
<%= render 'shared/micropost_form' %>
</section>
</aside>
<div class="col-md-8">
<h3>Micropost Feed</h3>
<%= render 'shared/feed' %>
</div>
</div>
<% else %>
.
.
.
<% end %>
To style the stats, we’ll add some SCSS, as shown in Listing 12.18 (which contains all the stylesheet code needed in this chapter). The resulting Home page appears in Figure 12.11.
.
.
.
/* sidebar */
.
.
.
.gravatar {
float: left;
margin-right: 10px;
}
.gravatar_edit {
margin-top: 15px;
}
.stats {
overflow: auto;
margin-top: 0;
padding: 0;
a {
float: left;
padding: 0 10px;
border-left: 1px solid $gray-lighter;
color: gray;
&:first-child {
padding-left: 0;
border: 0;
}
&:hover {
text-decoration: none;
color: blue;
}
}
strong {
display: block;
}
}
.user_avatars {
overflow: auto;
margin-top: 10px;
.gravatar {
margin: 1px 1px;
}
a {
padding: 0;
}
}
.users.follow {
padding: 0;
}
/* forms */
.
.
.
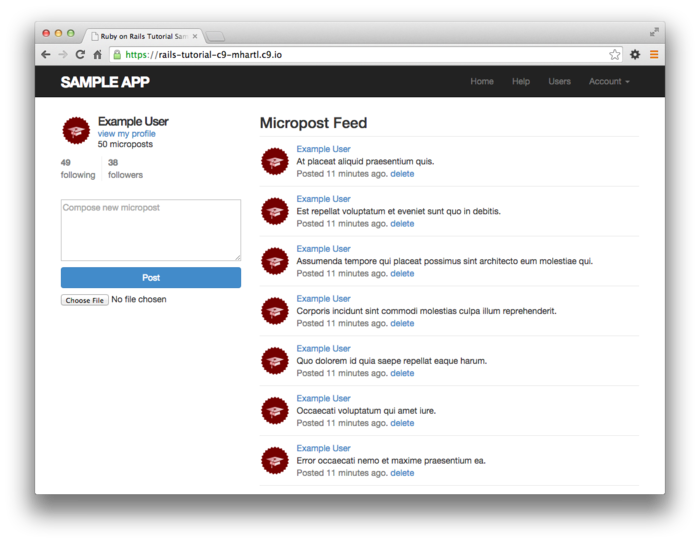
We’ll render the stats partial on the profile page in a moment, but first let’s make a partial for the follow/unfollow button, as shown in Listing 12.19.
<% unless current_user?(@user) %>
<div id="follow_form">
<% if current_user.following?(@user) %>
<%= render 'unfollow' %>
<% else %>
<%= render 'follow' %>
<% end %>
</div>
<% end %>
This does nothing but defer the real work to follow
and unfollow partials, which need new routes
for the Relationships resource, which follows the
Microposts resource example (Listing 11.29),
as seen in Listing 12.20.
Rails.application.routes.draw do
root 'static_pages#home'
get 'help' => 'static_pages#help'
get 'about' => 'static_pages#about'
get 'contact' => 'static_pages#contact'
get 'signup' => 'users#new'
get 'login' => 'sessions#new'
post 'login' => 'sessions#create'
delete 'logout' => 'sessions#destroy'
resources :users do
member do
get :following, :followers
end
end
resources :account_activations, only: [:edit]
resources :password_resets, only: [:new, :create, :edit, :update]
resources :microposts, only: [:create, :destroy]
resources :relationships, only: [:create, :destroy]
end
The follow/unfollow partials themselves are shown in Listing 12.21 and Listing 12.22.
<%= form_for(current_user.active_relationships.build) do |f| %>
<div><%= hidden_field_tag :followed_id, @user.id %></div>
<%= f.submit "Follow", class: "btn btn-primary" %>
<% end %>
<%= form_for(current_user.active_relationships.find_by(followed_id: @user.id),
html: { method: :delete }) do |f| %>
<%= f.submit "Unfollow", class: "btn" %>
<% end %>
These two forms both use form_for to
manipulate a Relationship model object; the main
difference between the two is that Listing 12.21
builds a new relationship, whereas Listing 12.22
finds the existing relationship.
Naturally, the former sends a POST
request to the Relationships controller to create
a relationship, while the latter sends a DELETE
request to destroy a relationship.
(We’ll write these actions in Section 12.2.4.) Finally, you’ll note
that the follow form doesn’t have any content other than
the button, but it still needs to send the followed_id
to the controller.
We accomplish this with the hidden_field_tag
method in Listing 12.21, which produces HTML of
the form
<input id="followed_id" name="followed_id" type="hidden" value="3" />
As we saw in Section 10.2.4 (Listing 10.50),
the hidden input tag puts the relevant
information on the page without displaying it in the
browser.
We can now include the follow form and the following statistics on the user profile page simply by rendering the partials, as shown in Listing 12.23. Profiles with follow and unfollow buttons, respectively, appear in Figure 12.12 and Figure 12.13.
<% provide(:title, @user.name) %>
<div class="row">
<aside class="col-md-4">
<section>
<h1>
<%= gravatar_for @user %>
<%= @user.name %>
</h1>
</section>
<section class="stats">
<%= render 'shared/stats' %>
</section>
</aside>
<div class="col-md-8">
<%= render 'follow_form' if logged_in? %>
<% if @user.microposts.any? %>
<h3>Microposts (<%= @user.microposts.count %>)</h3>
<ol class="microposts">
<%= render @microposts %>
</ol>
<%= will_paginate @microposts %>
<% end %>
</div>
</div>

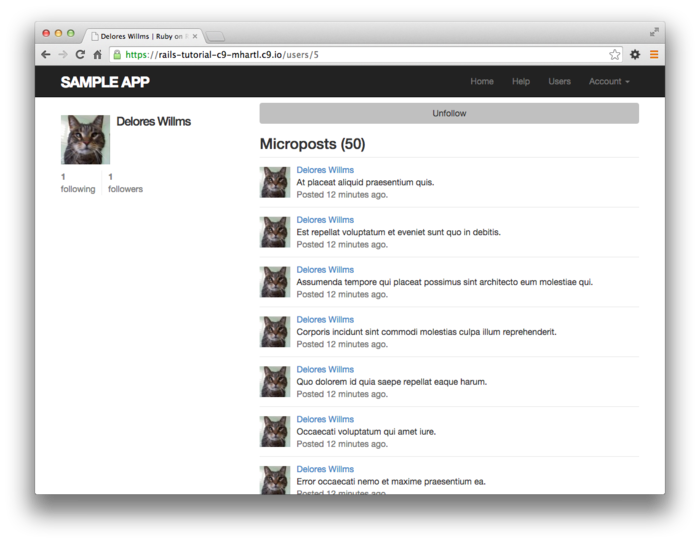
We’ll get these buttons working soon enough—in fact, we’ll do it two ways, the standard way (Section 12.2.4) and using Ajax (Section 12.2.5)—but first we’ll finish the HTML interface by making the following and followers pages.
12.2.3 Following and followers pages
Pages to display followed users and followers will resemble a hybrid of the user profile page and the user index page (Section 9.3.1), with a sidebar of user information (including the following stats) and a list of users. In addition, we’ll include a raster of smaller user profile image links in the sidebar. Mockups matching these requirements appear in Figure 12.14 (following) and Figure 12.15 (followers).
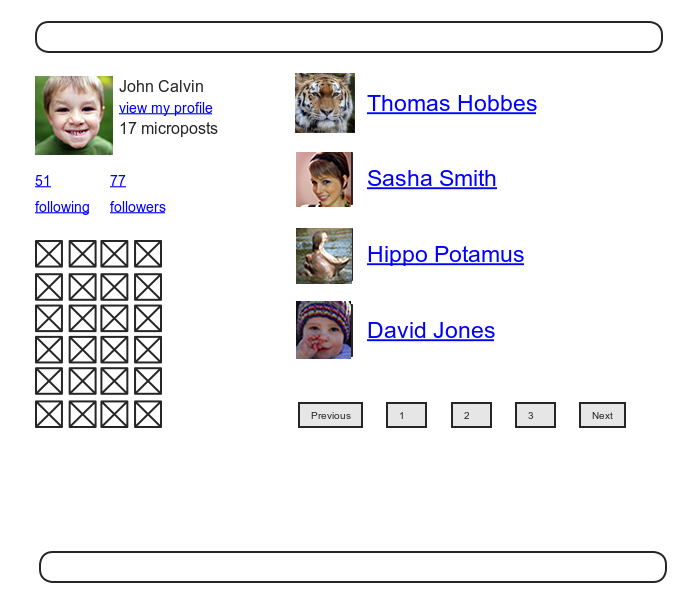
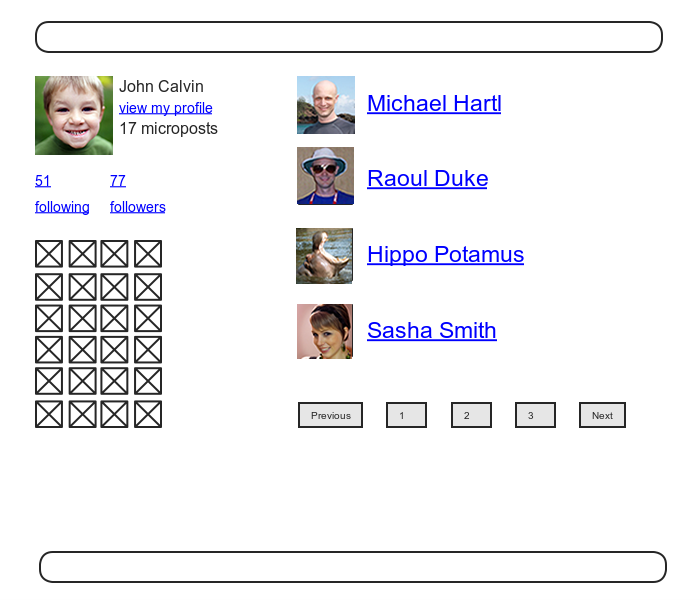
Our first step is to get the following and followers links to work. We’ll follow Twitter’s lead and have both pages require user login. As with most previous examples of access control, we’ll write the tests first, as shown in Listing 12.24.
require 'test_helper'
class UsersControllerTest < ActionController::TestCase
def setup
@user = users(:michael)
@other_user = users(:archer)
end
.
.
.
test "should redirect following when not logged in" do
get :following, id: @user
assert_redirected_to login_url
end
test "should redirect followers when not logged in" do
get :followers, id: @user
assert_redirected_to login_url
end
end
The only tricky part of the implementation is realizing
that we need to add two new actions to the Users
controller. Based
on the routes defined in Listing 12.15,
we need to call them following and followers. Each action needs to
set a title, find the user, retrieve either @user.following
or @user.followers (in paginated form), and
then render the page.
The result appears in Listing 12.25.
following
and followers actions.
red app/controllers/users_controller.rb
class UsersController < ApplicationController
before_action :logged_in_user, only: [:index, :edit, :update, :destroy,
:following, :followers]
.
.
.
def following
@title = "Following"
@user = User.find(params[:id])
@users = @user.following.paginate(page: params[:page])
render 'show_follow'
end
def followers
@title = "Followers"
@user = User.find(params[:id])
@users = @user.followers.paginate(page: params[:page])
render 'show_follow'
end
private
.
.
.
end
As we’ve seen throughout this tutorial, the usual Rails
convention is to implicitly render the template
corresponding to an action, such as rendering show.html.erb
at the end of the show action.
In contrast, both actions in Listing 12.25
make an explicit call to render,
in this case rendering a view called show_follow,
which we must create.
The reason for the common view is that the ERb is nearly
identical for the two cases, and Listing 12.26
covers them both.
show_follow
view used to render following and followers.
green app/views/users/show_follow.html.erb
<% provide(:title, @title) %>
<div class="row">
<aside class="col-md-4">
<section class="user_info">
<%= gravatar_for @user %>
<h1><%= @user.name %></h1>
<span><%= link_to "view my profile", @user %></span>
<span><b>Microposts:</b> <%= @user.microposts.count %></span>
</section>
<section class="stats">
<%= render 'shared/stats' %>
<% if @users.any? %>
<div class="user_avatars">
<% @users.each do |user| %>
<%= link_to gravatar_for(user, size: 30), user %>
<% end %>
</div>
<% end %>
</section>
</aside>
<div class="col-md-8">
<h3><%= @title %></h3>
<% if @users.any? %>
<ul class="users follow">
<%= render @users %>
</ul>
<%= will_paginate %>
<% end %>
</div>
</div>
The actions in Listing 12.25 render the view from Listing 12.26 in two contexts, “following” and “followers”, with the results shown in Figure 12.16 and Figure 12.17. Note that nothing in the above code uses the current user, so the same links work for other users, as shown in Figure 12.18.
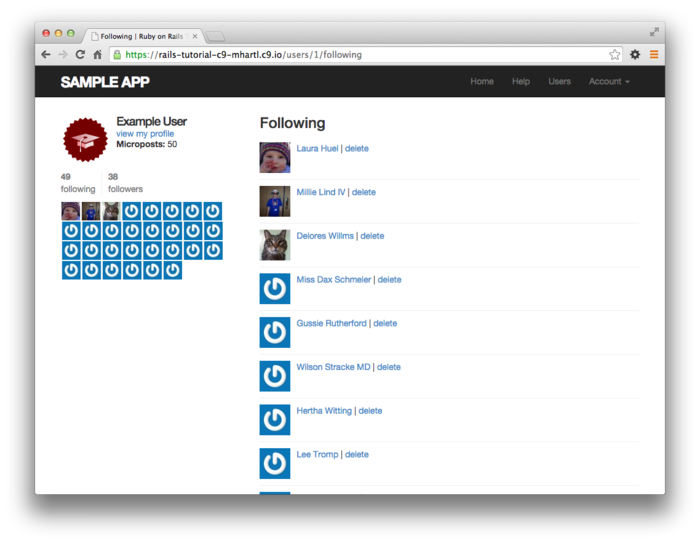

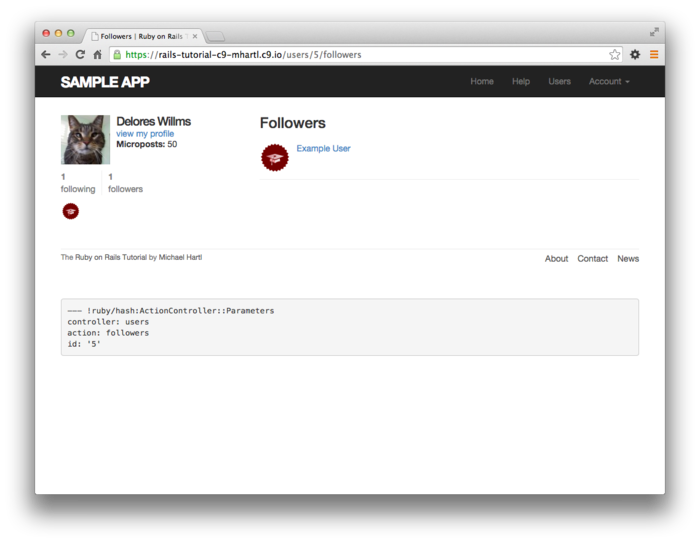
Now that we have working following and followers pages, we’ll write a couple of short integration tests to verify their behavior. They are designed to be a sanity check, not to be comprehensive. Indeed, as noted in Section 5.3.4, comprehensive tests of things like HTML structure are likely to be brittle and thus counter-productive. Our plan in the case of following/followers pages is to check the number is correctly displayed and that links with the right URLs appear on the page.
To get started, we’ll generate an integration test as usual:
$ rails generate integration_test following
invoke test_unit
create test/integration/following_test.rb
Next, we need to assemble some test data, which we can do by adding some relationships fixtures to create following/follower relationships. Recall from Section 11.2.3 that we can use code like
orange:
content: "I just ate an orange!"
created_at: <%= 10.minutes.ago %>
user: michael
to associate a micropost with a given user. In particular, we can write
user: michael
instead of
user_id: 1
Applying this idea to the relationships fixtures gives the associations in Listing 12.27.
one:
follower: michael
followed: lana
two:
follower: michael
followed: mallory
three:
follower: lana
followed: michael
four:
follower: archer
followed: michael
The fixtures in Listing 12.27 first arrange for Michael
to follow Lana and Mallory, and then arrange for Michael
to be followed by Lana and Archer.
To test for the right count, we can use the same assert_match
method we used in Listing 11.27 to test for the display
of the number of microposts on the user profile page. Adding in assertions
for the right links yields the tests shown in Listing 12.28.
require 'test_helper'
class FollowingTest < ActionDispatch::IntegrationTest
def setup
@user = users(:michael)
log_in_as(@user)
end
test "following page" do
get following_user_path(@user)
assert_not @user.following.empty?
assert_match @user.following.count.to_s, response.body
@user.following.each do |user|
assert_select "a[href=?]", user_path(user)
end
end
test "followers page" do
get followers_user_path(@user)
assert_not @user.followers.empty?
assert_match @user.followers.count.to_s, response.body
@user.followers.each do |user|
assert_select "a[href=?]", user_path(user)
end
end
end
In Listing 12.28, note that we include the assertion
assert_not @user.following.empty?
which is included to make sure that
@user.following.each do |user|
assert_select "a[href=?]", user_path(user)
end
isn’t vacuously true (and similarly for followers).
The test suite should now be green:
$ bundle exec rake test
12.2.4 A working follow button the standard way
Now that our views are in order, it’s time to get the follow/unfollow buttons working. Because following and unfollowing involve creating and destroying relationships, we need a Relationships controller, which we generate as usual
$ rails generate controller Relationships
As we’ll see in Listing 12.31, enforcing access control on the Relationships controller actions won’t much matter, but we’ll still follow our previous practice of enforcing the security model as early as possible. In particular, we’ll check that attempts to access actions in the Relationships controller require a logged-in user (and thus get redirected to the login page), while also not changing the Relationship count, as shown in Listing 12.30.
require 'test_helper'
class RelationshipsControllerTest < ActionController::TestCase
test "create should require logged-in user" do
assert_no_difference 'Relationship.count' do
post :create
end
assert_redirected_to login_url
end
test "destroy should require logged-in user" do
assert_no_difference 'Relationship.count' do
delete :destroy, id: relationships(:one)
end
assert_redirected_to login_url
end
end
We can get the tests in Listing 12.30
to pass by adding the logged_in_user before
filter (Listing 12.31).
class RelationshipsController < ApplicationController
before_action :logged_in_user
def create
end
def destroy
end
end
To get the follow and unfollow buttons to work, all we
need to do is find the user associated with the followed_id
in the corresponding form (i.e., Listing 12.21
or Listing 12.22), and then use the
appropriate follow or unfollow
method from Listing 12.10.
The full implementation appears in Listing 12.32.
class RelationshipsController < ApplicationController
before_action :logged_in_user
def create
user = User.find(params[:followed_id])
current_user.follow(user)
redirect_to user
end
def destroy
user = Relationship.find(params[:id]).followed
current_user.unfollow(user)
redirect_to user
end
end
We can see from Listing 12.32
why the security issue mentioned above is minor: if an
unlogged-in user were to hit either action directly (e.g.,
using a command-line tool like curl), current_user
would be nil, and in both cases the action’s
second line would raise an exception, resulting in an
error but no harm to the application or its data.
It’s best not to rely on that, though, so we’ve taken the
extra step and added an additional layer of security.
With that, the core follow/unfollow functionality is complete, and any user can follow or unfollow any other user, as you can verify by clicking the corresponding buttons in your browser. (We’ll write integration tests to verify this behavior in Section 12.2.6.) The result of following user #2 is shown in Figure 12.19 and Figure 12.20.
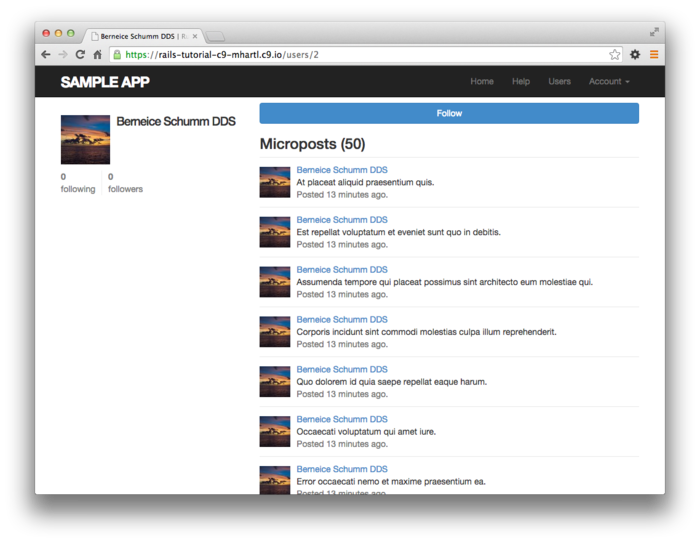
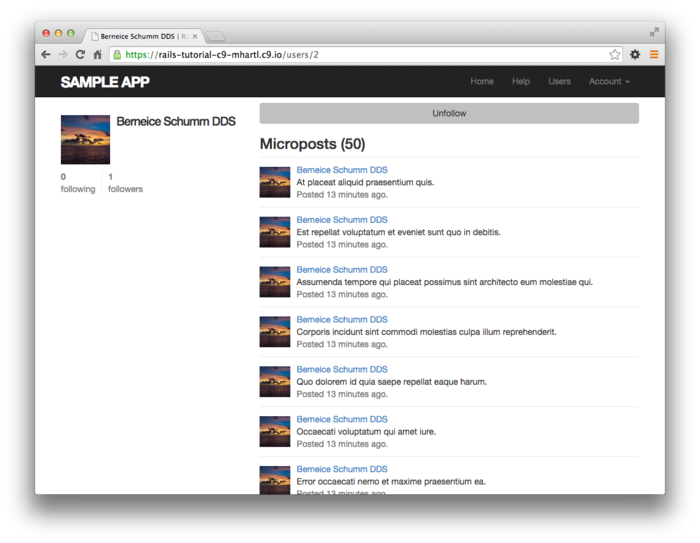
12.2.6 Following tests
Now that the follow buttons are working, we’ll write some simple tests to prevent regressions. To follow a user, we post to the relationships path and verify that the number of followed users increases by 1:
assert_difference '@user.following.count', 1 do
post relationships_path, followed_id: @other.id
end
This tests the standard implementation, but testing the
Ajax version is almost the same, with xhr :post
in place of plain post:
assert_difference '@user.following.count', 1 do
xhr :post, relationships_path, followed_id: @other.id
end
This uses the xhr method (for
XmlHttpRequest) to issue an Ajax request, which causes the
respond_to block in Listing 12.35
to execute the proper JavaScript method.
The same parallel structure applies to deleting users,
with delete instead of post. Here we check that
the followed user count goes down by 1 and include
the relationship and followed user’s id:
assert_difference '@user.following.count', -1 do
delete relationship_path(relationship),
relationship: relationship.id
end
and
assert_difference '@user.following.count', -1 do
xhr :delete, relationship_path(relationship),
relationship: relationship.id
end
Putting the two cases together gives the tests in Listing 12.39.
require 'test_helper'
class FollowingTest < ActionDispatch::IntegrationTest
def setup
@user = users(:michael)
@other = users(:archer)
log_in_as(@user)
end
.
.
.
test "should follow a user the standard way" do
assert_difference '@user.following.count', 1 do
post relationships_path, followed_id: @other.id
end
end
test "should follow a user with Ajax" do
assert_difference '@user.following.count', 1 do
xhr :post, relationships_path, followed_id: @other.id
end
end
test "should unfollow a user the standard way" do
@user.follow(@other)
relationship = @user.active_relationships.find_by(followed_id: @other.id)
assert_difference '@user.following.count', -1 do
delete relationship_path(relationship)
end
end
test "should unfollow a user with Ajax" do
@user.follow(@other)
relationship = @user.active_relationships.find_by(followed_id: @other.id)
assert_difference '@user.following.count', -1 do
xhr :delete, relationship_path(relationship)
end
end
end
At this point, the tests should be green:
$ bundle exec rake test
12.3 The status feed
We come now to the pinnacle of our sample application: the status feed of microposts. Appropriately, this section contains some of the most advanced material in the entire tutorial. The full status feed builds on the proto-feed from Section 11.3.3 by assembling an array of the microposts from the users being followed by the current user, along with the current user’s own microposts. Throughout this section, we’ll proceed through a series of feed implementations of increasing sophistication. To accomplish this, we will need some fairly advanced Rails, Ruby, and even SQL programming techniques.
Because of the heavy lifting ahead, it’s especially important to review where we’re going. A recap of the final status feed, shown in Figure 12.5, appears again in Figure 12.21.
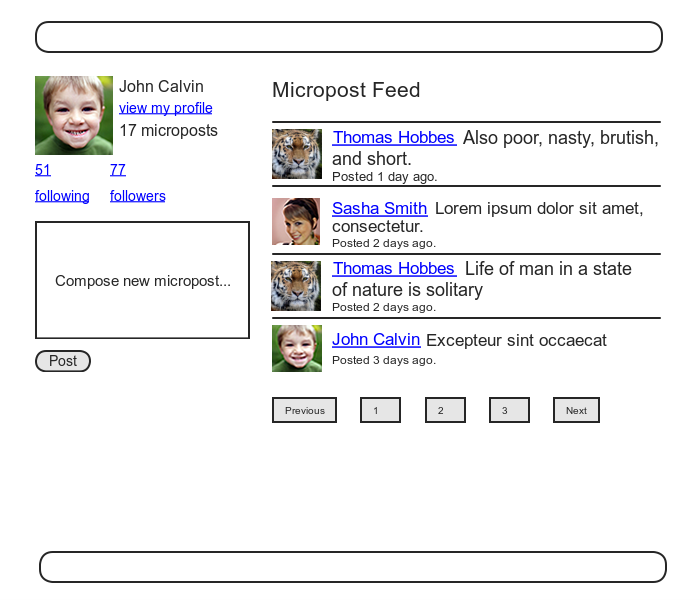
12.3.1 Motivation and strategy
The basic idea behind the feed is simple.
Figure 12.22 shows a sample microposts
database table and the resulting feed.
The purpose of a feed is to pull out the microposts whose
user ids correspond to the users being followed by the
current user (and the current user itself), as indicated
by the arrows in the diagram.
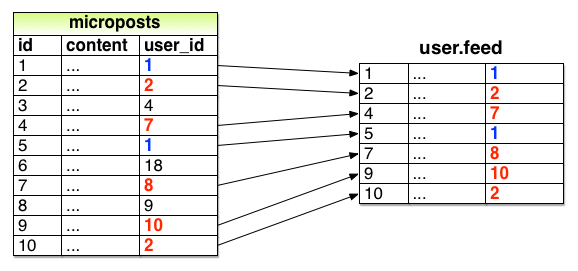
Although we don’t yet know how to implement the feed, the
tests are relatively straightforward, so (following the
guidelines in Box 3.3) we’ll write them first. The key is to check
all three requirements for the feed: microposts for both
followed users and the user itself should be included in
the feed, but a post from an unfollowed user
should not be included.
Based on the fixtures in Listing 9.43
and Listing 11.51, this means that Michael
should see Lana’s posts and his own posts, but not
Archer’s posts.
Converting these requirements to assertions and recalling
that the feed is in the User model (Listing 11.44)
gives the updated User model test shown in Listing 12.41.
require 'test_helper'
class UserTest < ActiveSupport::TestCase
.
.
.
test "feed should have the right posts" do
michael = users(:michael)
archer = users(:archer)
lana = users(:lana)
# Posts from followed user
lana.microposts.each do |post_following|
assert michael.feed.include?(post_following)
end
# Posts from self
michael.microposts.each do |post_self|
assert michael.feed.include?(post_self)
end
# Posts from unfollowed user
archer.microposts.each do |post_unfollowed|
assert_not michael.feed.include?(post_unfollowed)
end
end
end
Of course, the current implementation is just a proto-feed, so the new test is initially red:
$ bundle exec rake test
12.3.2 A first feed implementation
With the status feed design requirements captured in the
test from Listing
12.41, we’re ready to start
writing the feed.
Since the final feed implementation is rather intricate,
we’ll build up to it by introducing one piece at a time. The first step is to
think of the kind of query we’ll need.
We need to select all the microposts from the microposts
table with ids corresponding to the users being followed
by a given user (or the user itself).
We might write this schematically as follows:
SELECT * FROM microposts
WHERE user_id IN (<list of ids>) OR user_id = <user id>
In writing this code, we’ve guessed that SQL supports an
IN keyword that allows us to test for set
inclusion.
(Happily, it does.)
Recall from the proto-feed in Section 11.3.3
that Active Record uses the where method to
accomplish the kind of select shown above, as illustrated
in Listing 11.44.
There, our select was very simple; we just picked out all
the microposts with user id corresponding to the current
user:
Micropost.where("user_id = ?", id)
Here, we expect it to be more complicated, something like this:
Micropost.where("user_id IN (?) OR user_id = ?", following_ids, id)
We see from these conditions that we’ll need an array of
ids corresponding to the users being followed.
One way to do this is to use Ruby’s map
method, available on any “enumerable” object, i.e., any
object (such as an Array or a Hash) that consists of a
collection of elements.9
We saw an example of this method in Section 4.3.2;
as another example, we’ll use map to convert
an array of integers to an array of strings:
$ rails console
>> [1, 2, 3, 4].map { |i| i.to_s }
=> ["1", "2", "3", "4"]
Situations like the one illustrated above, where the same
method gets called on each element in the collection, are
common enough that there’s a shorthand notation for it
(seen briefly in Section 4.3.2) that uses an ampersand &
and a symbol corresponding to the method:
>> [1, 2, 3, 4].map(&:to_s)
=> ["1", "2", "3", "4"]
Using the join method (Section 4.3.1),
we can create a string composed of the ids by joining them
on comma-space :
>> [1, 2, 3, 4].map(&:to_s).join(', ')
=> "1, 2, 3, 4"
We can use the above method to construct the necessary
array of followed user ids by calling id
on each element in user.following.
For example, for the first user in the database this array
appears as follows:
>> User.first.following.map(&:id)
=> [4, 5, 6, 7, 8, 9, 10, 11, 12, 13, 14, 15, 16, 17, 18, 19, 20, 21, 22, 23,
24, 25, 26, 27, 28, 29, 30, 31, 32, 33, 34, 35, 36, 37, 38, 39, 40, 41, 42,
43, 44, 45, 46, 47, 48, 49, 50, 51]
In fact, because this sort of construction is so useful, Active Record provides it by default:
>> User.first.following_ids
=> [4, 5, 6, 7, 8, 9, 10, 11, 12, 13, 14, 15, 16, 17, 18, 19, 20, 21, 22, 23,
24, 25, 26, 27, 28, 29, 30, 31, 32, 33, 34, 35, 36, 37, 38, 39, 40, 41, 42,
43, 44, 45, 46, 47, 48, 49, 50, 51]
Here the following_ids method is
synthesized by Active Record based on the has_many
:following association (Listing 12.8);
the result is that we need only append _ids
to the association name to get the ids corresponding to
the user.following collection.
A string of followed user ids then appears as follows:
>> User.first.following_ids.join(', ')
=> "4, 5, 6, 7, 8, 9, 10, 11, 12, 13, 14, 15, 16, 17, 18, 19, 20, 21, 22, 23,
24, 25, 26, 27, 28, 29, 30, 31, 32, 33, 34, 35, 36, 37, 38, 39, 40, 41, 42,
43, 44, 45, 46, 47, 48, 49, 50, 51"
When inserting into an SQL string, though, you don’t need
to do this; the ? interpolation takes care
of it for you (and in fact eliminates some
database-dependent incompatibilities).
This means we can use following_ids by
itself.
As a result, the initial guess of
Micropost.where("user_id IN (?) OR user_id = ?", following_ids, id)
actually works! The result appears in Listing 12.43.
class User < ActiveRecord::Base
.
.
.
# Returns true if a password reset has expired.
def password_reset_expired?
reset_sent_at < 2.hours.ago
end
# Returns a user's status feed.
def feed
Micropost.where("user_id IN (?) OR user_id = ?", following_ids, id)
end
# Follows a user.
def follow(other_user)
active_relationships.create(followed_id: other_user.id)
end
.
.
.
end
The test suite should be green:
$ bundle exec rake test
In some applications, this initial implementation might be good enough for most practical purposes, but Listing 12.43 isn’t the final implementation; see if you can make a guess about why not before moving on to the next section. (Hint: What if a user is following 5000 other users?)
12.3.3 Subselects
As hinted at in the last section, the feed implementation in Section 12.3.2 doesn’t scale well when the number of microposts in the feed is large, as would likely happen if a user were following, say, 5000 other users. In this section, we’ll reimplement the status feed in a way that scales better with the number of followed users.
The problem with the code in Section 12.3.2
is that following_ids pulls all
the followed users’ ids into memory, and creates an array
the full length of the followed users array.
Since the condition in Listing 12.43
actually just checks inclusion in a set, there must be a
more efficient way to do this, and indeed SQL is optimized
for just such set operations.
The solution involves pushing the finding of followed user
ids into the database using a subselect.
We’ll start by refactoring the feed with the slightly modified code in Listing 12.45.
where method.
green app/models/user.rb
class User < ActiveRecord::Base
.
.
.
# Returns a user's status feed.
def feed
Micropost.where("user_id IN (:following_ids) OR user_id = :user_id",
following_ids: following_ids, user_id: id)
end
.
.
.
end
As preparation for the next step, we have replaced
Micropost.where("user_id IN (?) OR user_id = ?", following_ids, id)
with the equivalent
Micropost.where("user_id IN (:following_ids) OR user_id = :user_id",
following_ids: following_ids, user_id: id)
The question mark syntax is fine, but when we want the same variable inserted in more than one place, the second syntax is more convenient.
The above discussion implies that we will be adding a second
occurrence of user_id in the SQL query. In particular, we can
replace the Ruby code
following_ids
with the SQL snippet
following_ids = "SELECT followed_id FROM relationships
WHERE follower_id = :user_id"
This code contains an SQL subselect, and internally the entire select for user 1 would look something like this:
SELECT * FROM microposts
WHERE user_id IN (SELECT followed_id FROM relationships
WHERE follower_id = 1)
OR user_id = 1
This subselect arranges for all the set logic to be pushed into the database, which is more efficient.
With this foundation, we are ready for a more efficient
feed implementation, as seen in Listing 12.46. Note that, because it
is now raw SQL, the following_ids string is
interpolated, not escaped.
class User < ActiveRecord::Base
.
.
.
# Returns a user's status feed.
def feed
following_ids = "SELECT followed_id FROM relationships
WHERE follower_id = :user_id"
Micropost.where("user_id IN (#{following_ids})
OR user_id = :user_id", user_id: id)
end
.
.
.
end
This code has a formidable combination of Rails, Ruby, and SQL, but it does the job, and does it well:
$ bundle exec rake test
Of course, even the subselect won’t scale forever. For bigger sites, you would probably need to generate the feed asynchronously using a background job, but such scaling subtleties are beyond the scope of this tutorial.
With the code in Listing 12.46, our status feed is now
complete. Recall
from Section 11.3.3 that the Home page
already includes the feed; as a reminder, the home
action appears again in Listing 12.48. In Chapter 11,
the result was only a proto-feed (Figure 11.14),
but with the implementation in Listing 12.46
as seen in Figure 12.23 the Home page now shows
the full feed.
home action
with a paginated feed.
app/controllers/static_pages_controller.rb
class StaticPagesController < ApplicationController
def home
if logged_in?
@micropost = current_user.microposts.build
@feed_items = current_user.feed.paginate(page: params[:page])
end
end
.
.
.
end
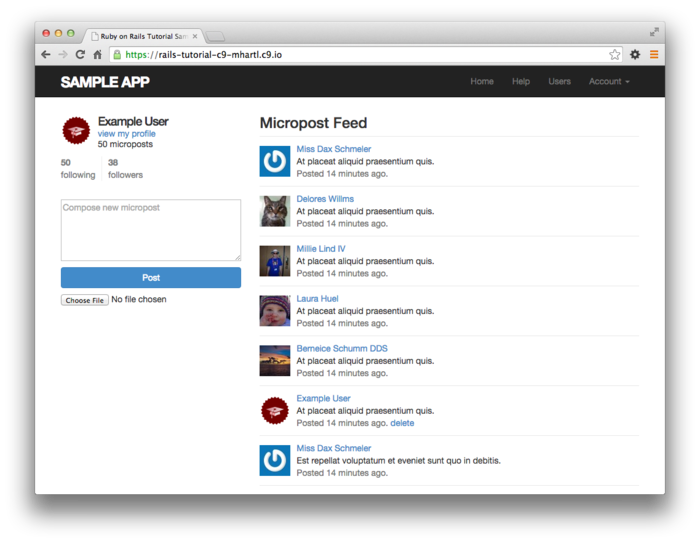
At this point, we’re ready to merge our changes into the master branch:
$ bundle exec rake test
$ git add -A
$ git commit -m "Add user following"
$ git checkout master
$ git merge following-users
We can then push the code to the remote repository and deploy the application to production:
$ git push
$ git push heroku
$ heroku pg:reset DATABASE
$ heroku run rake db:migrate
$ heroku run rake db:seed
The result is a working status feed on the live Web (Figure 12.24).
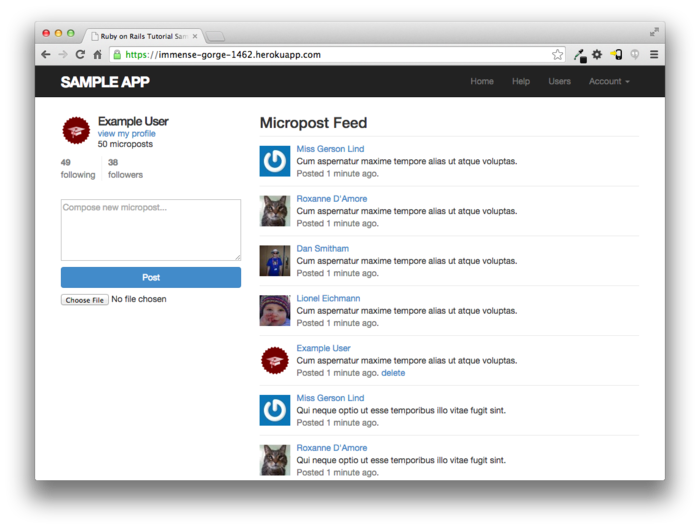
12.4 Висновок
With the addition of the status feed, we’ve finished the
sample application for the Ruby on Rails Tutorial. This application
includes examples of all the major features of Rails,
including models, views, controllers, templates, partials,
filters, validations, callbacks, has_many/belongs_to
and has_many :through associations, security,
testing, and deployment.
Despite this impressive list, there is still much to learn about web development. As a first step in this process, this section contains some suggestions for further learning.
12.4.1 Guide to further resources
There is a wealth of Rails resources in stores and on the web—indeed, the supply is so rich that it can be overwhelming. The good news is that, having gotten this far, you’re ready for almost anything else out there. Here are some suggestions for further learning:
- The Ruby on Rails Tutorial screencasts: I offer a full-length screencast course based on this book. In addition to covering all the material in the book, the screencasts are filled with tips, tricks, and the kind of see-how-it’s-done demos that are hard to capture in print. They are available for purchase through the Ruby on Rails Tutorial website.
- RailsCasts: I suggest starting by visiting the RailsCasts episode archive and clicking on subjects that catch your eye.
- Tealeaf Academy: Lots of in-person developer bootcamps have sprung up in recent years, and I recommend looking for one in your area, but Tealeaf Academy is available online and so can be taken from anywhere. Tealeaf is an especially good choice if you want instructor feedback within the context of a structured curriculum.
- The Turing School of Software & Design: a full-time, 27-week Ruby/Rails/JavaScript training program in Denver, Colorado. Most of their students start with limited programming experience but have the determination and drive needed to pick it up quickly. Turing guarantees its students will find a job after graduating or they’ll refund the cost of tuition. Rails Tutorial readers can get a $500 discount using the code RAILSTUTORIAL500.
- Thinkful: An online class that pairs you with a professional engineer as you work through a project-based curriculum. Subjects include Ruby on Rails, front-end development, web design, and data science.
- Pragmatic Studio: Online Ruby and Rails courses from Mike and Nicole Clark.
- RailsApps: Instructive sample Rails apps
- Code School: A large variety of interactive programming courses
- Bala Paranj’s Test Driven Development in Ruby: A more advanced online course focusing on TDD in pure Ruby
- Ruby and Rails books: For further Ruby learning, I recommend Beginning Ruby by Peter Cooper, The Well-Grounded Rubyist by David A. Black, Eloquent Ruby by Russ Olsen, and The Ruby Way by Hal Fulton. For further Rails learning, I recommend Agile Web Development with Rails by Sam Ruby, Dave Thomas, and David Heinemeier Hansson, The Rails 4 Way by Obie Fernandez and Kevin Faustino, and Rails 4 in Action by Ryan Bigg and Yehuda Katz.
12.4.2 Що ми вивчили в цій главі
- Rails’
has_many :throughallows the modeling of complicated data relationships. - The
has_manymethod takes several optional arguments, including the object class name and the foreign key. - Using
has_manyandhas_many :throughwith properly chosen class names and foreign keys, we can model both active (following) and passive (being followed) relationships. - Rails routing supports nested routes.
- The
wheremethod is a flexible and powerful way to create database queries. - Rails supports issuing lower-level SQL queries if needed.
- By putting together everything we’ve learned in this book, we’ve successfully implemented user following with a status feed of microposts from followed users.
12.5 Вправи
Note: The Solutions Manual for Вправи, with solutions to every exercise in the Ruby on Rails Tutorial book, is included for free with every purchase at www.railstutorial.org.
For a suggestion on how to avoid conflicts between Вправи and the main tutorial, see the note on exercise topic branches in Section 3.6.
- Write tests for the stats on the Home and profile pages. Hint: Add to the test in Listing 11.27. (Why don’t we have to test the stats on the Home page separately?)
- Write a test to verify that the first page of the feed
appears on the Home page as required.
A template appears in Listing 12.49.
Note the use of HTML escaping via
CGI.escapeHTML; see if you can figure out why this is necessary. (Try removing the escaping and carefully inspect the page source for the micropost content that doesn’t match.)
require 'test_helper'
class FollowingTest < ActionDispatch::IntegrationTest
def setup
@user = users(:michael)
log_in_as(@user)
end
.
.
.
test "feed on Home page" do
get root_path
@user.feed.paginate(page: 1).each do |micropost|
assert_match CGI.escapeHTML(FILL_IN), FILL_IN
end
end
end
- The new photographs in the mockup tour are from http://www.flickr.com/photos/john_lustig/2518452221/ and https://www.flickr.com/photos/renemensen/9187111340. ↑
- For simplicity, Figure 12.6
omits the
followingtable’sidcolumn. ↑ - Thanks to reader Paul Fioravanti for suggesting this terminology. ↑
- Technically, Rails converts the
argument of
has_manyto a class name using theclassifymethod, which converts"foo_bars"to"FooBar". ↑ - Technically, Rails uses the
underscoremethod to convert the class name to an id. For example,"FooBar".underscoreis"foo_bar", so the foreign key for aFooBarobject would befoo_bar_id. ↑ - Once you have a lot of experience modeling a particular domain, you can often guess such utility methods in advance, and even when you can’t you’ll often find yourself writing them to make the tests cleaner. In this case, though, it’s OK if you wouldn’t have guessed them. Software development is usually an iterative process—you write code until it starts getting ugly, and then you refactor it—but for brevity the tutorial presentation is streamlined a bit. ↑
- For more details on such routing options, see the Rails Guides article on “Rails Routing from the Outside In”. ↑
- Because it is nominally an acronym for asynchronous JavaScript and XML, Ajax is sometimes misspelled “AJAX”, even though the original Ajax article spells it as “Ajax” throughout. ↑
- The main requirement is that
enumerable objects must implement an
eachmethod to iterate through the collection. ↑